2013 MITSUBISHI iMiEV wheel
[x] Cancel search: wheelPage 119 of 258

l
If your vehicle is equipped with heated mir-
rors, when the rear window demister switch
is pressed, the outside rear-view mirrors are
defogged or defrosted. Refer to “Heated mir-
ror” on page 5-07.
l The demister switch is not to melt snow but
to clear mist. Remove snow before use of the
demister switch.
l When cleaning the inside of the rear win-
dow, use a soft cloth and wipe gently along
the heater wires, being careful not to damage
the wires.
l Do not allow objects to touch the inside of
the rear window glass, damaged or broken
wires may result. Horn switch
E00508000318
Press
the steering wheel on or around the “ ”
mark. Instruments and controls
4-19 4
OHAE13E1
Page 121 of 258

Economical driving.......................................................................5-02
Driving, alcohol and drugs
........................................................... 5-02
Safe driving techniques ................................................................ 5-03
Parking brake................................................................................ 5-03
Parking.......................................................................................... 5-04
Inside rear-view mirror ................................................................. 5-05
Outside rear-view mirrors ............................................................. 5-05
Electric motor switch .................................................................... 5-07
Steering wheel lock ...................................................................... 5-08
Starting the electric motor unit ..................................................... 5-08
Transmission................................................................................. 5-09
Driving the vehicle ....................................................................... 5-11
Inspection
and maintenance following rough road oper-
ation.......................................................................................... 5-12
Acoustic Vehicle Alerting System (AVAS) .................................5-12
Braking......................................................................................... 5-14
Brake assist system....................................................................... 5-15
Anti-lock brake system (ABS) ..................................................... 5-15
Electric power steering system (EPS) ..........................................5-17
Active stability control (ASC) ...................................................... 5-18
Cargo loads................................................................................... 5-20
Trailer towing ............................................................................... 5-21Starting and driving
5
OHAE13E1
Page 123 of 258

Safe driving techniques
E00600300635
Driving
safety and protection against injury cannot
be fully ensured. However, we recommend that
you pay extra attention to the following:
Seat belts
Before starting the vehicle, make sure that you and
your passengers have fastened your seat belts.
Floor mats WARNING
l Keep
floor mats clear of the pedals by cor-
rectly laying floor mats that are suitable
for the vehicle.
To prevent the floor mats from slipping
out of position, securely retain them us-
ing the hook etc.
Note that laying a floor mat over a pedal
or laying one floor mat on top of another
can obstruct pedal operation and lead to
a serious accident. Carrying children in the vehicle
l Never leave your vehicle unattended with the
key
and children inside the vehicle. Children
may play with the driving controls and this
could lead to an accident.
l Make sure that infants and small children are
properly restrained in accordance with the
laws and regulations, and for maximum pro-
tection in case of an accident.
l Prevent children from playing in the luggage
compartment. It is quite dangerous to allow
them to play there while the vehicle is moving.
Loading luggage
When loading luggage, be careful not to load
above the height of seats. This is dangerous not on-
ly because rearward vision will be obstructed, but
also the luggage may be projected into the passen-
ger compartment under hard braking. Parking brake
E00600501647
To
park the vehicle, first bring it to a complete
stop, fully apply the parking lever sufficiently to
hold the vehicle.
To apply the parking brake 1- Firmly
depress and hold the brake pedal,
then pull the lever up without pushing the but-
ton at the end of hand grip. CAUTION
l
When
you intend to apply the parking
brake, firmly press the brake pedal to
bring the vehicle to a complete stop be-
fore pulling the parking brake lever.
Pulling the parking brake lever with the
vehicle moving could make the rear
wheels lock up, thereby making the vehi-
cle unstable. It could also make the park-
ing brake malfunction. Starting and driving
5-03 5
OHAE13E1
Page 124 of 258

NOTE
l Apply
sufficient force to the parking brake
lever to hold the vehicle stationary after the
foot brake is released.
l If the parking brake does not hold the vehicle
stationary after the foot brake is released,
have your vehicle checked immediately.
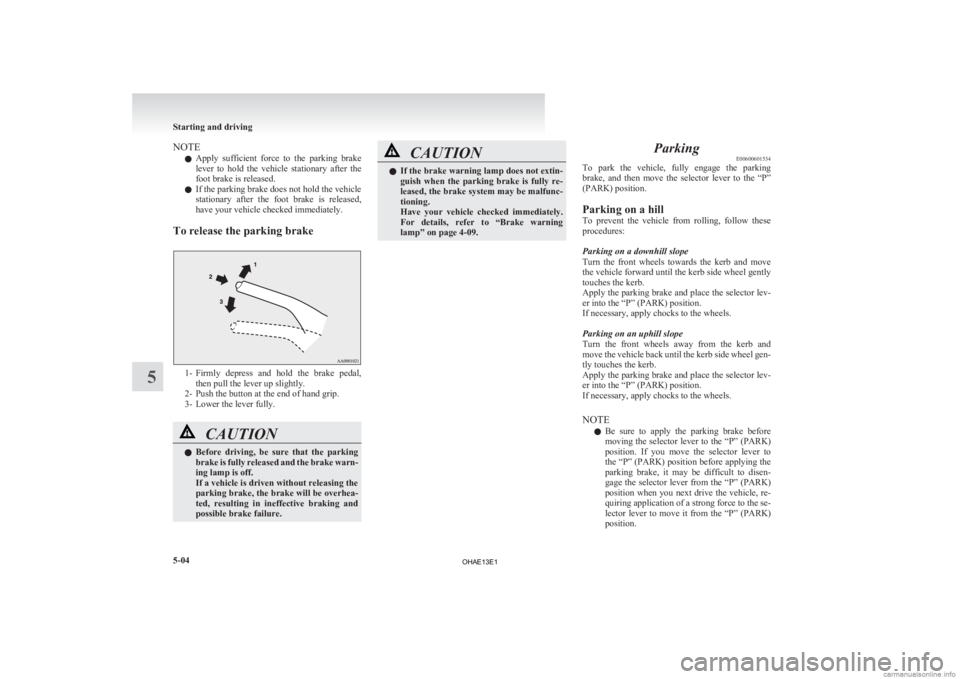
To release the parking brake 1- Firmly
depress and hold the brake pedal,
then pull the lever up slightly.
2- Push the button at the end of hand grip.
3- Lower the lever fully. CAUTION
l
Before
driving, be sure that the parking
brake is fully released and the brake warn-
ing lamp is off.
If a vehicle is driven without releasing the
parking brake, the brake will be overhea-
ted, resulting in ineffective braking and
possible brake failure. CAUTION
l
If
the brake warning lamp does not extin-
guish when the parking brake is fully re-
leased, the brake system may be malfunc-
tioning.
Have your vehicle checked immediately.
For details, refer to “Brake warning
lamp” on page 4-09. Parking
E00600601534
To
park the vehicle, fully engage the parking
brake, and then move the selector lever to the “P”
(PARK) position.
Parking on a hill
To prevent the vehicle from rolling, follow these
procedures:
Parking on a downhill slope
Turn the front wheels towards the kerb and move
the vehicle forward until the kerb side wheel gently
touches the kerb.
Apply the parking brake and place the selector lev-
er into the “P” (PARK) position.
If necessary, apply chocks to the wheels.
Parking on an uphill slope
Turn the front wheels away from the kerb and
move the vehicle back until the kerb side wheel gen-
tly touches the kerb.
Apply the parking brake and place the selector lev-
er into the “P” (PARK) position.
If necessary, apply chocks to the wheels.
NOTE
l Be sure to apply the parking brake before
moving the selector lever to the “P” (PARK)
position. If you move the selector lever to
the “P” (PARK) position before applying the
parking brake, it may be difficult to disen-
gage the selector lever from the “P” (PARK)
position when you next drive the vehicle, re-
quiring application of a strong force to the se-
lector lever to move it from the “P” (PARK)
position. Starting and driving
5-04
5
OHAE13E1
Page 125 of 258

Parking with the electric motor unit
running
Never
leave the electric motor unit running while
you take a short sleep/rest. WARNING
l Leaving
the electric motor unit running
risks injury or death from accidentally
moving the selector lever.
Do not keep the steering wheel fully
turned for a long time
More
effort could be required to turn the steering
wheel. Refer to “Electric power steering system
(EPS)” on page 5-17.
When leaving the vehicle
Always carry the key and lock all doors and the tail-
gate when leaving the vehicle unattended.
Always try to park your vehicle in a well lit area. Inside rear-view mirror
E00600800672
Adjust
the rear-view mirror only after making any
seat adjustments so you have a clear view to the
rear of the vehicle. WARNING
l Do
not attempt to adjust the rear-view
mirror while driving. This can be danger-
ous.
Always adjust the mirror before driving.
Adjust the rear-view mirror to maximize the view
through the rear window. Outside rear-view mirrors
E00600900628
To adjust the mirror position E00601000655
The outside rear-view mirrors can be operated
when
the electric motor switch is in the “ON” or
“ACC” position. WARNING
l Do
not attempt to adjust the rear-view
mirrors while driving. This can be danger-
ous.
Always adjust the mirrors before driving.
l Your vehicle is equipped with convex
type mirrors.
Please take into consideration, that ob-
jects you see in the mirror will look small-
er and farther away compared to a nor-
mal flat mirror.
Do not use this mirror to estimate dis-
tance of following vehicles when changing
lanes. Starting and driving
5-05 5
OHAE13E1
Page 127 of 258

Heated mirror*
E00601200514
To
demist or defrost the outside rear-view mirrors,
press the rear window demister switch.
The indication lamp (A) will illuminate while the
demister is on.
The heater will be turned off automatically in about
20 minutes. NOTE
l Since
the demister requires a significant
amount of power, stop the demister as soon
as the window is demisted. Electric motor switch
E00629400013 LOCK
The
steering wheel is locked. The key can only be
inserted and removed in this position.
ACC
The ready indicator is not illuminated, but the au-
dio system and other electric devices can be operat-
ed.
ON
The electric motor unit is running, and all the vehi-
cle’s electrical devices can be operated.
START
The electric motor unit operates. After the electric
motor unit has started, release the key and it will au-
tomatically return to the “ON” position. NOTE
l Your
vehicle is equipped with an electronic
immobilizer.
To start the electric motor unit, the ID code
which the transponder inside the key sends
must match the one registered in the immobil-
izer computer. Refer to “Electronic immobil-
izer (Anti-theft starting system)” on page
2-02.
To remove the key E00629500014
1. Set
the selector lever to the “P” (PARK) po-
sition.
2. Turn the key to the “LOCK” position and re- move it. Starting and driving
5-07 5
OHAE13E1
Page 128 of 258

CAUTION
l
If the ready indicator goes out while driv-
ing, the brake servomechanism will cease
to function and braking efficiency will de-
teriorate. Also, the power steering system
may not operate, the steering wheel feels
heavy when turning it.
l When the ready indicator has turned off,
turn the electric motor switch to the
“LOCK” position.
Leaving the electric motor switch in the
“ON” or “ACC” position and using elec-
trical devices such as the audio system for
a long time could cause the auxiliary bat-
tery to go flat and prevent the electric mo-
tor unit from being started. Steering wheel lock
E00601500692
To lock
Remove the key at the “LOCK” position.
Turn the steering wheel until it is locked.
To unlock
Turn
the key to the “ACC” position while moving
the steering wheel slightly right and left. CAUTION
l
Remove the key when leaving the vehicle.
In some countries, it is prohibited to leave
the key in the vehicle when parked. Starting the electric motor unit
E00629300012 CAUTION
l
Never
attempt to start the electric motor
unit by pushing or pulling the vehicle.
The starting procedure is as follows: 1. Insert
the key in the electric motor switch
and fasten the seat belt.
2. Make sure the parking brake is applied.
3. Depress and hold the brake pedal.
4. Make sure the selector lever is in the “P” (PARK) position. NOTE
l The
electric motor unit will not start unless
the selector lever is in the “P” (PARK) posi-
tion. Starting and driving
5-08
5
OHAE13E1
Page 135 of 258

Brake assist system
E00627000174
The brake assist system is a device assisting drivers
who
cannot depress the brake pedal firmly when it
is necessary to do so (such as in emergency stop sit-
uations) and provides greater braking force.
If the brake pedal is depressed suddenly, the brakes
will be applied with more force than usual. CAUTION
l
The
brake assist system is not a device de-
signed to exercise braking force greater
than its capacity. Make sure to always
keep a sufficient distance between vehi-
cles in front of you without relying too
much on the brake assist system.
NOTE l Once
the brake assist system is operational,
it maintains great braking force even if the
brake pedal is lightly released.
To stop its operation, completely remove
your foot from the brake pedal.
l The brake assist system may become opera-
tional when the brake pedal is fully de-
pressed even if it has not been depressed sud-
denly. l
When
the brake assist system is in use, you
may feel as if the depressed brake pedal is
soft, the pedal moves in small motions in con-
junction with the sound of the ABS opera-
tion, or the vehicle body and the steering
wheel vibrate. This occurs when the brake as-
sist system is operating normally and does
not indicate faulty operation. Continue to
firmly depress the brake pedal.
l You may hear an operation noise when the
brake pedal is depressed suddenly while sta-
tionary. This does not indicate a malfunction
and the brake assist system is operating nor-
mally. Anti-lock brake system (ABS)
E00607101394
The
anti-lock brake system (ABS) helps prevent
the wheels from locking during braking. This helps
maintain vehicle drivability and steering wheel han-
dling.
Driving hints
l Always keep a safe distance from the vehicle
in front of you. Even if your vehicle is equip-
ped with ABS, leave a greater braking dis-
tance when:
• Driving on gravel or snow-covered roads.
• Driving with tyre chains installed.
• Driving on uneven road surfaces.
l Operation of ABS is not restricted to situa-
tions where brakes are applied suddenly.
This system may also prevent the wheels
from locking when you drive over manholes,
steel roadwork plates, road markings, or any
uneven road surface.
l When the ABS is activated, you may feel the
brake pedal pulsation and the vibrations of
the vehicle body and steering wheel. It may
also feel as if the pedal resists being pressed.
In this situation, simply hold the brake ped-
al down firmly. Do not pump the brake,
which will result in reduced braking per-
formance.
l An operation noise may be emitted from the
bonnet room in the following situations. The
sound is associated with checking the opera-
tions of the anti-lock brake system.
At this time, you may feel a shock from the
brake pedal if you depress it. These do not in-
dicate a malfunction.
• When the electric motor switch is turnedto the “ON” position. Starting and driving
5-15 5
OHAE13E1