2013 MITSUBISHI iMiEV reset
[x] Cancel search: resetPage 39 of 258

Symptom Possible cause Possible solution
Regular charging is dis-
continued. There is no power coming from the out-
let. There may have been a electrical power failure, or the breaker may have failed.Charging will
resume when the power source is reset.
The EV charging cable has been discon-
nected. Check that the EV charging cable has not been disconnected.
The button on the regular charge con-
nector has been pressed. If the charge connector button is pressed for a long period of time, charging will be stopped.
Start the charging procedure again.
The temperature of the traction battery
is too hot or too cold to charge. Confirm the traction battery temperature.
Refer to “Cautions and actions to deal with intense heat” on page
06 and “Cautions and ac-
tions to deal with intense cold” on page 08.
Charging is stopped by the regular
charge timer. Charging will stop depending on the timer function setting of the regular charge device. If
you need to charge the traction battery more, start the charging procedure again.
Quick charging cannot be
started. The charge connector is not connected
correctly and/or not locked. Check that the charge connector is connected correctly and that it is locked.
The self-diagnostic function of the
quick charge device returns a negative
result. There is a possibility that the vehicle has a malfunction. Stop charging and contact a
MITSUBISHI MOTORS
Authorized Service Point.
The power switch of the quick charger
is off. Check the power switch of the quick charger.
Quick charge is discontin-
ued. Charging is stopped by the quick
charge timer. Charging will stop depending on the timer function setting of the quick charge device.If you
need to charge the traction battery more, start the charging procedure again.
Charging stops at 80% capacity. Charging is designed to stop when the traction battery capacity reaches 80%. If you need to charge the traction battery more than
80%, start the charging procedure again.
The power supply for the quick charg-
er is off. Check whether the power supply for the quick charger is off. Charging
1-17 1
OHAE13E1
Page 56 of 258

Phenomena Cause Remedy
Timer charging is not possible. After the power/communication switch is pressed, the following symbol blinks
for several seconds.
l ERROR symbol
l symbol
Regular charge connector is not inser-
ted or not locked completely.
Lock the regular charge connector se-
curely.
A household electrical outlet, to which
the
EV charging cable (regular charg-
er) is connected, is shut down.(e.g. dis-
connected plug) Turn on the household electrical outlet
to
which the EV charging cable (regu-
lar charger) is connected.
An earth leakage circuit breaker at the
household electrical outlet is working.
Otherwise,
the power supply at the
household electrical outlet is cut off. Check the earth leakage circuit breaker
and the power supply cut.
If the charging unit is equipped with
the
timer function, the power supply to
the unit has been cut off. Preset the Charging Timer while the
charging
unit with timer function is
powered on.
After the power/communication switch
is
pressed, the following symbol blinks
for several seconds.
l ERROR symbol The selector lever is in a position other
than P (PARK).
Set the selector lever to the “P”
(PARK) position.
Quick charging is in progress. (The symbol illuminates.)
Terminate the quick charging, or wait
until the quick charging completes.
The temperature of the traction battery
has exceeded about 60 °C. Allow the temperature of the traction
battery
to reach normal operating tem-
perature. Refer to “Cautions and ac-
tions to deal with intense heat” on page
06.
The temperature of the traction battery
has been under about -25 °C. Allow the temperature of the traction
battery
to reach normal operating tem-
perature. Refer to “Cautions and ac-
tions to deal with intense cold” on page
08. Charging
1-34
1
OHAE13E1
Page 57 of 258

Phenomena Cause Remedy
Timer charging is not possible. Charging is preset, but the specified charging level is not satisfied.
l The
charging level is not expec-
ted amount.
l Is not charged.
l Is not charged at the preset time. The timer is cancelled or the preset
time
is changed by using another
MiEV Remote. Check whether another person has op-
erated his or her MiEV Remote.
The electric motor switch has been op-
erated before the system is charged. Check whether the electric motor
switch
has been operated before the sys-
tem is charged.
The temperature of the traction battery
has exceeded about 60 °C. Allow the temperature of the traction
battery
to reach normal operating tem-
perature. Refer to “Cautions and ac-
tions to deal with intense heat” on page
06.
The temperature of the traction battery
has been under about -25 °C. Allow the temperature of the traction
battery
to reach normal operating tem-
perature. Refer to “Cautions and ac-
tions to deal with intense cold” on page
08.
Charging timer is not preset correctly. Preset the timed charging again.
Although the charging is preset, too
much
time is needed to charge the sys-
tem fully. The Remote Climate Control has been
activated.
Check whether the Remote Climate
Control has been activated.
Temperature of the traction battery is
low. Refer to “Cautions
and actions to deal
with intense cold” on page 08.
It is not fully charged. If the charging unit is equipped with
the
timer function, the power supply to
the unit has been cut off. Preset the Charging Timer while the
charging
unit with timer function is
powered on. Charging
1-35 1
OHAE13E1
Page 58 of 258

Phenomena Cause Remedy
The Remote Climate Control cannot be
activated. After the power/communication switch
is
pressed, the following symbol blinks
for several seconds.
l ERROR symbol
l symbol
The regular charge connector is not in-
serted or it is not locked completely.
Lock the regular charge connector se-
curely.
A household electrical outlet, to which
the
EV charging cable (regular charge)
is connected, is shut down.(e.g. discon-
nected plug) Turn on the household electrical outlet
to
which the EV charging cable (regu-
lar charger) is connected.
An earth leakage circuit breaker at the
household electrical outlet is working.
Otherwise,
the power supply at the
household electrical outlet is cut off. Check the earth leakage circuit breaker
and the power supply cut.
If the charging unit is equipped with
the
timer function, the power supply to
the unit has been cut off. Preset the Charging Timer while the
charging
unit with timer function is
powered on.
After the power/communication switch
is
pressed, the following symbol blinks
for several seconds.
l ERROR symbol
l symbol
The traction battery charging level is
low.
Charge the traction battery until the
MiEV
Remote illuminates the battery
charging level by at least 1 segment. Charging
1-36
1
OHAE13E1
Page 102 of 258

Instruments
E005001012511- Energy level gauge
2-
Energy usage indicator
3- Odometer/Tripmeter/Meter illumination con- trol/Service reminder/Cruising range indica-
tor
4- Speedometer (km/h or MPH)
5- Reset button/Daytime dipper button/Selector button Speedometer
E00500201050
When
the electric motor switch is in the “ON” posi-
tion, the speedometer indicates the vehicle speed in
kilometers per hour (km/h) (Type 1) or miles per
hour (MPH) (Type 2).
Type 1 Type 2 NOTE
l The
display setting can be changed to the pre-
ferred units (km or miles) (Type 2).
Refer to “Changing the display unit*” on
page 4-02.
Changing the display unit* E00529500026
It is possible to select the speedometer’s display unit.
1. Press
the reset button (A) to display the od-
ometer (B).
(Refer to “To change the display” on page
4-03.) 2. Keep
the reset button pressed for two sec-
onds or longer to change the display unit
from MPH to km/h or from km/h to MPH. NOTE
l Once
the display unit has changed, keeping
the reset button pressed will not cause the dis-
play unit to change again.
The display unit for the cruising range will change
to match the selected speedometer display unit. Speedometer Cruising range
MPH Miles
km/h km NOTE
l Even
if speedometer display unit is changed,
the display units for the odometer, tripmeter,
and service reminder do not change. Instruments and controls
4-02
4
OHAE13E1
Page 103 of 258

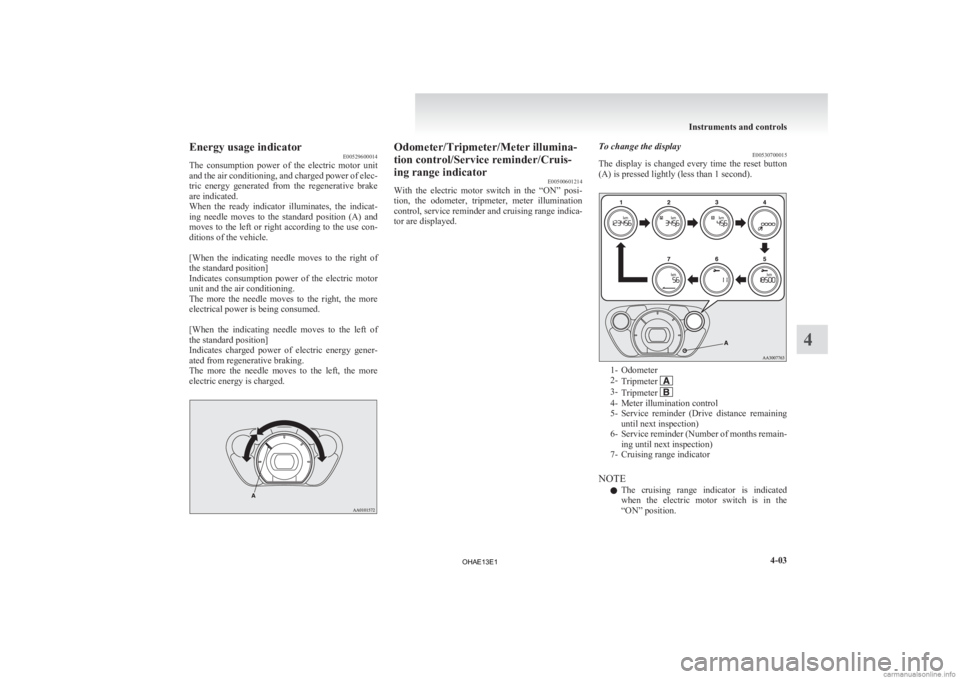
Energy usage indicator
E00529600014
The
consumption power of the electric motor unit
and the air conditioning, and charged power of elec-
tric energy generated from the regenerative brake
are indicated.
When the ready indicator illuminates, the indicat-
ing needle moves to the standard position (A) and
moves to the left or right according to the use con-
ditions of the vehicle.
[When the indicating needle moves to the right of
the standard position]
Indicates consumption power of the electric motor
unit and the air conditioning.
The more the needle moves to the right, the more
electrical power is being consumed.
[When the indicating needle moves to the left of
the standard position]
Indicates charged power of electric energy gener-
ated from regenerative braking.
The more the needle moves to the left, the more
electric energy is charged. Odometer/Tripmeter/Meter illumina-
tion control/Service reminder/Cruis-
ing range indicator
E00500601214
With
the electric motor switch in the “ON” posi-
tion, the odometer, tripmeter, meter illumination
control, service reminder and cruising range indica-
tor are displayed. To change the display
E00530700015
The
display is changed every time the reset button
(A) is pressed lightly (less than 1 second). 1- Odometer
2-
Tripmeter 3-
Tripmeter 4- Meter illumination control
5- Service
reminder (Drive distance remaining
until next inspection)
6- Service reminder (Number of months remain- ing until next inspection)
7- Cruising range indicator
NOTE l The cruising range indicator is indicated
when the electric motor switch is in the
“ON” position. Instruments and controls
4-03 4
OHAE13E1
Page 104 of 258

l
If there is no operation for about 10 seconds
when the meter illumination control or serv-
ice reminder is shown, the display returns to
the odometer.
Odometer E00530800016
The odometer indicates the total distance the vehi-
cle has travelled.
NOTE
l Even
if the electric motor switch is turned to
“ACC” or “LOCK”, the odometer will be dis-
played for about 30 seconds after the reset but-
ton is pressed.
Tripmeter E00530900017
The tripmeter indicates the distance travelled dur-
ing a particular trip or period.
There
are two tripmeter displays: Tripmeter and .
Tripmeter can be used to measure the distance
travelled
since the current trip began. At the same
time, Tripmeter can be used to measure the dis-
tance from an intermediate location.
NOTE
l Even
if the electric motor switch is turned to
the “ACC” or “LOCK” position, the tripme-
ter will be displayed for about 30 seconds af-
ter the reset button is pressed.
To reset the tripmeter
To return the display to “0”, press the reset button
(A) for more than 2 seconds. Only the currently dis-
played value will be reset. NOTE
l If
the auxiliary battery terminal is removed,
the memories for the tripmeter and
displays are erased and the displays return to
0.
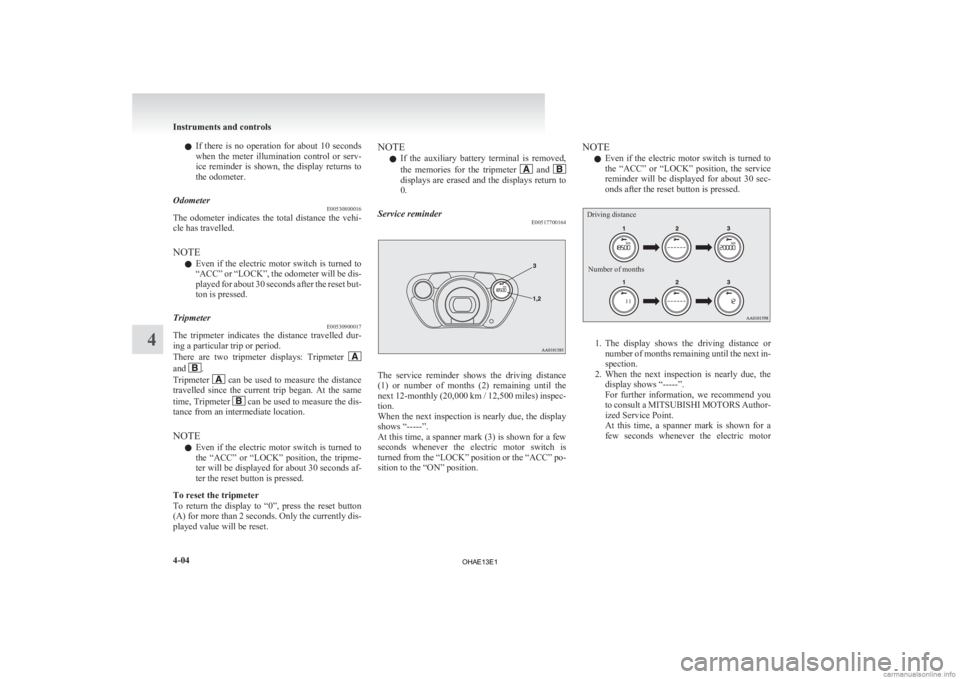
Service reminder E00517700164 The service reminder shows the driving distance
(1)
or number of months (2) remaining until the
next 12-monthly (20,000 km / 12,500 miles) inspec-
tion.
When the next inspection is nearly due, the display
shows “-----”.
At this time, a spanner mark (3) is shown for a few
seconds whenever the electric motor switch is
turned from the “LOCK” position or the “ACC” po-
sition to the “ON” position. NOTE
l Even
if the electric motor switch is turned to
the “ACC” or “LOCK” position, the service
reminder will be displayed for about 30 sec-
onds after the reset button is pressed.
Driving distance
Number of months 1. The
display shows the driving distance or
number of months remaining until the next in-
spection.
2. When the next inspection is nearly due, the display shows “-----”.
For further information, we recommend you
to consult a MITSUBISHI MOTORS Author-
ized Service Point.
At this time, a spanner mark is shown for a
few seconds whenever the electric motor Instruments and controls
4-04
4
OHAE13E1
Page 105 of 258

switch is turned from the “LOCK” position
or the “ACC” position to the “ON” position.
3. When the vehicle is inspected at a
MITSUBISHI MOTORS Authorized Service
Point, the driving distance or number of
months remaining until the next inspection
will be shown.
NOTE l The indicated distance decreases in steps of
100 km (62 miles). The indicated number of
months decreases in steps of one month.
l It is possible to change the settings for the
service reminder.
For further information, we recommend you
to consult a MITSUBISHI MOTORS Author-
ized Service Point.
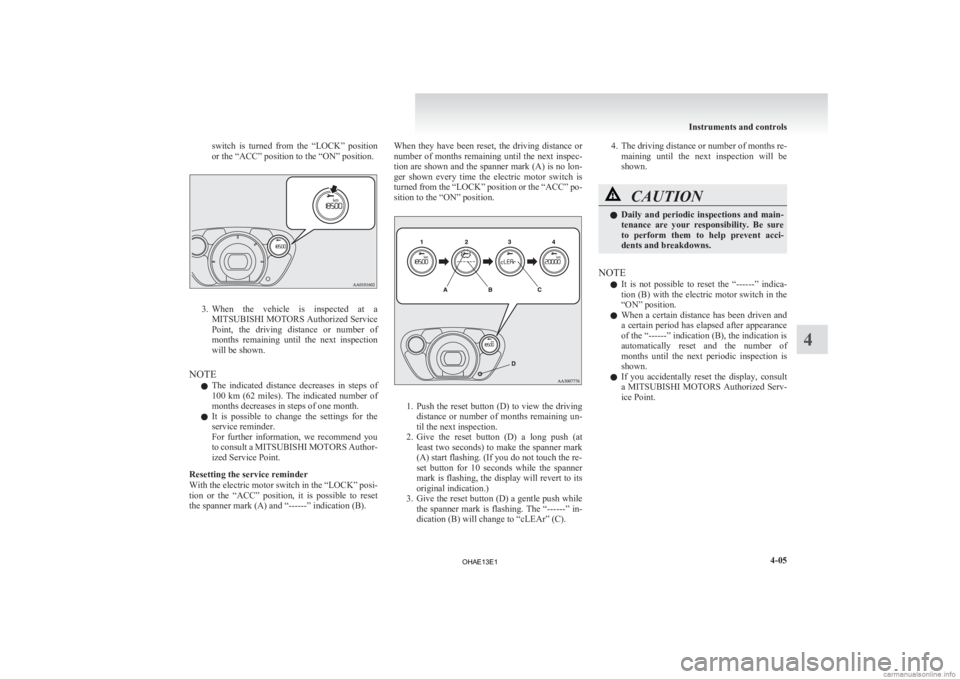
Resetting the service reminder
With the electric motor switch in the “LOCK” posi-
tion or the “ACC” position, it is possible to reset
the spanner mark (A) and “------” indication (B). When they have been reset, the driving distance or
number
of months remaining until the next inspec-
tion are shown and the spanner mark (A) is no lon-
ger shown every time the electric motor switch is
turned from the “LOCK” position or the “ACC” po-
sition to the “ON” position. 1. Push
the reset button (D) to view the driving
distance or number of months remaining un-
til the next inspection.
2. Give the reset button (D) a long push (at least two seconds) to make the spanner mark
(A) start flashing. (If you do not touch the re-
set button for 10 seconds while the spanner
mark is flashing, the display will revert to its
original indication.)
3. Give the reset button (D) a gentle push while the spanner mark is flashing. The “------” in-
dication (B) will change to “cLEAr” (C). 4. The
driving distance or number of months re-
maining until the next inspection will be
shown. CAUTION
l
Daily
and periodic inspections and main-
tenance are your responsibility. Be sure
to perform them to help prevent acci-
dents and breakdowns.
NOTE l It
is not possible to reset the “------” indica-
tion (B) with the electric motor switch in the
“ON” position.
l When a certain distance has been driven and
a certain period has elapsed after appearance
of the “------” indication (B), the indication is
automatically reset and the number of
months until the next periodic inspection is
shown.
l If you accidentally reset the display, consult
a MITSUBISHI MOTORS Authorized Serv-
ice Point. Instruments and controls
4-05 4
OHAE13E1