2013 MERCEDES-BENZ SL-CLASS ROADSTER reset
[x] Cancel search: resetPage 399 of 572
X
From the weather memory: select
Position in the information chart by
turning cVd the COMAND controller and
press W to confirm.
X Select Presets and press W to confirm.
X Select a preset position that has an entry
by turning cVd the COMAND controller
and press W to confirm.
The information
chart appears and displays
the weather information. Options
Introduction You can select options for the following
COMAND Mercedes-Benz Apps:
R
local search ( Y page 397)
R weather display (Y
page 398)
R destination/route download
(Y page 400)
You can reset the selected options to the
default settings (Y page 401).
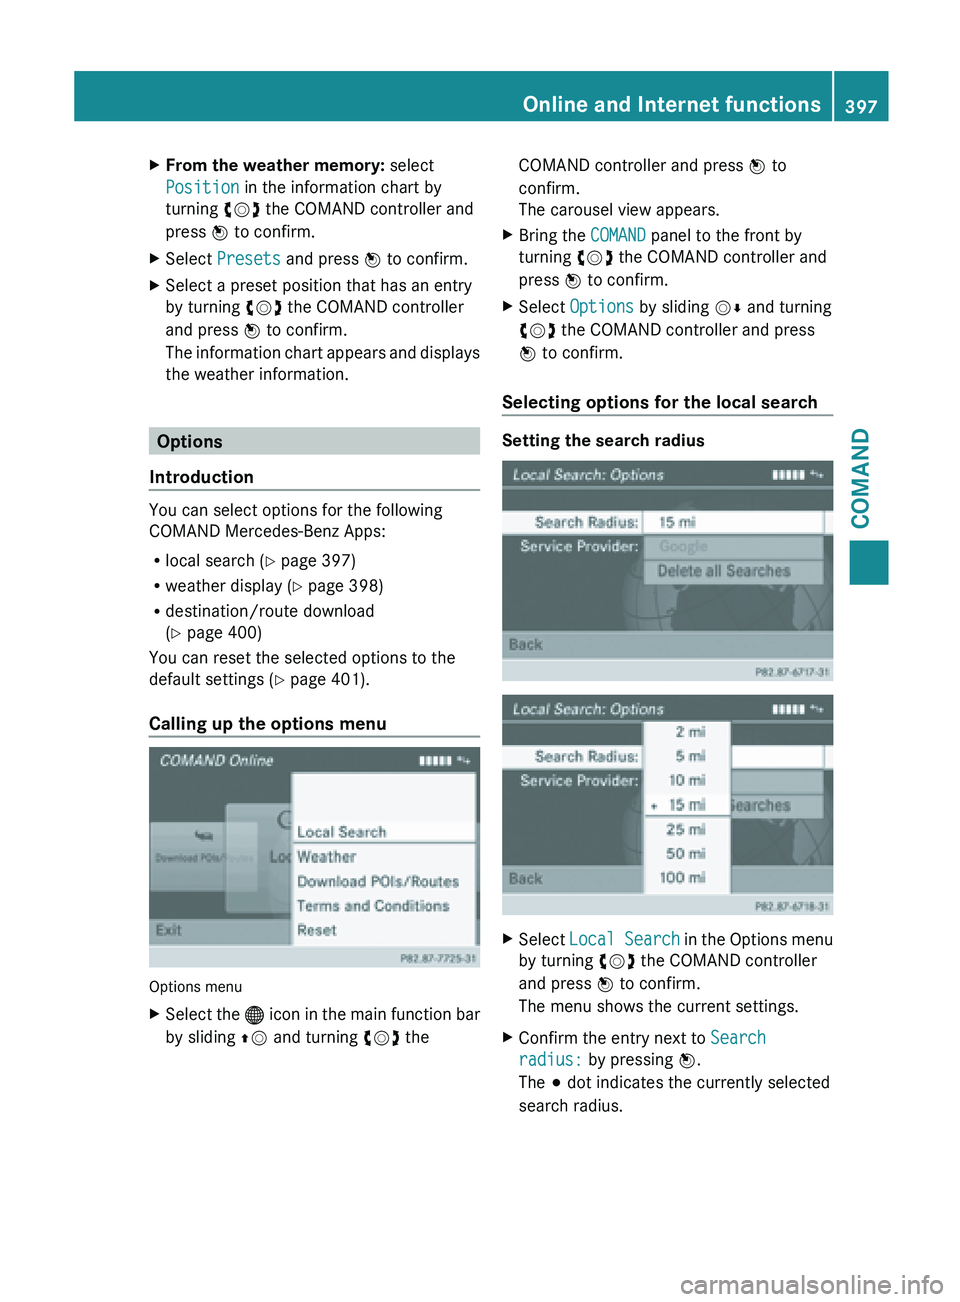
Calling up the options menu Options menu
X
Select the ® icon
in the main function bar
by sliding ZV and turning cVd the COMAND controller and press
W to
confirm.
The carousel view appears.
X Bring the COMAND panel to the front by
turning cVd the COMAND controller and
press W to confirm.
X Select Options by sliding VÆ and turning
cVd the COMAND controller and press
W to confirm.
Selecting options for the local search Setting the search radius
X
Select Local Search in
the Options menu
by turning cVd the COMAND controller
and press W to confirm.
The menu shows the current settings.
X Confirm the entry next to Search
radius: by pressing W.
The # dot indicates the currently selected
search radius. Online and Internet functions
397
COMAND Z
Page 401 of 572
X
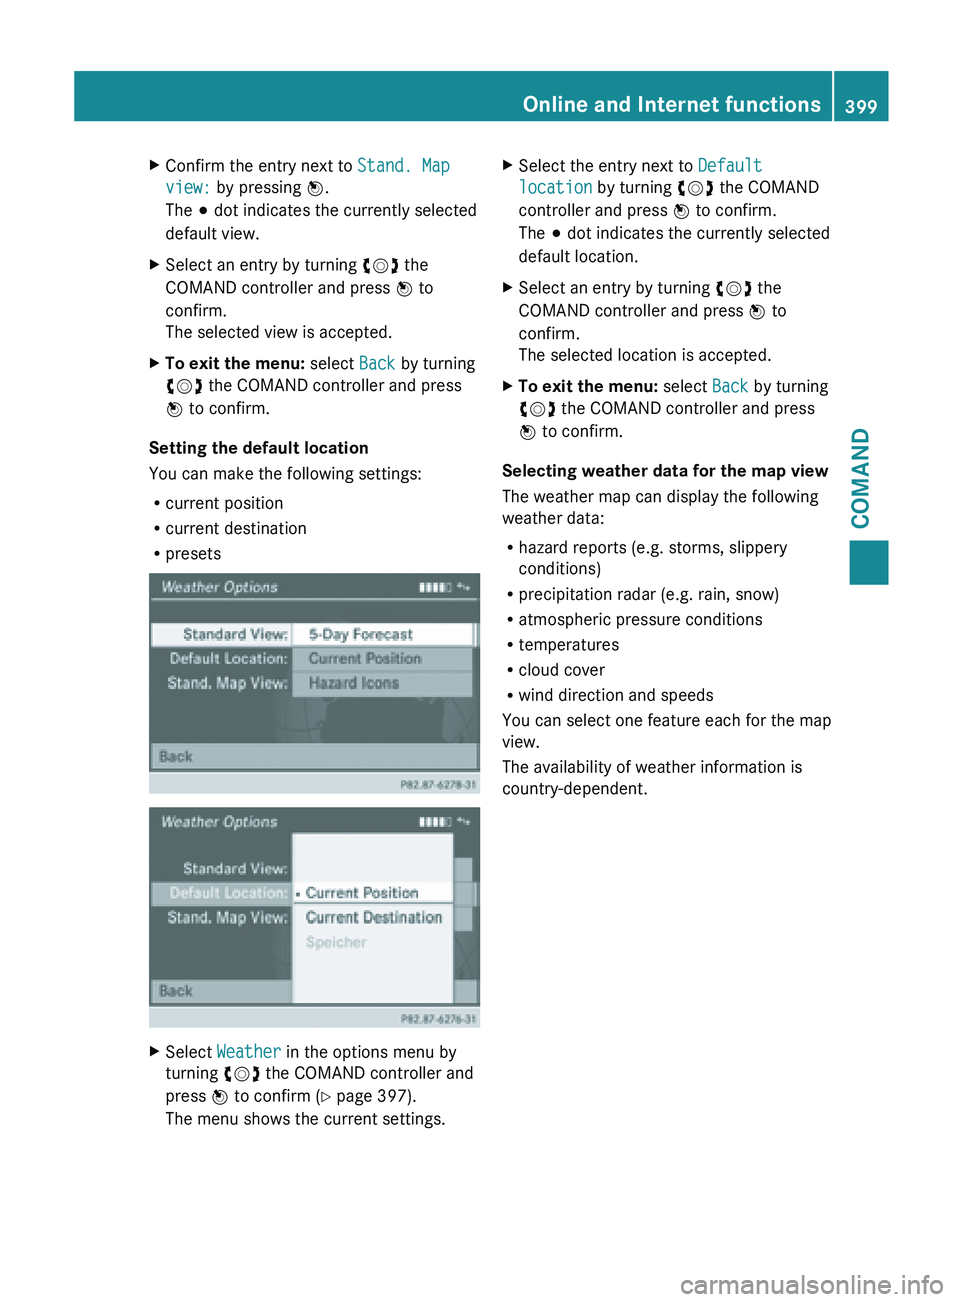
Confirm the entry next to Stand. Map
view: by pressing W.
The # dot indicates the currently selected
default view.
X Select an entry by turning cVd the
COMAND controller and press W to
confirm.
The selected view is accepted.
X To exit the menu: select Back by turning
cVd the COMAND controller and press
W to confirm.
Setting the default location
You can make the following settings:
R current position
R current destination
R presets X
Select Weather in the options menu by
turning cVd the COMAND controller and
press W to confirm (
Y page 397).
The menu shows the current settings. X
Select the entry next to Default
location by turning cVd the COMAND
controller and press W to confirm.
The # dot indicates the currently selected
default location.
X Select an entry by turning cVd the
COMAND controller and press W to
confirm.
The selected location is accepted.
X To exit the menu: select Back by turning
cVd the COMAND controller and press
W to confirm.
Selecting weather data for the map view
The weather map can display the following
weather data:
R hazard reports (e.g. storms, slippery
conditions)
R precipitation radar (e.g. rain, snow)
R atmospheric pressure conditions
R temperatures
R cloud cover
R wind direction and speeds
You can select one feature each for the map
view.
The availability of weather information is
country-dependent. Online and Internet functions
399
COMAND Z
Page 403 of 572

X
Select Yes or No and press W to confirm.
The setting is accepted.
Yes deletes
the POIs after importing to the
server.
No does not delete the POIs on the server.
X To exit the menu: select Back by turning
cVd the COMAND controller and press
W to confirm.
i Routes and destinations are
automatically deleted on the server after
seven days.
Conditions of use You can review the terms of use for the
COMAND Mercedes-Benz Apps and
Google™.
X
Select Terms and conditions in the
options menu
by sliding ZVÆ the COMAND
controller and press W to confirm
(Y page 397).
X Select COMAND or Google and press W to
confirm.
The respective start page appears.
X Select Continue to view further content.
Resetting settings The reset function resets all COMAND
settings to the factory settings.
X
Select the ® icon
in the main function bar
by sliding ZV and turning cVd the
COMAND controller and press W to
confirm.
The carousel view appears.
X Bring the COMAND panel to the front by
turning cVd the COMAND controller and
press W to confirm.
X Select Options by sliding VÆ and turning
cVd the COMAND controller and press
W to confirm. X
Select Reset and press W to confirm.
A prompt appears asking whether you
really wish to reset.
X Select Yes or No and press W to confirm.
If you select Yes, the settings are reset.
If you
select No, the process will be aborted.
i Resetting your
personal data in COMAND
(reset function) does not reset the settings
for the online functions (Y page 294).
Similarly, resetting the settings of the
online functions has no influence on the
reset function. Other services
Mercedes-Benz Mobile Website The COMAND functions include the
Mercedes-Benz Mobile Website as a
predefined favorite.
X
Select the ® icon
in the main function bar
by sliding ZV and turning cVd the Online and Internet functions
401
COMAND Z
Page 413 of 572
COMAND controller and press
W to
confirm.
X Select a setting using the COMAND
controller and press W to confirm.
i If you change the settings, the websites
may not be displayed correctly.
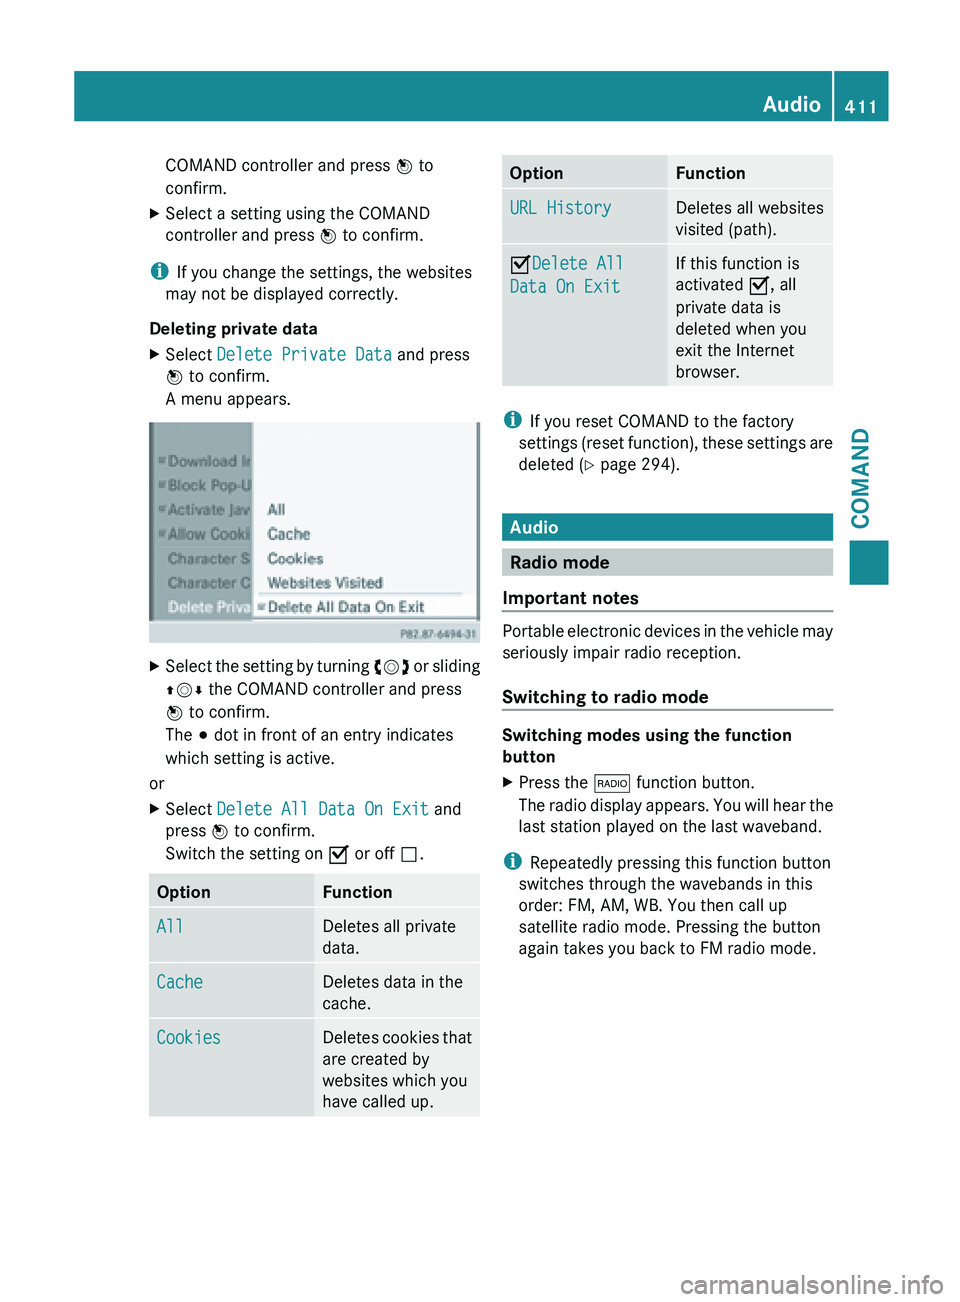
Deleting private data
X Select Delete Private Data and press
W to confirm.
A menu appears. X
Select the setting by turning cVd or sliding
ZVÆ the COMAND controller and press
W to confirm.
The # dot in front of an entry indicates
which setting is active.
or
X Select Delete All Data On Exit and
press W to confirm.
Switch the setting on O or off ª.Option Function
All Deletes all private
data.
Cache Deletes data in the
cache.
Cookies Deletes cookies that
are created by
websites which you
have called up. Option Function
URL History Deletes all websites
visited (path).
ODelete All
Data On Exit If this function is
activated O, all
private data is
deleted when you
exit the Internet
browser.
i
If you reset COMAND to the factory
settings (reset
function), these settings are
deleted ( Y page 294). Audio
Radio mode
Important notes Portable electronic devices in the vehicle may
seriously impair radio reception.
Switching to radio mode
Switching modes using the function
button
X
Press the $ function button.
The radio
display appears. You will hear the
last station played on the last waveband.
i Repeatedly pressing this function button
switches through the wavebands in this
order: FM, AM, WB. You then call up
satellite radio mode. Pressing the button
again takes you back to FM radio mode. Audio
411
COMAND Z
Page 414 of 572
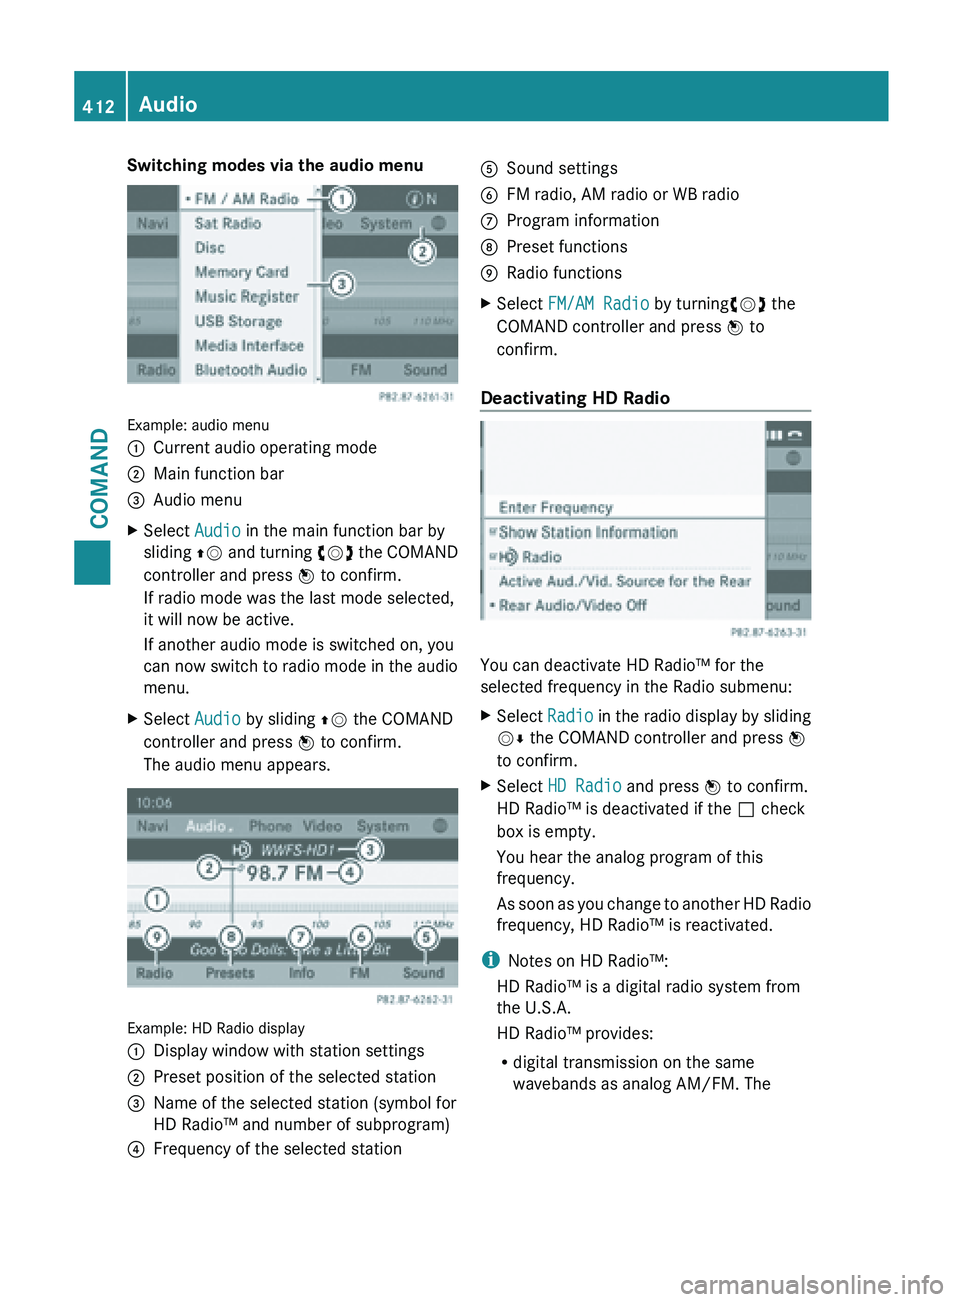
Switching modes via the audio menu
Example: audio menu
:
Current audio operating mode
; Main function bar
= Audio menu
X Select Audio in the main function bar by
sliding ZV and
turning cVd the COMAND
controller and press W to confirm.
If radio mode was the last mode selected,
it will now be active.
If another audio mode is switched on, you
can now switch to radio mode in the audio
menu.
X Select Audio by sliding ZV the COMAND
controller and press W to confirm.
The audio menu appears. Example: HD Radio display
:
Display window with station settings
; Preset position of the selected station
= Name of the selected station (symbol for
HD Radio™ and number of subprogram)
? Frequency of the selected station A
Sound settings
B FM radio, AM radio or WB radio
C Program information
D Preset functions
E Radio functions
X Select FM/AM Radio by turningcVd the
COMAND controller and press W to
confirm.
Deactivating HD Radio You can deactivate HD Radio™ for the
selected frequency in the Radio submenu:
X
Select Radio in
the radio display by sliding
VÆ the COMAND controller and press W
to confirm.
X Select HD Radio and press W to confirm.
HD Radio™ is deactivated if the ª check
box is empty.
You hear the analog program of this
frequency.
As soon
as you change to another HD Radio
frequency, HD Radio™ is reactivated.
i Notes on HD Radio™:
HD Radio™ is a digital radio system from
the U.S.A.
HD Radio™ provides:
R digital transmission on the same
wavebands as analog AM/FM. The412
Audio
COMAND
Page 415 of 572
analog AM/FM stations remain in the
same position when selecting a station.
R broadcasting of
several program streams
over a single FM frequency (e.g. HD1,
HD2, etc.).
R clear, interference free reception
R FM: CD quality sound
AM: analog FM station sound quality
R the display of text-based information
(e.g. artist, track name) in the display
For further information on HD Radio™, visit
http://www.hdradio.com .
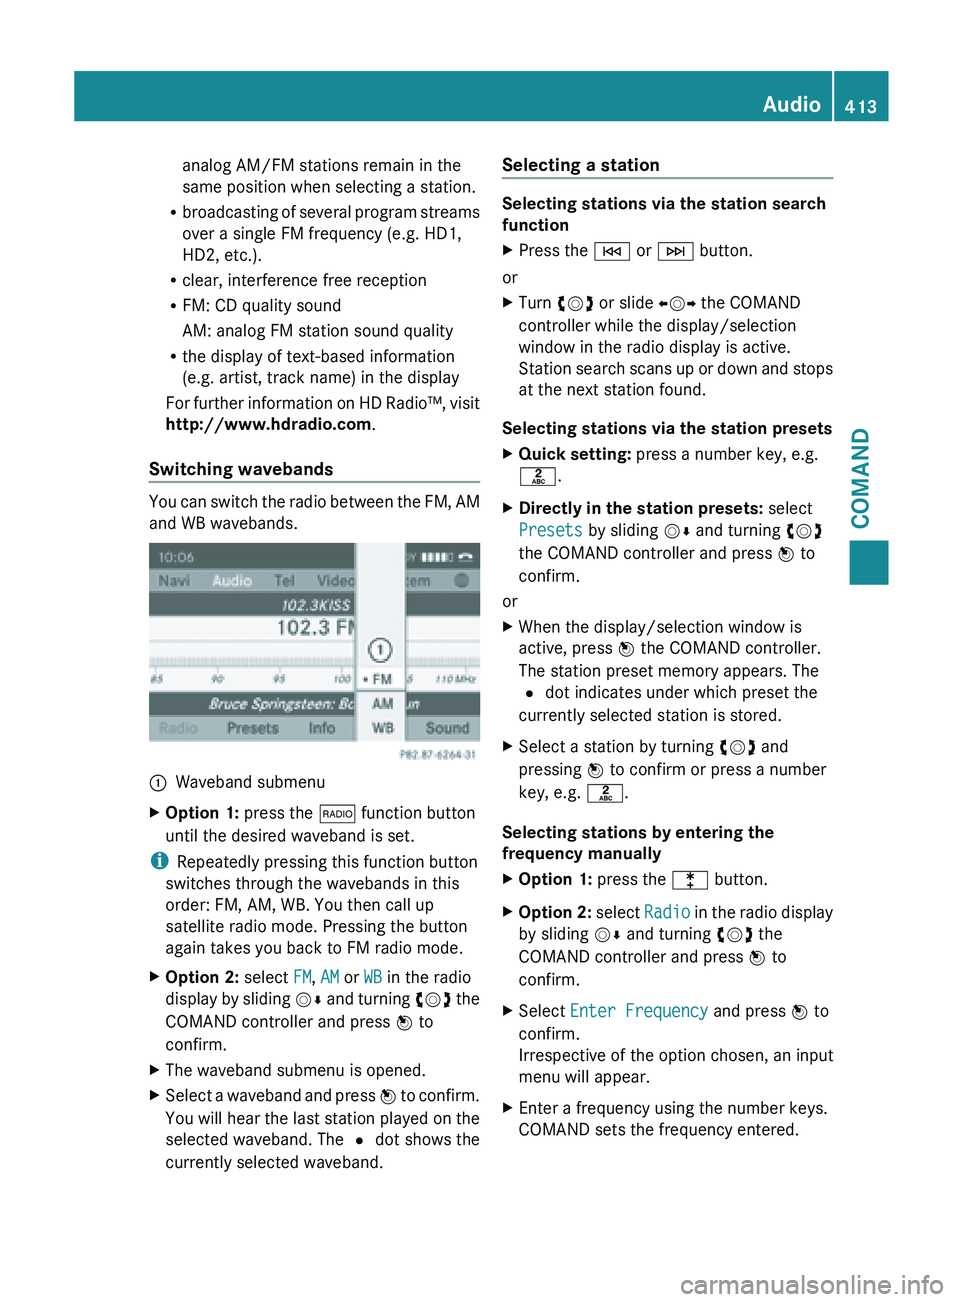
Switching wavebands You can switch the radio between the FM, AM
and WB wavebands.
:
Waveband submenu
X Option 1: press the $ function button
until the desired waveband is set.
i Repeatedly pressing this function button
switches through the wavebands in this
order: FM, AM, WB. You then call up
satellite radio mode. Pressing the button
again takes you back to FM radio mode.
X Option 2: select FM, AM or WB in the radio
display by
sliding VÆ and turning cVd the
COMAND controller and press W to
confirm.
X The waveband submenu is opened.
X Select a waveband and press W to
confirm.
You will hear the last station played on the
selected waveband. The # dot shows the
currently selected waveband. Selecting a station Selecting stations via the station search
function
X
Press the E or F button.
or
X Turn cVd or slide XVY the COMAND
controller while the display/selection
window in the radio display is active.
Station search
scans up or down and stops
at the next station found.
Selecting stations via the station presets
X Quick setting: press a number key, e.g.
l.
X Directly in the station presets: select
Presets by sliding VÆ and turning cVd
the COMAND controller and press W to
confirm.
or
X When the display/selection window is
active, press W the COMAND controller.
The station preset memory appears. The
# dot indicates under which preset the
currently selected station is stored.
X Select a station by turning cVd and
pressing W to confirm or press a number
key, e.g. l.
Selecting stations by entering the
frequency manually
X Option 1: press the l button.
X Option 2: select
Radio
in the radio display
by sliding VÆ and turning cVd the
COMAND controller and press W to
confirm.
X Select Enter Frequency and press W to
confirm.
Irrespective of the option chosen, an input
menu will appear.
X Enter a frequency using the number keys.
COMAND sets the frequency entered. Audio
413
COMAND Z
Page 416 of 572
Waveband Frequency
AM (MF) 530 – 1700 kHz
FM (VHF) 87.7 – 107.9 MHz
WB (Weather Band) Weather report
channels
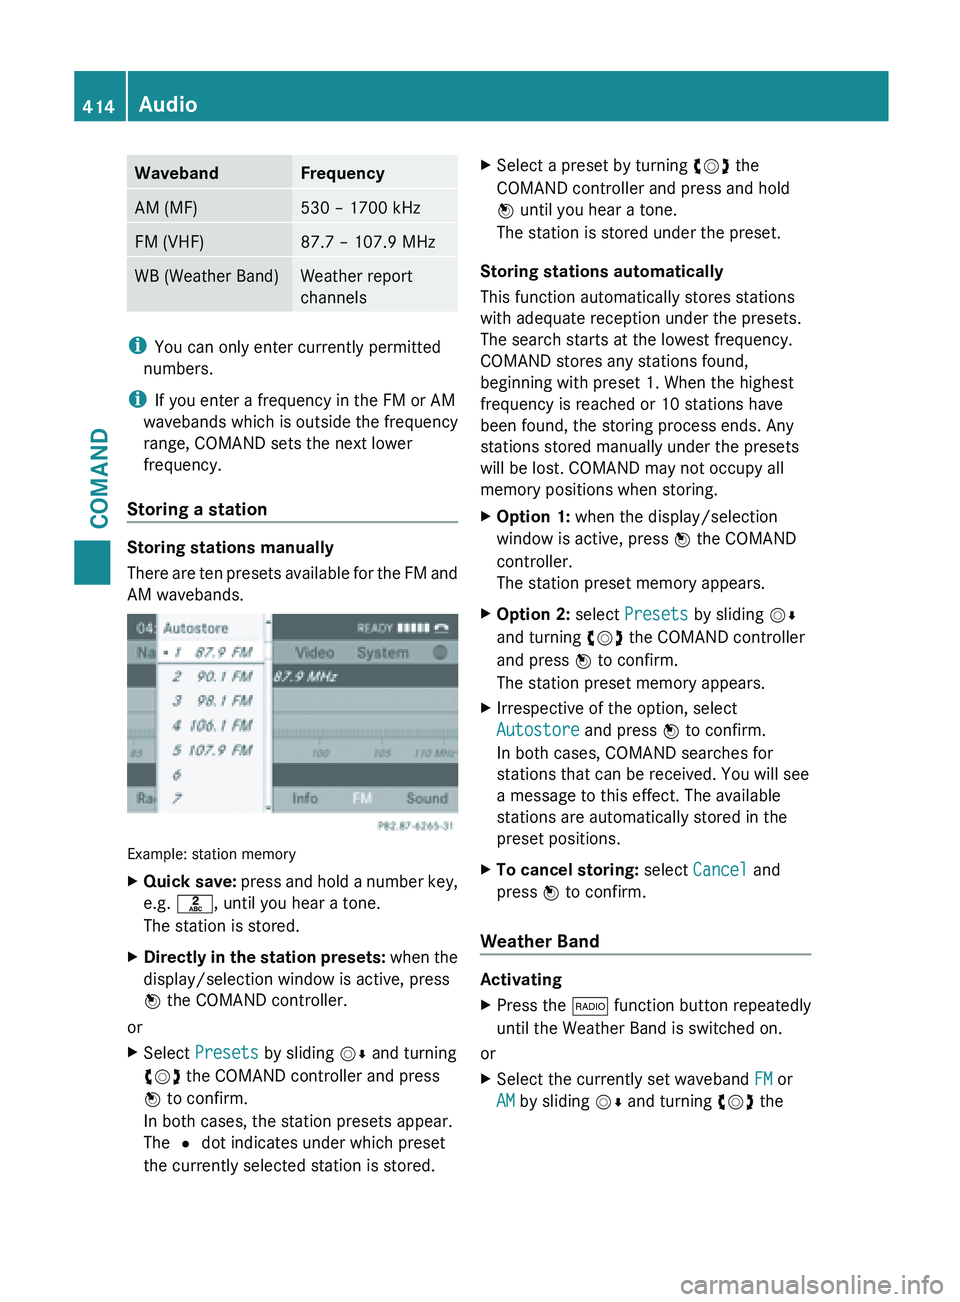
i
You can only enter currently permitted
numbers.
i If you enter a frequency in the FM or AM
wavebands which is outside the frequency
range, COMAND sets the next lower
frequency.
Storing a station Storing stations manually
There
are
ten presets available for the FM and
AM wavebands. Example: station memory
X
Quick save: press
and hold a number key,
e.g. l, until you hear a tone.
The station is stored.
X Directly in the station presets: when
the
display/selection window is active, press
W the COMAND controller.
or
X Select Presets by sliding VÆ and turning
cVd the COMAND controller and press
W to confirm.
In both cases, the station presets appear.
The # dot indicates under which preset
the currently selected station is stored. X
Select a preset by turning cVd the
COMAND controller and press and hold
W until you hear a tone.
The station is stored under the preset.
Storing stations automatically
This function automatically stores stations
with adequate reception under the presets.
The search starts at the lowest frequency.
COMAND stores any stations found,
beginning with preset 1. When the highest
frequency is reached or 10 stations have
been found, the storing process ends. Any
stations stored manually under the presets
will be lost. COMAND may not occupy all
memory positions when storing.
X Option 1: when the display/selection
window is active, press W the COMAND
controller.
The station preset memory appears.
X Option 2: select Presets by sliding VÆ
and turning cVd the COMAND controller
and press W to confirm.
The station preset memory appears.
X Irrespective of the option, select
Autostore and press W to confirm.
In both cases, COMAND searches for
stations that can be received. You will see
a message to this effect. The available
stations are automatically stored in the
preset positions.
X To cancel storing: select Cancel and
press W to confirm.
Weather Band Activating
X
Press the $ function button repeatedly
until the Weather Band is switched on.
or
X Select the currently set waveband FM or
AM by sliding VÆ and turning cVd the414
Audio
COMAND
Page 419 of 572

http://www.sirius.com (USA) or
http://www.siriuscanada.com
(Canada).
i If registration is not included when
purchasing the system, your credit card
details will be required to activate your
account.
If the
satellite receiver is not installed or is
not installed correctly, the Device
Unavailable message will appear.
Switching on satellite radio mode Notes
For example, to select a channel or scroll in
the lists, you can also use the
=;
9: buttons on the multifunction
steering wheel ( Y page 211).
Important information on registering the
satellite radio (Y
page 416).
Option 1
X Press the $ function button.
The No Service message appears after
switching on or if no signal is being
received. Once COMAND receives the
signal, the satellite radio display appears.
The station last selected is played.
i Repeatedly pressing this function button
switches through the wavebands in this
order: FM, AM, WB and subsequently
switches on
the satellite radio. Pressing the
button again takes you back to FM radio
mode. Option 2 Satellite radio main menu
:
Satellite radio main display
; Channel name
= Preset
? Selected category/channel number
A Channel information (in brief)
B Sound settings
C Category list
D Channel information (in detail)
E Channel preset list
F Satellite radio menu
Channel information A can be viewed in
detail ( Y page 420).
X Select Audio in the main function bar by
sliding ZV and
turning cVd the COMAND
controller and press W to confirm.
If satellite radio mode was the last mode
selected, it will now be active.
If another audio mode is switched on, you
can now switch to satellite radio mode in
the audio menu.
X Select Audio by sliding ZV the COMAND
controller and press W to confirm.
The audio menu appears.
X Select Sat and press W to confirm. Audio
417
COMAND Z