2013 MERCEDES-BENZ CLA-CLASS ignition
[x] Cancel search: ignitionPage 185 of 352
PARKTRONIC is only an aid. It is not a substi-
tute for your attention to the immediate sur-
roundings. The responsibility for safe
manoeuvring and parking remains with you.
Make sure that there are no persons, animals
or objects in range while manoeuvring and
parking.
! When parking, pay particular attention to
objects above or below the sensors, such
as flower pots or trailer drawbars. PARK-
TRONIC does not detect such objects when
they are in the immediate vicinity of the
vehicle. You could damage the vehicle or
the objects.
The sensors may not detect snow and
objects which absorb ultrasonic sources.
Ultrasonic sources, such as an automatic
car wash, a lorry's compressed-air brakes
or a pneumatic drill, could cause PARK-
TRONIC to malfunction.
PARKTRONIC may not function correctly on
uneven terrain.
PARKTRONIC is activated automatically if
you:
R switch on the ignition
R shift to position D, R or N on vehicles with
automatic transmission
R release the electric parking brake
PARKTRONIC is deactivated at speeds above
18 km/h. It is reactivated at lower speeds.
Range of the sensors
General notes
PARKTRONIC does not take into account
obstacles located:
R below the detection range, e.g. persons,
animals or objects
R above the detection range, e.g. overhang-
ing loads, tail sections or loading ramps of
goods vehicles
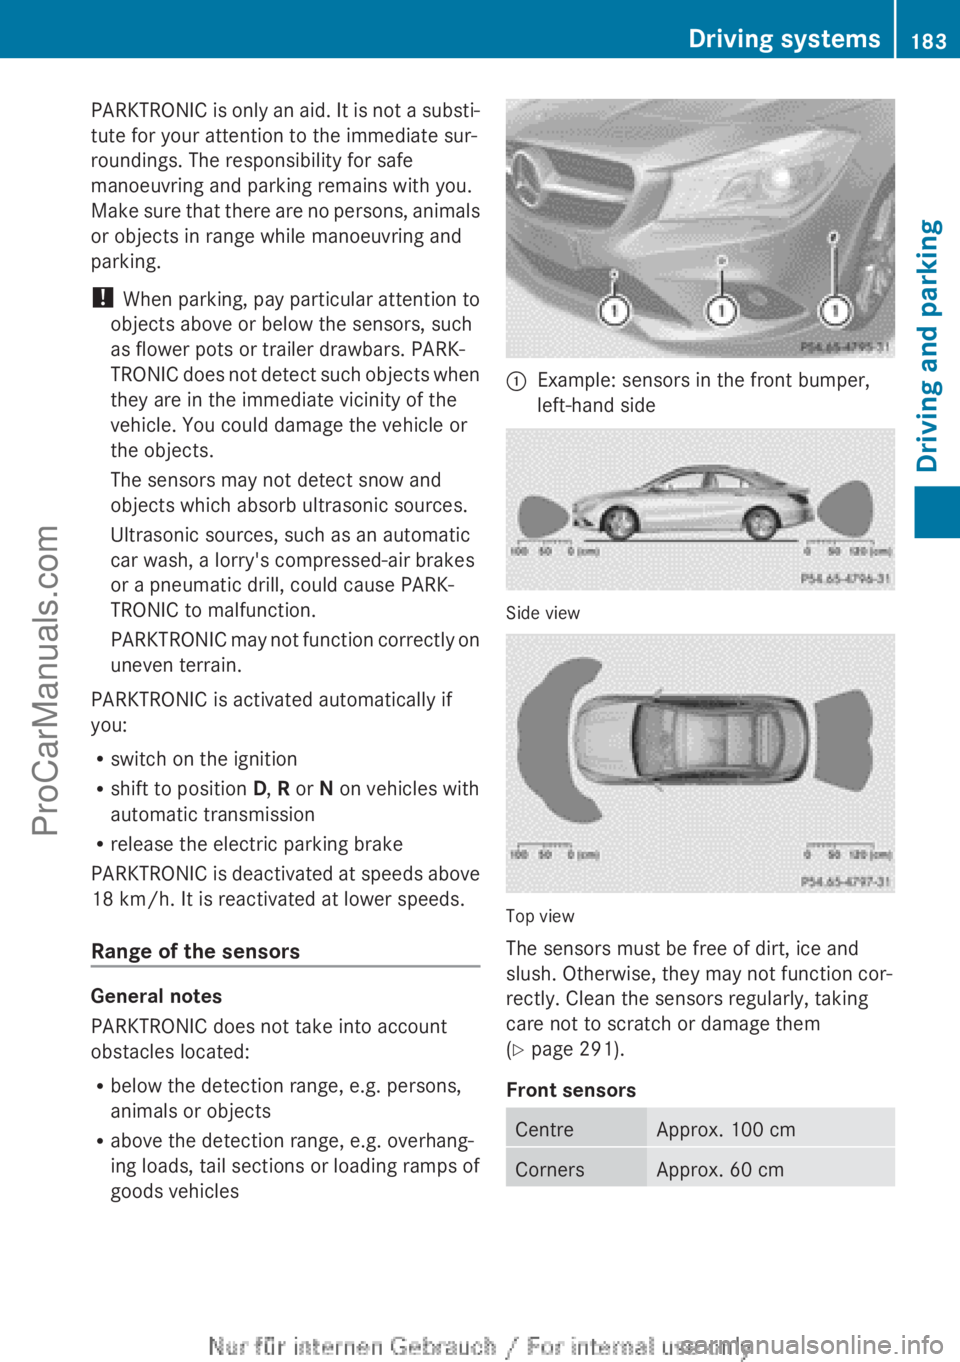
:Example: sensors in the front bumper,
left-hand side
Side view
Top view
The sensors must be free of dirt, ice and
slush. Otherwise, they may not function cor-
rectly. Clean the sensors regularly, taking
care not to scratch or damage them
( Y page 291).
Front sensors
CentreApprox. 100 cmCornersApprox. 60 cmDriving systems183Driving and parkingZProCarManuals.com
Page 187 of 352
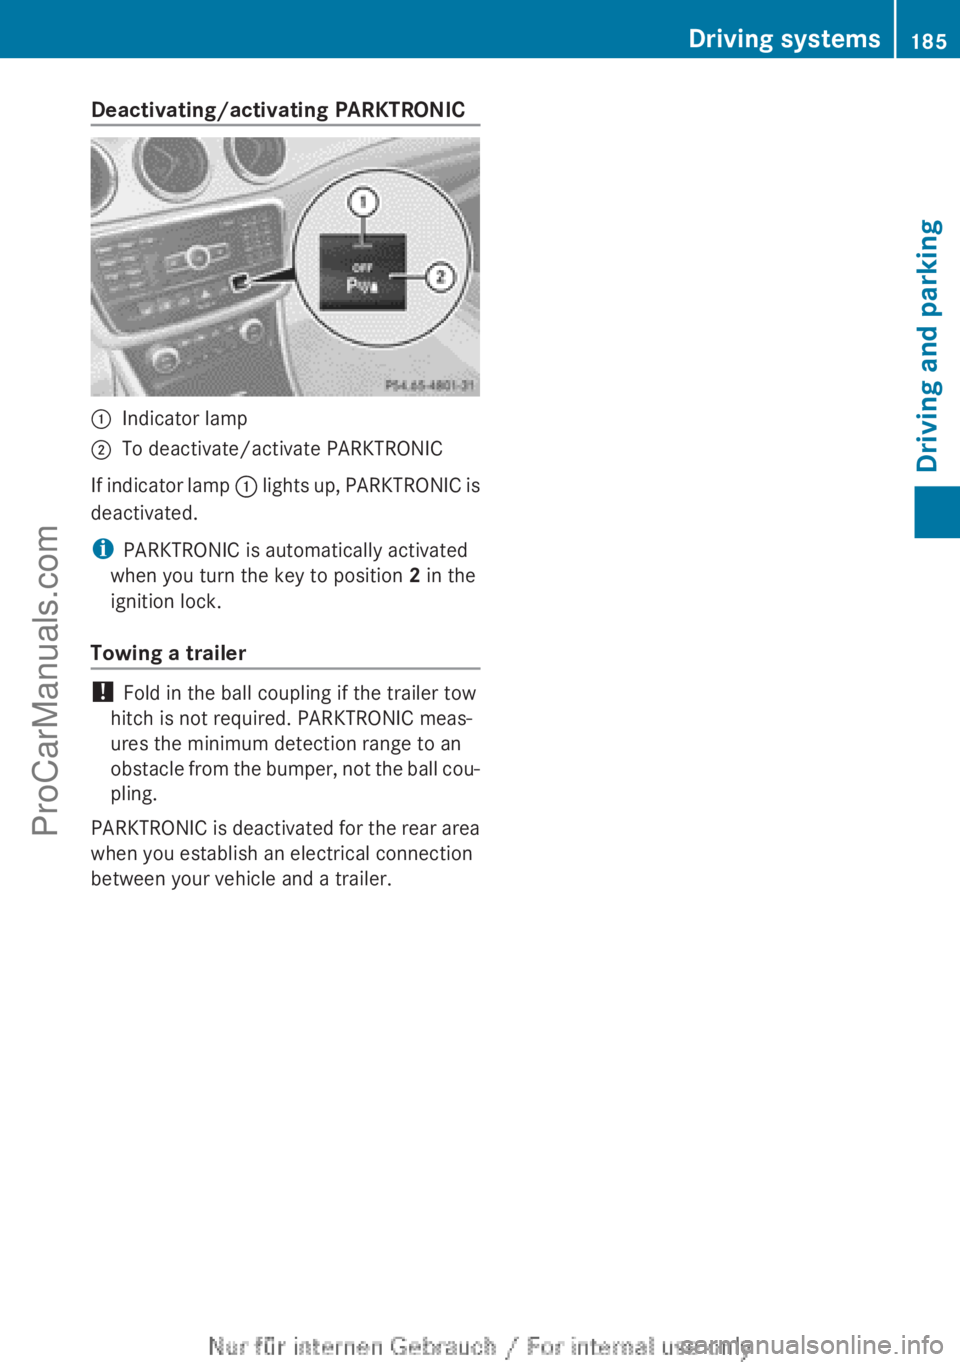
Deactivating/activating PARKTRONIC:Indicator lamp;To deactivate/activate PARKTRONIC
If indicator lamp : lights up, PARKTRONIC is
deactivated.
i PARKTRONIC is automatically activated
when you turn the key to position 2 in the
ignition lock.
Towing a trailer
! Fold in the ball coupling if the trailer tow
hitch is not required. PARKTRONIC meas-
ures the minimum detection range to an
obstacle from the bumper, not the ball cou-
pling.
PARKTRONIC is deactivated for the rear area
when you establish an electrical connection
between your vehicle and a trailer.
Driving systems185Driving and parkingZProCarManuals.com
Page 188 of 352
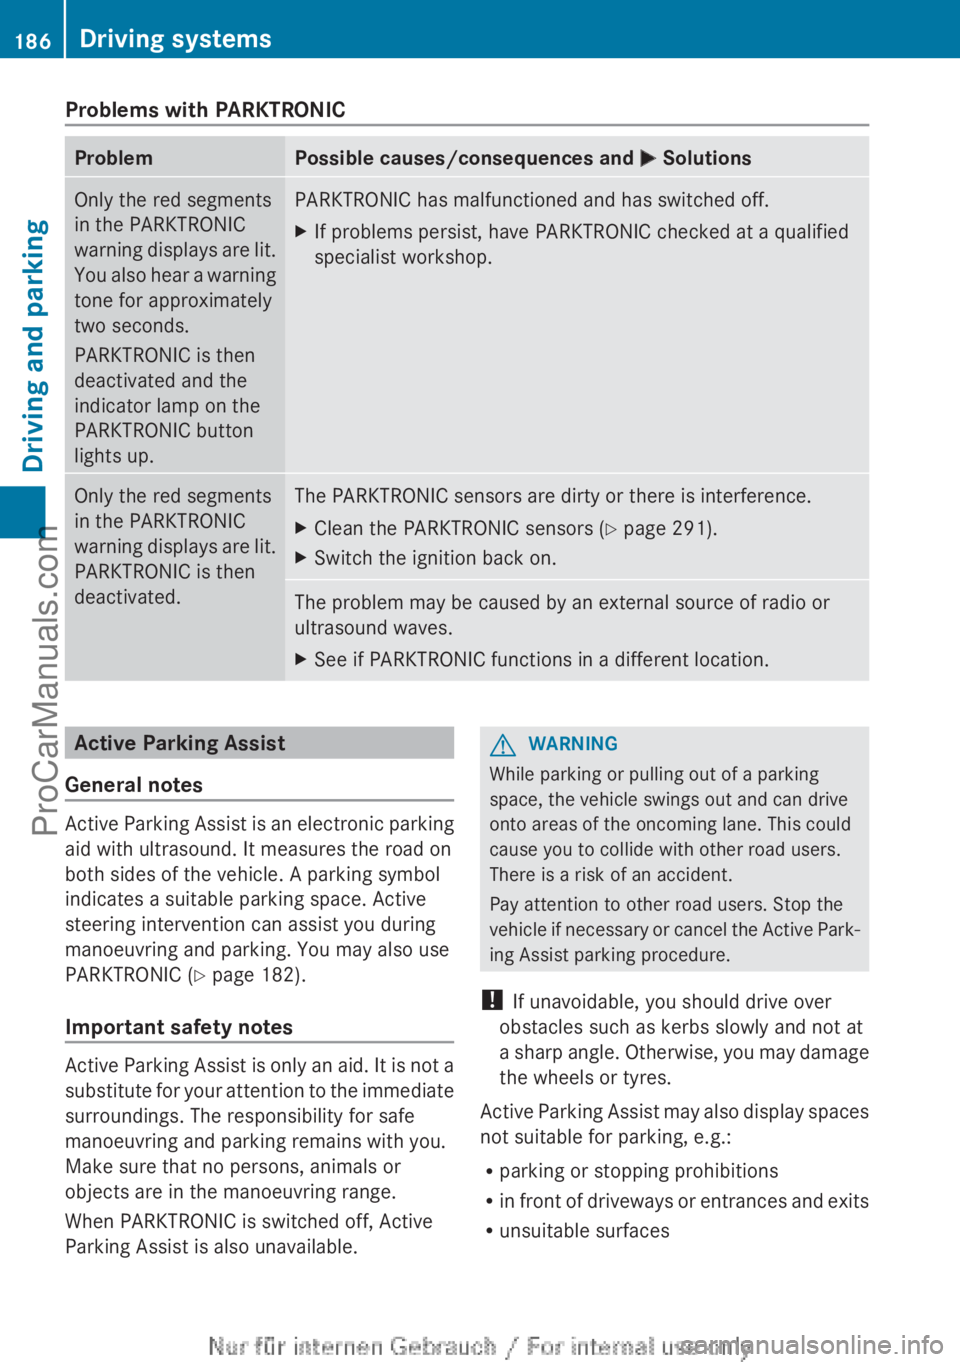
Problems with PARKTRONICProblemPossible causes/consequences and M SolutionsOnly the red segments
in the PARKTRONIC
warning displays are lit.
You also hear a warning
tone for approximately
two seconds.
PARKTRONIC is then
deactivated and the
indicator lamp on the
PARKTRONIC button
lights up.PARKTRONIC has malfunctioned and has switched off.XIf problems persist, have PARKTRONIC checked at a qualified
specialist workshop.Only the red segments
in the PARKTRONIC
warning displays are lit.
PARKTRONIC is then
deactivated.The PARKTRONIC sensors are dirty or there is interference.XClean the PARKTRONIC sensors ( Y page 291).XSwitch the ignition back on.The problem may be caused by an external source of radio or
ultrasound waves.XSee if PARKTRONIC functions in a different location.Active Parking Assist
General notes
Active Parking Assist is an electronic parking
aid with ultrasound. It measures the road on
both sides of the vehicle. A parking symbol
indicates a suitable parking space. Active
steering intervention can assist you during
manoeuvring and parking. You may also use
PARKTRONIC ( Y page 182).
Important safety notes
Active Parking Assist is only an aid. It is not a
substitute for your attention to the immediate
surroundings. The responsibility for safe
manoeuvring and parking remains with you.
Make sure that no persons, animals or
objects are in the manoeuvring range.
When PARKTRONIC is switched off, Active
Parking Assist is also unavailable.
GWARNING
While parking or pulling out of a parking
space, the vehicle swings out and can drive
onto areas of the oncoming lane. This could
cause you to collide with other road users.
There is a risk of an accident.
Pay attention to other road users. Stop the
vehicle if necessary or cancel the Active Park-
ing Assist parking procedure.
! If unavoidable, you should drive over
obstacles such as kerbs slowly and not at
a sharp angle. Otherwise, you may damage
the wheels or tyres.
Active Parking Assist may also display spaces
not suitable for parking, e.g.:
R parking or stopping prohibitions
R in front of driveways or entrances and exits
R unsuitable surfaces
186Driving systemsDriving and parking
ProCarManuals.com
Page 193 of 352
A warning tone sounds. The parking symbol
disappears and the multifunction display
shows the Park Assist cancelled mes-
sage.
When Active Parking Assist is cancelled, you
must steer again yourself.
Towing a trailer
For vehicles with a trailer tow hitch, the min-
imum required length for parking spaces is
slightly increased.
If you have attached a trailer to your vehicle,
you should not use Active Parking Assist.
Once the electrical connection is established
between your vehicle and the trailer, Active
Parking Assist is no longer available. PARK-
TRONIC is deactivated for the rear area.
Reversing camera
General notes
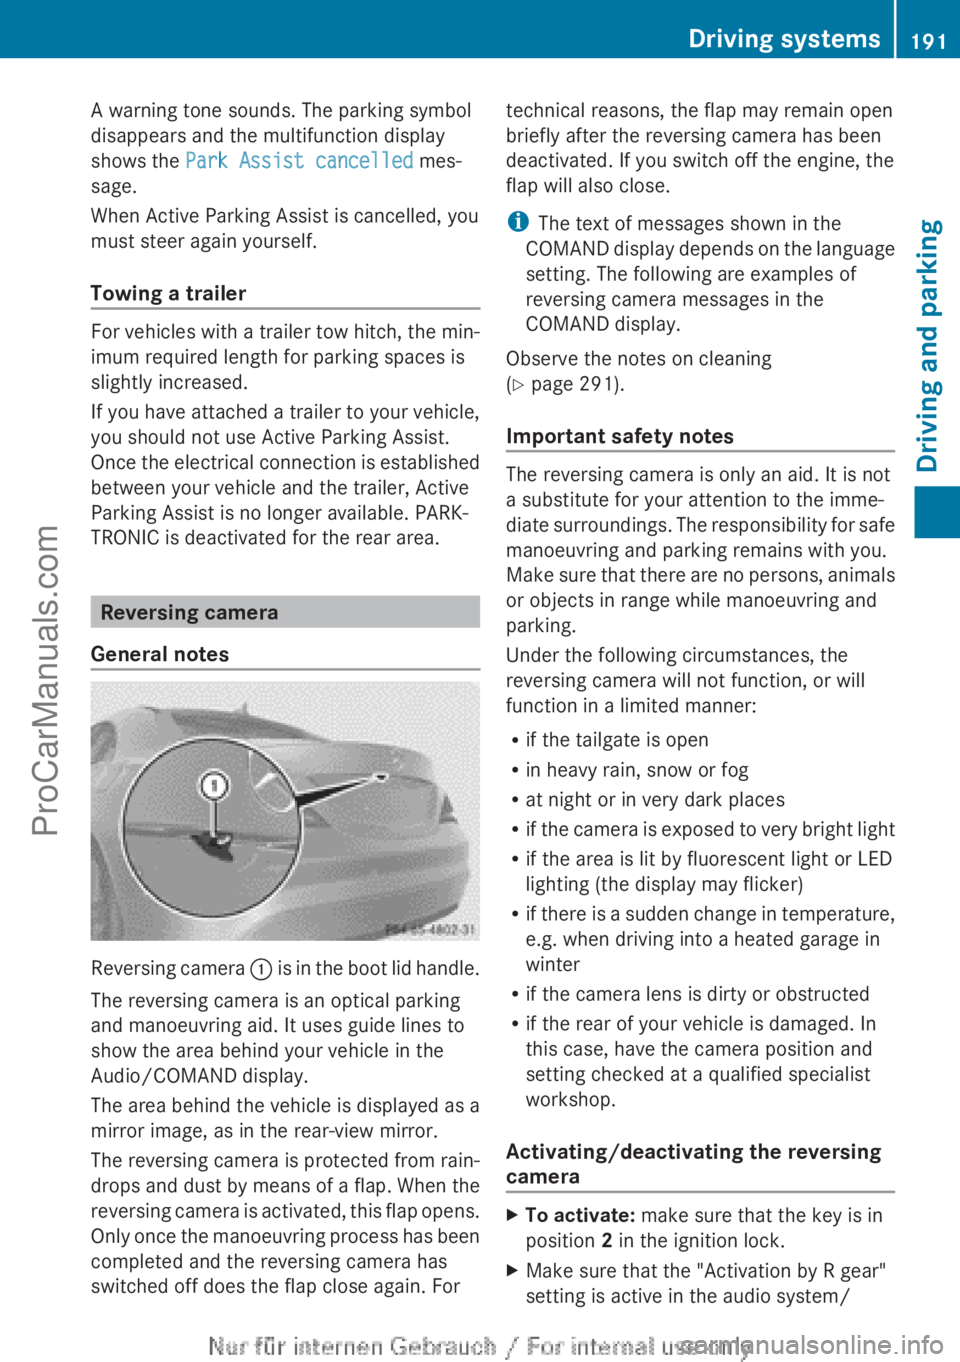
Reversing camera : is in the boot lid handle.
The reversing camera is an optical parking
and manoeuvring aid. It uses guide lines to
show the area behind your vehicle in the
Audio/COMAND display.
The area behind the vehicle is displayed as a
mirror image, as in the rear-view mirror.
The reversing camera is protected from rain-
drops and dust by means of a flap. When the
reversing camera is activated, this flap opens.
Only once the manoeuvring process has been
completed and the reversing camera has
switched off does the flap close again. For
technical reasons, the flap may remain open
briefly after the reversing camera has been
deactivated. If you switch off the engine, the
flap will also close.
i The text of messages shown in the
COMAND display depends on the language
setting. The following are examples of
reversing camera messages in the
COMAND display.
Observe the notes on cleaning
( Y page 291).
Important safety notes
The reversing camera is only an aid. It is not
a substitute for your attention to the imme-
diate surroundings. The responsibility for safe
manoeuvring and parking remains with you.
Make sure that there are no persons, animals
or objects in range while manoeuvring and
parking.
Under the following circumstances, the
reversing camera will not function, or will
function in a limited manner:
R if the tailgate is open
R in heavy rain, snow or fog
R at night or in very dark places
R if the camera is exposed to very bright light
R if the area is lit by fluorescent light or LED
lighting (the display may flicker)
R if there is a sudden change in temperature,
e.g. when driving into a heated garage in
winter
R if the camera lens is dirty or obstructed
R if the rear of your vehicle is damaged. In
this case, have the camera position and
setting checked at a qualified specialist
workshop.
Activating/deactivating the reversing
camera
XTo activate: make sure that the key is in
position 2 in the ignition lock.XMake sure that the "Activation by R gear"
setting is active in the audio system/Driving systems191Driving and parkingZProCarManuals.com
Page 201 of 352
Indicator and warning display
Blind Spot Assist is not active at speeds below
approximately 30 km/h. Vehicles in the mon-
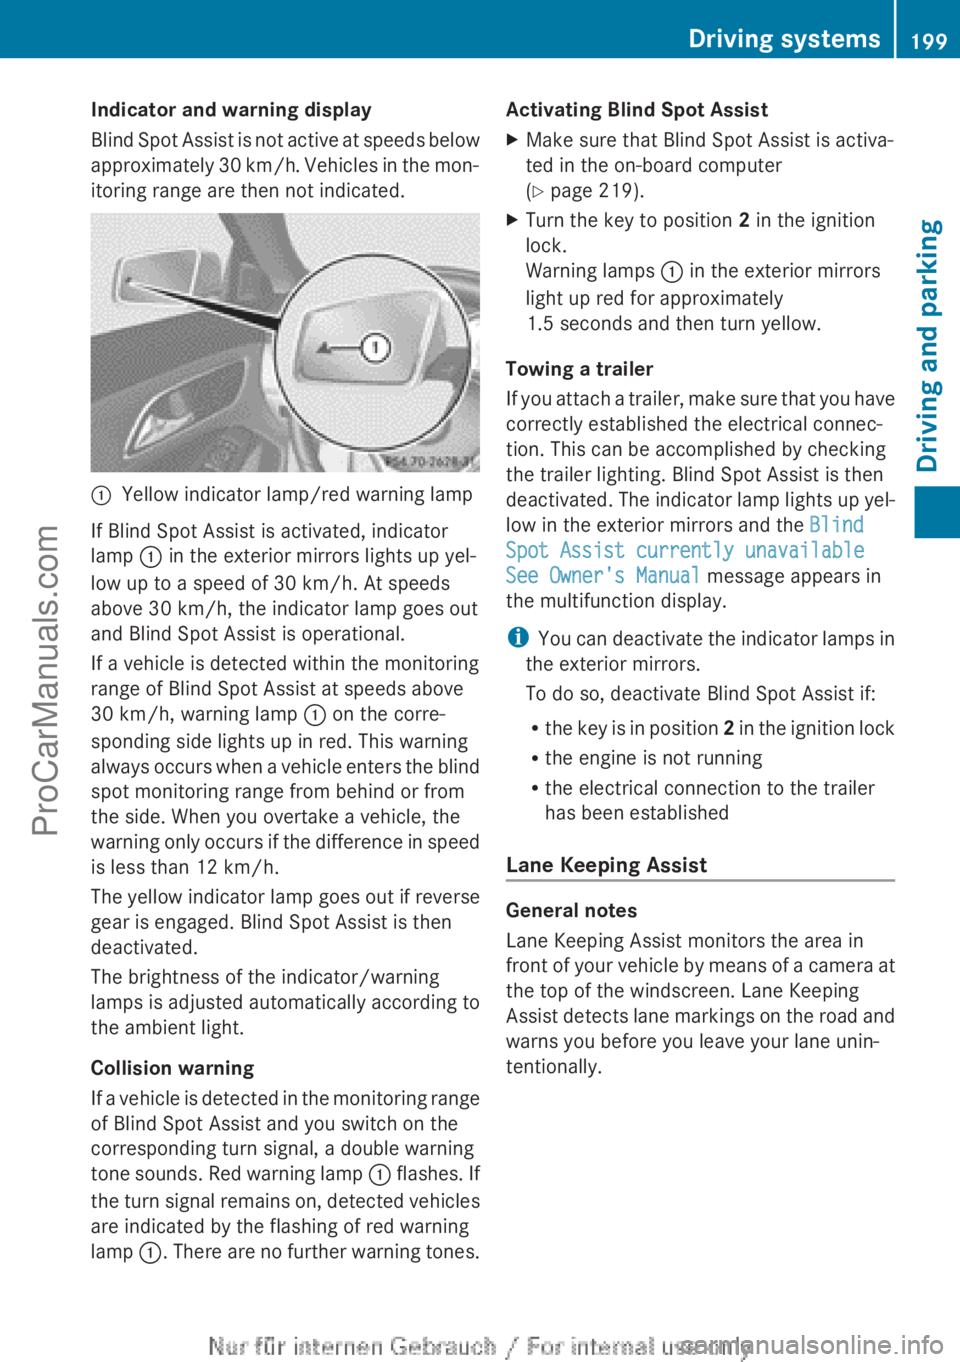
itoring range are then not indicated.:Yellow indicator lamp/red warning lamp
If Blind Spot Assist is activated, indicator
lamp : in the exterior mirrors lights up yel-
low up to a speed of 30 km/h. At speeds
above 30 km/h, the indicator lamp goes out
and Blind Spot Assist is operational.
If a vehicle is detected within the monitoring
range of Blind Spot Assist at speeds above
30 km/h, warning lamp : on the corre-
sponding side lights up in red. This warning
always occurs when a vehicle enters the blind
spot monitoring range from behind or from
the side. When you overtake a vehicle, the
warning only occurs if the difference in speed
is less than 12 km/h.
The yellow indicator lamp goes out if reverse
gear is engaged. Blind Spot Assist is then
deactivated.
The brightness of the indicator/warning
lamps is adjusted automatically according to
the ambient light.
Collision warning
If a vehicle is detected in the monitoring range
of Blind Spot Assist and you switch on the
corresponding turn signal, a double warning
tone sounds. Red warning lamp : flashes. If
the turn signal remains on, detected vehicles
are indicated by the flashing of red warning
lamp :. There are no further warning tones.
Activating Blind Spot AssistXMake sure that Blind Spot Assist is activa-
ted in the on-board computer
( Y page 219).XTurn the key to position 2 in the ignition
lock.
Warning lamps : in the exterior mirrors
light up red for approximately
1.5 seconds and then turn yellow.
Towing a trailer
If you attach a trailer, make sure that you have
correctly established the electrical connec-
tion. This can be accomplished by checking
the trailer lighting. Blind Spot Assist is then
deactivated. The indicator lamp lights up yel-
low in the exterior mirrors and the Blind
Spot Assist currently unavailable
See Owner's Manual message appears in
the multifunction display.
i You can deactivate the indicator lamps in
the exterior mirrors.
To do so, deactivate Blind Spot Assist if:
R the key is in position 2 in the ignition lock
R the engine is not running
R the electrical connection to the trailer
has been established
Lane Keeping Assist
General notes
Lane Keeping Assist monitors the area in
front of your vehicle by means of a camera at
the top of the windscreen. Lane Keeping
Assist detects lane markings on the road and
warns you before you leave your lane unin-
tentionally.
Driving systems199Driving and parkingZProCarManuals.com
Page 208 of 352
XPress the ball coupling in the direction of
the arrow until it engages behind the
bumper.
Indicator lamp ? goes out and the mes-
sage in the multifunction display disap-
pears.
Trailer power supply
! You can connect accessories with a
power rating of up to 240 W to the perma-
nent power supply and with a power rating
of up to 180 W to the power supply that is
switched on via the ignition lock.
The trailer battery may not be charged from
the power supply.
XTo switch the connected power supply
on or off: turn the key in the ignition lock
to position 2 or 0 respectively.
When it leaves the factory, your vehicle's
trailer socket is equipped with a permanent
power supply and a power supply that is
switched on via the ignition lock.
The permanent power supply is supplied via
trailer socket pin 9.
The power supply that is switched on via the
ignition lock is supplied via trailer socket pin
10.
The trailer's permanent power supply is
switched off in the event of low vehicle supply
voltage and after six hours at the latest.
You can find more information about instal-
ling the trailer electrics at a qualified special-
ist workshop.
Bulb failure indicator for LED lamps
i If LED lamps are fitted in the trailer, an
error message may appear in the multi-
function display even if there is no fault. The
reason for the error message could be that
the current has fallen below the minimum
of 50 mA.
To ensure reliable operation of the bulb failure
indicator, each LED chain in the trailer lighting
must be guaranteed a minimum current of
50 mA.
Trailer with 7-pin connector
General notes
Trailers with 7-pin connector: you can
make a connection to the 13-pin connector
on the ball coupling using an adapter plug or,
if necessary, an adapter cable. Both can be
obtained in a qualified specialist workshop.
Fitting the adapter
! Make sure that there is sufficient cable
play so that the cable cannot become
detached when cornering.
! Remove the installed adapter cable
before folding in the ball coupling. Other-
wise, damage may occur to the rear
bumper and the adapter cable.
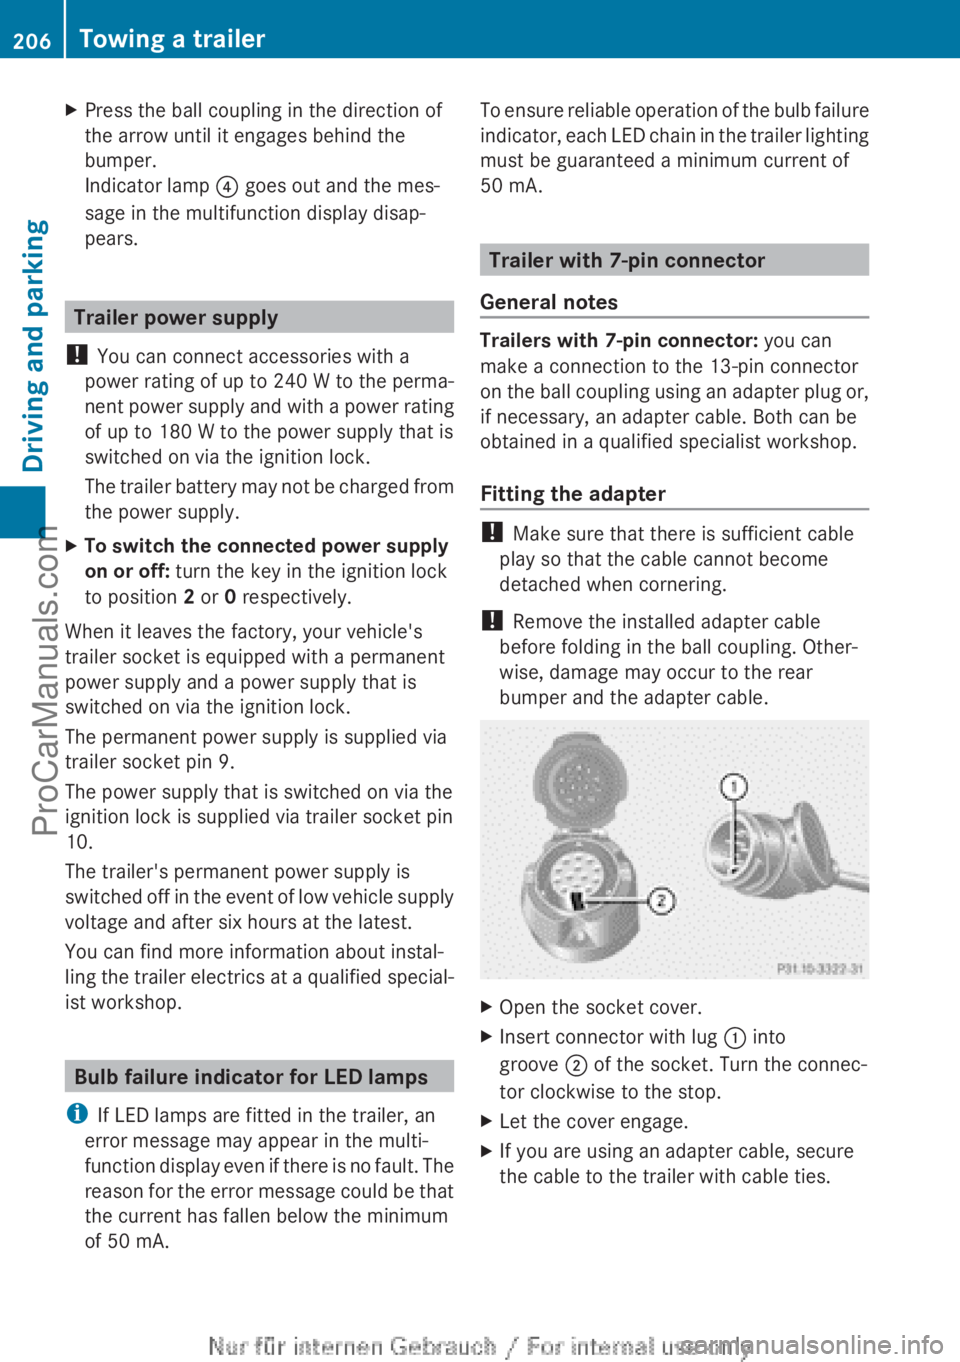
XOpen the socket cover.XInsert connector with lug : into
groove ; of the socket. Turn the connec-
tor clockwise to the stop.XLet the cover engage.XIf you are using an adapter cable, secure
the cable to the trailer with cable ties.206Towing a trailerDriving and parking
ProCarManuals.com
Page 211 of 352
At high outside temperatures and when driv-
ing uphill, the coolant temperature may rise
to the end of the scale.
Rev counter
! Do not drive in the overrevving range.
Doing so will damage the engine.
The red band in the rev counter indicates the
engine's overrevving range.
The fuel supply is interrupted to protect the
engine when the red band is reached.
Outside temperature display
You should pay special attention to road con-
ditions when temperatures are around the
freezing point.
The outside temperature display is in the mul-
tifunction display.
Changes in the outside temperature are dis-
played after a short delay.
Speedometer with segments
The speedometer is divided into segments on
vehicles with DISTRONIC PLUS.
The segments in the speedometer indicate
which speed range is available.
R Cruise control activated ( Y page 168):
The segments light up from the stored
speed to the maximum speed.
R Variable SPEEDTRONIC activated
( Y page 171):
The segments light up from the start of the
scale to the selected limit speed.
R DISTRONIC PLUS activated ( Y page 173):
One or two segments in the set speed
range light up.
R DISTRONIC PLUS detects a vehicle in front:
The segments between the speed of the
vehicle in front and the stored speed light
up.
Operating the on-board computer
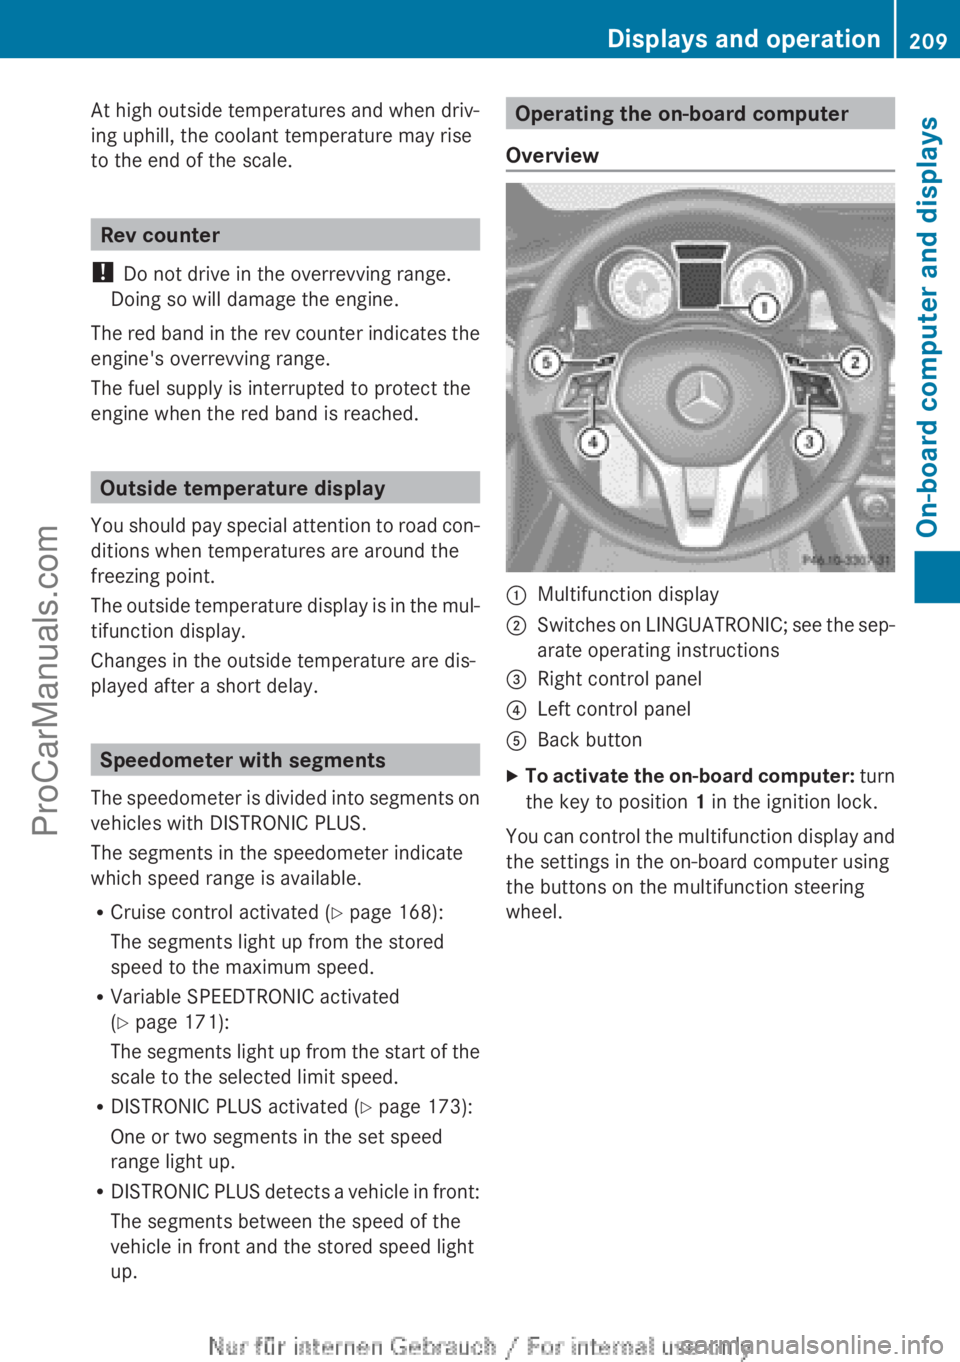
Overview:Multifunction display;Switches on LINGUATRONIC; see the sep-
arate operating instructions=Right control panel?Left control panelABack buttonXTo activate the on-board computer: turn
the key to position 1 in the ignition lock.
You can control the multifunction display and
the settings in the on-board computer using
the buttons on the multifunction steering
wheel.
Displays and operation209On-board computer and displaysZProCarManuals.com
Page 214 of 352
The values in the From start submenu are
calculated from the start of a journey, whilst
the values in the From reset submenu are
calculated from the last time the submenu
was reset ( Y page 212).
The From start trip computer is automati-
cally reset when:
R the ignition has been switched off for more
than four hours.
R 999 hours have been exceeded.
R 9,999 kilometres have been exceeded.
If the value exceeds 9,999 hours or
99,999 kilometres, the From reset trip com-
puter is automatically reset.
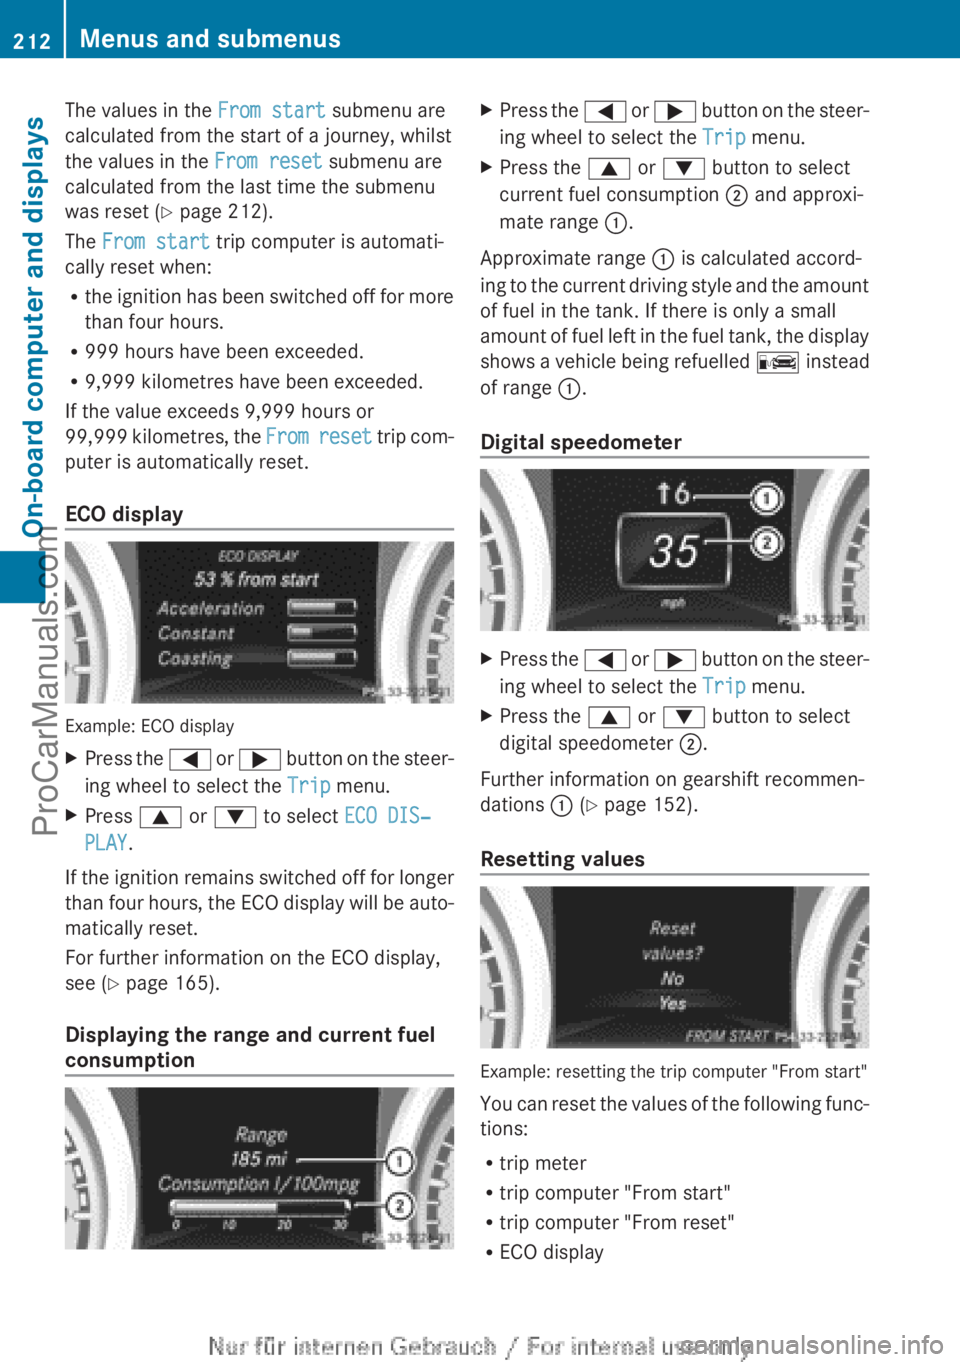
ECO display
Example: ECO display
XPress the = or ; button on the steer-
ing wheel to select the Trip menu.XPress 9 or : to select ECO DIS‐
PLAY .
If the ignition remains switched off for longer
than four hours, the ECO display will be auto-
matically reset.
For further information on the ECO display,
see ( Y page 165).
Displaying the range and current fuel
consumption
XPress the = or ; button on the steer-
ing wheel to select the Trip menu.XPress the 9 or : button to select
current fuel consumption ; and approxi-
mate range :.
Approximate range : is calculated accord-
ing to the current driving style and the amount
of fuel in the tank. If there is only a small
amount of fuel left in the fuel tank, the display
shows a vehicle being refuelled C instead
of range :.
Digital speedometer
XPress the = or ; button on the steer-
ing wheel to select the Trip menu.XPress the 9 or : button to select
digital speedometer ;.
Further information on gearshift recommen-
dations : (Y page 152).
Resetting values
Example: resetting the trip computer "From start"
You can reset the values of the following func-
tions:
R trip meter
R trip computer "From start"
R trip computer "From reset"
R ECO display
212Menus and submenusOn-board computer and displays
ProCarManuals.com