2013 MERCEDES-BENZ CLA-CLASS ignition
[x] Cancel search: ignitionPage 279 of 352
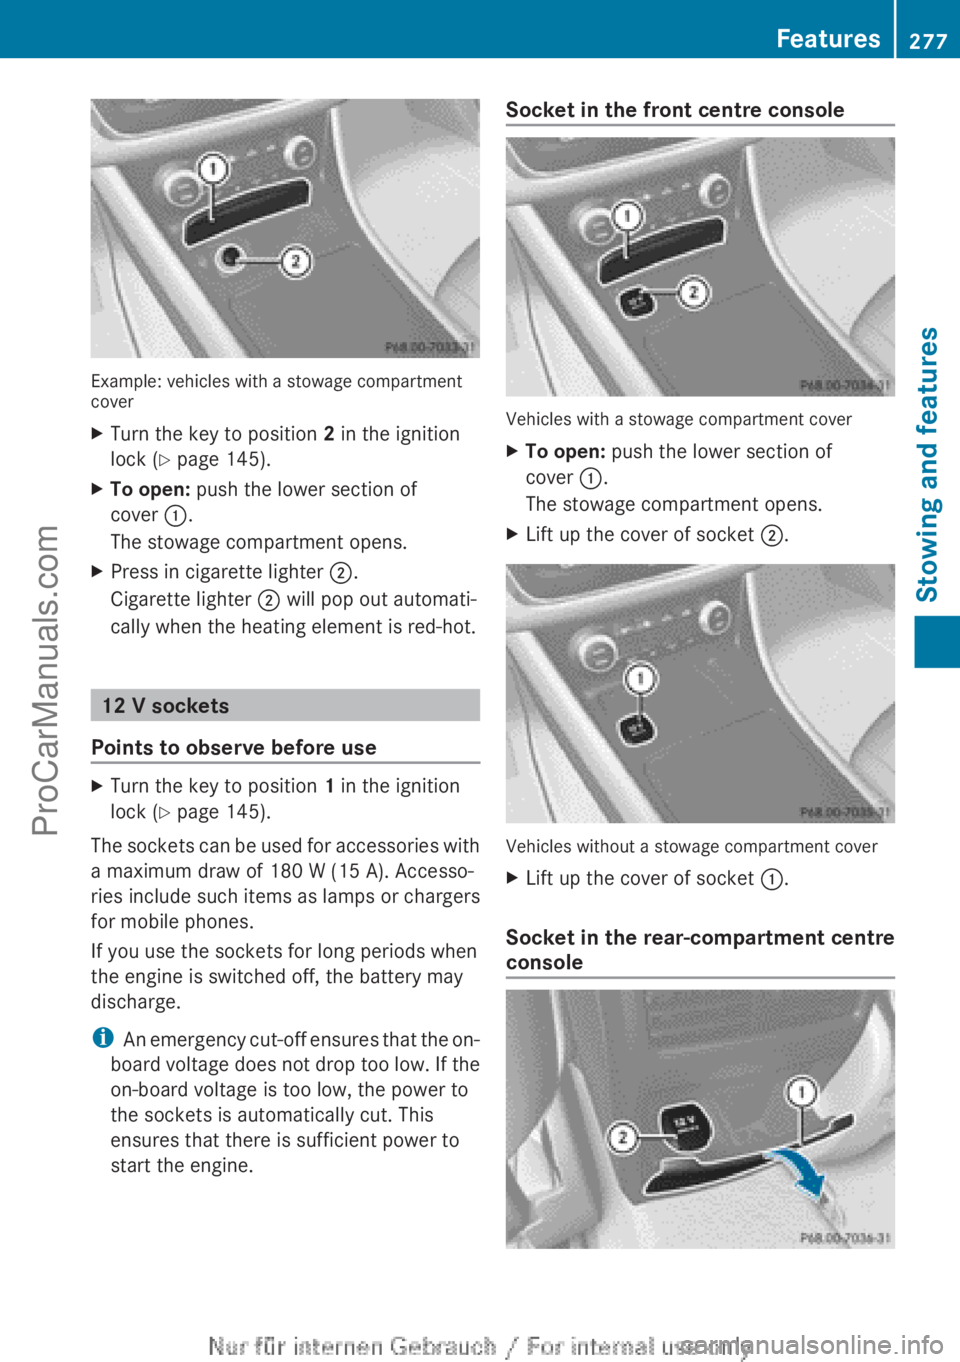
Example: vehicles with a stowage compartment
cover
XTurn the key to position 2 in the ignition
lock ( Y page 145).XTo open: push the lower section of
cover :.
The stowage compartment opens.XPress in cigarette lighter ;.
Cigarette lighter ; will pop out automati-
cally when the heating element is red-hot.
12 V sockets
Points to observe before use
XTurn the key to position 1 in the ignition
lock ( Y page 145).
The sockets can be used for accessories with
a maximum draw of 180 W (15 A). Accesso-
ries include such items as lamps or chargers
for mobile phones.
If you use the sockets for long periods when
the engine is switched off, the battery may
discharge.
i An emergency cut-off ensures that the on-
board voltage does not drop too low. If the
on-board voltage is too low, the power to
the sockets is automatically cut. This
ensures that there is sufficient power to
start the engine.
Socket in the front centre console
Vehicles with a stowage compartment cover
XTo open: push the lower section of
cover :.
The stowage compartment opens.XLift up the cover of socket ;.
Vehicles without a stowage compartment cover
XLift up the cover of socket :.
Socket in the rear-compartment centre
console
Features277Stowing and featuresZProCarManuals.com
Page 281 of 352
Using a mobile phone
If the mobile phone is inserted in the mobile
phone bracket, you can speak to the person
you are calling using the hands-free system.
XOpen the telephone compartment
( Y page 270).XPlace the mobile phone bracket into the
pre-installed fitting (see the separate
installation instructions for the mobile
phone fitting).XInsert the mobile phone into the mobile
phone bracket (see the separate installa-
tion instructions for the mobile phone fit-
ting).
i On some mobile phone brackets, first you
have to connect the phone to the mobile
phone bracket via Bluetooth ®
(see the sep-
arate operating instructions for the mobile
phone bracket).
If this is the case, the mobile phone does
not have to be inserted into the bracket for
you to be able to use the telephone func-
tions. However, the charging function and
aerial function are not available.
Operating the mobile phone
You can operate the telephone using the
6 and ~ buttons on the multifunction
steering wheel. You can operate other mobile
phone functions via the on-board computer
( Y page 215).
When you remove the key from the ignition
lock, the mobile phone stays switched on.
However, you can no longer use the hands-
free system.
If you have an active call and would like to
take the key out of the ignition lock, first
remove the mobile phone from the bracket.
i If you use a mobile phone bracket which
is connected to your mobile via Blue-
tooth ®
and you wish to continue a call on
your mobile phone:
You should switch the call to "Private
mode" before you remove the key from the
ignition lock. Otherwise, it will take up to
20 seconds for the mobile phone to dis-
connect from the system. Only then can
you continue the call on your mobile phone.
Notes on the necessary steps for setting
"Private mode" can be found in the sepa-
rate operating instructions of the mobile
phone.
i Not all mobile phones support "Private
mode".
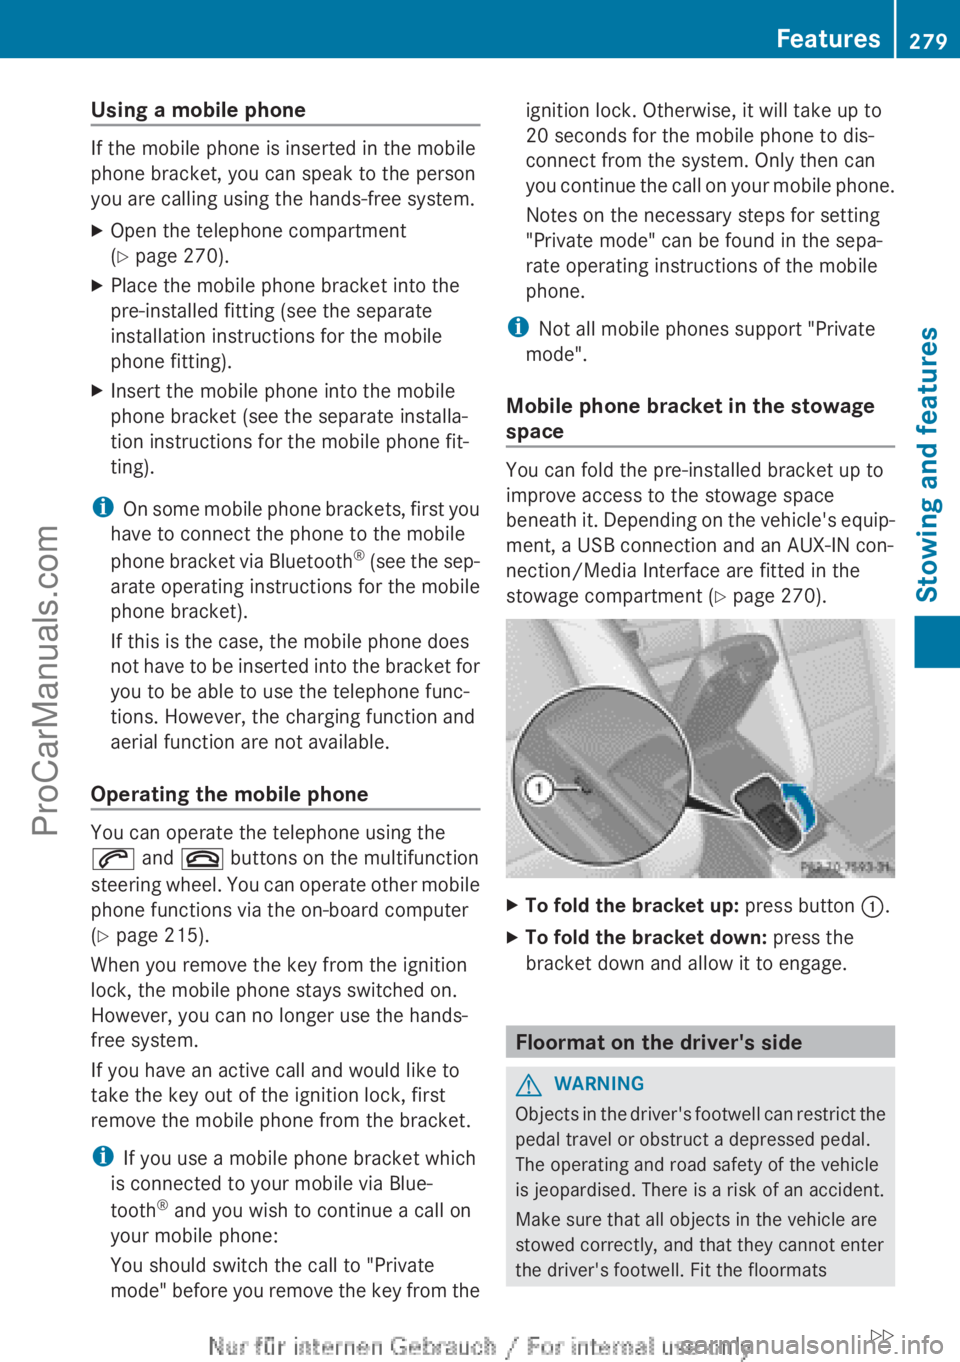
Mobile phone bracket in the stowage
space
You can fold the pre-installed bracket up to
improve access to the stowage space
beneath it. Depending on the vehicle's equip-
ment, a USB connection and an AUX-IN con-
nection/Media Interface are fitted in the
stowage compartment ( Y page 270).
XTo fold the bracket up: press button :.XTo fold the bracket down: press the
bracket down and allow it to engage.
Floormat on the driver's side
GWARNING
Objects in the driver's footwell can restrict the
pedal travel or obstruct a depressed pedal.
The operating and road safety of the vehicle
is jeopardised. There is a risk of an accident.
Make sure that all objects in the vehicle are
stowed correctly, and that they cannot enter
the driver's footwell. Fit the floormats
Features279Stowing and featuresZProCarManuals.com
Page 284 of 352
Useful information
i This Owner's Manual describes all mod-
els, series and optional equipment for your
vehicle that were available at the time of
going to press. National variations are pos-
sible. Note that your vehicle may not be
equipped with all of the functions descri-
bed. This is also the case for systems and
functions relevant to safety.
i Read the information on qualified special-
ist workshops: ( Y page 24).
Engine compartment
Bonnet
Important safety notes
GWARNING
An unlocked bonnet may open while driving
and block your view. There is a risk of an acci-
dent.
Never unlock the bonnet while driving.
GWARNING
When being opened and closed, the bonnet
may suddenly fall into the closed position.
There is a risk of injury to persons in the range
of movement of the bonnet.
Open and close the bonnet only when nobody
is in the range of movement.
GWARNING
Certain components in the engine compart-
ment could be very hot, e.g. the engine, the
radiator and parts of the exhaust system.
There is a risk of injury when accessing the
engine compartment.
As far as possible, allow the engine to cool
down and only touch the following compo-
nents.
GWARNING
If you open the bonnet while the engine is
overheating or while there is a fire in the
engine compartment, you could come into
contact with hot gases or other leaking
service products. There is a danger of injury.
Allow an overheating engine to cool down
before opening the bonnet. If there is a fire in
the engine compartment, leave the bonnet
closed and notify the fire brigade.GWARNING
There are parts in the engine compartment
that move. Certain components may continue
to run even if the ignition is switched off or
may suddenly start again, e.g. the radiator
fan. There is a danger of injury.
If you need to access the engine compart-
ment:
R switch off the ignition
R never enter the danger area of moving com-
ponents, e.g. the rotation area of the fan
R keep items of clothing away from moving
parts
GWARNING
The ignition system and the fuel injection sys-
tem operate with a high voltage. If you touch
the live components, you could receive an
electric shock. There is a danger of injury.
Never touch components of the ignition sys-
tem or the fuel injection system when the
ignition is switched on.
Active bonnet (pedestrian protection)
Operating principle
! Once triggered, an active bonnet must be
reset at a qualified specialist workshop,
e.g. a Mercedes-Benz Service Centre. The
active bonnet function will then be availa-
ble again. The additional pedestrian pro-
tection provided by the active bonnet will
then be restored.
The active bonnet is only available in certain
countries.
The active bonnet can reduce the risk of injury
to pedestrians in certain accident situations.
282Engine compartmentMaintenance and care
ProCarManuals.com
Page 285 of 352
Raising the active bonnet increases the clear-
ance to hard components, such as the engine.
If the active bonnet has been triggered, it is
raised at the rear in the area around the hinge
by approximately 60 mm.
For the drive to the workshop, reset the trig-
gered active bonnet yourself. If the active
bonnet has been triggered, pedestrian pro-
tection may be limited.
ResettingGWARNING
Certain components in the engine compart-
ment could be very hot, e.g. the engine, the
radiator and parts of the exhaust system.
There is a risk of injury when accessing the
engine compartment.
As far as possible, allow the engine to cool
down and only touch the following compo-
nents.
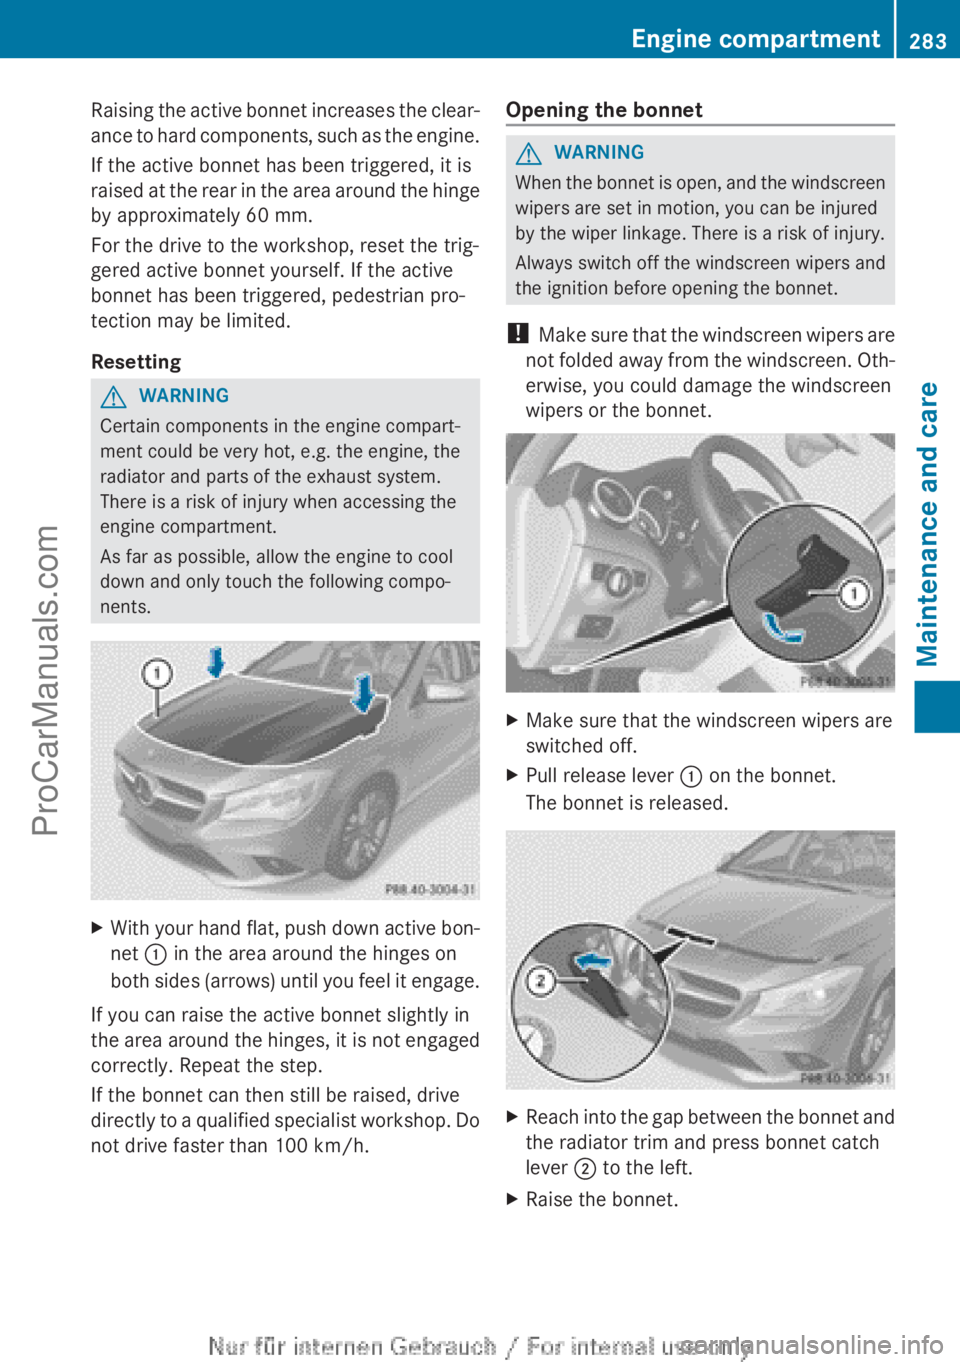
XWith your hand flat, push down active bon-
net : in the area around the hinges on
both sides (arrows) until you feel it engage.
If you can raise the active bonnet slightly in
the area around the hinges, it is not engaged
correctly. Repeat the step.
If the bonnet can then still be raised, drive
directly to a qualified specialist workshop. Do
not drive faster than 100 km/h.
Opening the bonnetGWARNING
When the bonnet is open, and the windscreen
wipers are set in motion, you can be injured
by the wiper linkage. There is a risk of injury.
Always switch off the windscreen wipers and
the ignition before opening the bonnet.
! Make sure that the windscreen wipers are
not folded away from the windscreen. Oth-
erwise, you could damage the windscreen
wipers or the bonnet.
XMake sure that the windscreen wipers are
switched off.XPull release lever : on the bonnet.
The bonnet is released.XReach into the gap between the bonnet and
the radiator trim and press bonnet catch
lever ; to the left.XRaise the bonnet.Engine compartment283Maintenance and careZProCarManuals.com
Page 288 of 352

Checking the coolant level when the cool-
ant temperature is over 40 † can lead to
damage to the engine or engine cooling
system.
Example
XPark the vehicle on a level surface.
Only check the coolant level if the vehicle
is on a level surface and the engine has
cooled down.XTurn the key to position 2 in the ignition
lock ( Y page 145).XCheck the coolant temperature display in
the instrument cluster.
The coolant temperature must be below
40 †.XTurn the key to position 0 (Y page 145) in
the ignition lock.XSlowly turn cap : half a turn anti-clock-
wise to allow excess pressure to escape.XTurn cap : further anti-clockwise and
remove it.
If the coolant is at the level of marker bar
= in the filler neck when cold, there is
enough coolant in coolant expansion
tank ;.XIf necessary, top up with coolant that has
been tested and approved by Mercedes-
Benz.XReplace cap : and turn it clockwise as far
as it will go.
For further information on coolant, see
( Y page 341).
Topping up the windscreen washer sys-
tem/headlamp cleaning systemGWARNING
Windscreen washer concentrate is highly
flammable. If it comes into contact with hot
engine components or the exhaust system it
could ignite. There is a risk of fire and injury.
Make sure that no windscreen washer con-
centrate is spilled next to the filler neck.
Example
XTo open: pull cap : upwards by the tab.XTop up with the premixed washer fluid.XTo close: press cap : onto the filler neck
until it engages.
The washer fluid reservoir is used for both the
windscreen washer system and the headlamp
cleaning system.
If the washer fluid level drops below the rec-
ommended minimum of 1 litre, a message
appears in the multifunction display prompt-
ing you to refill the washer fluid
( Y page 254).
Further information on windscreen washer
fluid/antifreeze ( Y page 342).
Service
ASSYST PLUS
Service messages
The ASSYST PLUS service interval display
informs you of the next service due date.
286ServiceMaintenance and care
ProCarManuals.com
Page 289 of 352

Information on the type of service and service
intervals (see separate Service Booklet).
You can obtain further information from any
Mercedes-Benz Service Centre.
i The ASSYST PLUS service interval display
does not show any information on the
engine oil level. Observe the notes on the
engine oil level ( Y page 284).
The multifunction display shows a service
message for a few seconds, e.g.:
R Service A in .. days
R Service A due
R Service A overdue by .. days
Depending on the operating conditions of the
vehicle, the remaining time or distance until
the next service due date is displayed.
The letter indicates which service is due. A
stands for a minor service and B for a major
service. A number or another letter may be
displayed after the letter. This figure indicates
any necessary additional maintenance work
to be performed.
If you notify a qualified specialist workshop of
this display, you will receive a statement on
the associated costs.
The ASSYST PLUS service interval display
does not take into account any periods of
time during which the battery is disconnec-
ted.
Maintaining the time-dependent service
schedule:XNote down the service due date displayed
in the multifunction display before discon-
necting the battery.
or
XAfter reconnecting the battery, subtract
the battery disconnection periods from the
service date shown on the display.
Hiding a service message
XPress % or a .Displaying service messagesXSwitch the ignition on.XUsing = or ; , select the Service
menu.XPress 9 or : to select the ASSYST
PLUS submenu and press a to confirm.
The service due date appears in the multi-
function display.
Information about Service
Resetting the ASSYST PLUS service inter-
val display
! If the ASSYST PLUS service interval dis-
play has been inadvertently reset, this set-
ting can be corrected at a qualified special-
ist workshop.
Have service work carried out as described
in the Service Booklet. This may otherwise
lead to increased wear and damage to the
major assemblies or the vehicle.
A qualified specialist workshop, e.g. a
Mercedes-Benz Service Centre, will reset the
ASSYST PLUS service interval display after
the service work has been carried out. You
can also obtain further information on main-
tenance work, for example.
Special service requirements
The prescribed service interval is based on
normal operation of the vehicle. Service work
will need to be performed more often if the
vehicle is operated under arduous conditions
or increased loads, for example:
R regular city driving with frequent intermedi-
ate stops
R if the vehicle is primarily used to travel
short distances
R for frequent operation in mountainous ter-
rain or on poor road surfaces
R if the engine is often left idling for long peri-
ods
In these or similar operating conditions, have
the air filter, engine oil and oil filter, for exam-
ple, changed more frequently. The tyres must
Service287Maintenance and careZProCarManuals.com
Page 292 of 352
XRemove impurities immediately, where
possible, whilst avoiding rubbing too hard.XSoak insect remains with insect remover
and rinse off the treated areas afterwards.XSoak bird droppings with water and rinse
off the treated areas afterwards.XRemove coolant, brake fluid, tree resin,
oils, fuels and greases by rubbing gently
with a cloth soaked in petroleum ether or
lighter fluid.XUse tar remover to remove tar stains.XUse silicone remover to remove wax.
The following cannot always be completely
repaired:
R scratches
R corrosive deposits
R areas affected by corrosion
R damage caused by inadequate care
In such cases, visit a qualified specialist work-
shop.
Care and treatment of matt paintwork
! Never polish the vehicle or the light alloy
wheels. Polishing makes the paintwork
shiny.
! The following may cause the paint to
become shiny and thus reduce the matt
effect:
R Vigorous rubbing with unsuitable mate-
rials.
R Frequent use of car washes.
R Washing the vehicle in direct sunlight.
! Never use paint cleaner, buffing or pol-
ishing products, or gloss preserver, e.g.
wax. These products are only suitable for
high-gloss surfaces. Their use on vehicles
with matt finish leads to considerable sur-
face damage (shiny, spotted areas).
Always have paintwork repairs carried out
at a qualified specialist workshop.
! Do not use wash programs with a hot wax
treatment under any circumstances.
Observe these notes if your vehicle has a
clear matt finish. This will help you to avoid
damage to the paintwork due to incorrect
treatment.
These notes also apply to light-alloy wheels
with a clear matt finish.
i The vehicle should preferably be washed
by hand using a soft sponge, car shampoo
and plenty of water.
i Use only insect remover and car shampoo
from the range of recommended and
approved Mercedes-Benz care products.
Cleaning the windowsGWARNING
If the windscreen wipers are set in motion
when cleaning the windscreen or wiper
blades, you could become trapped. There is a
danger of injury.
Always switch off the windscreen wipers and
the ignition before cleaning the windscreen or
wiper blades.
! Only fold the windscreen wipers away
from the windscreen when vertical. Other-
wise, you will damage the bonnet.
! Do not use dry cloths, abrasive products,
solvents or cleaning agents containing sol-
vents to clean the inside of the windows.
Do not touch the insides of the windows
with hard objects, e.g. an ice scraper or
ring. There is otherwise a risk of damaging
the windows.
! Clean the water drainage channels of the
windscreen and the rear window at regular
intervals. Deposits such as leaves, petals
and pollen may under certain circumstan-
ces prevent water from draining away. This
can lead to corrosion damage and damage
to electronic components.
XClean the inside and outside of the win-
dows with a damp cloth and a cleaning
agent that is recommended and approved
by Mercedes-Benz.290CareMaintenance and care
ProCarManuals.com
Page 293 of 352
Cleaning the wiper bladesGWARNING
If the windscreen wipers are set in motion
when cleaning the windscreen or wiper
blades, you could become trapped. There is a
danger of injury.
Always switch off the windscreen wipers and
the ignition before cleaning the windscreen or
wiper blades.
! Only fold the windscreen wipers away
from the windscreen when vertical. Other-
wise, you will damage the bonnet.
! Do not pull on the wiper blade. Otherwise,
the wiper blade could be damaged.
! Do not clean wiper blades too often and
do not rub them too hard. Otherwise, the
graphite coating could be damaged. This
could cause wiper noise.
XFold the wiper arms away from the wind-
screen.XClean the wiper blades carefully using a
damp cloth.XFold the windscreen wipers back again
before switching on the ignition.
! Hold the wiper arm securely when folding
back. The windscreen could be damaged if
the wiper arm hits against it suddenly.
Cleaning the exterior lighting
! Only use cleaning agents or cleaning
cloths that are suitable for plastic lenses.
Unsuitable cleaning agents or cleaning
cloths could scratch or damage the plastic
lenses of the exterior lighting.
XClean the plastic lenses of the exterior
lighting using a wet sponge and a mild
cleaning agent, e.g. Mercedes-Benz car
shampoo or cleaning cloths.Cleaning the mirror turn signal
! Only use cleaning agents or cleaning
cloths that are suitable for plastic lenses.
Unsuitable cleaning agents or cleaning
cloths could scratch or damage the plastic
lenses of the mirror turn signals.
XClean the plastic lenses of the mirror turn
signals in the exterior mirror housing using
a wet sponge and a mild cleaning agent,
e.g. Mercedes-Benz car shampoo or clean-
ing cloths.
Cleaning the sensors
! If you clean the sensors with a high-pres-
sure cleaner, make sure that you keep a
distance of at least 30 cm between the
vehicle and the high-pressure cleaner noz-
zle. Information about the correct distance
is available from the equipment manufac-
turer.
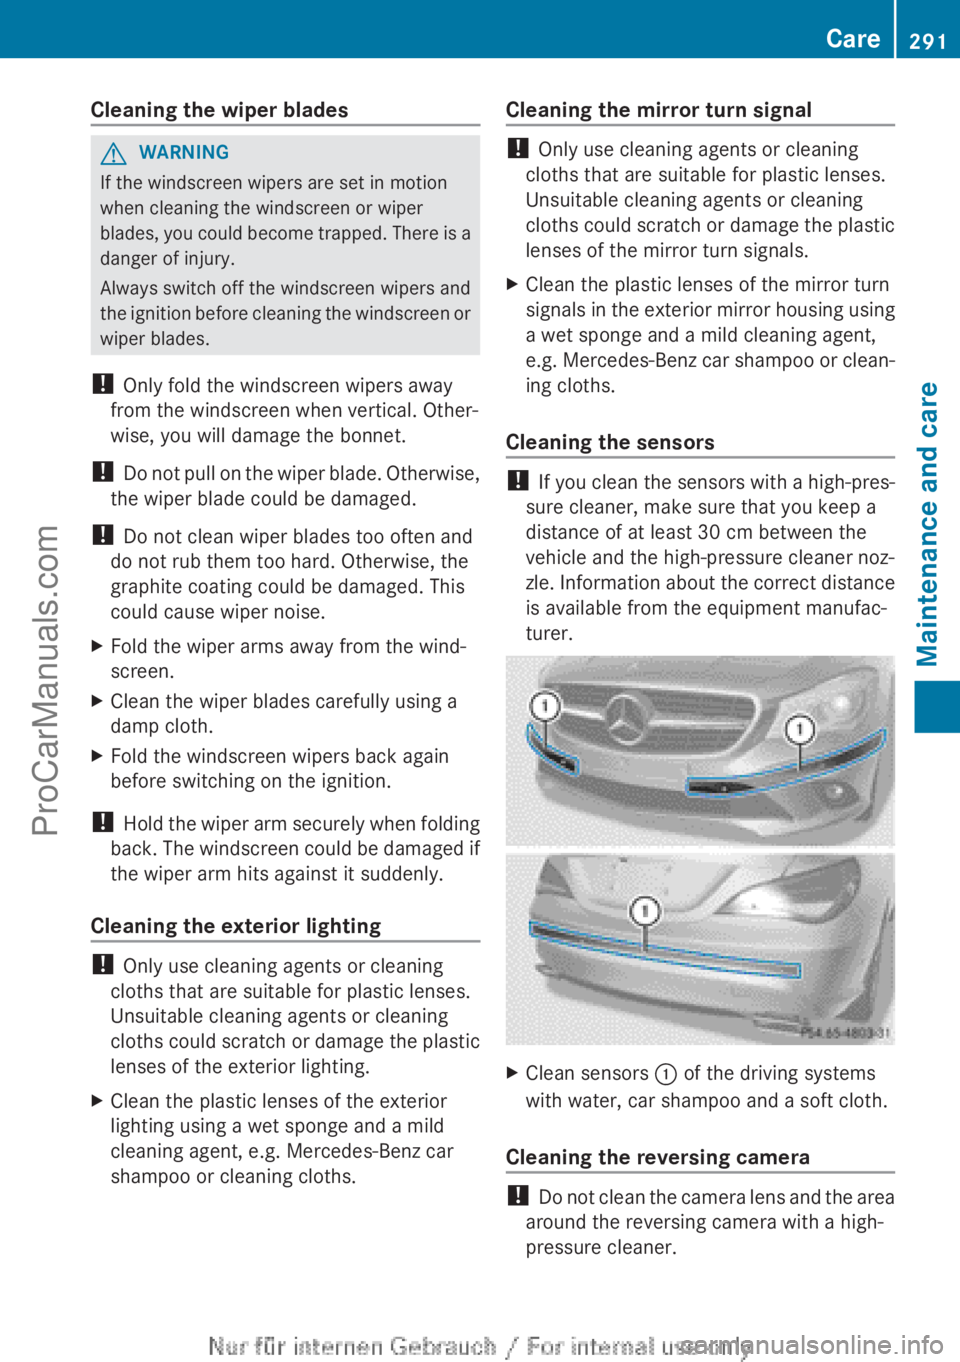
XClean sensors : of the driving systems
with water, car shampoo and a soft cloth.
Cleaning the reversing camera
! Do not clean the camera lens and the area
around the reversing camera with a high-
pressure cleaner.
Care291Maintenance and careZProCarManuals.com