2013 MERCEDES-BENZ CLA-CLASS ignition
[x] Cancel search: ignitionPage 294 of 352
XMake sure that the vehicle is stationary and
that the key is in position 2 in the ignition
lock.XTo open the cover of the reversing cam-
era: with the audio system/COMAND
Online activated, press the W button.XSelect System by turning cVd the audio
system/COMAND controller and press W
to confirm.XSelect Rear view camera and press W to
confirm.XSelect Open camera cover and confirm
with W.
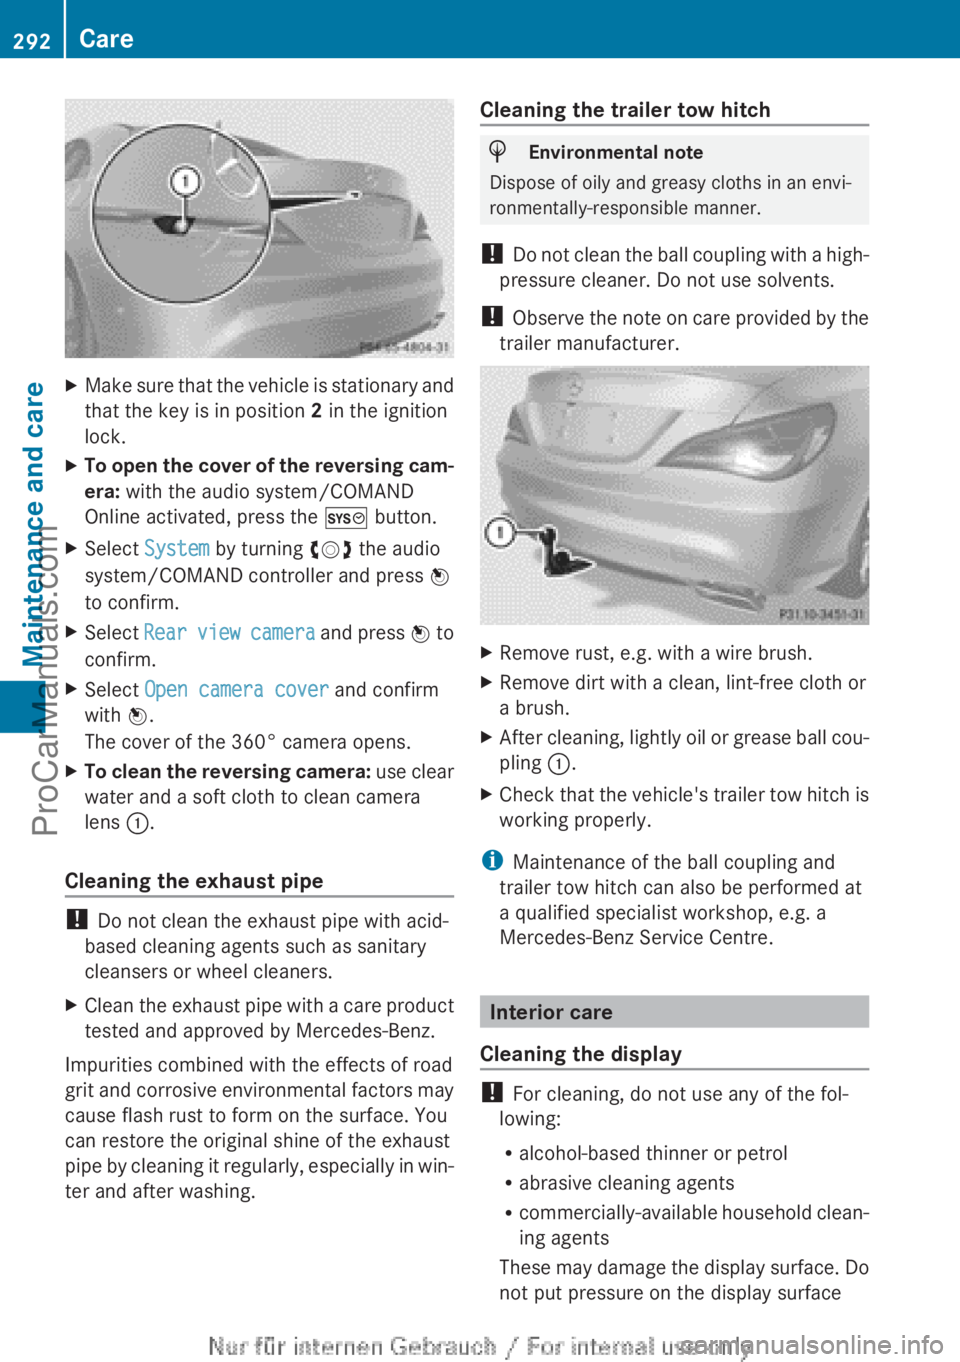
The cover of the 360° camera opens.XTo clean the reversing camera: use clear
water and a soft cloth to clean camera
lens :.
Cleaning the exhaust pipe
!
Do not clean the exhaust pipe with acid-
based cleaning agents such as sanitary
cleansers or wheel cleaners.
XClean the exhaust pipe with a care product
tested and approved by Mercedes-Benz.
Impurities combined with the effects of road
grit and corrosive environmental factors may
cause flash rust to form on the surface. You
can restore the original shine of the exhaust
pipe by cleaning it regularly, especially in win-
ter and after washing.
Cleaning the trailer tow hitchHEnvironmental note
Dispose of oily and greasy cloths in an envi-
ronmentally-responsible manner.
! Do not clean the ball coupling with a high-
pressure cleaner. Do not use solvents.
! Observe the note on care provided by the
trailer manufacturer.
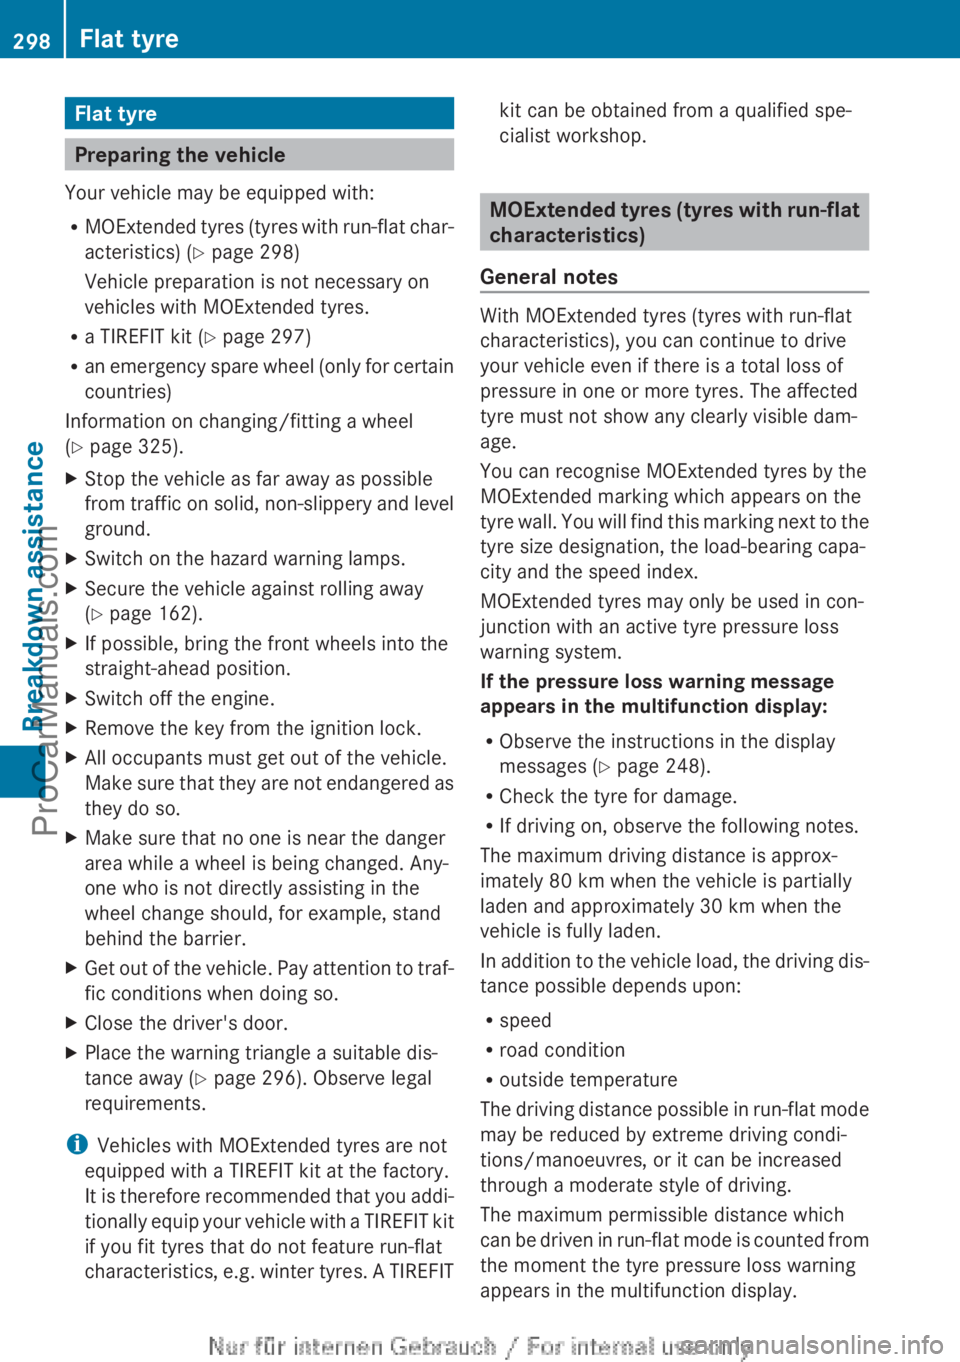
XRemove rust, e.g. with a wire brush.XRemove dirt with a clean, lint-free cloth or
a brush.XAfter cleaning, lightly oil or grease ball cou-
pling :.XCheck that the vehicle's trailer tow hitch is
working properly.
i Maintenance of the ball coupling and
trailer tow hitch can also be performed at
a qualified specialist workshop, e.g. a
Mercedes-Benz Service Centre.
Interior care
Cleaning the display
! For cleaning, do not use any of the fol-
lowing:
R alcohol-based thinner or petrol
R abrasive cleaning agents
R commercially-available household clean-
ing agents
These may damage the display surface. Do
not put pressure on the display surface
292CareMaintenance and care
ProCarManuals.com
Page 300 of 352
Flat tyre
Preparing the vehicle
Your vehicle may be equipped with:
R MOExtended tyres (tyres with run-flat char-
acteristics) ( Y page 298)
Vehicle preparation is not necessary on
vehicles with MOExtended tyres.
R a TIREFIT kit ( Y page 297)
R an emergency spare wheel (only for certain
countries)
Information on changing/fitting a wheel
( Y page 325).
XStop the vehicle as far away as possible
from traffic on solid, non-slippery and level
ground.XSwitch on the hazard warning lamps.XSecure the vehicle against rolling away
( Y page 162).XIf possible, bring the front wheels into the
straight-ahead position.XSwitch off the engine.XRemove the key from the ignition lock.XAll occupants must get out of the vehicle.
Make sure that they are not endangered as
they do so.XMake sure that no one is near the danger
area while a wheel is being changed. Any-
one who is not directly assisting in the
wheel change should, for example, stand
behind the barrier.XGet out of the vehicle. Pay attention to traf-
fic conditions when doing so.XClose the driver's door.XPlace the warning triangle a suitable dis-
tance away ( Y page 296). Observe legal
requirements.
i Vehicles with MOExtended tyres are not
equipped with a TIREFIT kit at the factory.
It is therefore recommended that you addi-
tionally equip your vehicle with a TIREFIT kit
if you fit tyres that do not feature run-flat
characteristics, e.g. winter tyres. A TIREFIT
kit can be obtained from a qualified spe-
cialist workshop.
MOExtended tyres (tyres with run-flat
characteristics)
General notes
With MOExtended tyres (tyres with run-flat
characteristics), you can continue to drive
your vehicle even if there is a total loss of
pressure in one or more tyres. The affected
tyre must not show any clearly visible dam-
age.
You can recognise MOExtended tyres by the
MOExtended marking which appears on the
tyre wall. You will find this marking next to the
tyre size designation, the load-bearing capa-
city and the speed index.
MOExtended tyres may only be used in con-
junction with an active tyre pressure loss
warning system.
If the pressure loss warning message
appears in the multifunction display:
R Observe the instructions in the display
messages ( Y page 248).
R Check the tyre for damage.
R If driving on, observe the following notes.
The maximum driving distance is approx-
imately 80 km when the vehicle is partially
laden and approximately 30 km when the
vehicle is fully laden.
In addition to the vehicle load, the driving dis-
tance possible depends upon:
R speed
R road condition
R outside temperature
The driving distance possible in run-flat mode
may be reduced by extreme driving condi-
tions/manoeuvres, or it can be increased
through a moderate style of driving.
The maximum permissible distance which
can be driven in run-flat mode is counted from
the moment the tyre pressure loss warning
appears in the multifunction display.
298Flat tyreBreakdown assistance
ProCarManuals.com
Page 302 of 352
You can use TIREFIT at outside temperatures
down to Ò20 †.
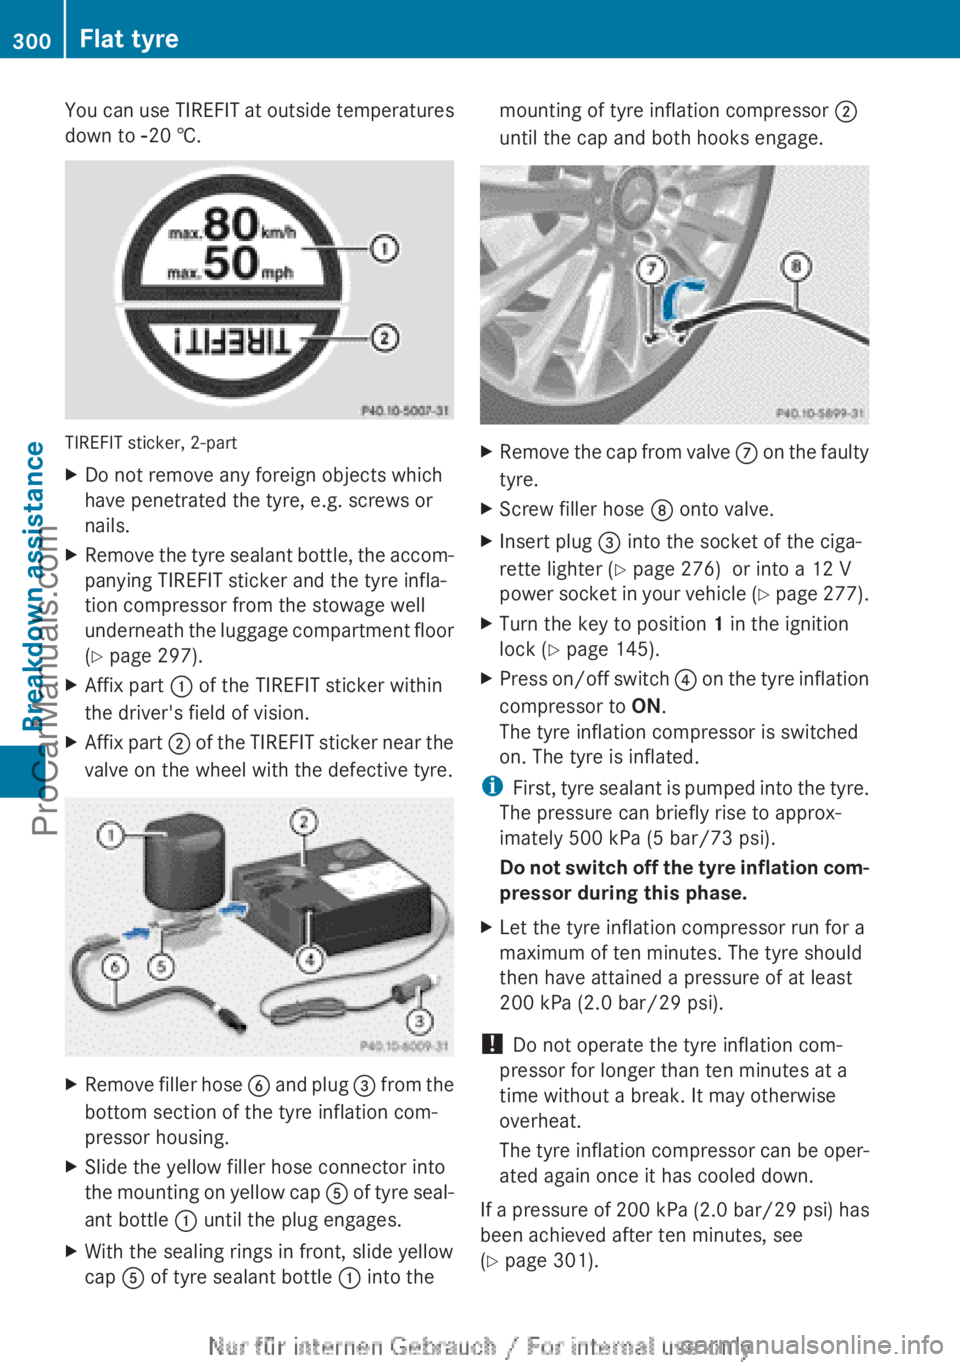
TIREFIT sticker, 2-part
XDo not remove any foreign objects which
have penetrated the tyre, e.g. screws or
nails.XRemove the tyre sealant bottle, the accom-
panying TIREFIT sticker and the tyre infla-
tion compressor from the stowage well
underneath the luggage compartment floor
( Y page 297).XAffix part : of the TIREFIT sticker within
the driver's field of vision.XAffix part ; of the TIREFIT sticker near the
valve on the wheel with the defective tyre.XRemove filler hose B and plug = from the
bottom section of the tyre inflation com-
pressor housing.XSlide the yellow filler hose connector into
the mounting on yellow cap A of tyre seal-
ant bottle : until the plug engages.XWith the sealing rings in front, slide yellow
cap A of tyre sealant bottle : into themounting of tyre inflation compressor ;
until the cap and both hooks engage.XRemove the cap from valve C on the faulty
tyre.XScrew filler hose D onto valve.XInsert plug = into the socket of the ciga-
rette lighter ( Y page 276) or into a 12 V
power socket in your vehicle (Y page 277).XTurn the key to position 1 in the ignition
lock ( Y page 145).XPress on/off switch ? on the tyre inflation
compressor to ON.
The tyre inflation compressor is switched
on. The tyre is inflated.
i First, tyre sealant is pumped into the tyre.
The pressure can briefly rise to approx-
imately 500 kPa (5 bar/73 psi).
Do not switch off the tyre inflation com-
pressor during this phase.
XLet the tyre inflation compressor run for a
maximum of ten minutes. The tyre should
then have attained a pressure of at least
200 kPa (2.0 bar/29 psi).
! Do not operate the tyre inflation com-
pressor for longer than ten minutes at a
time without a break. It may otherwise
overheat.
The tyre inflation compressor can be oper-
ated again once it has cooled down.
If a pressure of 200 kPa (2.0 bar/29 psi) has
been achieved after ten minutes, see
( Y page 301).
300Flat tyreBreakdown assistance
ProCarManuals.com
Page 309 of 352
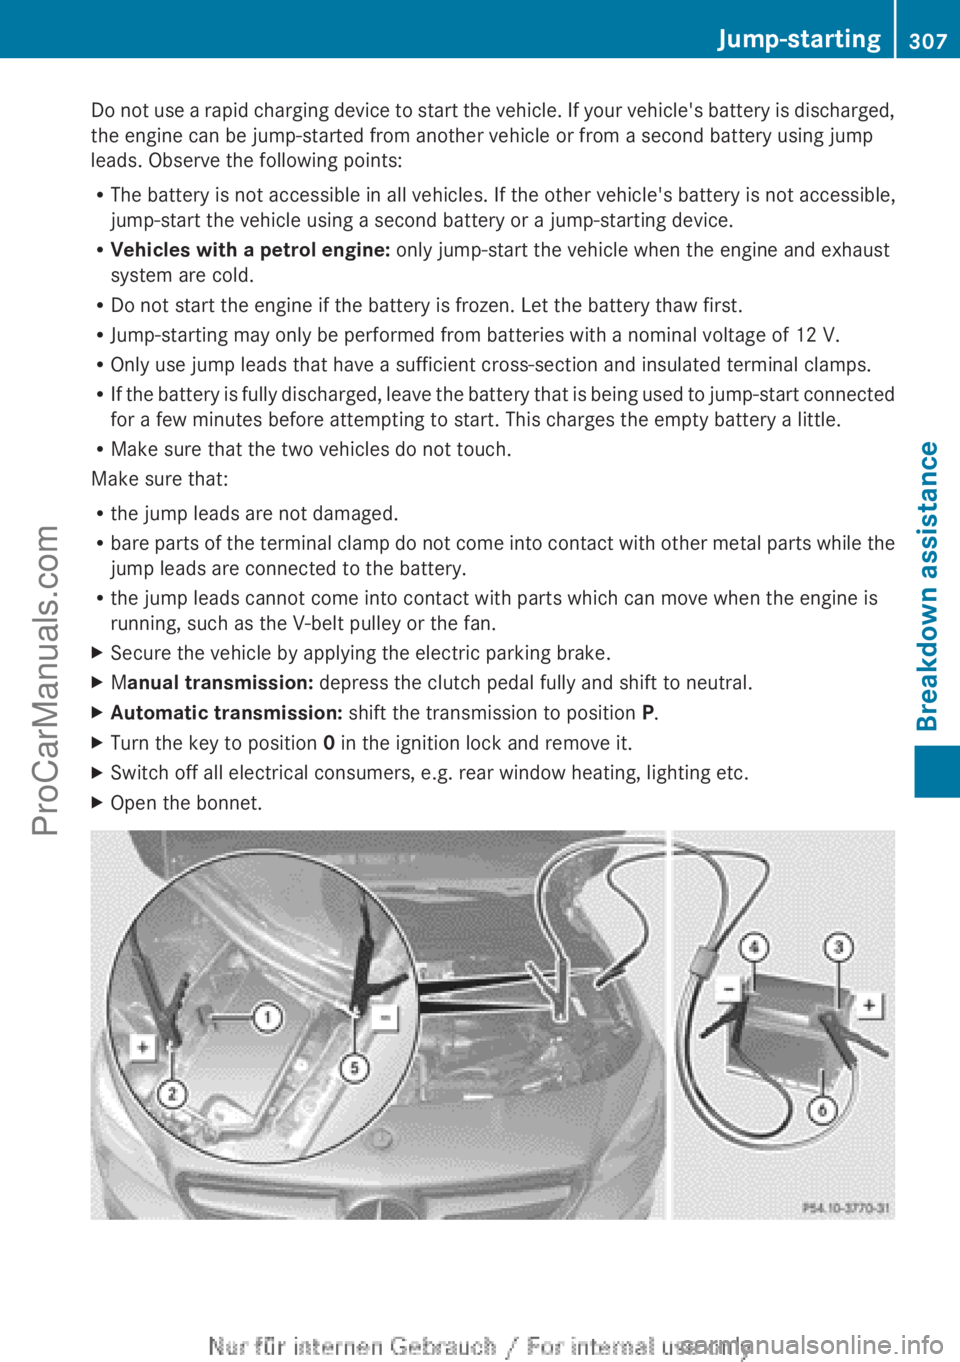
Do not use a rapid charging device to start the vehicle. If your vehicle's battery is discharged,
the engine can be jump-started from another vehicle or from a second battery using jump
leads. Observe the following points:
R The battery is not accessible in all vehicles. If the other vehicle's battery is not accessible,
jump-start the vehicle using a second battery or a jump-starting device.
R Vehicles with a petrol engine: only jump-start the vehicle when the engine and exhaust
system are cold.
R Do not start the engine if the battery is frozen. Let the battery thaw first.
R Jump-starting may only be performed from batteries with a nominal voltage of 12 V.
R Only use jump leads that have a sufficient cross-section and insulated terminal clamps.
R If the battery is fully discharged, leave the battery that is being used to jump-start connected
for a few minutes before attempting to start. This charges the empty battery a little.
R Make sure that the two vehicles do not touch.
Make sure that:
R the jump leads are not damaged.
R bare parts of the terminal clamp do not come into contact with other metal parts while the
jump leads are connected to the battery.
R the jump leads cannot come into contact with parts which can move when the engine is
running, such as the V-belt pulley or the fan.XSecure the vehicle by applying the electric parking brake.XM anual transmission: depress the clutch pedal fully and shift to neutral.XAutomatic transmission: shift the transmission to position P.XTurn the key to position 0 in the ignition lock and remove it.XSwitch off all electrical consumers, e.g. rear window heating, lighting etc.XOpen the bonnet.Jump-starting307Breakdown assistanceZProCarManuals.com
Page 311 of 352
! If DISTRONIC PLUS or the HOLD function
is activated, the vehicle brakes automati-
cally in certain situations. To prevent dam-
age to the vehicle, deactivate DISTRONIC
PLUS and the HOLD function in the follow-
ing or other similar situations:
R when towing the vehicle
R in the car wash
! Only secure the tow cable or tow bar to
the towing eyes or, if available, to the trailer
tow hitch. You could otherwise damage the
vehicle.
! Observe the following points when towing
with a tow rope:
R Secure the tow rope on the same side on
both vehicles.
R Make sure that the tow rope is not longer
than legally permitted. Mark the tow rope
in the middle, e.g. with a white cloth
(30 x 30 cm). This will make other road
users aware that a vehicle is being
towed.
R Only secure the tow cable to the towing
eyes or, if available, to the trailer tow
hitch.
R Observe the brake lamps of the towing
vehicle while driving. Always maintain a
distance a distance so that the tow rope
does not sag.
R Do not use steel cables or chains to tow
your vehicle. You could otherwise dam-
age the vehicle.
! Do not use the towing eyes for recovery
purposes as this could damage the vehicle.
If in doubt, recover the vehicle with a crane.
! Pull away smoothly when towing away or
tow-starting a vehicle. If the tractive power
is too high, the vehicles could be damaged.
! You may tow the vehicle for a maximum
of 50 km. A towing speed of 50 km/h must
not be exceeded.For towing distances over 50 km, the front
axle or the entire vehicle must be raised
and transported.
! Vehicles with automatic transmission
must not be tow-started. The transmission
may otherwise be damaged.
Observe the legal requirements for the rele-
vant countries when towing and tow-starting.
It is better to have the vehicle transported
than to have it towed.
Vehicles with automatic transmission:
when towing a vehicle, the transmission must
be in position N.
The battery must be connected and charged.
Otherwise, you:
R cannot turn the key in the ignition lock to
position 2
R vehicles with automatic transmission:
cannot shift the transmission to position N
i Deactivate the automatic locking feature
( Y page 223). You could otherwise be
locked out when pushing or towing the
vehicle.
Deactivate tow-away protection
( Y page 71) before the vehicle is towed.Towing and tow-starting309Breakdown assistanceZProCarManuals.com
Page 312 of 352
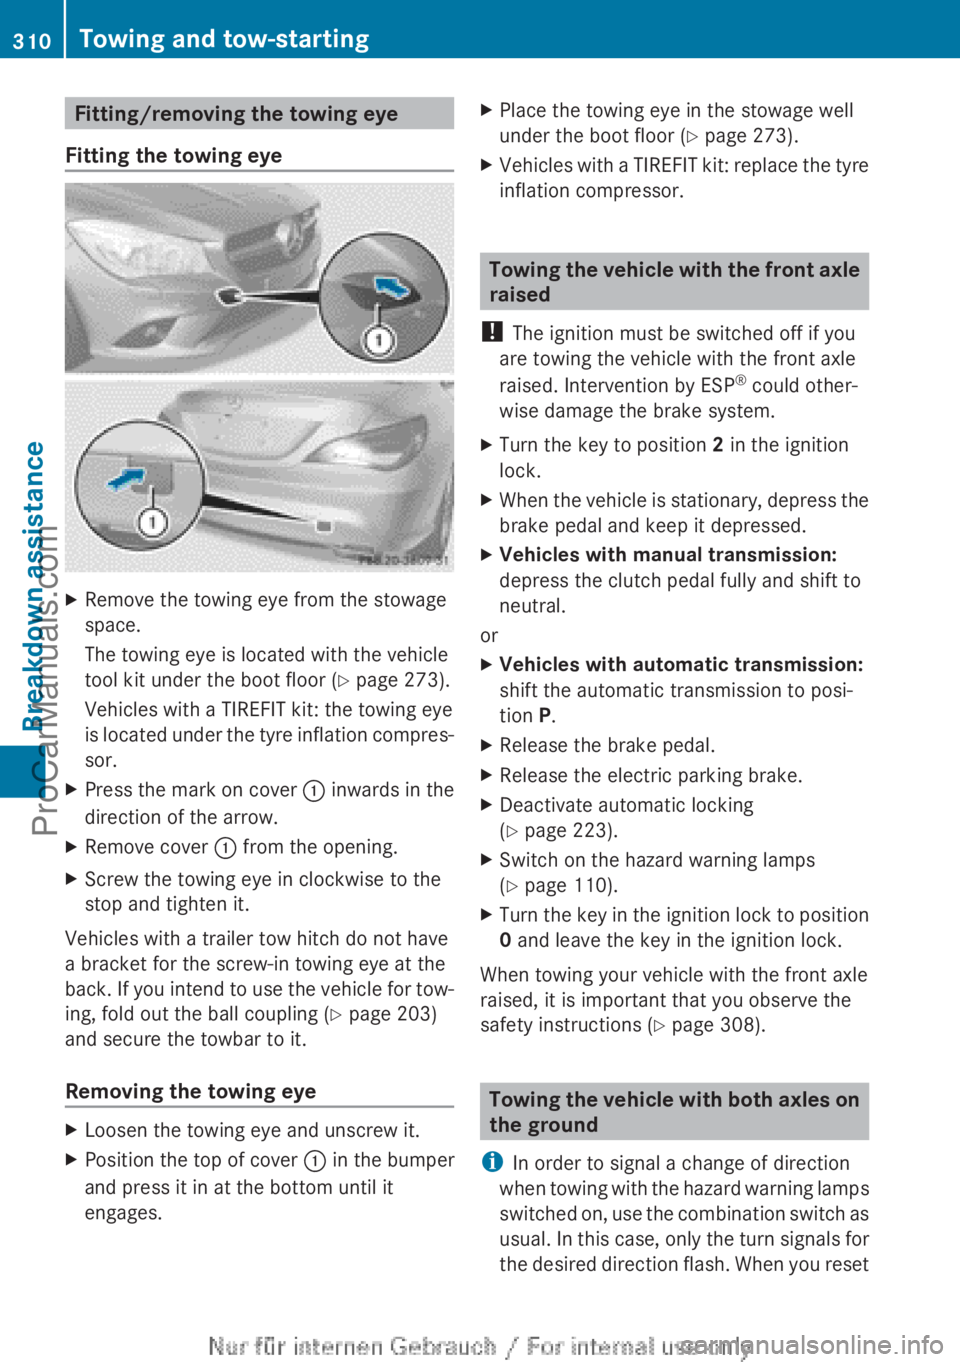
Fitting/removing the towing eye
Fitting the towing eyeXRemove the towing eye from the stowage
space.
The towing eye is located with the vehicle
tool kit under the boot floor ( Y page 273).
Vehicles with a TIREFIT kit: the towing eye
is located under the tyre inflation compres-
sor.XPress the mark on cover : inwards in the
direction of the arrow.XRemove cover : from the opening.XScrew the towing eye in clockwise to the
stop and tighten it.
Vehicles with a trailer tow hitch do not have
a bracket for the screw-in towing eye at the
back. If you intend to use the vehicle for tow-
ing, fold out the ball coupling ( Y page 203)
and secure the towbar to it.
Removing the towing eye
XLoosen the towing eye and unscrew it.XPosition the top of cover : in the bumper
and press it in at the bottom until it
engages.XPlace the towing eye in the stowage well
under the boot floor ( Y page 273).XVehicles with a TIREFIT kit: replace the tyre
inflation compressor.
Towing the vehicle with the front axle
raised
! The ignition must be switched off if you
are towing the vehicle with the front axle
raised. Intervention by ESP ®
could other-
wise damage the brake system.
XTurn the key to position 2 in the ignition
lock.XWhen the vehicle is stationary, depress the
brake pedal and keep it depressed.XVehicles with manual transmission:
depress the clutch pedal fully and shift to
neutral.
or
XVehicles with automatic transmission:
shift the automatic transmission to posi-
tion P.XRelease the brake pedal.XRelease the electric parking brake.XDeactivate automatic locking
( Y page 223).XSwitch on the hazard warning lamps
( Y page 110).XTurn the key in the ignition lock to position
0 and leave the key in the ignition lock.
When towing your vehicle with the front axle
raised, it is important that you observe the
safety instructions ( Y page 308).
Towing the vehicle with both axles on
the ground
i In order to signal a change of direction
when towing with the hazard warning lamps
switched on, use the combination switch as
usual. In this case, only the turn signals for
the desired direction flash. When you reset
310Towing and tow-startingBreakdown assistance
ProCarManuals.com
Page 313 of 352
the combination switch, the hazard warn-
ing lamps start flashing again.
Vehicles with automatic transmission: the
automatic transmission automatically shifts
to position P when you open the driver's or
front-passenger door or when you remove the
key from the ignition lock. In order to ensure
that the automatic transmission stays in posi-
tion N when towing the vehicle, you must
observe the following points:XMake sure that the vehicle is stationary.XTurn the key to position 2 in the ignition
lock.XDepress and hold the brake pedal.XShift the automatic transmission to posi-
tion N.
Vehicles with manual transmission:
XTurn the key to position 2 in the ignition
lock.XDepress and hold the brake pedal.XDepress the clutch pedal fully and shift to
neutral.
Vehicles with manual or automatic trans-
mission:
XLeave the key in position 2 in the ignition
lock.XRelease the brake pedal.XRelease the electric parking brake.XSwitch on the hazard warning lamps
( Y page 110).
It is important that you observe the safety
instructions when towing away your vehicle
( Y page 308).
Transporting the vehicle
! You may only secure the vehicle by the
wheels, not by parts of the vehicle such as
axle or steering components. Otherwise,
the vehicle could be damaged.
XVehicles with manual transmission:
depress the clutch pedal fully and shift to
neutral.XVehicles with automatic transmission:
turn the key to position 2 in the ignition
lock.XMove the transmission to position N.
As soon as the vehicle is loaded:
XPrevent the vehicle from rolling away by
applying the electric parking brake.XVehicles with manual transmission:
depress the clutch pedal fully and engage
first or reverse gear.XVehicles with automatic transmission:
shift the transmission to position P.XTurn the key to position 0 in the ignition
lock and remove it.XSecure the vehicle.
The towing eyes or trailer tow hitch can be
used to pull the vehicle onto a trailer or trans-
porter if you wish to transport it.
Tow-starting (emergency engine
starting)
! Do not tow-start vehicles with automatic
transmission. You could otherwise damage
the automatic transmission.
Before tow-starting the following conditions
must be fulfilled:
R the battery is connected.
R the engine has cooled down.
R the exhaust system has cooled down.
XSwitch on the hazard warning lamps
( Y page 110).XFit the towing eye ( Y page 310).XSecure the rigid towing bar or the towing
rope.XDepress and hold the brake pedal.XTurn the key to position 2 in the ignition
lock.Towing and tow-starting311Breakdown assistanceZProCarManuals.com
Page 314 of 352
XDepress the clutch pedal fully and shift to
neutral.XRelease the brake pedal.XTow-start the vehicle.XDepress the clutch pedal fully and engage
second gear.XRelease the clutch pedal slowly without
depressing the accelerator pedal.
The engine is started.XDepress the clutch pedal fully and shift to
neutral.XStop at a suitable place.XSecure the vehicle by applying the electric
parking brake.XRemove the rigid towing bar or towing rope.XRemove the towing eye ( Y page 310).XSwitch off the hazard warning lamps.
When tow-starting, it is important that you
observe the safety notes (Y page 308) and the
legal requirements in each respective coun-
try.
Electrical fuses
Important safety notes
GWARNING
If you manipulate, bridge or replace a faulty
fuse with a fuse of a higher amperage, the
electric cables could be overloaded. This may
result in a fire. There is a risk of an accident
and injury.
Always replace faulty fuses with specified new
fuses of the correct amperage.
! Only use fuses that have been approved
for Mercedes-Benz vehicles and which
have the correct fuse rating for the system
concerned. Only use fuses marked with an
"S". Components or systems could other-
wise be damaged.
The fuses in your vehicle serve to disconnect
faulty circuits. If a fuse blows, all the compo-
nents on the circuit and their functions will
fail.
Blown fuses must be replaced with fuses of
the same rating, which you can recognise by
the colour and fuse rating. The fuse ratings
are listed in the fuse allocation chart.
If the newly inserted fuse also blows, have the
cause traced and rectified at a qualified spe-
cialist workshop, e.g. a Mercedes-Benz
Service Centre.
Before replacing a fuse
XSecure the vehicle against rolling away
( Y page 162).XSwitch off all electrical consumers.XTurn the key to position 0 in the ignition
lock and remove it ( Y page 145). All indi-
cator lamps in the instrument cluster must
be off.
The fuses are located in various fuse boxes:
R fuse box in the engine compartment on the
left-hand side of the vehicle, when viewed
in the direction of travel
R fuse box in the front-passenger footwell
The fuse allocation chart is on the fuse box in
the front-passenger footwell ( Y page 313).
Fuse box in the engine compartment
GWARNING
When the bonnet is open, and the windscreen
wipers are set in motion, you can be injured
by the wiper linkage. There is a risk of injury.
Always switch off the windscreen wipers and
the ignition before opening the bonnet.
! Make sure that no moisture can enter the
fuse box when the cover is open.
! When closing the cover, make sure that it
is lying correctly on the fuse box. Moisture
seeping in or dirt could otherwise impair
the operation of the fuses.
312Electrical fusesBreakdown assistance
ProCarManuals.com