2013 MERCEDES-BENZ CLA-CLASS bonnet
[x] Cancel search: bonnetPage 7 of 352

Audio menu (on-board computer) .... 214
Authorised workshop see Qualified specialist workshop
AUTO lights
Display message ............................ 239
see Lights
Automatic engine start (ECO start/
stop function) .................................... 149
Automatic engine switch-off (ECO
start/stop function) .......................... 148
Automatic headlamp mode .............. 107
Automatic transmission Accelerator pedal position .............154
Automatic drive program ...............156
Changing gear ............................... 154
DIRECT SELECT lever .....................152
Display message ............................ 250
Drive program display ....................153
Driving tips .................................... 154
Emergency running mode ..............159
Engaging drive position .................. 154
Engaging neutral ............................ 154
Engaging reverse gear ...................154
Engaging the park position ............153
Holding the vehicle stationary on
uphill gradients .............................. 154
Kickdown ....................................... 155
Manual drive program ....................156
Overview ........................................ 152
Problem (fault) ............................... 159
Program selector button ................155
Pulling away ................................... 146
Starting the engine ........................145
Steering wheel gearshift paddles ...156
Trailer towing ................................. 155
Transmission position display ........153
Transmission positions ..................154
Automatic transmission emer-
gency running mode ......................... 159
Auxiliary heating Activating/deactivating .................136
Activating/deactivating (on the
centre console) .............................. 137
Display message ............................ 253
Important safety notes ..................136
Problem (display message) ............140
Remote control .............................. 137Setting ........................................... 224
Setting the departure time ............. 138
Auxiliary ventilation
Activating/deactivating .................136
Activating/deactivating (on the
centre console) .............................. 137
Problem (display message) ............140
Remote control .............................. 137
Axle load, permissible (trailer tow-
ing) ...................................................... 345
B
Ball coupling Folding in ....................................... 205
Folding out ..................................... 203
BAS (Brake Assist System) ................. 64
Battery (key) Checking .......................................... 78
Important safety notes ....................78
Replacing ......................................... 79
Battery (vehicle)
Charging ........................................ 304
Display message ............................ 241
Important safety notes ..................302
Jump starting ................................. 306
Belt
see Seat belt
Belt force limiter
Activation ......................................... 50
Function ........................................... 50
Belt tensioner
Activation ......................................... 41
Function ........................................... 50
Blind Spot Assist
Activating/deactivating .................219
Display message ............................ 244
Notes/function .............................. 197
Trailer towing ................................. 199
Bonnet
Active bonnet (pedestrian protec-
tion) ............................................... 282
Closing ........................................... 284
Display message ............................ 252
Important safety notes ..................282
Opening ......................................... 283
Index5ProCarManuals.com
Page 30 of 352
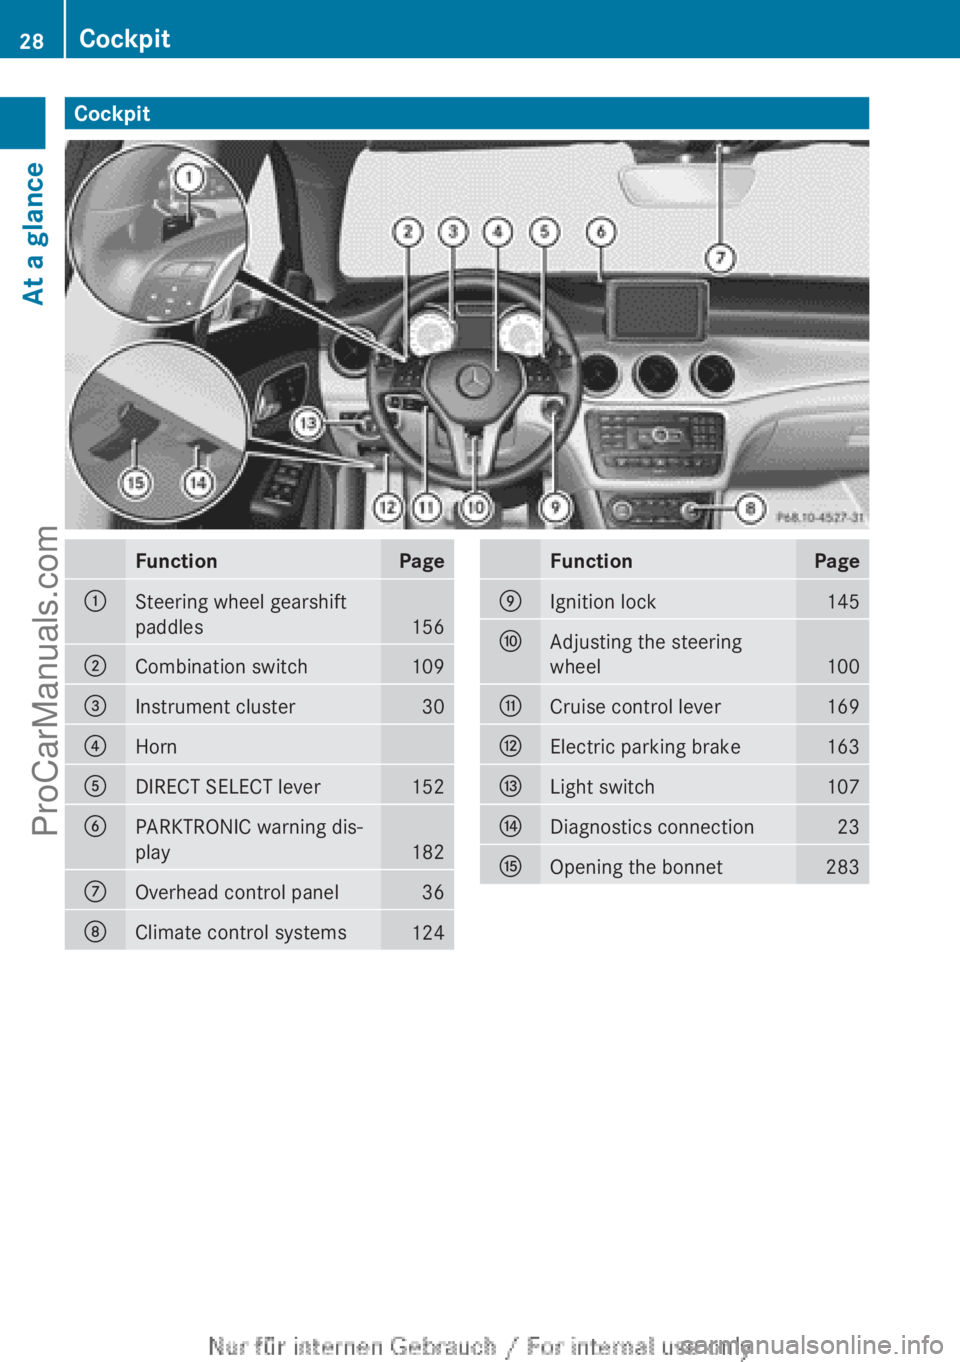
CockpitFunctionPage:Steering wheel gearshift
paddles
156
;Combination switch109=Instrument cluster30?HornADIRECT SELECT lever152BPARKTRONIC warning dis-
play
182
COverhead control panel36DClimate control systems124FunctionPageEIgnition lock145FAdjusting the steering
wheel
100
GCruise control lever169HElectric parking brake163ILight switch107JDiagnostics connection23KOpening the bonnet28328CockpitAt a glance
ProCarManuals.com
Page 31 of 352
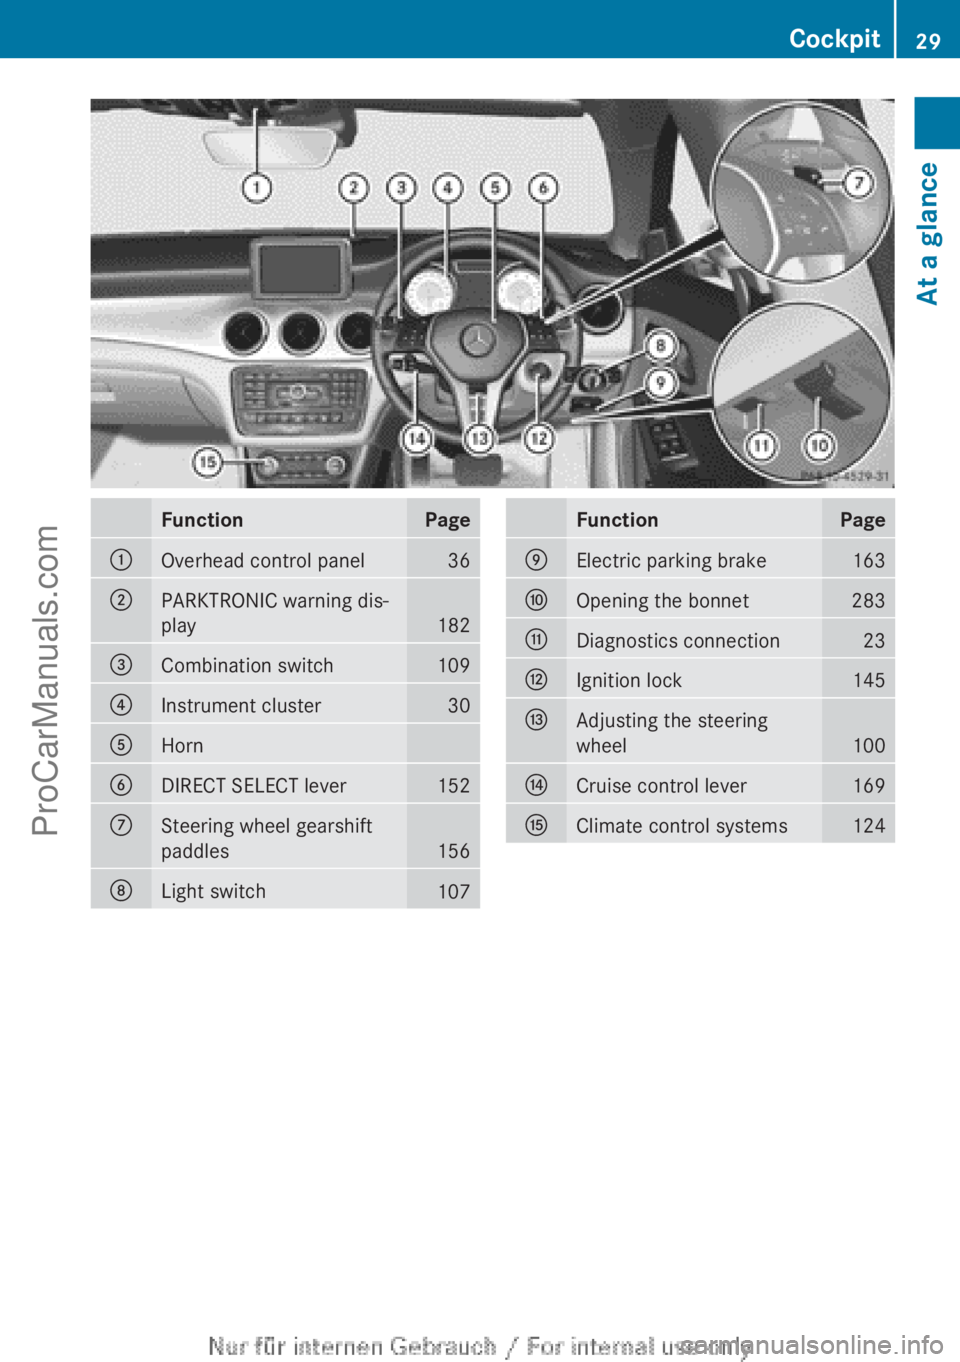
FunctionPage:Overhead control panel36;PARKTRONIC warning dis-
play
182
=Combination switch109?Instrument cluster30AHornBDIRECT SELECT lever152CSteering wheel gearshift
paddles
156
DLight switch107FunctionPageEElectric parking brake163FOpening the bonnet283GDiagnostics connection23HIgnition lock145IAdjusting the steering
wheel
100
JCruise control lever169KClimate control systems124Cockpit29At a glanceProCarManuals.com
Page 44 of 352
The rate of vehicle deceleration or accelera-
tion and the direction of the force are essen-
tially determined by:
R the distribution of forces during the colli-
sion
R the collision angle
R the deformation characteristics of the vehi-
cle
R the characteristics of the object with which
the vehicle has collided
Factors which can only be seen and measured
after a collision has occurred do not play a
decisive role in the deployment of an airbag,
nor do they provide an indication of airbag
deployment.
The vehicle may be deformed significantly,
e.g. the bonnet or the wing, without an airbag
being deployed. This is the case if only parts
which are relatively easily deformed are affec-
ted and the rate of deceleration is not high.
Conversely, airbags may be deployed even
though the vehicle suffers only minor defor-
mation. This is the case if, for example, very
rigid vehicle parts such as longitudinal body
members are hit, and sufficient deceleration
occurs as a result.
i The front belt tensioners can only be trig-
gered if the seat belt tongues on the front
seats are correctly engaged in the seat belt
buckles.
i Not all airbags are deployed in an acci-
dent. The different airbag systems work
independently of each other.
How the airbag system works is deter-
mined by predicting the severity of the acci-
dent, especially vehicle deceleration or
acceleration, and the type of accident:
R head-on collision
R side impact
R overturnAirbags
Important safety notesGWARNING
Airbags provide additional protection; they
are not, however, a substitute for seat belts.
Observe the following notes to reduce the risk
of serious or even fatal injury caused by airbag
deployment:
R all vehicle occupants – in particular, preg-
nant women – must wear their seat belt
correctly at all times and lean back against
the backrest, which should be positioned
as close to the vertical as possible. The
head restraint must support the back of the
head at about eye level.
R always secure children less than
1.50 m tall or under 12 years of age in suit-
able child restraint systems.
R all vehicle occupants must select a seat
position that is as far away from the airbag
as possible. The driver's seat position must
allow the vehicle to be driven safely. The
driver's chest should be as far away from
the centre of the driver's airbag cover as
possible.
R move the front-passenger seat as far back
as possible. This is especially important if
you have secured a child in a child restraint
system on the front-passenger seat.
R vehicle occupants – in particular, children
– must not lean their head into the area of
the window in which the sidebag/window-
bag is deployed.
R rearward-facing child restraint systems
must not be fitted to the front-passenger
seat unless the front-passenger airbag has
been disabled. On the front-passenger
seat, the front-passenger airbag is disabled
if a child restraint system with a trans-
ponder for automatic child seat recognition
is fitted to the front-passenger seat in a
vehicle equipped with automatic child seat
recognition. The 4 PASSENGER AIRBAG
42Occupant safetySafety
ProCarManuals.com
Page 73 of 352
Anti-theft systems
Immobiliser
The immobiliser prevents your vehicle from
being started without the correct key.
XTo activate: remove the key from the igni-
tion lock.XTo deactivate: switch on the ignition.
When leaving the vehicle, always take the key
with you and lock the vehicle. The engine can
be started by anyone with a valid key that is
left inside the vehicle.
i The immobiliser is always deactivated
when you start the engine.
ATA (Anti-Theft Alarm system)
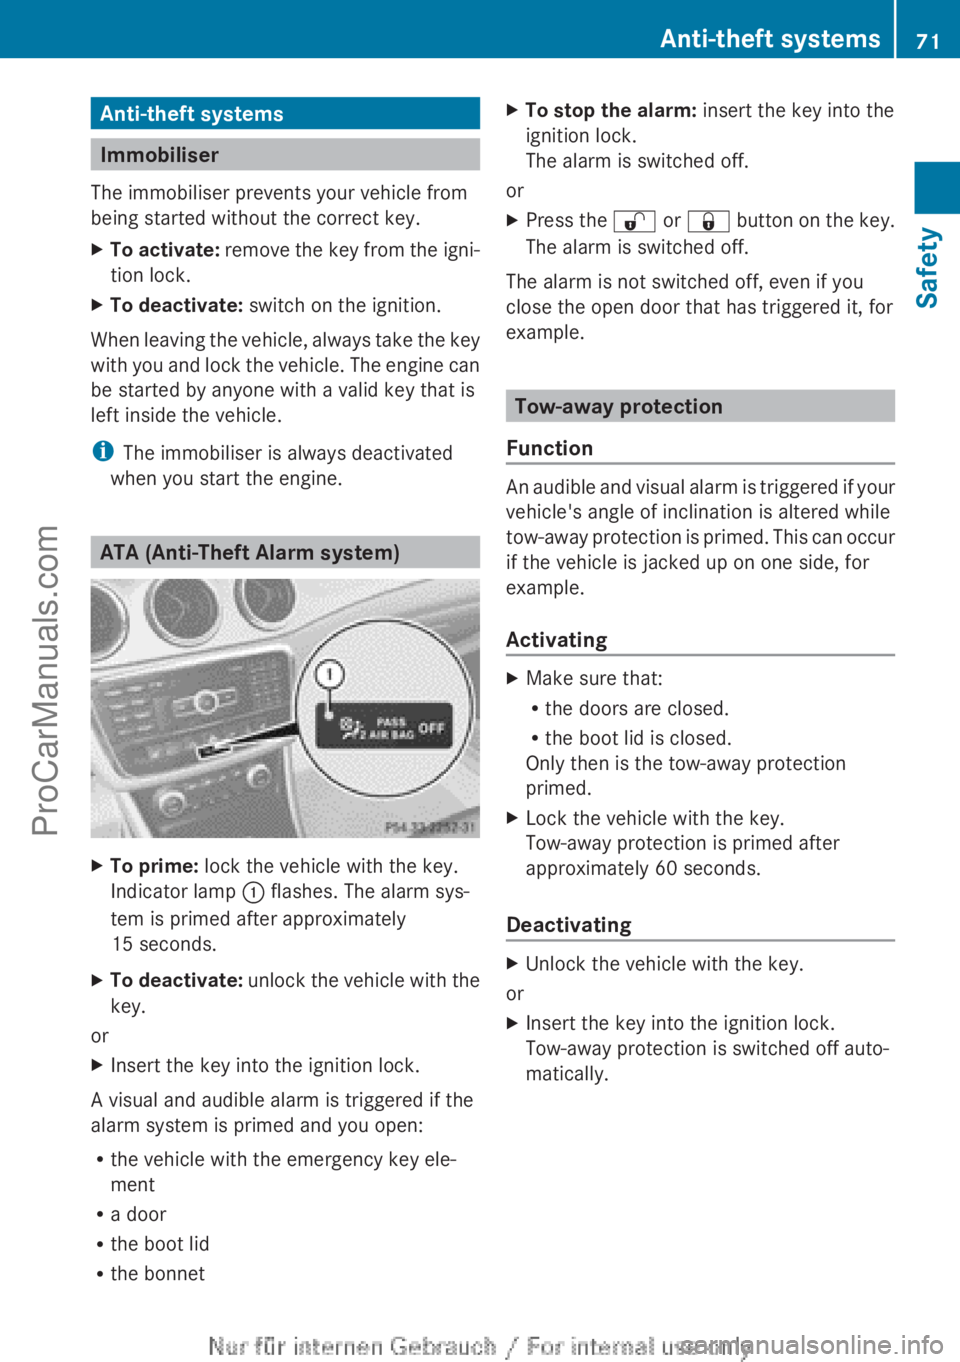
XTo prime: lock the vehicle with the key.
Indicator lamp : flashes. The alarm sys-
tem is primed after approximately
15 seconds.XTo deactivate: unlock the vehicle with the
key.
or
XInsert the key into the ignition lock.
A visual and audible alarm is triggered if the
alarm system is primed and you open:
R the vehicle with the emergency key ele-
ment
R a door
R the boot lid
R the bonnet
XTo stop the alarm: insert the key into the
ignition lock.
The alarm is switched off.
or
XPress the % or & button on the key.
The alarm is switched off.
The alarm is not switched off, even if you
close the open door that has triggered it, for
example.
Tow-away protection
Function
An audible and visual alarm is triggered if your
vehicle's angle of inclination is altered while
tow-away protection is primed. This can occur
if the vehicle is jacked up on one side, for
example.
Activating
XMake sure that:
R the doors are closed.
R the boot lid is closed.
Only then is the tow-away protection
primed.XLock the vehicle with the key.
Tow-away protection is primed after
approximately 60 seconds.
Deactivating
XUnlock the vehicle with the key.
or
XInsert the key into the ignition lock.
Tow-away protection is switched off auto-
matically.Anti-theft systems71SafetyZProCarManuals.com
Page 118 of 352

?Turn signal lamp: PY 21 WAReversing lamp: W 16 W
Replacing the front bulbs
Fitting/removing the cover on the front
wheel arch
You must remove the cover from the front
wheel housing before you can change the
front bulbs.
XTo remove: switch off the lights.XTurn the front wheels inwards.XTurn rotary knob : through 90°.
Cover ; is released.XPush cover ; down.XTo fit: push cover ; up.XTurn rotary knob : through 90°.
Cover ; is locked.
Dipped-beam headlamps (halogen
headlamps)
XRemove the cover in the front wheel arch
( Y page 116).XTurn housing cover : anti-clockwise and
pull it out.XTurn bulb holder ; anti-clockwise and pull
it out.XTake the bulb out of bulb holder ;.XInsert the new bulb into bulb holder ;.XInsert bulb holder ; into the lamp and turn
it clockwise.XAlign housing cover : and turn it clock-
wise until it engages.XReplace the cover in the front wheel arch
( Y page 116).
Main-beam headlamps/daytime driving
lights/side lamps and parking lamps
(vehicles with halogen headlamps)
XSwitch off the lights.XOpen the bonnet.XTurn housing cover : anti-clockwise and
pull it out.XTurn bulb ; anti-clockwise and pull it out.XInsert the new bulb and engage it to the
stop.XAlign housing cover : and turn it clock-
wise until it engages.116Replacing bulbsLights and windscreen wipers
ProCarManuals.com
Page 119 of 352

Turn signal lamp (halogen headlamps)XSwitch off the lights.XOpen the bonnet.XTurn bulb holder : anti-clockwise and pull
it out.XTake the bulb out of bulb holder :.XInsert the new bulb into bulb holder :.XInsert bulb holder : and turn it clockwise
until it engages.
Cornering lamps (Intelligent Light Sys-
tem)
XSwitch off the lights.XOpen the bonnet.XTurn housing cover : anti-clockwise and
pull it out.XTurn bulb holder ; anti-clockwise and pull
it out.XTake the bulb out of bulb holder ;.XInsert the new bulb into bulb holder ;.XInsert bulb holder ; into the lamp and turn
it clockwise.XAlign housing cover : and turn it clock-
wise until it engages.
Replacing the rear bulbs
Opening and closing the side trim pan-
els
You must open the side trim panel in the boot
before you can replace the bulbs in the tail
lamps.
Left-hand side trim panel
XTo open: turn release knob : 90° in the
direction of the arrow and remove side trim
panel ;.XTo close: insert side trim panel ; and turn
release knob : 90° in the opposite direc-
tion to the arrow.
Right-hand side trim panel
Replacing bulbs117Lights and windscreen wipersZProCarManuals.com
Page 121 of 352
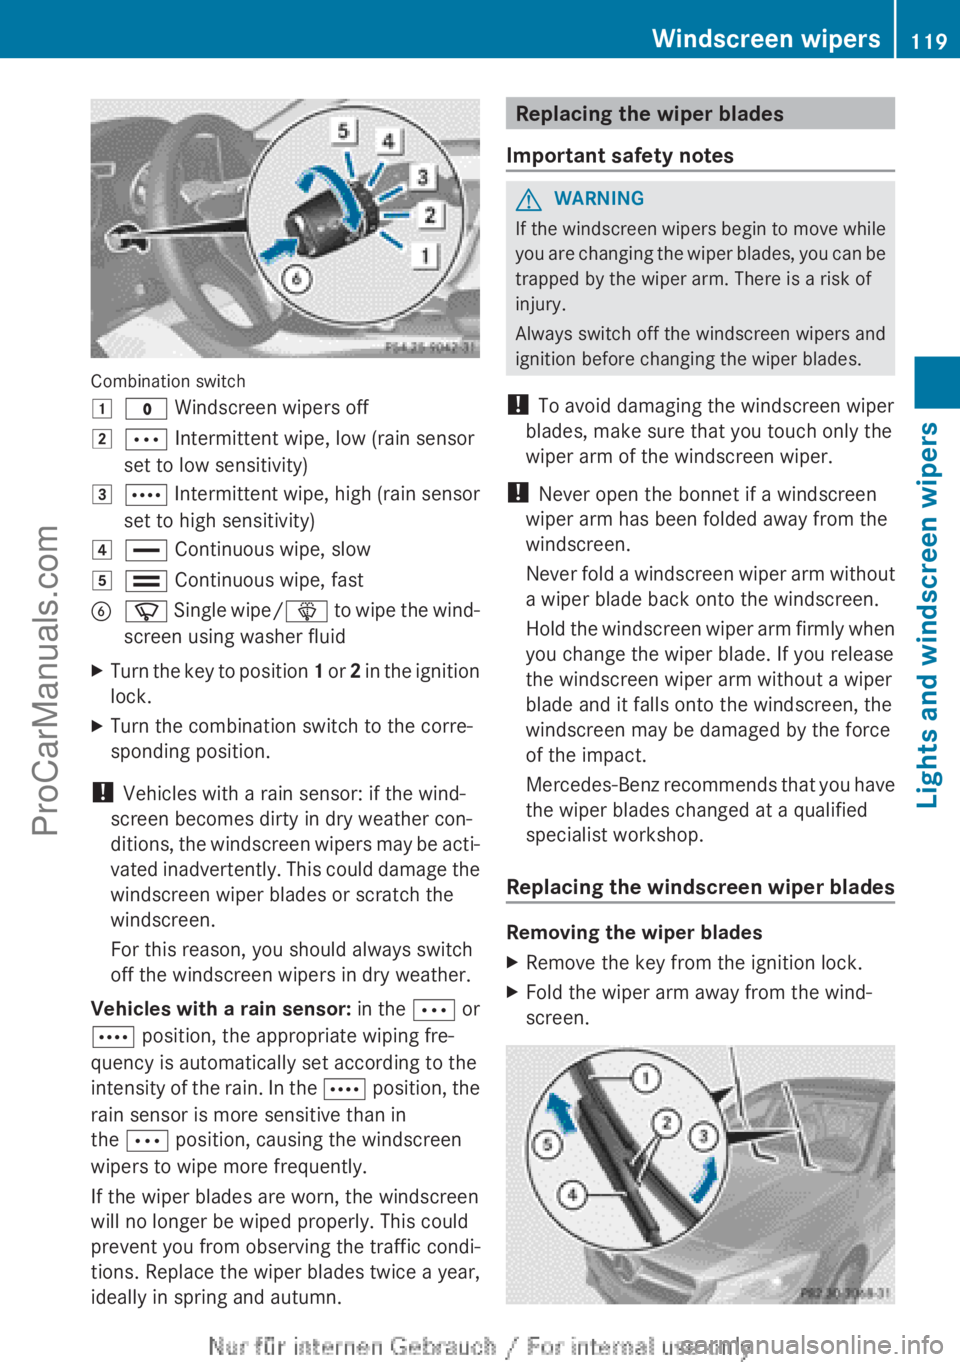
Combination switch
1$ Windscreen wipers off2Ä Intermittent wipe, low (rain sensor
set to low sensitivity)3Å Intermittent wipe, high (rain sensor
set to high sensitivity)4° Continuous wipe, slow5¯ Continuous wipe, fastBí Single wipe/ î to wipe the wind-
screen using washer fluidXTurn the key to position 1 or 2 in the ignition
lock.XTurn the combination switch to the corre-
sponding position.
! Vehicles with a rain sensor: if the wind-
screen becomes dirty in dry weather con-
ditions, the windscreen wipers may be acti-
vated inadvertently. This could damage the
windscreen wiper blades or scratch the
windscreen.
For this reason, you should always switch
off the windscreen wipers in dry weather.
Vehicles with a rain sensor: in the Ä or
Å position, the appropriate wiping fre-
quency is automatically set according to the
intensity of the rain. In the Å position, the
rain sensor is more sensitive than in
the Ä position, causing the windscreen
wipers to wipe more frequently.
If the wiper blades are worn, the windscreen
will no longer be wiped properly. This could
prevent you from observing the traffic condi-
tions. Replace the wiper blades twice a year,
ideally in spring and autumn.
Replacing the wiper blades
Important safety notesGWARNING
If the windscreen wipers begin to move while
you are changing the wiper blades, you can be
trapped by the wiper arm. There is a risk of
injury.
Always switch off the windscreen wipers and
ignition before changing the wiper blades.
! To avoid damaging the windscreen wiper
blades, make sure that you touch only the
wiper arm of the windscreen wiper.
! Never open the bonnet if a windscreen
wiper arm has been folded away from the
windscreen.
Never fold a windscreen wiper arm without
a wiper blade back onto the windscreen.
Hold the windscreen wiper arm firmly when
you change the wiper blade. If you release
the windscreen wiper arm without a wiper
blade and it falls onto the windscreen, the
windscreen may be damaged by the force
of the impact.
Mercedes-Benz recommends that you have
the wiper blades changed at a qualified
specialist workshop.
Replacing the windscreen wiper blades
Removing the wiper blades
XRemove the key from the ignition lock.XFold the wiper arm away from the wind-
screen.Windscreen wipers119Lights and windscreen wipersZProCarManuals.com