2013 MERCEDES-BENZ CLA-CLASS bonnet
[x] Cancel search: bonnetPage 286 of 352
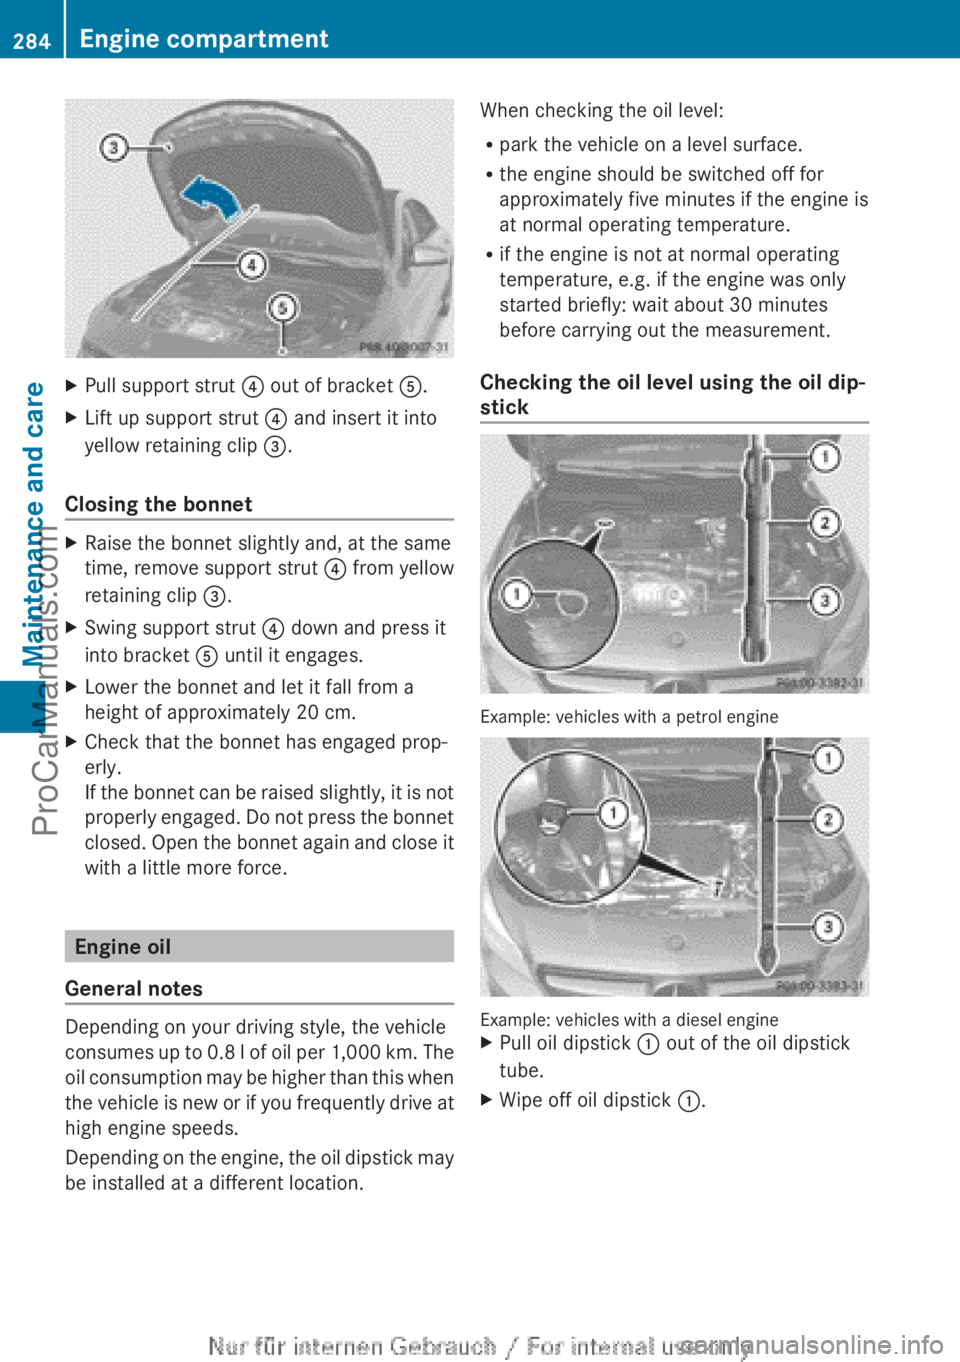
XPull support strut ? out of bracket A.XLift up support strut ? and insert it into
yellow retaining clip =.
Closing the bonnet
XRaise the bonnet slightly and, at the same
time, remove support strut ? from yellow
retaining clip =.XSwing support strut ? down and press it
into bracket A until it engages.XLower the bonnet and let it fall from a
height of approximately 20 cm.XCheck that the bonnet has engaged prop-
erly.
If the bonnet can be raised slightly, it is not
properly engaged. Do not press the bonnet
closed. Open the bonnet again and close it
with a little more force.
Engine oil
General notes
Depending on your driving style, the vehicle
consumes up to 0.8 l of oil per 1,000 km. The
oil consumption may be higher than this when
the vehicle is new or if you frequently drive at
high engine speeds.
Depending on the engine, the oil dipstick may
be installed at a different location.
When checking the oil level:
R park the vehicle on a level surface.
R the engine should be switched off for
approximately five minutes if the engine is
at normal operating temperature.
R if the engine is not at normal operating
temperature, e.g. if the engine was only
started briefly: wait about 30 minutes
before carrying out the measurement.
Checking the oil level using the oil dip-
stick
Example: vehicles with a petrol engine
Example: vehicles with a diesel engine
XPull oil dipstick : out of the oil dipstick
tube.XWipe off oil dipstick :.284Engine compartmentMaintenance and care
ProCarManuals.com
Page 292 of 352
XRemove impurities immediately, where
possible, whilst avoiding rubbing too hard.XSoak insect remains with insect remover
and rinse off the treated areas afterwards.XSoak bird droppings with water and rinse
off the treated areas afterwards.XRemove coolant, brake fluid, tree resin,
oils, fuels and greases by rubbing gently
with a cloth soaked in petroleum ether or
lighter fluid.XUse tar remover to remove tar stains.XUse silicone remover to remove wax.
The following cannot always be completely
repaired:
R scratches
R corrosive deposits
R areas affected by corrosion
R damage caused by inadequate care
In such cases, visit a qualified specialist work-
shop.
Care and treatment of matt paintwork
! Never polish the vehicle or the light alloy
wheels. Polishing makes the paintwork
shiny.
! The following may cause the paint to
become shiny and thus reduce the matt
effect:
R Vigorous rubbing with unsuitable mate-
rials.
R Frequent use of car washes.
R Washing the vehicle in direct sunlight.
! Never use paint cleaner, buffing or pol-
ishing products, or gloss preserver, e.g.
wax. These products are only suitable for
high-gloss surfaces. Their use on vehicles
with matt finish leads to considerable sur-
face damage (shiny, spotted areas).
Always have paintwork repairs carried out
at a qualified specialist workshop.
! Do not use wash programs with a hot wax
treatment under any circumstances.
Observe these notes if your vehicle has a
clear matt finish. This will help you to avoid
damage to the paintwork due to incorrect
treatment.
These notes also apply to light-alloy wheels
with a clear matt finish.
i The vehicle should preferably be washed
by hand using a soft sponge, car shampoo
and plenty of water.
i Use only insect remover and car shampoo
from the range of recommended and
approved Mercedes-Benz care products.
Cleaning the windowsGWARNING
If the windscreen wipers are set in motion
when cleaning the windscreen or wiper
blades, you could become trapped. There is a
danger of injury.
Always switch off the windscreen wipers and
the ignition before cleaning the windscreen or
wiper blades.
! Only fold the windscreen wipers away
from the windscreen when vertical. Other-
wise, you will damage the bonnet.
! Do not use dry cloths, abrasive products,
solvents or cleaning agents containing sol-
vents to clean the inside of the windows.
Do not touch the insides of the windows
with hard objects, e.g. an ice scraper or
ring. There is otherwise a risk of damaging
the windows.
! Clean the water drainage channels of the
windscreen and the rear window at regular
intervals. Deposits such as leaves, petals
and pollen may under certain circumstan-
ces prevent water from draining away. This
can lead to corrosion damage and damage
to electronic components.
XClean the inside and outside of the win-
dows with a damp cloth and a cleaning
agent that is recommended and approved
by Mercedes-Benz.290CareMaintenance and care
ProCarManuals.com
Page 293 of 352
Cleaning the wiper bladesGWARNING
If the windscreen wipers are set in motion
when cleaning the windscreen or wiper
blades, you could become trapped. There is a
danger of injury.
Always switch off the windscreen wipers and
the ignition before cleaning the windscreen or
wiper blades.
! Only fold the windscreen wipers away
from the windscreen when vertical. Other-
wise, you will damage the bonnet.
! Do not pull on the wiper blade. Otherwise,
the wiper blade could be damaged.
! Do not clean wiper blades too often and
do not rub them too hard. Otherwise, the
graphite coating could be damaged. This
could cause wiper noise.
XFold the wiper arms away from the wind-
screen.XClean the wiper blades carefully using a
damp cloth.XFold the windscreen wipers back again
before switching on the ignition.
! Hold the wiper arm securely when folding
back. The windscreen could be damaged if
the wiper arm hits against it suddenly.
Cleaning the exterior lighting
! Only use cleaning agents or cleaning
cloths that are suitable for plastic lenses.
Unsuitable cleaning agents or cleaning
cloths could scratch or damage the plastic
lenses of the exterior lighting.
XClean the plastic lenses of the exterior
lighting using a wet sponge and a mild
cleaning agent, e.g. Mercedes-Benz car
shampoo or cleaning cloths.Cleaning the mirror turn signal
! Only use cleaning agents or cleaning
cloths that are suitable for plastic lenses.
Unsuitable cleaning agents or cleaning
cloths could scratch or damage the plastic
lenses of the mirror turn signals.
XClean the plastic lenses of the mirror turn
signals in the exterior mirror housing using
a wet sponge and a mild cleaning agent,
e.g. Mercedes-Benz car shampoo or clean-
ing cloths.
Cleaning the sensors
! If you clean the sensors with a high-pres-
sure cleaner, make sure that you keep a
distance of at least 30 cm between the
vehicle and the high-pressure cleaner noz-
zle. Information about the correct distance
is available from the equipment manufac-
turer.
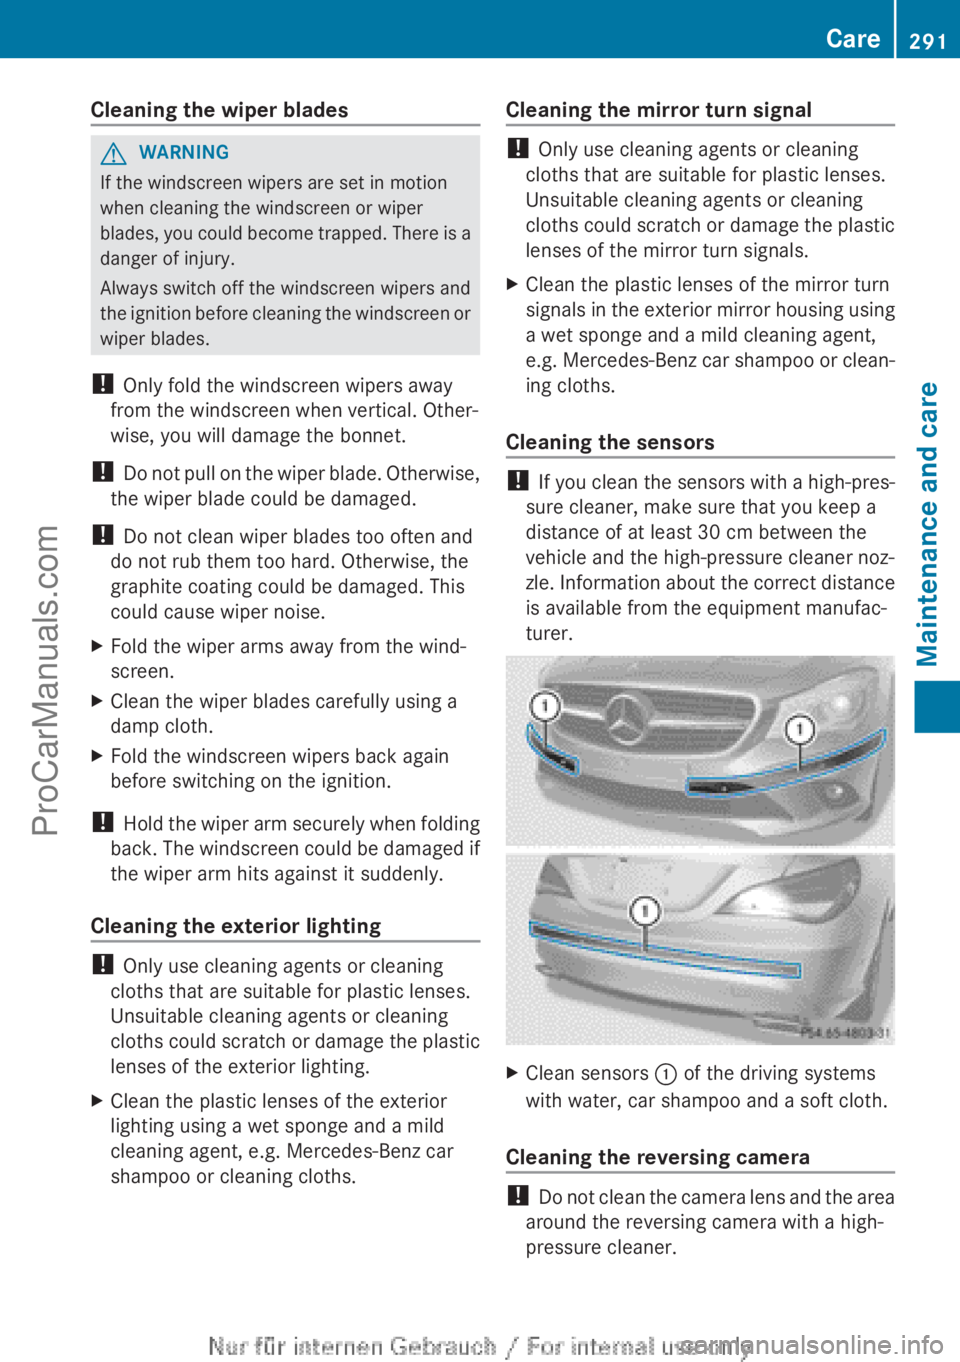
XClean sensors : of the driving systems
with water, car shampoo and a soft cloth.
Cleaning the reversing camera
! Do not clean the camera lens and the area
around the reversing camera with a high-
pressure cleaner.
Care291Maintenance and careZProCarManuals.com
Page 307 of 352
can escape from the battery. There is a risk of
an explosion.
Allow the frozen battery to thaw out before
charging it or jump-starting.
! Only use battery chargers with a maxi-
mum charging voltage of 14.8 V.
! Only charge the battery using the jump-
start connection point.
The jump-starting connection point is in the
engine compartment ( Y page 306).XOpen the bonnet.XConnect the battery charger to the positive
terminal and earth point in the same order
as when connecting the donor battery in
the jump-starting procedure
( Y page 306).
If the indicator/warning lamps do not light up
at low temperatures, it is very likely that the
discharged battery has frozen. In this case
you may neither jump-start the vehicle nor
charge the battery. The service life of a bat-
tery that has been thawed may be reduced.
The starting characteristics may be impaired,
especially at low temperatures. Have the
thawed battery checked at a qualified spe-
cialist workshop.
Only charge the installed battery with a bat-
tery charger which has been tested and
approved by Mercedes-Benz. A battery
charger unit specially adapted for Mercedes-
Benz vehicles and tested and approved by
Mercedes-Benz is available as an accessory.
It permits the charging of the battery in its
installed position. Contact a Mercedes-Benz
Service Centre for information and availabil-
ity. Read the battery charger's operating
instructions before charging the battery.
Battery (vehicle)305Breakdown assistanceZProCarManuals.com
Page 309 of 352
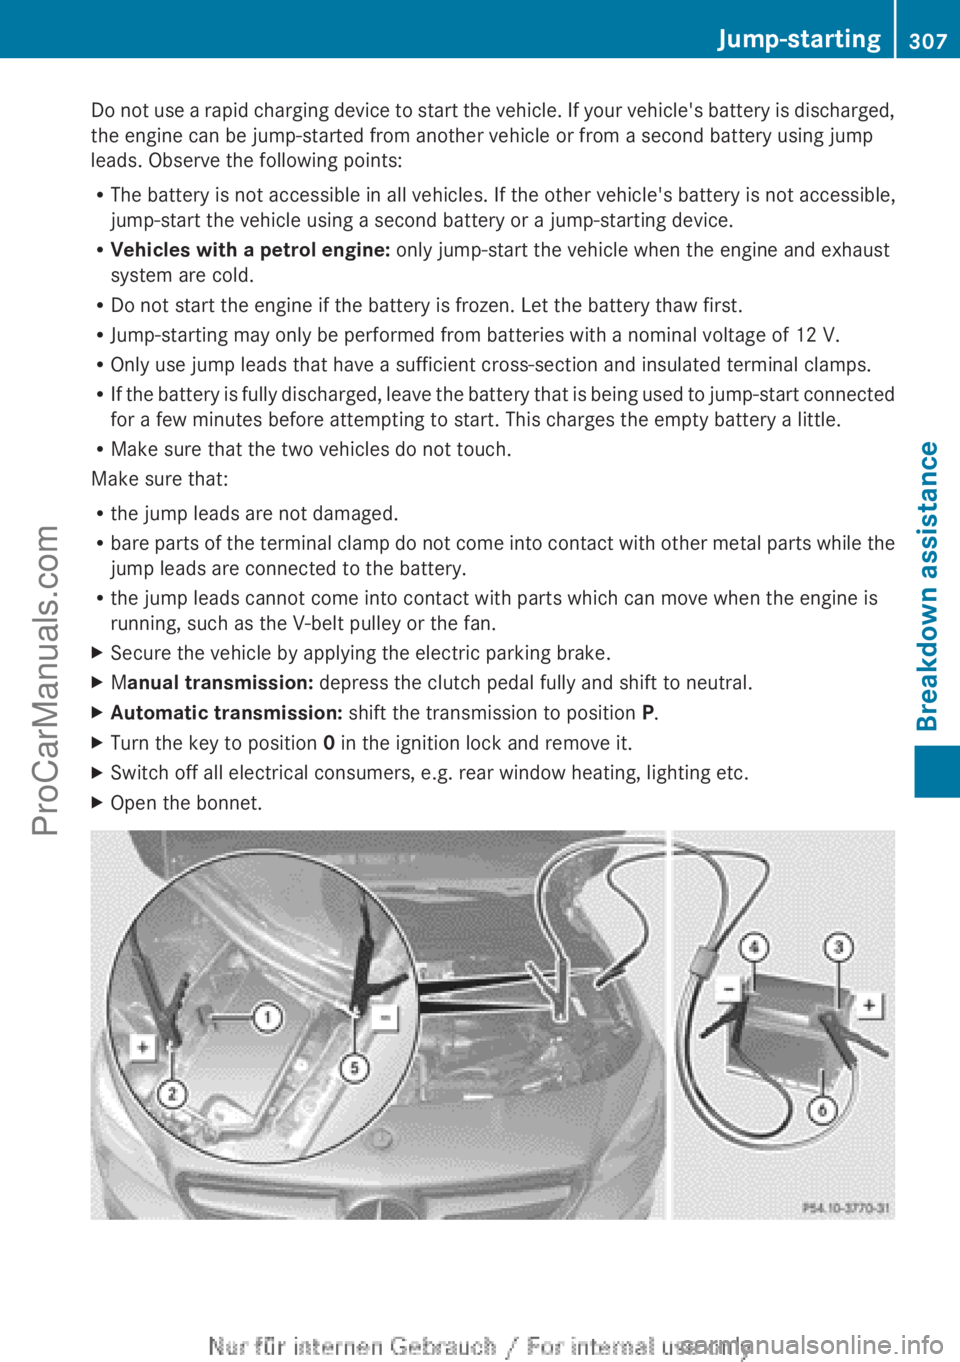
Do not use a rapid charging device to start the vehicle. If your vehicle's battery is discharged,
the engine can be jump-started from another vehicle or from a second battery using jump
leads. Observe the following points:
R The battery is not accessible in all vehicles. If the other vehicle's battery is not accessible,
jump-start the vehicle using a second battery or a jump-starting device.
R Vehicles with a petrol engine: only jump-start the vehicle when the engine and exhaust
system are cold.
R Do not start the engine if the battery is frozen. Let the battery thaw first.
R Jump-starting may only be performed from batteries with a nominal voltage of 12 V.
R Only use jump leads that have a sufficient cross-section and insulated terminal clamps.
R If the battery is fully discharged, leave the battery that is being used to jump-start connected
for a few minutes before attempting to start. This charges the empty battery a little.
R Make sure that the two vehicles do not touch.
Make sure that:
R the jump leads are not damaged.
R bare parts of the terminal clamp do not come into contact with other metal parts while the
jump leads are connected to the battery.
R the jump leads cannot come into contact with parts which can move when the engine is
running, such as the V-belt pulley or the fan.XSecure the vehicle by applying the electric parking brake.XM anual transmission: depress the clutch pedal fully and shift to neutral.XAutomatic transmission: shift the transmission to position P.XTurn the key to position 0 in the ignition lock and remove it.XSwitch off all electrical consumers, e.g. rear window heating, lighting etc.XOpen the bonnet.Jump-starting307Breakdown assistanceZProCarManuals.com
Page 314 of 352
XDepress the clutch pedal fully and shift to
neutral.XRelease the brake pedal.XTow-start the vehicle.XDepress the clutch pedal fully and engage
second gear.XRelease the clutch pedal slowly without
depressing the accelerator pedal.
The engine is started.XDepress the clutch pedal fully and shift to
neutral.XStop at a suitable place.XSecure the vehicle by applying the electric
parking brake.XRemove the rigid towing bar or towing rope.XRemove the towing eye ( Y page 310).XSwitch off the hazard warning lamps.
When tow-starting, it is important that you
observe the safety notes (Y page 308) and the
legal requirements in each respective coun-
try.
Electrical fuses
Important safety notes
GWARNING
If you manipulate, bridge or replace a faulty
fuse with a fuse of a higher amperage, the
electric cables could be overloaded. This may
result in a fire. There is a risk of an accident
and injury.
Always replace faulty fuses with specified new
fuses of the correct amperage.
! Only use fuses that have been approved
for Mercedes-Benz vehicles and which
have the correct fuse rating for the system
concerned. Only use fuses marked with an
"S". Components or systems could other-
wise be damaged.
The fuses in your vehicle serve to disconnect
faulty circuits. If a fuse blows, all the compo-
nents on the circuit and their functions will
fail.
Blown fuses must be replaced with fuses of
the same rating, which you can recognise by
the colour and fuse rating. The fuse ratings
are listed in the fuse allocation chart.
If the newly inserted fuse also blows, have the
cause traced and rectified at a qualified spe-
cialist workshop, e.g. a Mercedes-Benz
Service Centre.
Before replacing a fuse
XSecure the vehicle against rolling away
( Y page 162).XSwitch off all electrical consumers.XTurn the key to position 0 in the ignition
lock and remove it ( Y page 145). All indi-
cator lamps in the instrument cluster must
be off.
The fuses are located in various fuse boxes:
R fuse box in the engine compartment on the
left-hand side of the vehicle, when viewed
in the direction of travel
R fuse box in the front-passenger footwell
The fuse allocation chart is on the fuse box in
the front-passenger footwell ( Y page 313).
Fuse box in the engine compartment
GWARNING
When the bonnet is open, and the windscreen
wipers are set in motion, you can be injured
by the wiper linkage. There is a risk of injury.
Always switch off the windscreen wipers and
the ignition before opening the bonnet.
! Make sure that no moisture can enter the
fuse box when the cover is open.
! When closing the cover, make sure that it
is lying correctly on the fuse box. Moisture
seeping in or dirt could otherwise impair
the operation of the fuses.
312Electrical fusesBreakdown assistance
ProCarManuals.com
Page 315 of 352
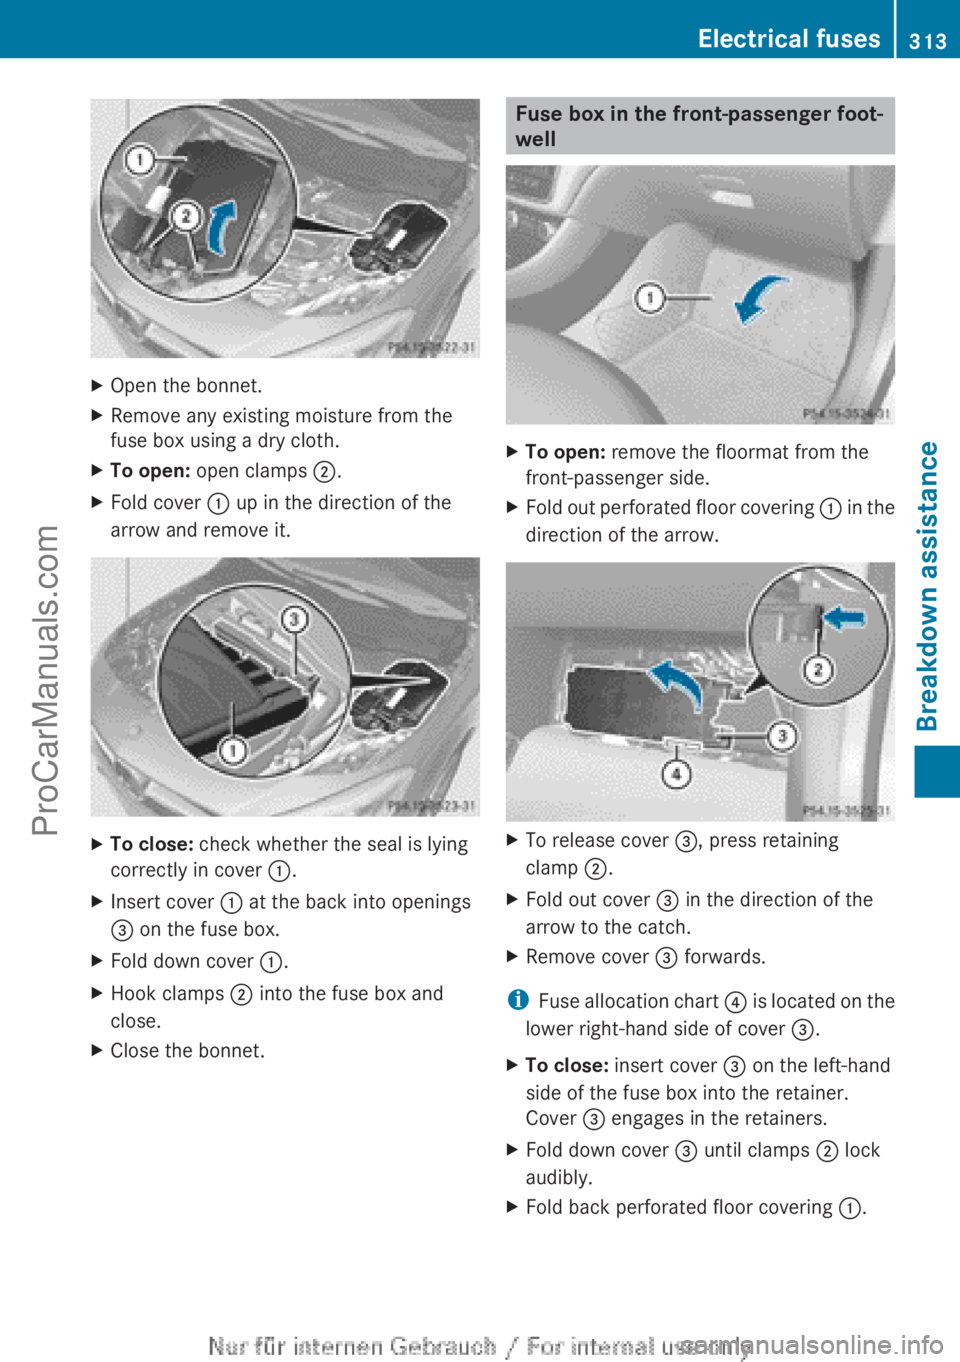
XOpen the bonnet.XRemove any existing moisture from the
fuse box using a dry cloth.XTo open: open clamps ;.XFold cover : up in the direction of the
arrow and remove it.XTo close: check whether the seal is lying
correctly in cover :.XInsert cover : at the back into openings
= on the fuse box.XFold down cover :.XHook clamps ; into the fuse box and
close.XClose the bonnet.Fuse box in the front-passenger foot-
wellXTo open: remove the floormat from the
front-passenger side.XFold out perforated floor covering : in the
direction of the arrow.XTo release cover =, press retaining
clamp ;.XFold out cover = in the direction of the
arrow to the catch.XRemove cover = forwards.
i
Fuse allocation chart ? is located on the
lower right-hand side of cover =.
XTo close: insert cover = on the left-hand
side of the fuse box into the retainer.
Cover = engages in the retainers.XFold down cover = until clamps ; lock
audibly.XFold back perforated floor covering :.Electrical fuses313Breakdown assistanceZProCarManuals.com