2013 MERCEDES-BENZ CLA-CLASS washer fluid
[x] Cancel search: washer fluidPage 18 of 352

Fastening ......................................... 48
Important safety guidelines .............46
Rear seat belt status indicator .........49
Releasing ......................................... 49
Switching belt adjustment on/off
(on-board computer) ......................225
Warning lamp ................................. 255
Warning lamp (function) ................... 49
Seats
Adjusting (electrically) .....................96
Adjusting (manually) ........................96
Adjusting the 4-way lumbar sup-
port .................................................. 98
Adjusting the head restraint ............97
Cleaning the cover .........................293
Correct driver's seat position ........... 94
Important safety notes ....................95
Seat heating problem ....................100
Storing settings (memory function) 103
Switching seat heating on/off .........99
Sensors (cleaning instructions) ....... 291
Service see ASSYST PLUS
Service menu (on-board computer) . 219
Service products Brake fluid ..................................... 341
Coolant (engine) ............................ 341
Engine oil ....................................... 340
Fuel ................................................ 337
Important safety notes ..................336
Washer fluid ................................... 342
Settings
Factory (on-board computer) .........225
On-board computer .......................219
Setting the air distribution ............... 131
Setting the airflow ............................ 131
Shifting to neutral (manual trans-
mission) ............................................. 152
Sidebag ................................................ 44
Side lamps Switching on/off ........................... 108
Side windows
Convenience closing ........................88
Convenience opening ......................88
Important safety notes ....................86
Opening/closing .............................. 87
Problem (malfunction) .....................89
resetting .......................................... 88Sliding sunroof
see Panorama sliding sunroof
Snow chains ...................................... 319
Socket Centre console .............................. 277
Points to observe before use .........277
Rear compartment .........................277
Specialist workshop ............................ 24
Spectacles compartment ................. 269
Speed, controlling see Cruise control
Speed Limit Assist
Activating/deactivating the warn-
ing function .................................... 218
Displaying ...................................... 217
Display message ............................ 243
Display message in the multifunc-
tion display .................................... 197
Function/notes ............................. 196
Important safety notes ..................196
Speedometer
Activating/deactivating the addi-
tional speedometer ........................220
Digital ............................................ 212
In the Instrument cluster .................30
Segments ...................................... 209
Selecting the unit of measurement 220
see Instrument cluster
SPEEDTRONIC
Deactivating variable .....................172
Display message ............................ 247
Function/notes ............................. 171
Important safety notes ..................171
LIM indicator lamp .........................171
Permanent ..................................... 173
Selecting ........................................ 171
Storing the current speed ..............172
Variable ......................................... 171
SRS (Supplemental Restraint Sys-
tem) Display message ............................ 235
Introduction ..................................... 41
Warning lamp ................................. 261
Warning lamp (function) ................... 41
Start/stop function
see ECO start/stop function
Starting (engine) ................................ 145
STEER CONTROL .................................. 7016IndexProCarManuals.com
Page 21 of 352
Securing from rolling away ............326
Towing away .................................. 308
Tow-starting ................................... 308
Transporting .................................. 311
Unlocking (in an emergency) ...........83
Unlocking (key) ................................ 77
Vehicle data ................................... 343
Vehicle data ....................................... 343
Vehicle dimensions ........................... 343
Vehicle emergency locking ................ 84
Vehicle identification number see VIN
Vehicle identification plate .............. 336
Vehicle maintenance see ASSYST PLUS
Vehicle tool kit .................................. 297
Vehicle weights ................................. 343
Video (DVD) ........................................ 215
Video DVD (on-board computer) ...... 215
VIN ...................................................... 336
W
Warning and indicator lamps ABS ................................................ 256
Brakes ........................................... 256
Distance warning signal .................264
ESP ®
.............................................. 258
ESP ®
OFF ....................................... 259
Fuel tank ........................................ 262
LIM (cruise control) ........................ 169
LIM (DISTRONIC PLUS) ..................174
LIM (variable SPEEDTRONIC) .........171
Overview .......................................... 32
PASSENGER AIRBAG OFF ................53
Reserve fuel ................................... 262
Seat belt ........................................ 255
SRS ................................................ 261
Tyre pressure monitor ...................265
Warning triangle ................................ 296
Washer fluid Display message ............................ 254
Wheel bolt tightening torque ........... 328
Wheel chock ...................................... 326
Wheels Changing/replacing .......................324
Changing a wheel .......................... 324
Checking ........................................ 317
Cleaning ......................................... 289
Cleaning (warning) .........................325
Emergency spare wheel .................331
Fitting a new wheel ........................328
Fitting a wheel ............................... 325
Important safety notes ..................316
Removing a wheel ..........................328
Storing ........................................... 325
Tightening torque ........................... 328
Wheel size/tyre size ......................329
Windowbag
Display message ............................ 236
Operation ......................................... 45
Windows
Cleaning ......................................... 290
see Side windows
Windscreen
Demisting ...................................... 132
see Windscreen
Windscreen washer fluid
see Windscreen washer system
Windscreen washer system
Notes ............................................. 342
Topping up ..................................... 286
Windscreen wipers
Display message ............................ 254
Problem (malfunction) ...................121
Replacing the wiper blades ............119
Switching on/off ........................... 118
Winter driving
General notes ................................ 318
Winter operation
Slippery road surfaces ...................168
Snow chains .................................. 319
Winter tyres
Limiting the speed (on-board com-
puter) ............................................. 223
M+S tyres ...................................... 318
Wiper blades
Cleaning ......................................... 291
Important safety notes ..................119
Replacing (windscreen) ..................119
Wooden trim (cleaning instructions) 293
Workshop see Qualified specialist workshop Index19ProCarManuals.com
Page 112 of 352
Hazard warning lamps
The hazard warning lamps switch on auto-
matically if:
R an airbag is deployed or
R the vehicle decelerates rapidly from a
speed of more than 70 km/h and comes to
a standstill
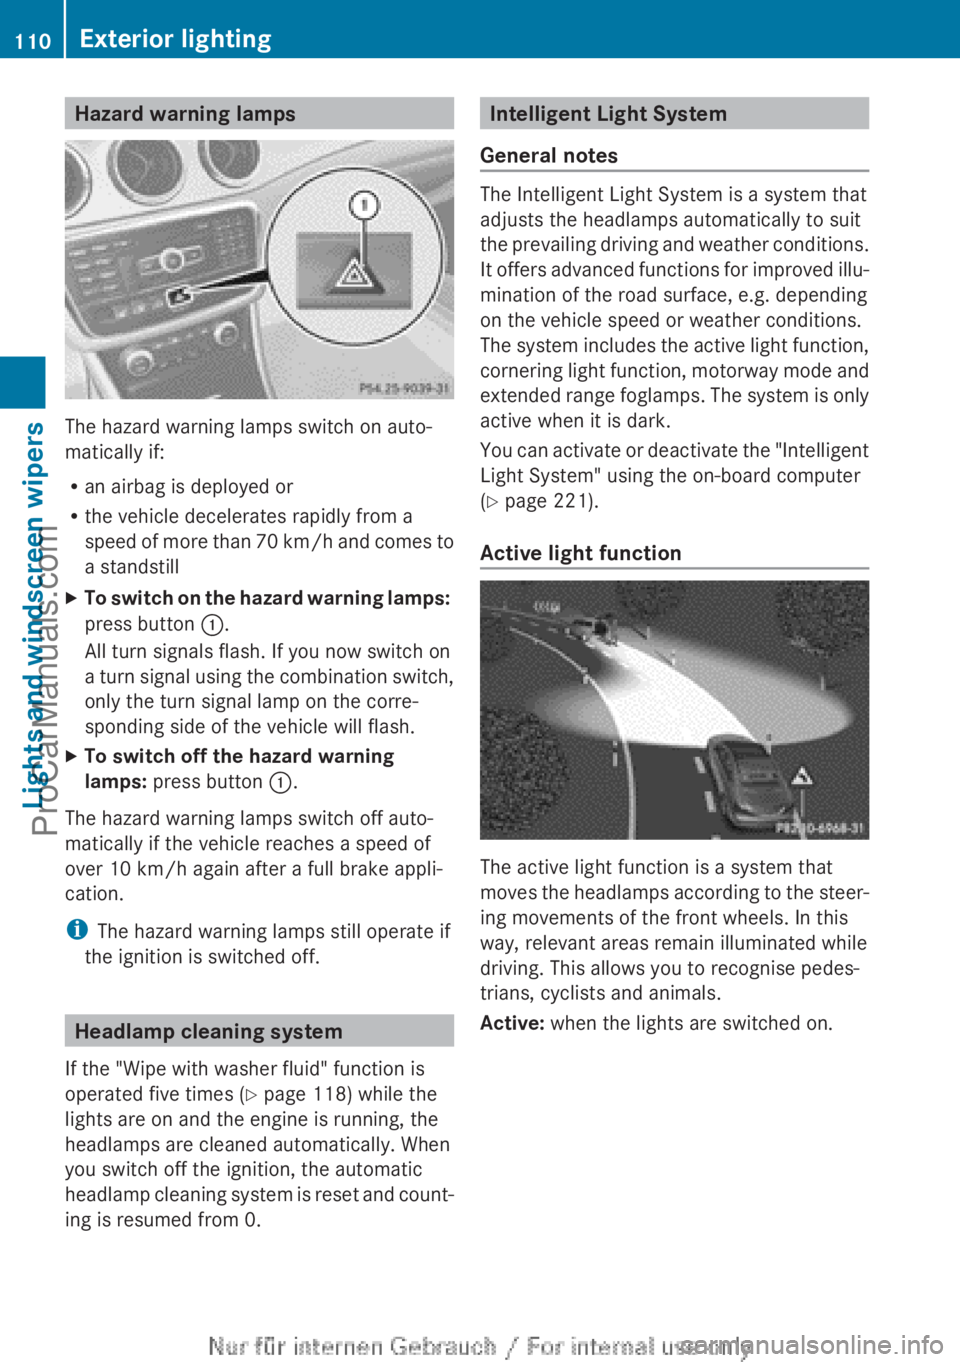
XTo switch on the hazard warning lamps:
press button :.
All turn signals flash. If you now switch on
a turn signal using the combination switch,
only the turn signal lamp on the corre-
sponding side of the vehicle will flash.XTo switch off the hazard warning
lamps: press button :.
The hazard warning lamps switch off auto-
matically if the vehicle reaches a speed of
over 10 km/h again after a full brake appli-
cation.
i The hazard warning lamps still operate if
the ignition is switched off.
Headlamp cleaning system
If the "Wipe with washer fluid" function is
operated five times ( Y page 118) while the
lights are on and the engine is running, the
headlamps are cleaned automatically. When
you switch off the ignition, the automatic
headlamp cleaning system is reset and count-
ing is resumed from 0.
Intelligent Light System
General notes
The Intelligent Light System is a system that
adjusts the headlamps automatically to suit
the prevailing driving and weather conditions.
It offers advanced functions for improved illu-
mination of the road surface, e.g. depending
on the vehicle speed or weather conditions.
The system includes the active light function,
cornering light function, motorway mode and
extended range foglamps. The system is only
active when it is dark.
You can activate or deactivate the "Intelligent
Light System" using the on-board computer
( Y page 221).
Active light function
The active light function is a system that
moves the headlamps according to the steer-
ing movements of the front wheels. In this
way, relevant areas remain illuminated while
driving. This allows you to recognise pedes-
trians, cyclists and animals.
Active: when the lights are switched on.
110Exterior lightingLights and windscreen wipers
ProCarManuals.com
Page 120 of 352

XTo open: loosen side trim panel : at the
top and fold it down in the direction of the
arrow.XTo close: insert side panel :.
Tail lamps
XSwitch off the lights.XOpen the boot.XOpen the side trim panel ( Y page 117).XRelease and remove connector.XPress retaining clips : at the same time in
the direction of the arrows.XPull the bulb holder out with the bulbs.
Bulb holder
:Brake lamp;Brake lamp=Rear foglamp?Reversing lampATurn signalsXBrake lamp/rear foglamp/reversing
lamp: remove the corresponding bulb from
the bulb holder.XInsert the new bulb into the bulb holder.XTurn signal lamp: lightly press the bulb
into the bulb holder, turn it anti-clockwise
and remove it from the bulb holder.XInsert the new bulb into the bulb holder and
turn it clockwise.XReinsert the bulb holder and engage on
retaining clips :.XRe-establish contact with the connector.XClose the side trim panel ( Y page 117).
Windscreen wipers
Switching the windscreen wipers on/
off
! Do not operate the windscreen wipers
when the windscreen is dry, as this could
damage the wiper blades. Moreover, dust
that has collected on the windscreen can
scratch the glass if wiping takes place when
the windscreen is dry.
If it is necessary to switch on the wind-
screen wipers in dry weather conditions,
always operate them using washer fluid.
! If the windscreen wipers leave smears on
the windscreen after the vehicle has been
washed in an automatic car wash, this may
be due to wax or other residue. Clean the
windscreen with washer fluid after an auto-
matic car wash.
118Windscreen wipersLights and windscreen wipers
ProCarManuals.com
Page 121 of 352
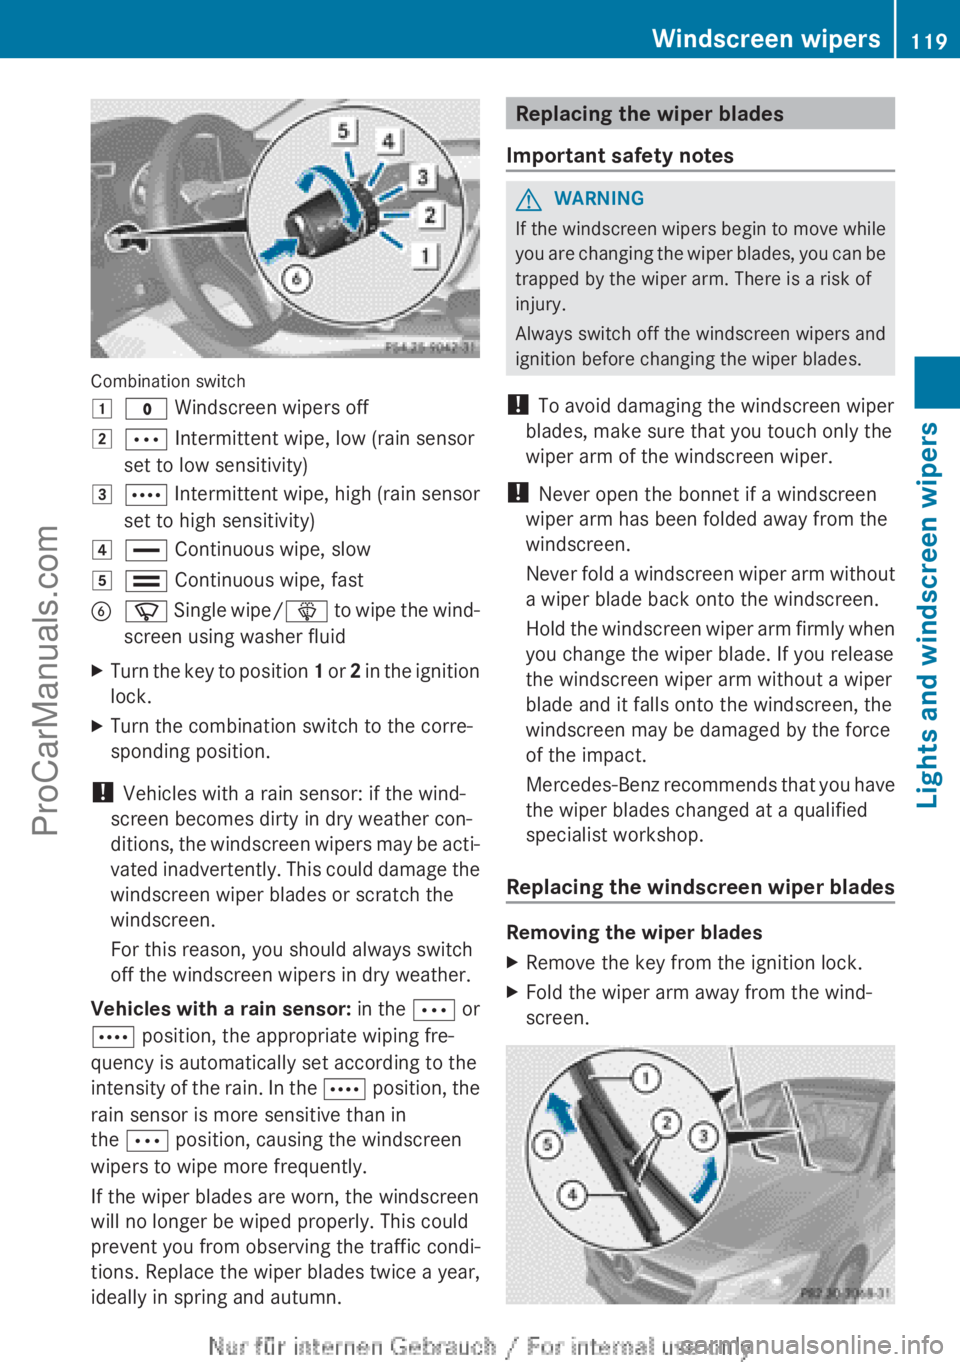
Combination switch
1$ Windscreen wipers off2Ä Intermittent wipe, low (rain sensor
set to low sensitivity)3Å Intermittent wipe, high (rain sensor
set to high sensitivity)4° Continuous wipe, slow5¯ Continuous wipe, fastBí Single wipe/ î to wipe the wind-
screen using washer fluidXTurn the key to position 1 or 2 in the ignition
lock.XTurn the combination switch to the corre-
sponding position.
! Vehicles with a rain sensor: if the wind-
screen becomes dirty in dry weather con-
ditions, the windscreen wipers may be acti-
vated inadvertently. This could damage the
windscreen wiper blades or scratch the
windscreen.
For this reason, you should always switch
off the windscreen wipers in dry weather.
Vehicles with a rain sensor: in the Ä or
Å position, the appropriate wiping fre-
quency is automatically set according to the
intensity of the rain. In the Å position, the
rain sensor is more sensitive than in
the Ä position, causing the windscreen
wipers to wipe more frequently.
If the wiper blades are worn, the windscreen
will no longer be wiped properly. This could
prevent you from observing the traffic condi-
tions. Replace the wiper blades twice a year,
ideally in spring and autumn.
Replacing the wiper blades
Important safety notesGWARNING
If the windscreen wipers begin to move while
you are changing the wiper blades, you can be
trapped by the wiper arm. There is a risk of
injury.
Always switch off the windscreen wipers and
ignition before changing the wiper blades.
! To avoid damaging the windscreen wiper
blades, make sure that you touch only the
wiper arm of the windscreen wiper.
! Never open the bonnet if a windscreen
wiper arm has been folded away from the
windscreen.
Never fold a windscreen wiper arm without
a wiper blade back onto the windscreen.
Hold the windscreen wiper arm firmly when
you change the wiper blade. If you release
the windscreen wiper arm without a wiper
blade and it falls onto the windscreen, the
windscreen may be damaged by the force
of the impact.
Mercedes-Benz recommends that you have
the wiper blades changed at a qualified
specialist workshop.
Replacing the windscreen wiper blades
Removing the wiper blades
XRemove the key from the ignition lock.XFold the wiper arm away from the wind-
screen.Windscreen wipers119Lights and windscreen wipersZProCarManuals.com
Page 123 of 352
Problems with the windscreen wipersProblemPossible causes/consequences and M SolutionsThe windscreen wipers
are jammed.Leaves or snow, for example, may be obstructing the windscreen
wiper movement. The wiper motor has been deactivated.XFor safety reasons, you should remove the key from the ignition
lock.XRemove the cause of the obstruction.XSwitch the windscreen wipers back on.The windscreen wipers
fail completely.The windscreen wiper drive is malfunctioning.XSelect another wiper speed on the combination switch.XHave the windscreen wipers checked at a qualified specialist
workshop.The windscreen washer
fluid from the spray
nozzles no longer hits
the centre of the wind-
screen.The spray nozzles are misaligned.XHave the spray nozzles adjusted at a qualified specialist work-
shop.Windscreen wipers121Lights and windscreen wipersZProCarManuals.com
Page 256 of 352
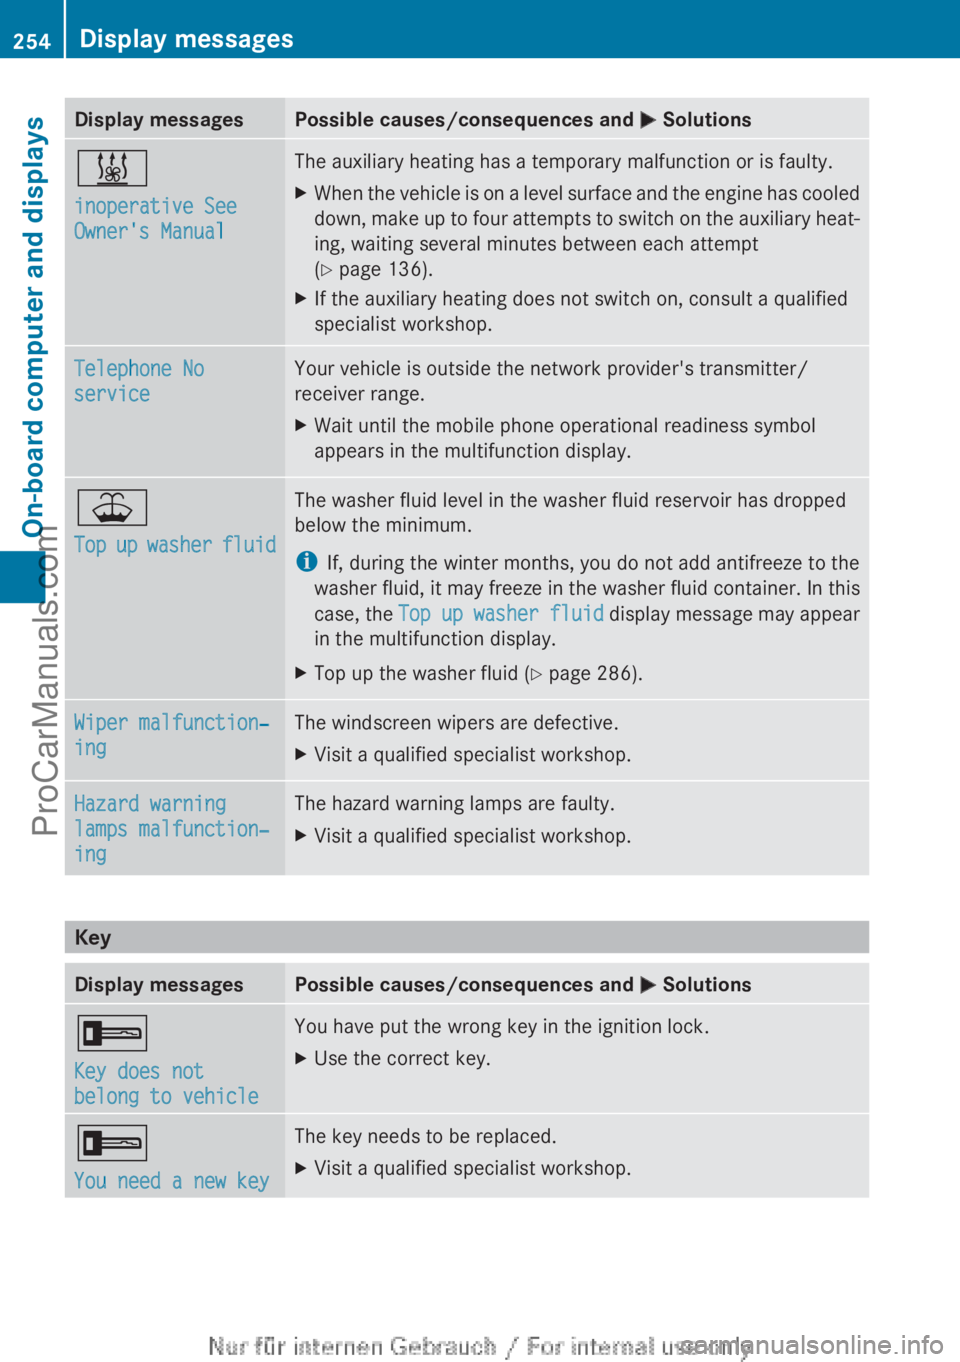
Display messagesPossible causes/consequences and M Solutions&
inoperative See
Owner's ManualThe auxiliary heating has a temporary malfunction or is faulty.XWhen the vehicle is on a level surface and the engine has cooled
down, make up to four attempts to switch on the auxiliary heat-
ing, waiting several minutes between each attempt
( Y page 136).XIf the auxiliary heating does not switch on, consult a qualified
specialist workshop.Telephone No
serviceYour vehicle is outside the network provider's transmitter/
receiver range.XWait until the mobile phone operational readiness symbol
appears in the multifunction display.¥
Top up washer fluidThe washer fluid level in the washer fluid reservoir has dropped
below the minimum.
i If, during the winter months, you do not add antifreeze to the
washer fluid, it may freeze in the washer fluid container. In this
case, the Top up washer fluid display message may appear
in the multifunction display.XTop up the washer fluid ( Y page 286).Wiper malfunction‐
ingThe windscreen wipers are defective.XVisit a qualified specialist workshop.Hazard warning
lamps malfunction‐
ingThe hazard warning lamps are faulty.XVisit a qualified specialist workshop.
Key
Display messagesPossible causes/consequences and M Solutions+
Key does not
belong to vehicleYou have put the wrong key in the ignition lock.XUse the correct key.+
You need a new keyThe key needs to be replaced.XVisit a qualified specialist workshop.254Display messagesOn-board computer and displays
ProCarManuals.com
Page 288 of 352

Checking the coolant level when the cool-
ant temperature is over 40 † can lead to
damage to the engine or engine cooling
system.
Example
XPark the vehicle on a level surface.
Only check the coolant level if the vehicle
is on a level surface and the engine has
cooled down.XTurn the key to position 2 in the ignition
lock ( Y page 145).XCheck the coolant temperature display in
the instrument cluster.
The coolant temperature must be below
40 †.XTurn the key to position 0 (Y page 145) in
the ignition lock.XSlowly turn cap : half a turn anti-clock-
wise to allow excess pressure to escape.XTurn cap : further anti-clockwise and
remove it.
If the coolant is at the level of marker bar
= in the filler neck when cold, there is
enough coolant in coolant expansion
tank ;.XIf necessary, top up with coolant that has
been tested and approved by Mercedes-
Benz.XReplace cap : and turn it clockwise as far
as it will go.
For further information on coolant, see
( Y page 341).
Topping up the windscreen washer sys-
tem/headlamp cleaning systemGWARNING
Windscreen washer concentrate is highly
flammable. If it comes into contact with hot
engine components or the exhaust system it
could ignite. There is a risk of fire and injury.
Make sure that no windscreen washer con-
centrate is spilled next to the filler neck.
Example
XTo open: pull cap : upwards by the tab.XTop up with the premixed washer fluid.XTo close: press cap : onto the filler neck
until it engages.
The washer fluid reservoir is used for both the
windscreen washer system and the headlamp
cleaning system.
If the washer fluid level drops below the rec-
ommended minimum of 1 litre, a message
appears in the multifunction display prompt-
ing you to refill the washer fluid
( Y page 254).
Further information on windscreen washer
fluid/antifreeze ( Y page 342).
Service
ASSYST PLUS
Service messages
The ASSYST PLUS service interval display
informs you of the next service due date.
286ServiceMaintenance and care
ProCarManuals.com