2013 MERCEDES-BENZ B-CLASS SPORTS transmission
[x] Cancel search: transmissionPage 165 of 336
PARKTRONIC is activated automatically when
you:
R
switch on the ignition
R shift the transmission to position D,Ror N
R release the electric parking brake
PARKTRONIC is deactivated at speeds above
11 mph (18 km/h). It is reactivated at lower
speeds.
PARKTRONIC monitors the area around your
vehicle using six sensors in the frontb umper
and four sensors in the rear bumper.
Range of the sensors General notes
PARKTRONIC does no
ttake objects into
consideratio nthat are:
R below the detection range, e.g. people,
animals or objects
R above the detection range, e.g.
overhanging loads, truck overhangs or
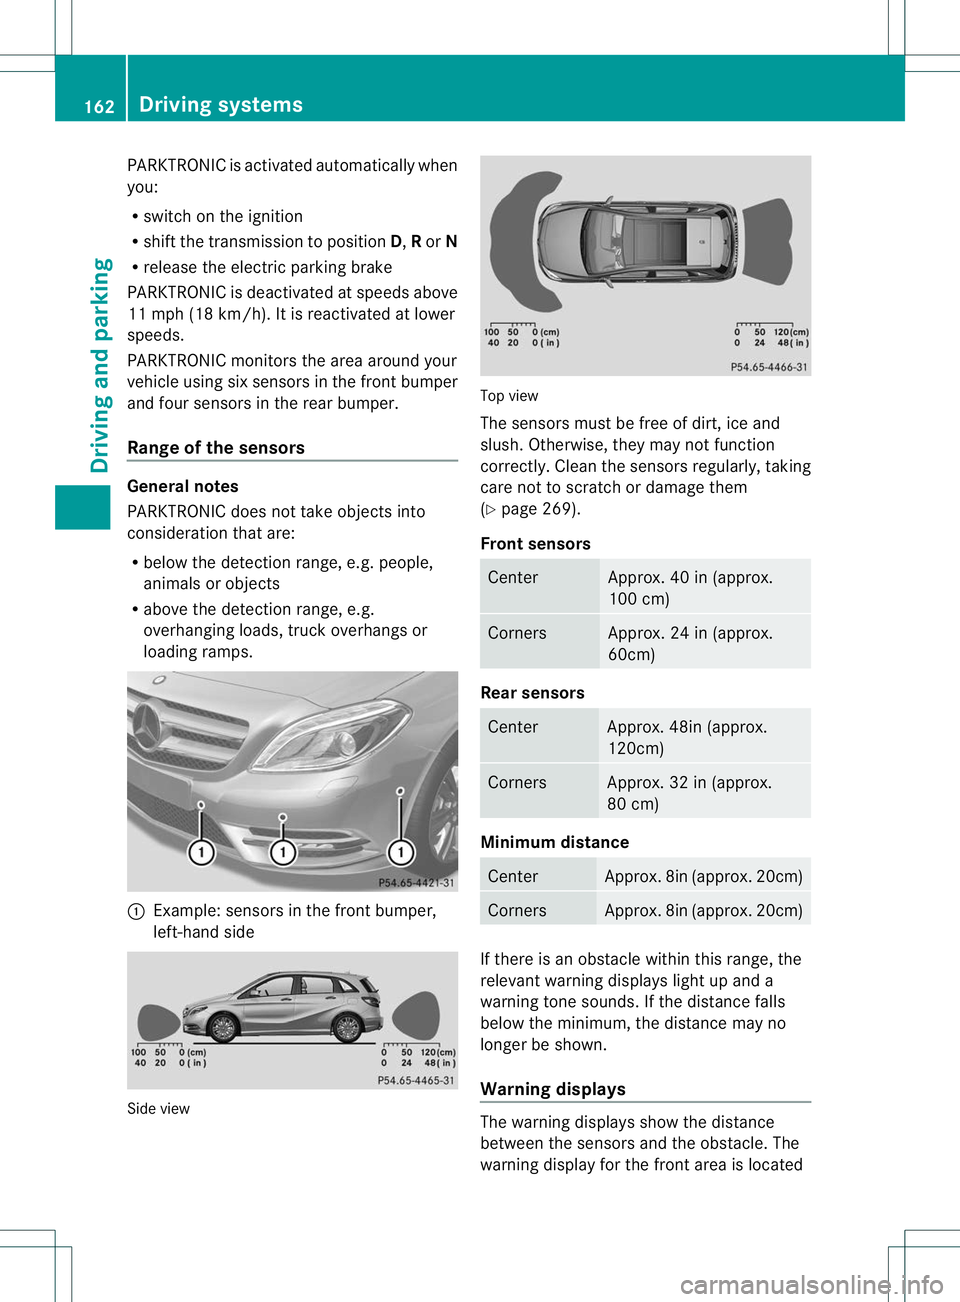
loading ramps. :
Example: sensors in the front bumper,
left-hand side Side view Top view
The sensors must be free of dirt, ice and
slush. Otherwise, they may not function
correctly. Cleant
he sensors regularly, taking
care not to scratch or damage them
(Y page 269).
Front sensors Center Approx. 40 in (approx.
100 cm)
Corners Approx. 24 in (approx.
60cm)
Rear sensors
Center Approx. 48in (approx.
120cm)
Corners Approx. 32 in (approx.
80 cm)
Minimum distance
Center Approx. 8in (approx. 20cm)
Corners Approx. 8in (approx. 20cm)
If there is an obstacle within this range, the
relevant warning displays light up and a
warning tone sounds. If the distance falls
below the minimum, the distance may no
longer be shown.
Warning displays
The warning displays show the distance
between the sensors and the obstacle. The
warning display for the front area is located162
Driving systemsDriving and parking
Page 166 of 336
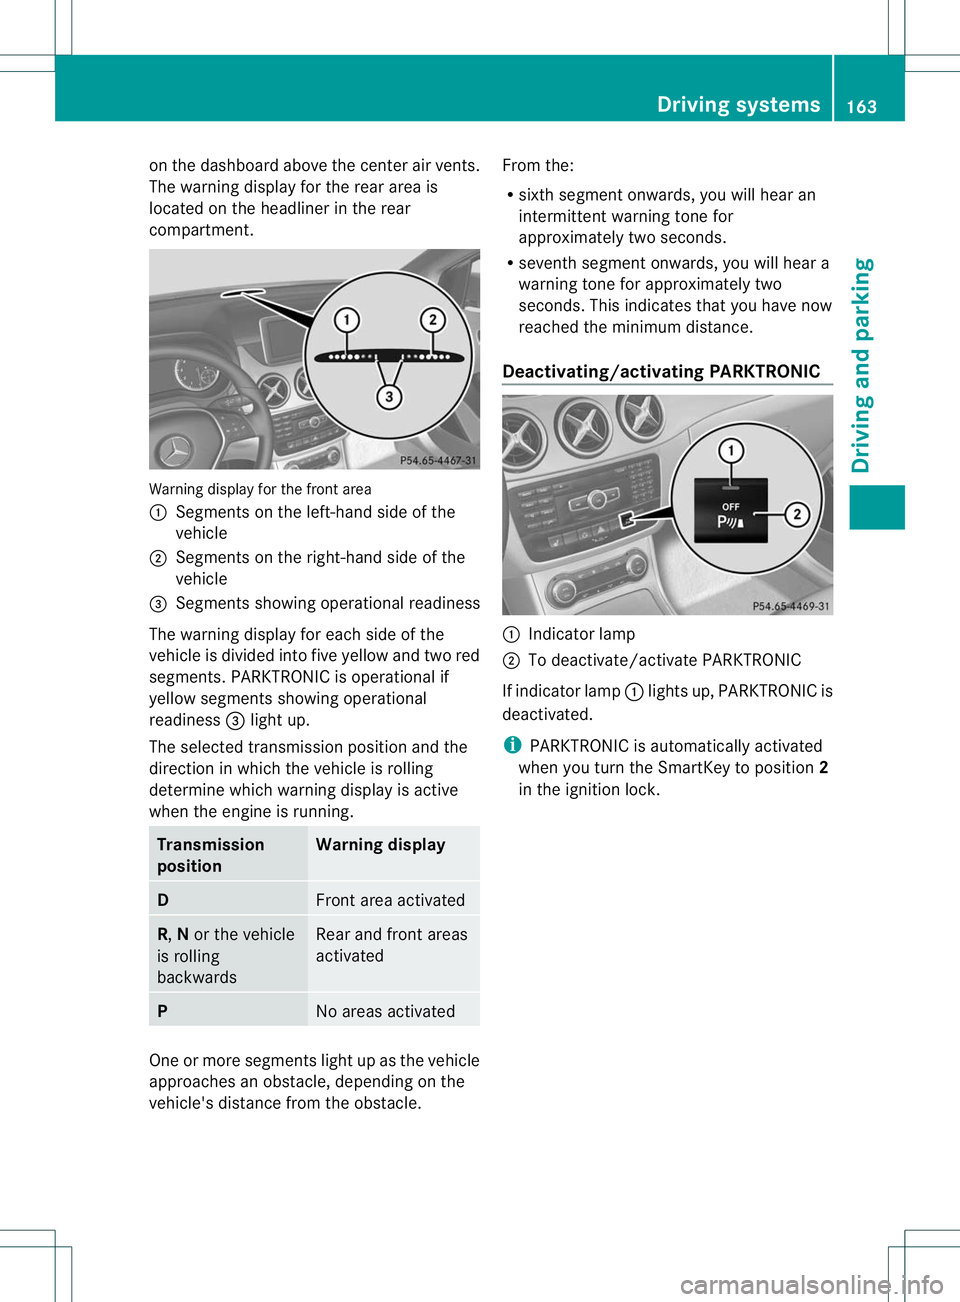
on the dashboard above the center air vents.
The warning display for the rear area is
located on the headliner in the rear
compartment.
Warning display for the front area
:
Segments on the left-hand side of the
vehicle
; Segments on the right-hand side of the
vehicle
= Segments showing operational readiness
The warning display for each side of the
vehicle is divided into five yellow and two red
segments. PARKTRONIC is operational if
yellow segments showing operational
readiness =light up.
The selected transmission position and the
direction in which the vehicle is rolling
determine which warning display is active
when the engine is running. Transmission
position Warning display
D
Front area activated
R,
Nor the vehicle
is rolling
backwards Rear and front areas
activated
P
No areas activated
One or more segments light up as the vehicle
approaches an obstacle, depending on the
vehicle's distance from the obstacle. From the:
R
sixth segment onwards, you will hear an
intermittent warning tonef or
approximately two seconds.
R seventh segment onwards, you will hear a
warning tone for approximately two
seconds. This indicates that you have now
reached the minimum distance.
Deactivating/activating PARKTRONIC :
Indicator lamp
; To deactivate/activate PARKTRONIC
If indicator lamp :lights up, PARKTRONIC is
deactivated.
i PARKTRONIC is automatically activated
when you turn the SmartKey to position 2
in the ignition lock. Driving systems
163Driving and parking Z
Page 169 of 336
passenger side. Parking spaces on the
driver's side are displayed as soon as the turn
signal on the driver's side is activated. To park
on the driver's side, you must leave the
driver's side turn signal switched on. This
must remain switched on until you
acknowledge the use of Active Parking Assist
by pressing the
abutton on the
multifunction steering wheel.
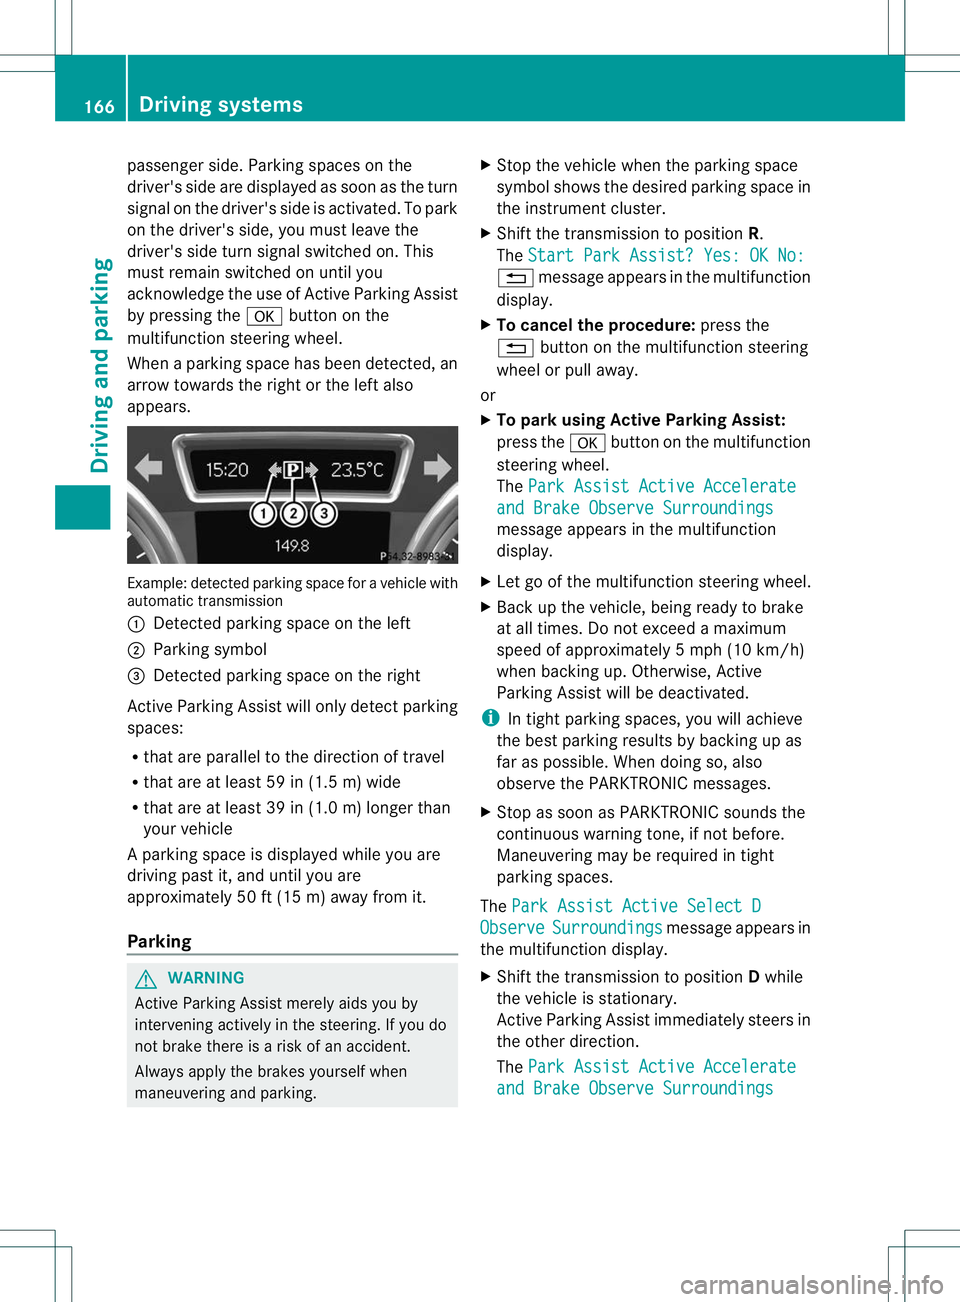
When a parking space has been detected, an
arrow towards the right or the left also
appears. Example: detected parkin
gspace for a vehicle with
automatic transmission
: Detected parking space on the left
; Parking symbol
= Detected parking space on the right
Active Parking Assist will only detectp arking
spaces:
R that are parallel to the direction of travel
R that are at least 59 in (1.5 m) wide
R that are at least 39 in (1.0 m) longer than
your vehicle
Ap arking space is displayed while you are
driving past it, and until you are
approximately 50 ft (15 m) away from it.
Parking G
WARNING
Active Parking Assist merely aids you by
intervening actively in the steering. If you do
not brake there is a risk of an accident.
Always apply the brakes yourself when
maneuvering and parking. X
Stop the vehicle when the parking space
symbol shows the desired parking space in
the instrument cluster.
X Shift the transmission to position R.
The Start Park Assist? Yes: OK No: %
message appears in the multifunction
display.
X To cancel the procedure: press the
% button on the multifunction steering
wheel or pull away.
or
X To park using Active Parking Assist:
press the abuttonont he multifunction
steering wheel.
The Park Assist Active Accelerate and Brake Observe Surroundings
message appears in the multifunction
display.
X Let go of the multifunction steering wheel.
X Back up the vehicle, being ready to brake
at all times. Do not exceed a maximum
speed of approximately 5mph (10 km/h)
when backing up. Otherwise, Active
Parking Assist will be deactivated.
i In tight parking spaces, you will achieve
the best parking results by backing up as
far as possible. When doing so, also
observe the PARKTRONIC messages.
X Stop as soon as PARKTRONIC sounds the
continuous warning tone, if not before.
Maneuvering may be required in tight
parking spaces.
The Park Assist Active Select D Observe Surroundings message appears in
the multifunction display.
X Shift the transmission to position Dwhile
the vehicle is stationary.
Active Parking Assist immediately steers in
the other direction.
The Park Assist Active Accelerate and Brake Observe Surroundings166
Driving systemsDriving and parking
Page 170 of 336
message appears in the multifunction
display.
i You will achieve the best results by
waiting for the steering procedure to
complete before pulling away.
X Drive forwards and be ready to brake at all
times.
X Stop as soon as PARKTRONIC sounds the
continuous warning tone, if not before.
The Park Assist Active Select R Observe Surroundings message appears in
the multifunction display.
X Further transmission shifts may be
necessary.
As soon as the parking procedure is
complete, the Park Assist Finished message appears in the multifunction
display.A
ctive Parking Assist is now
deactivated. PARKTRONIC is still available.
X Maneuver if necessary.
X Always observe the warning messages
displayed by PARKTRONIC (Y page 162).
Exiting aparking space G
WARNING
Active Parking Assist doe snot monitor street
traffic .Insome cases, the vehicle will also
take you onto sections of the oncoming lane
when exiting a parking space.
You are responsible for safety at all times and
must pay attention to any road users
approaching or passing. Stop the vehicle if
necessary or cancel Active Parking Assist.
Active Parking Assist can only assist you with
exiting a parking space if you have parked the
vehicle using Active Parking Assist.
X Start the engine.
X Switch on the turn signal on the side facing
the street.
X Shift the transmission to position Dor R.
The Start Park Assist? Yes: OK No: %
message appears in the multifunction
display. X
To cancel the procedure: press the
% button on the multifunction steering
wheel or pull away.
or
X To exit aparking space using Active
Parking Assist: press theabutton on
the multifunctio nsteering wheel.
The Park Assist Active Accelerate and Brake Observe Surroundings
message appears in the multifunction
display.
X Let go of the multifunctio nsteering wheel.
X Reverse the vehicle or drive forwards, being
ready to brake at all times. Do not exceed
a maximum speed of approximately
6 mph (10 km/h) when exiting a parking
space .Otherwise, Active Parking Assist will
be deactivated.
X Stop as soon as PARKTRONIC sounds the
continuous warning tone, if not before.
X Shift the transmission to position Dor Ras
required while the vehicle is stationary.
Active Parking Assist immediately steers in
the other direction.
i You will achieve the best results by
waiting for the steering procedure to
complete before pulling away.
If you back up after activation, the steering
wheel is moved to the straight-ahead
position.
X Drive forwards or back up the vehicle, being
ready to brake at all times.
X Stop as soon as PARKTRONIC sounds the
continuous warning tone, if not before.
X Drive forwards and back up as instructed
by the PARKTRONIC warning displays.
Once you have exited the parking space
completely, the steering whee lis moved to
the straight-ahead position. You hear a tone
and the message Park Assist Finished appears in the multifunction display. You will
then have to steer and merge into traffic on
your own. PARKTRONIC is still available. Driving systems
167Driving and parking Z
Page 171 of 336
Canceling Active Parking Assist
You can cancel Active Parking Assist at any
time.
X
Stop the movement of the multifunction
steering wheel or steer yourself.
Active Parking Assist will be canceled at
once. The Park Assist Canceled message appears in the multifunction
display.
or
X Press the PARKTRONIC butto nonthe
center console (Y page 163).
PARKTRONIC is switched off and Active
Parking Assist is immediately canceled.
The Park Assist Canceled message
appears in the multifunction display.
Active Parking Assist is canceled
automatically if:
R the transmission is shifted too early.
R parking using Active Parking Assist is no
longer possible.
R you are driving faster than 6 mph
(10 km/h).
R a wheel spins, ESP ®
intervenes or fails. The
÷ warning lamp lights up in the
instrument cluster.
Aw arning tone sounds. The parking symbol
disappears and the multifunction display
shows the Park Assist Canceled message.
When Active Parking Assist is canceled, you
must steer again yourself.
Rear view camera
Important safety notes The rear view camera is only an aid. It is not
a replacement for your attention to your
immediate surroundings. You are always
responsible for safe maneuvering and
parking
.When maneuvering or parking, make
sure that there are no persons, animals or objects in the area in which you are
maneuvering.
Under the following circumstances, the rear
view camera will not function, or will function
in a limited manner:
R
the tailgate is open
R in heavy rain, snow or fog
R at night or in very dark places
R if the camera is exposed to very bright light
R if the area is lit by fluorescent light or LED
lighting (the display may flicker)
R if there is a sudden change in temperature,
e.g. when driving into a heated garage in
winter
R if the camera lens is dirty or obstructed
R if the rear of your vehicle is damaged. In
this event, have the camera position and
setting checked at a qualified specialist
workshop.
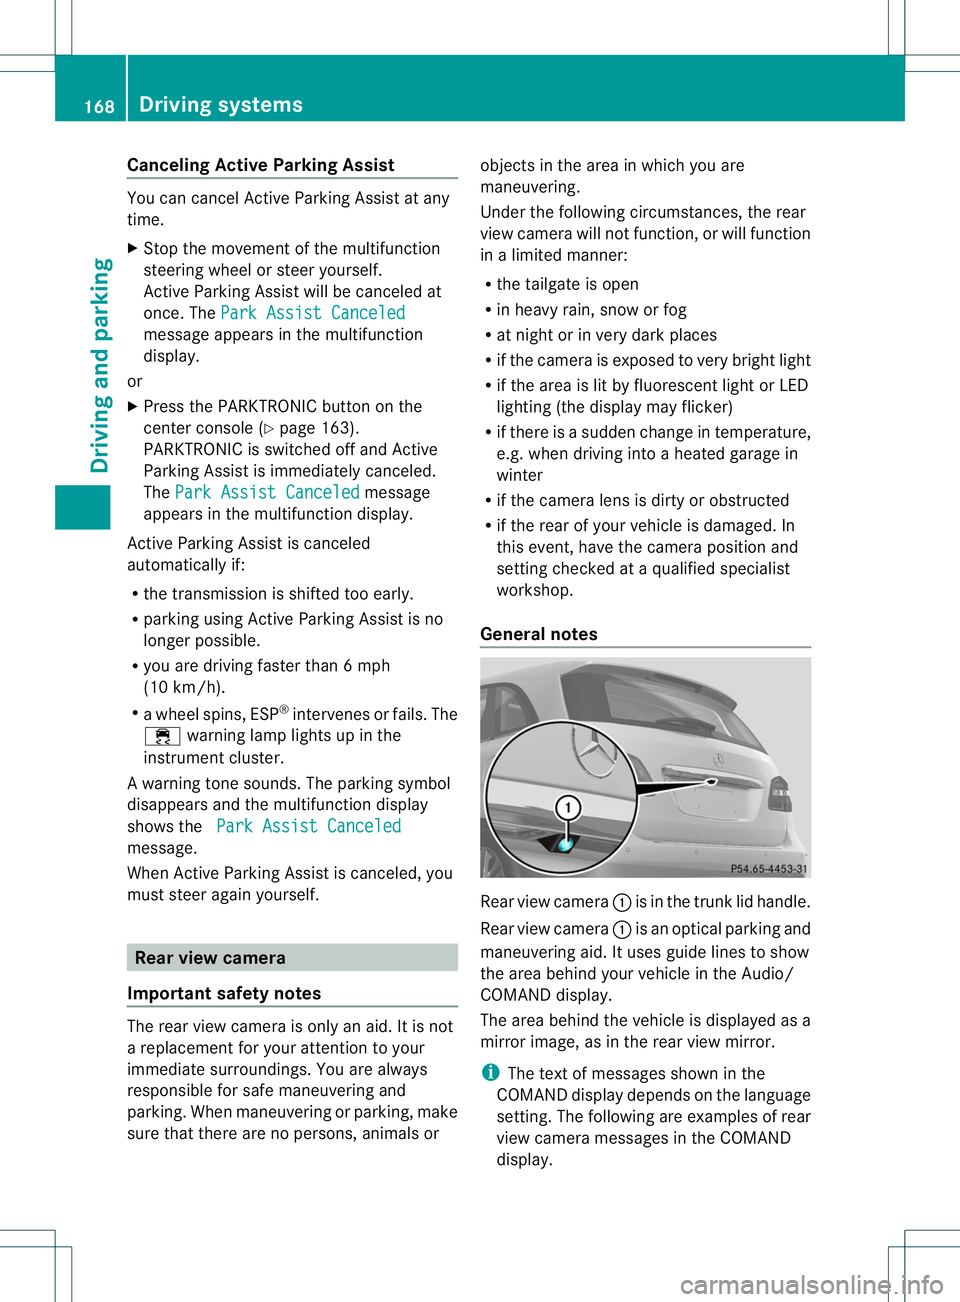
General notes Rear view camera
:is in the trunk lid handle.
Rear view camera :is an optical parking and
maneuvering aid. It uses guide lines to show
the area behind your vehicle in the Audio/
COMAND display.
The area behind the vehicle is displayed as a
mirror image, as in the rear view mirror.
i The text of messages shown in the
COMAND display depends on the language
setting. The following are examples of rear
view camera messages in the COMAND
display. 168
Driving systemsDriving and parking
Page 172 of 336
Activating/deactivating the rea
rview
camera X
To activate: make sure that the SmartKey
is in position 2in the ignition lock.
X Make sure that in the audio system/
COMAND, the "Activation by R gear"
function is selected; see the separate
operating instructions for the audio
system/COMAND.
X Engage reverse gear.
Guide lines are used to show the area
behind the vehicle in the Audio/COMAND
display.
To deactivate: the rear view camera is
deactivated if you:
R selec ttransmission position P(vehicles
with automatic transmission)
R drive forward ten meters
R shift the transmission from Rto another
position (after 15 seconds)
R drive forwards at a speed of over 5mph
(10km/h)
Displays in the Audio/COMAND display The rear view camera may show a distorted
view of obstacles, show them incorrectly or
not at all. The rear view camera does not show
objects in the following positions:
R
very close to the rear bumper
R under the rear bumper
R in the area immediately above the tailgate
handle
! Objects not at ground level may appear to
be further away than they actually are, e.g.:
R the bumper of a parked vehicle
R the drawbar of a trailer
R the ball coupling of a trailer tow hitch
R the rear section of an HGV
R a slanted post
Use the guidelines only for orientation.
Approach objects no further than the
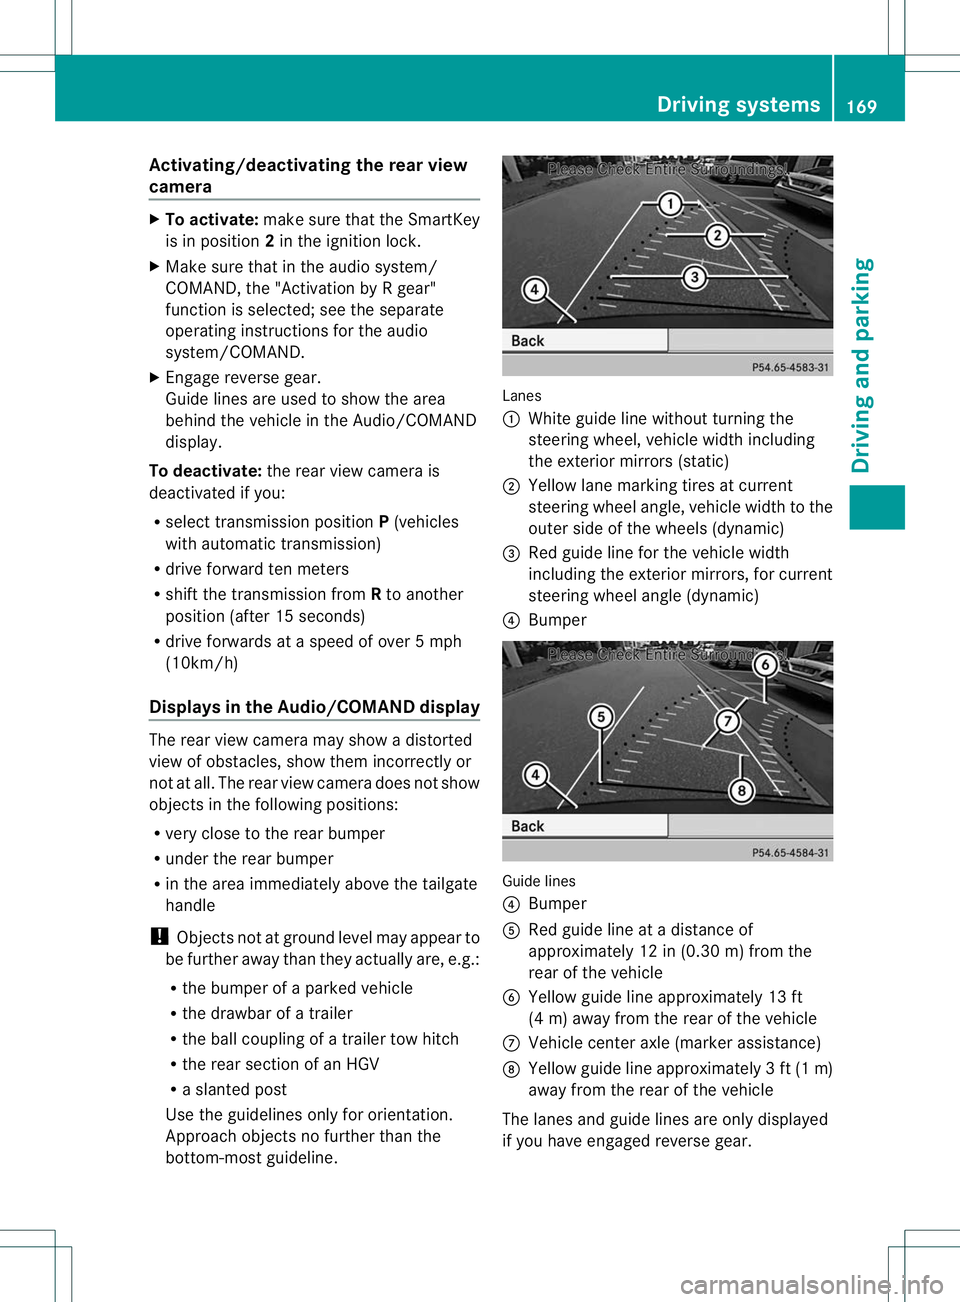
bottom-most guideline. Lanes
:
White guide line without turning the
steering wheel, vehicle width including
the exterior mirrors (static)
; Yellow lane marking tires at current
steering wheel angle, vehicle width to the
outer side of the wheels (dynamic)
= Red guide line for the vehicle width
including the exterior mirrors, for current
steering wheel angle (dynamic)
? Bumper Guide lines
?
Bumper
A Red guide line at a distance of
approximately 12 in (0.30 m) from the
rear of the vehicle
B Yellow guide line approximately 13 ft
(4 m) away from the rear of the vehicle
C Vehicle center axle (marker assistance)
D Yellow guide line approximately 3ft(1m)
away from the rear of the vehicle
The lanes and guide lines are only displayed
if you have engaged revers egear. Driving systems
169Driving and parking Z
Page 184 of 336
W
X R
Adjusts the volume 8 R
Mute Back button
%
Press briefly:
R
Back
R Switches off the Voice Control
System; see the separate
operating instructions
R Hides display messages/calls
up the last Trip menu function
used
R Exits the telephone book/redial
memory %
Press and hold:
R
Calls up the standard display in
the Trip menu
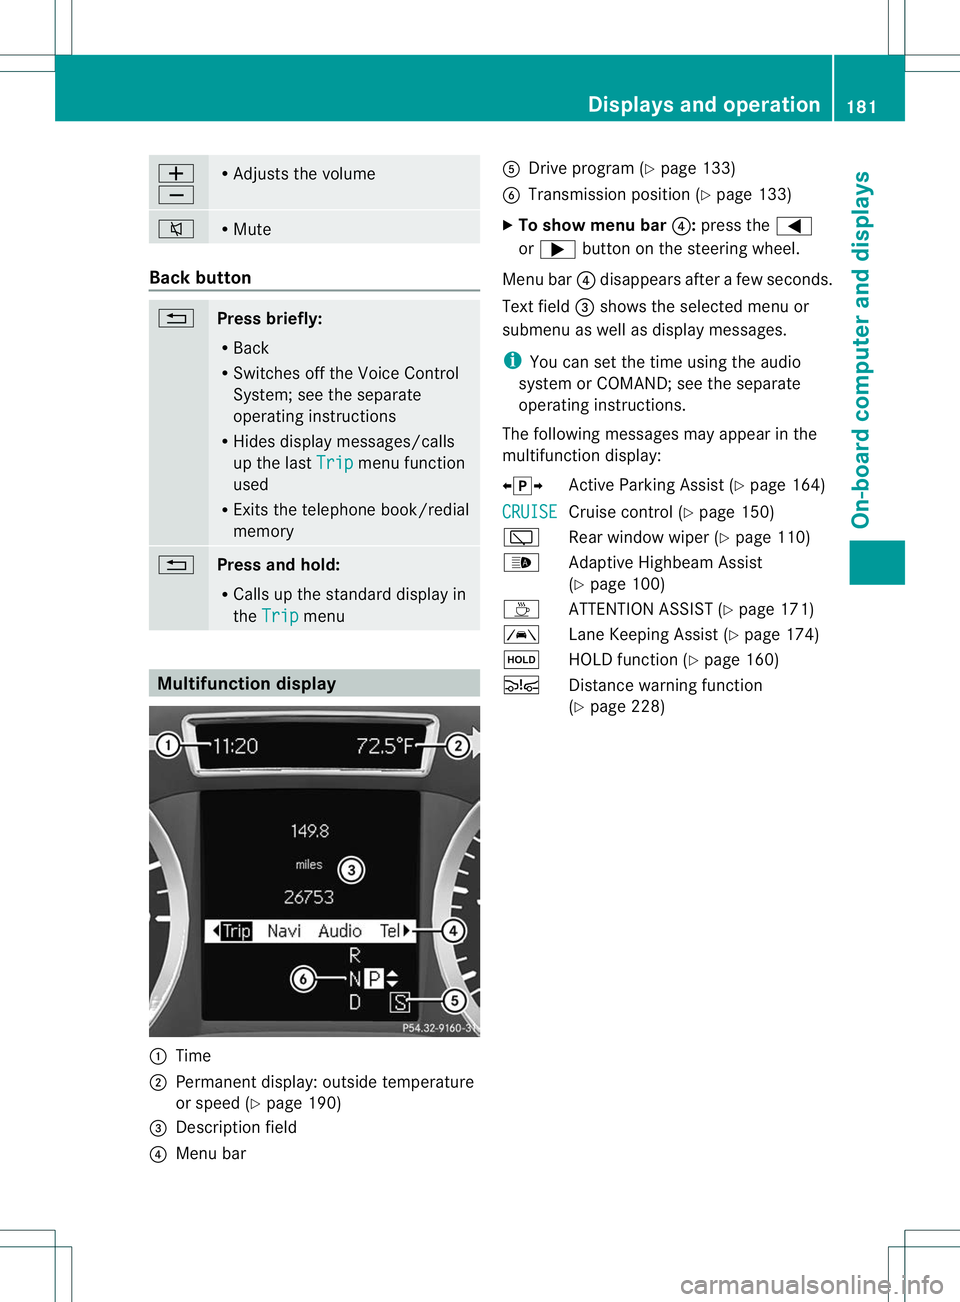
Multifunction display
:
Time
; Permanent display: outside temperature
or speed (Y page 190)
= Descriptio nfield
? Menu bar A
Drive program (Y page 133)
B Transmission position (Y page 133)
X To show menu bar ?:press the =
or ; button on the steering wheel.
Menu bar ?disappears after a few seconds.
Text field =shows the selected menu or
submenu as well as display messages.
i You can set the time using the audio
system or COMAND; see the separate
operating instructions.
The following messages may appear in the
multifunction display:
XjY Active Parking Assist (Y page 164)
CRUISE Cruise control (Y
page 150)
è Rear window wiper (Y page 110)
_ Adaptive Highbeam Assist
(Ypage 100)
À ATTENTION ASSIST( Ypage 171)
à Lane Keeping Assist (Y page 174)
ë HOLD function (Y page 160)
Ä Distance warning function
(Ypage 228) Displays and operation
181On-board computer and displays Z
Page 192 of 336
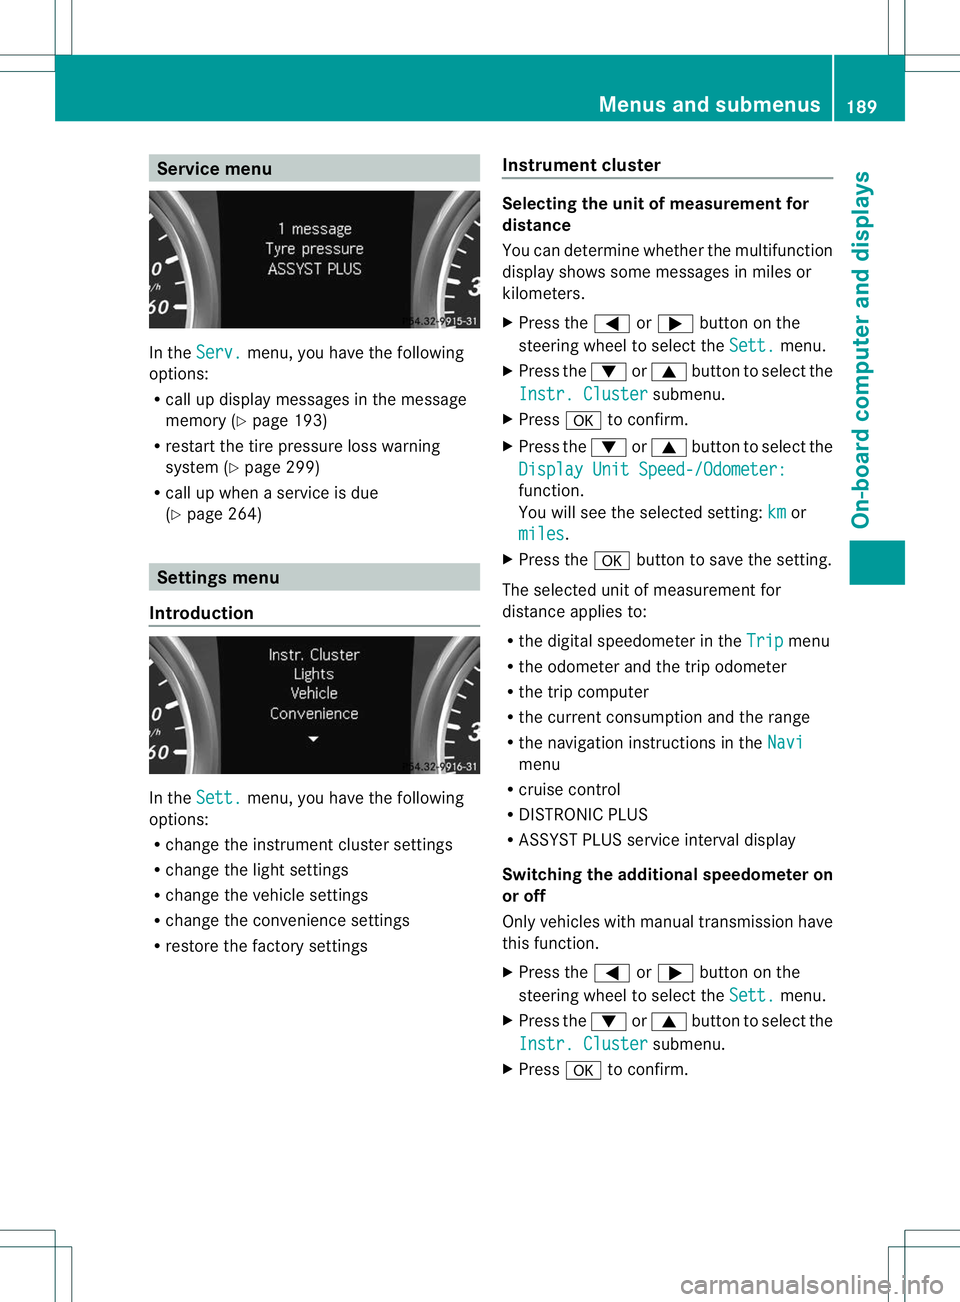
Service menu
In the
Serv. menu, you have the following
options:
R call up display messages in the message
memory (Y page 193)
R restart the tire pressure loss warning
system (Y page 299)
R call up when a service is due
(Y page 264) Settings menu
Introduction In the
Sett. menu, you have the following
options:
R change the instrument cluster settings
R change the light settings
R change the vehicle settings
R change the convenience settings
R restore the factory settings Instrument cluster Selecting the unit of measurement for
distance
You can determine whether the multifunction
display shows some messages in miles or
kilometers.
X
Press the =or; button on the
steering wheel to select the Sett. menu.
X Press the :or9 button to select the
Instr. Cluster submenu.
X Press ato confirm.
X Press the :or9 button to select the
Display Unit Speed-/Odometer: function.
You will see the selected setting:
km or
miles .
X Press the abutton to save the setting.
The selected unit of measurement for
distance applies to:
R the digital speedometer in the Trip menu
R the odometer and the trip odometer
R the trip computer
R the current consumption and the range
R the navigation instructions in the Navi menu
R cruise control
R DISTRONIC PLUS
R ASSYST PLUS service interval display
Switching the additional speedometer on
or off
Only vehicles with manual transmission have
this function.
X Press the =or; button on the
steering wheel to select the Sett. menu.
X Press the :or9 button to select the
Instr. Cluster submenu.
X Press ato confirm. Menus and submenus
189On-board computer and displays Z