2013 MERCEDES-BENZ B-CLASS SPORTS warning lights
[x] Cancel search: warning lightsPage 114 of 336
X
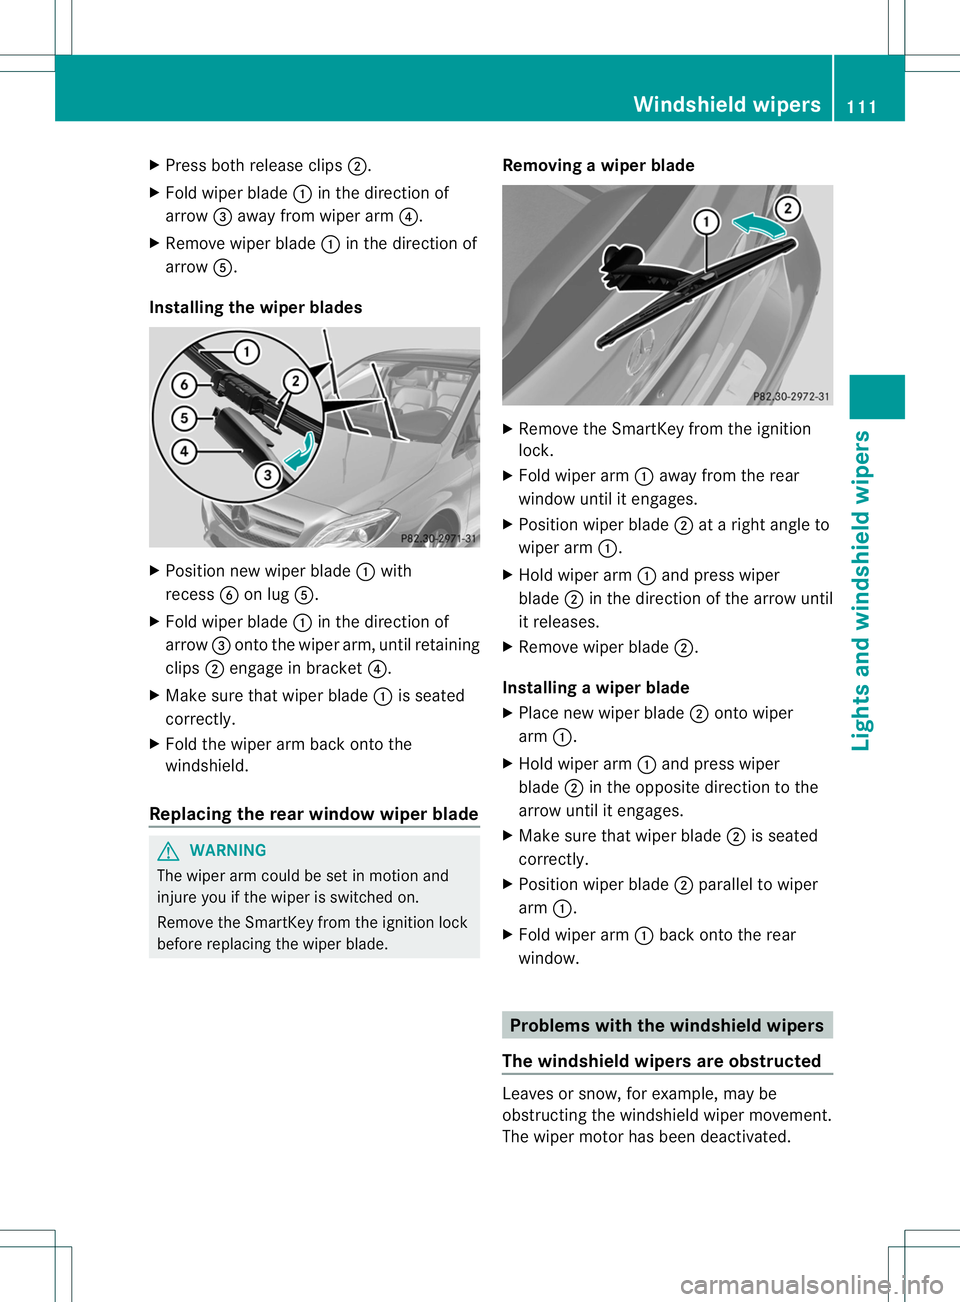
Press both release clips ;.
X Fold wiper blade :in the direction of
arrow =away from wiper arm ?.
X Remove wiper blade :in the direction of
arrow A.
Installing the wiper blades X
Position new wiper blade :with
recess Bon lug A.
X Fold wiper blade :in the direction of
arrow =onto the wiper arm, until retaining
clips ;engage in bracket ?.
X Make sure that wiper blade :is seated
correctly.
X Fold the wiper arm back onto the
windshield.
Replacing the rear window wiper blade G
WARNING
The wiper arm could be set in motion and
injure you if the wiper is switched on.
Remove the SmartKey from the ignition lock
before replacing the wiper blade. Removing
awiper blade X
Remove the SmartKey from the ignition
lock.
X Fold wiper arm :away from the rear
window until it engages.
X Position wiper blade ;at a right angle to
wiper arm :.
X Hold wiper arm :and press wiper
blade ;in the direction of the arrow until
it releases.
X Remove wiper blade ;.
Installing awiper blade
X Place new wiper blade ;onto wiper
arm :.
X Hold wiper arm :and press wiper
blade ;in the opposite direction to the
arrow until it engages.
X Make sure that wiper blade ;is seated
correctly.
X Position wiper blade ;parallel to wiper
arm :.
X Fold wiper arm :back onto the rear
window. Problems with the windshield wipers
The windshield wipers are obstructed Leaves or snow, for example, may be
obstructing the windshield wiper movement.
The wiper motor has been deactivated. Windshield wipers
111Lights and windshield wipers Z
Page 121 of 336
for the front-passenger side as well. The
indicator lamp in the
ábutton goes out.
R Use the residual heatf unction if you want
to heat or ventilate th evehicle interior
when the ignition is switched off. The
"residual heat" function can only be
activated or deactivated with the ignition
switched off. Operating the climate control
systems
Activating/deactivating climate
control
Points to observe before use G
WARNING
When the climate control system is
deactivated, the outside air supply and
circulation are also deactivated. Only choose
this setting for a short time. Otherwise the
windows could fog up, impairing visibility and
endangering you and others.
Activating/deactivating Climate control
X
Turn the SmartKey to position 2in the
ignition lock.
X To switch on: turn controlAclockwise
to the desired position (except position 0)
(Y page 115).
X To switch off: turn controlAcounter-
clockwise to position 0(Y page 115). 3-zone automatic climate control
X
Turn the SmartKey to position 2in the
ignition lock.
X To switch on: press theÃbutton.
The indicator lamp in the Ãbutton lights
up. Airflow and air distribution are set to
automatic mode.
or
X Press the ^button.
The indicator lamp in the ^button goes
out. The previously selected settings are
restored.
X To switch off: press button^.
The indicator lamp in the ^button lights
up.
i 3-zone automatic climate control: switch
on climate control primarily using the
à button. Activating/deactivating cooling with
air dehumidification
Points to observe before use G
WARNING
If you switch off the cooling function, the
vehicle will not be cooled when weather
conditions are warm. The windows can fog up
more quickly. This may preventy ou from
observing the traffic conditions, thereby
causing an accident.
The cooling with air dehumidification function
is only available with dual-zone automatic
climate control and 3-zone automatic climate
control.
The cooling with air dehumidification function
is only available when the engine is running.
The air inside the vehicle is cooled and
dehumidified according to the temperature
selected.
Condensation may drip from the underside of
the vehicle when it is in cooling mode. This is
normal and not a sign that there is a
malfunction. 118
Operating the climate control systemsClimate control
Page 122 of 336
i
The cooling with air dehumidification
function uses refrigerant R134a. This
refrigerant does not contain
chlorofluorocarbons, and therefore does
not damage the ozone layer.
Activating/deactivating X
To activate: press the¿button.
The indicator lamp in the ¿button lights
up.
X To deactivate: press the¿button.
The indicator lamp in the ¿button goes
out. The cooling with air dehumidification
function has a delayed switch-off feature.
Problems with the cooling with air
dehumidification function When you press the
¿button, the
indicator lamp in the button flashes three
times or remains off. You can no longer switch
on the cooling with air dehumidification
function.
X Visit a qualified specialist workshop. Setting climate control to automatic
G
WARNING
If you switch off the cooling function, the
vehicle will not be cooled when weather
conditions are warm. The windows can fog up
more quickly. Window fogging may impair
visibility and endanger you and others.
The automatic function is only available in
conjunction with 3-zone automatic climate
control.
In automatic mode, the set temperature is
maintained automatically at a constant level.
The system automatically regulates the
temperature of the dispensed air, the airflow
and the air distribution.
Automatic mode will achieve optimal
operation if cooling with air dehumidification is also activated. If desired, cooling with air
dehumidification can be deactivated.
X
Turn the SmartKey to position 2in the
ignition lock.
X Set the desired temperature.
X To activate: press theÃbutton.
The indicator lamp in the Ãbutton lights
up. Automatic air distribution and airflow
are activated.
X To select manually: press the_
button.
or
X Press the KorI button.
The indicator lamp in the Ãbutton goes
out. Automatic air distribution and airflow
are deactivated. Setting the temperature
Climate control You can set the temperature for the entire
vehicle.
X
Turn the SmartKey to position 2in the
ignition lock.
X To increase/reduce: turn control:
clockwise or counter-clockwise
(Y page 115). Only change the temperature
setting in small increments. Start at 22 †.
3-zone automatic climate control Different temperatures can be set for the
driver's and front-passenger sides.
X
Turn the SmartKey to position 2in the
ignition lock.
X To increase/reduce: turn control:or
E clockwise or counter-clockwise
(Y page 117). Only change the temperature
setting in small increments. Start at 22 †. Operating the climate control systems
119Climate control Z
Page 125 of 336
Rear window defroster
Activating/deactivating G
WARNING
Cleara ll windows of ice or snow before setting
off .O therwise, impaired visibility could
endanger you and others.
X Turn the SmartKey to position 2in the
ignition lock.
X Press the ¤button.
The indicator lamp in the ¤button lights
up or goes out.
The rea rwindow defroster has a high current
draw. You should therefore switch it off as
soon as the rear window is clear .Otherwise,
the rea rwindow defroster switches off
automatically after several minutes.
If the battery voltage is too low, the rear
window defroster may switc hoff.
Problems with the rear window
defroster The rear window defroster has deactivated
prematurely or cannot be activated.
X
Switch off any consumers that are not
required, e.g. reading lamps or interior
lighting.
When the battery is sufficiently charged,
the rear window defroster can be activated
again. Activating/deactivating air-
recirculation mode
G
WARNING
Only switch over to air-recirculation mode
briefly at low outside temperatures.
Otherwise, the windows could fog up,
impairing visibility and endangering you and
others. This may obstruct you rview of the
traffic situation and, as a result, you may
cause an accident. You can deactivate the flow of fresh air if
unpleasan
todors are entering the vehicle
from outside. The air already inside the
vehicle will then be recirculated.
The operation of air-recirculation mode is the
same for all control panels.
X Turn the SmartKey to position 2in the
ignition lock.
X To activate: press theebutton.
The indicator lamp in the ebutton lights
up.
i Air-recirculation mode is activated
automatically at high outside
temperatures. When air-recirculation mode
is activated automatically, the indicator
lamp in the ebutton is not lit.
Outside air is added after about
30 minutes.
X To deactivate: press theebutton.
The indicator lamp in the ebutton goes
out.
i Air-recirculation mode deactivates
automatically:
R after approximately five minutes at
outside temperatures below
approximately 5†
R after approximately five minutes if the
cooling with air dehumidification
function 8
is switched off
R after approximately 30 minutes at
outside temperatures above
approximately 5†with the "Cooling with
air dehumidification" function switched
on 8 Activating/deactivating the residual
heat function
The residual heat function is only available
with automatic climate control.
It is possible to make use of the residual heat
of the engine to continue heating the
8 Only with dual-zone/3-zone automatic climate control. 122
Operating the climate control systemsClimate control
Page 126 of 336
stationary vehicle for up to 30 minutes after
the engine has been switched off. The heating
time depends on the temperature that has
been set.
i
The blower will run at a low speed
regardless of the airflow setting.
i If you activate the residual heat function
at high temperatures, only the ventilation
will be activated. The blower runs at
medium speed.
X Turn the SmartKey to position 0in the
ignition lock or remove it.
X To activate: press theÌbutton.
The indicator lamp in the Ìbutton lights
up.
X To deactivate: press theÌbutton.
The indicator lamp in the Ìbutton goes
out.
i Residual heat is deactivated
automatically:
R after approximately 30 minutes
R when the ignition is switched on
R if the battery voltage drops
R when the auxiliary heating is activated Setting the air vents
Important safety notes
G
WARNING
Very hot or very cold air can flow from the air
vents. This could cause burns or frostbite to
bare skin in the immediate vicinity of the
vents. Keep bare skin away from these air
vents. If necessary, direct the airflow away to
a different area of the vehicle interior. In order to ensure the direct flow of fresh air
through the air vents into the vehicle interior,
please observe the following notes:
R
keep the air inlet between the windshield
and the hood free of blockages, such as ice,
snow or leaves.
R never cover the air vents or air intake grilles
in the vehicle interior.
i You can move the adjusters for the air
vents vertically or horizontally to set the
direction of the airflow.
i For optimal climate control in the vehicle,
open the air vents completely and set the
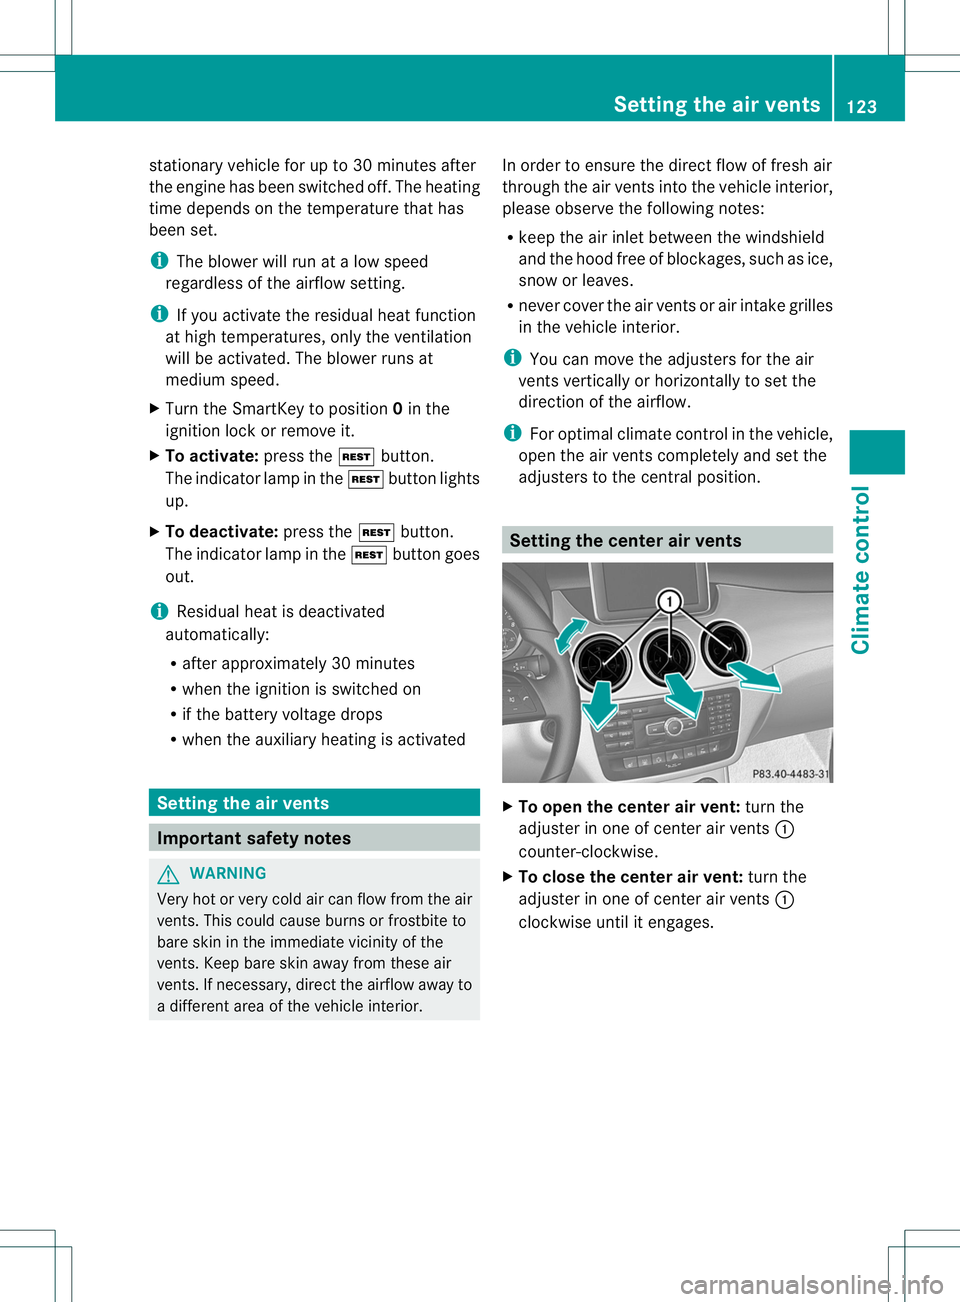
adjusters to the central position. Setting the center air vents
X
To open the center air vent: turn the
adjuster in one of center air vents :
counter-clockwise.
X To close the center air vent: turn the
adjuster in one of center air vents :
clockwise until it engages. Setting the air vents
123Climate control Z
Page 146 of 336
engine is switched off. The sounds that can
be heard while this is occurring are normal.
Applying/releasing manually Applying
X
Push handle :.
When the electric parking brake is
engaged, the !red indicator lamp lights
up in the instrument cluster.
i The electric parking brake can also be
applied when the SmartKey is removed.
Releasing
X Turn the SmartKey to position 1in the
ignition lock.
X Pull handle :.
The red !indicator lamp in the
instrument cluster goes out.
i The electric parking brake can only be
released if the SmartKey is in position 1in
the ignition lock.
Applying automatically The electric parking brake is applied
automatically:
R
if DISTRONIC PLUS brings the vehicle to a
standstill or
R if the HOLD function is keeping the vehicle
stationary
In addition, at least one of the following
conditions must be fulfilled:
R the engine is switched off.
R the driver's door is open and the seat belt
is not fastened.
R there is a system malfunction.
R the power supply is insufficient.
R the vehicle is stationary for a lengthy
period.
The red !indicator lamp in the instrument
cluster lights up.
i The electric parking brake is not
automatically engaged if the engine is switched off by the ECO start/stop
function.
Releasing automatically i
The electric parking brake can only be
released automatically on vehicles with
automatic transmission.
Your vehicle's electric parking brake is
automatically released if all of the following
conditions are met:
R the engine is running.
R the transmission is in position Dor R.
R the seat belt has been fastened.
R you depress the accelerator pedal.
If the transmission is in position R, the tailgate
must be closed.
If your seat belt is not fastened, the following
conditions must be fulfilled to automatically
release the electric parkin gbrake:
R the driver's door is closed.
R you shift out of position Por you have
previously drivenf aster than2mph
(3 km/h).
Emergency braking The vehicle can also be braked during an
emergency by using the electric parking
brake.
X
While driving, push handle :of the electric
parking brake (Y page 142).
i The vehicle is braked for as long as
handle :of the electric parking brake is
pressed. The longer electric parking brake
handle :is depressed, the greater the
braking force.
During braking:
R a warning tone sounds.
R the Please Release Parking Brake message appears.
R the red !indicator lamp in the
instrument cluster flashes. Parking
143Driving and parking Z
Page 150 of 336
Never use the brake pedal as a footrest. Never
depress the brake pedal and the accelerator
pedal at the same time.
! Depressing the brake pedal constantly
results in excessive and premature wearto
the brake pads.
If the brakes have been subjected to a heavy
load, do not stop the vehicle immediately.
Drive on for a short while. This allows the
airflow to cool the brakes more quickly.
Wet roads If you have driven for a long time in heav
yrain
without braking, there may be a delayed
reactio nfrom the brakes when braking for the
first time.
This may also occur after the vehicle has been
drive nthrough deep water.
You have to depress the brake pedal more
firmly. Maintain a greater distance from the
vehicle in front.
After driving on a wet road or having the
vehicle washed, brake firmly while paying
attention to the traffic conditions. This will
warm up the brake discs, thereby drying them
more quickly and protecting them against
corrosion.
Limited braking performance on salt-
treated roads If you drive on salted roads, a layer of salt
residue may form on the brake discs and
brake pads. This can result in a significantly
longer braking distance.
R
Brake occasionally to remove any possible
salt residue. Make sure that you do not
endanger other road users when doing so.
R Carefully depress the brake pedal and the
beginning and end of a journey.
R Maintain a greater distance to the vehicle
ahead. Servicing the brakes !
If the red brake warning lamp lights up in
the instrumentc luster and you hear a
warning tone while the engine is running,
the brake fluid level may be too low.
Observe additional warning messages in
the multifunction display.
The brake fluid level may be too low due to
brake pad wear or leaking brake lines.
Have the brake system checked
immediately. This work should be carried
out at a qualified specialist workshop.
! A function or performance test should
only be carried out on a2-axle
dynamometer. If you are planning to have
the vehicle tested on such a dynamometer,
contact an authorized Mercedes-Benz
Center to obtain further information first.
Otherwise, you could damage the drive
train or the brake system.
! As the ESP ®
system operates
automatically, the engine and the ignition
must be switched off (theS martKey must
be in position 0or 1in the ignitio nlock) if:
R the electric parking brake is tested on a
brake dynamometer (for a maximum of
ten seconds)
R the vehicle is towed with the front axle
raised.
Braking triggered automatically by ESP ®
may seriously damage the brake system.
All checks and maintenance work on the
brake system must be carried out at a
qualified specialist workshop. Consult a
qualified specialist workshop to arrange this.
Have brake pads installed and brake fluid
replaced at a qualified specialist workshop.
If the brake system has only been subject to
moderate loads, you should test the
functionality of your brakes at regular
intervals. To do so, press firmly on the brake
pedal when driving at a high speed. This
improves the grip of the brake pads. Driving tips
147Driving and parking Z
Page 163 of 336
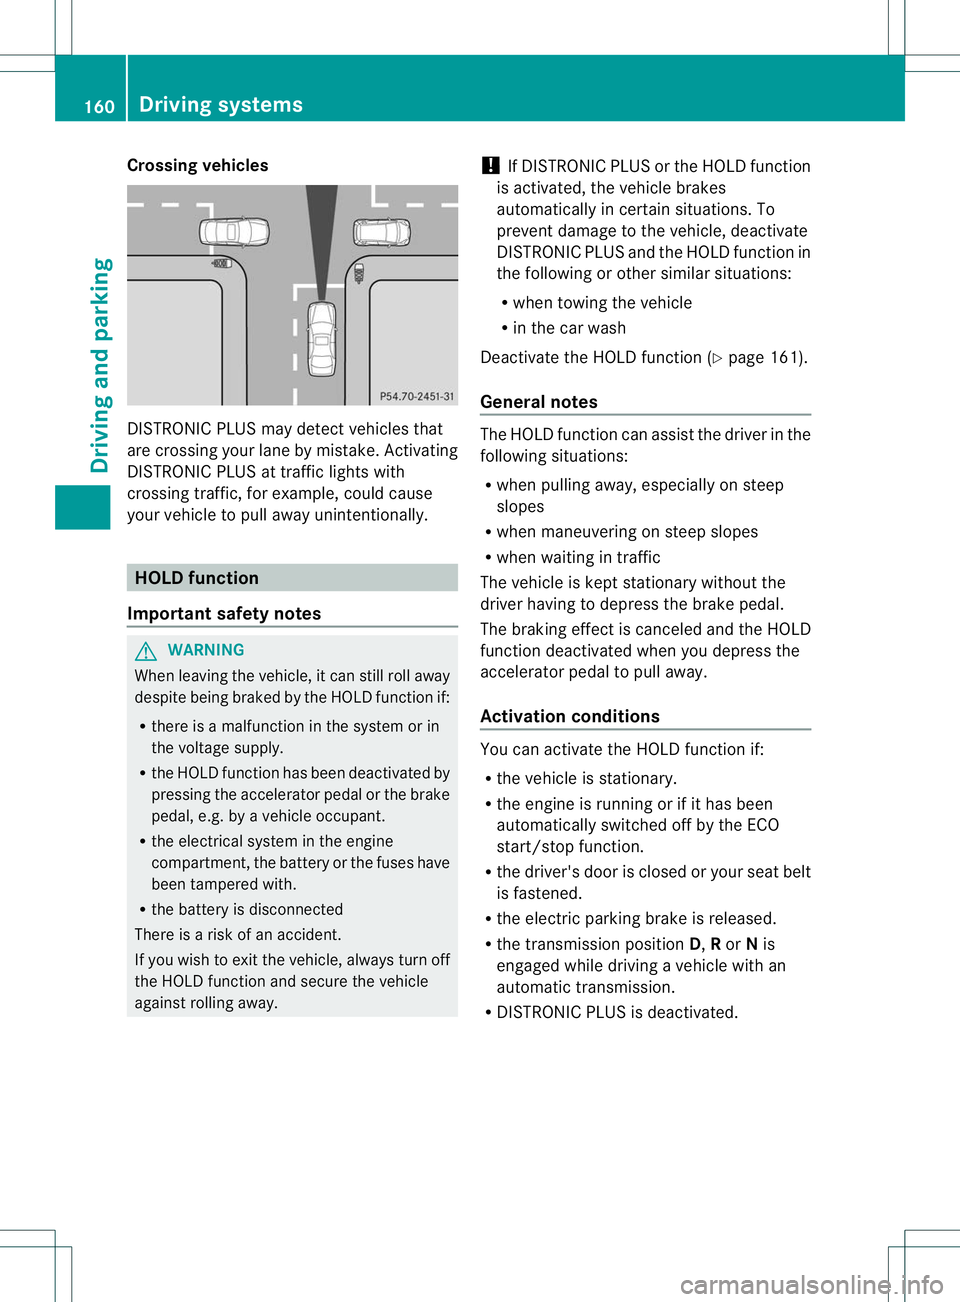
Crossing vehicles
DISTRONIC PLUS may detect vehicles that
are crossing your lane by mistake. Activating
DISTRONIC PLUS at traffic lights with
crossing traffic, for example, could cause
your vehicle to pull away unintentionally.
HOLD function
Important safety notes G
WARNING
When leaving the vehicle, it can still roll away
despite being braked by theH OLD function if:
R there is a malfunction in the system or in
the voltage supply.
R the HOLD function has been deactivated by
pressing the accelerator pedal or the brake
pedal, e.g. by a vehicle occupant.
R the electrical system in the engine
compartment, the battery or the fuses have
been tampered with.
R the battery is disconnected
There is a risk of an accident.
If you wish to exit the vehicle, always turn off
the HOLD function and secure the vehicle
against rolling away. !
If DISTRONIC PLUS or the HOLD function
is activated, the vehicle brakes
automatically in certain situations. To
prevent damage to the vehicle, deactivate
DISTRONIC PLUS and the HOLD function in
the following or other similars ituations:
R when towing the vehicle
R in the car wash
Deactivate the HOLD function (Y page 161).
General notes The HOL
Dfunction can assis tthe driver in the
following situations:
R when pulling away, especially on steep
slopes
R when maneuvering on steep slopes
R when waiting in traffic
The vehicle is kept stationary without the
driver having to depress the brake pedal.
The braking effect is canceled and the HOLD
function deactivated when you depress the
accelerator pedal to pull away.
Activation conditions You can activate the HOLD function if:
R
the vehicle is stationary.
R the engine is running or if it has been
automatically switched off by the ECO
start/stop function.
R the driver's door is closed or your seat belt
is fastened.
R the electric parking brake is released.
R the transmission position D,Ror Nis
engaged while driving a vehicle with an
automatic transmission.
R DISTRONIC PLUS is deactivated. 160
Driving systemsDriving and parking