2013 MERCEDES-BENZ B-CLASS SPORTS ECO mode
[x] Cancel search: ECO modePage 189 of 336
AUX mode (Auxiliary audio mode: external
audio source connected).
Video DVD operation
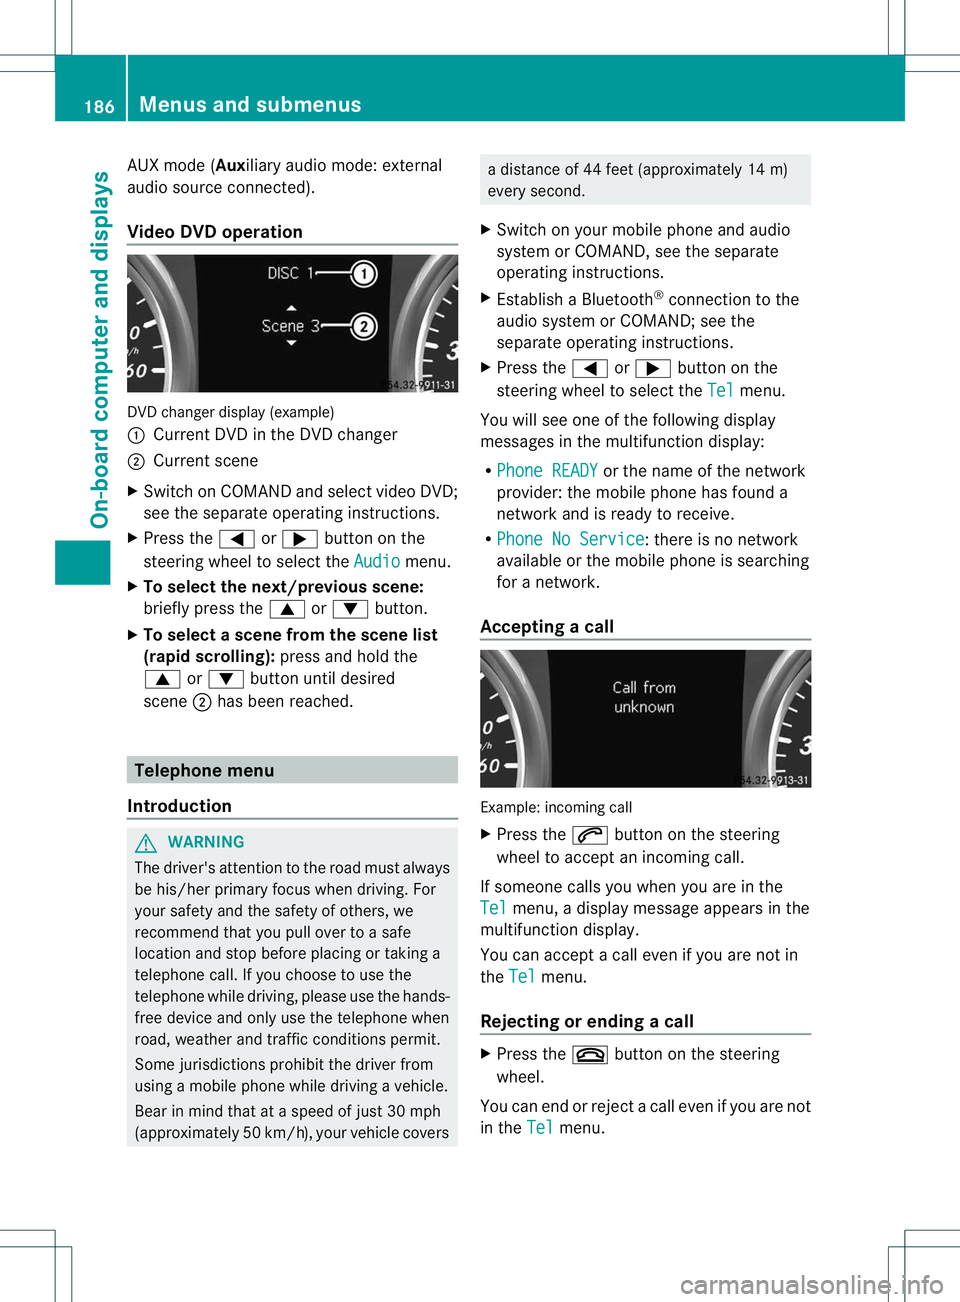
DVD change
rdisplay (example)
: Current DVD in the DVD changer
; Current scene
X Switch on COMANDa nd select video DVD;
see the separate operating instructions.
X Press the =or; button on the
steering wheel to select the Audio menu.
X To select the next/previous scene:
briefly press the 9or: button.
X To select ascene from the scene list
(rapid scrolling): press and hold the
9 or: buttonuntil desired
scene ;has been reached. Telephone menu
Introduction G
WARNING
The driver's attentio nto the road must always
be his/her primary focus when driving. For
your safety and the safety of others, we
recommend that you pull over to a safe
location and stop before placing or taking a
telephone call. If you choose to use the
telephone while driving, please use the hands-
free device and only use the telephone when
road, weather and traffic conditions permit.
Some jurisdictions prohibit the driver from
using a mobile phone while driving a vehicle.
Bear in mind that at a speed of just 30 mph
(approximately 50 km/h) , your vehicle covers a distance of 44 feet (approximately 14 m)
every second.
X Switch on your mobile phone and audio
system or COMAND, see the separate
operating instructions.
X Establish a Bluetooth ®
connection to the
audio system or COMAND; see the
separate operating instructions.
X Press the =or; button on the
steering wheel to select the Tel menu.
You will see one of the following display
messages in the multifunction display:
R Phone READY or the name of the network
provider :the mobile phone has found a
network and is ready to receive.
R Phone No Service : there is no network
available or the mobile phone is searching
for a network.
Accepting acall Example: incoming call
X
Press the 6button on the steering
wheel to accep tanincoming call.
If someone calls you when you are in the
Tel menu, a display message appears in the
multifunctio ndisplay.
You can accept a call even if you are not in
the Tel menu.
Rejecting or ending acall X
Press the ~button on the steering
wheel.
You can end or reject a call even if you are not
in the Tel menu.186
Menus and submenusOn-board computer and displays
Page 193 of 336
![MERCEDES-BENZ B-CLASS SPORTS 2013 Owners Manual X
Press the :or9 button to select the
Speedometer [mph]: function.
You will see the selected setting: On or
Off .
X Press the abutton to save the setting.
i Speed is displayed in mph.
The Speedometer MERCEDES-BENZ B-CLASS SPORTS 2013 Owners Manual X
Press the :or9 button to select the
Speedometer [mph]: function.
You will see the selected setting: On or
Off .
X Press the abutton to save the setting.
i Speed is displayed in mph.
The Speedometer](/manual-img/4/58079/w960_58079-192.png)
X
Press the :or9 button to select the
Speedometer [mph]: function.
You will see the selected setting: On or
Off .
X Press the abutton to save the setting.
i Speed is displayed in mph.
The Speedometer [mph] function allows you
to choose whether the status area in the
multifunction display always shows the speed
in mph instead of the outside temperature.
Selecting the permanent display function
You can determine whether the multifunction
display permanently shows your speed or the
outside temperature.
X Press the =or; button on the
steering wheel to select the Sett. menu.
X Press the :or9 button to select the
Instr. Cluster submenu.
X Press ato confirm.
X Press the :or9 button to select the
Permanent Display: function.
You will see the selected setting OutsideTemperature or
Speedometer [km/h] (USA)/Speedometer [mph] (Canada).
X Press the abutton to save the setting.
i The speed is shown in km/h( USA)/mph
(Canada).
Lights Switching the daytime running lamps on/
off
The
Daytime Running Lights: function
can only be set when the engine is switched
off.
X Press the =or; button on the
steering wheel to select the Sett. menu.
X Press the :or9 button to select the
Lights submenu.
X Press ato confirm. X
Press the :or9 button to select the
Daytime Running Lights function.
You will see the selected setting: Enabled or
Disabled .
X Press the abutton to save the setting.
Further information on daytime running
lamps (Y page 97).
Switching Adaptive Highbeam Assisto n/
off
X Press the =or; button on the
steering wheel to select the Sett. menu.
X Press the :or9 button to select the
Lights submenu.
X Press ato confirm.
X Press the :or9 button to select the
Adaptive Highbeam Assist: function.
You will see the selected setting: Enabled or
Disabled .
X Press the abutton to save the setting.
For further information about Adaptive
Highbeam Assist, see (Y page 100).
Activating/deactivating surround
lighting and exterior lighting delayed
switch-off
If you have activated the Locator Lighting: function and the light switch is set
to Ã, the following function sare activated
when it is dark:
R surround lighting: the exterior lighting
remains lit for 40 seconds after unlocking
with the SmartKey. If you start the engine,
the surround lighting is switched off and
automatic headlamp mode is activated
(Y page 97).
R exterio rlighting delayed switch-off: the
exterior lighting remains lit for
60 seconds aftert he engine is switched off.
If you close all the doors and the tailgate,
the exterior lighting goes off after
15 seconds. 190
Menus and submenusOn-board computer and displays
Page 243 of 336
X
Attach hook =to the cargo
compartment's uppers eal?.
X To close: detach hook =from seal ?.
X Fasten hook =to the bracket on the
underside of the cargo compartment floor.
X Fold the trunk floor down.
X Press the trun kfloor down until it engages.
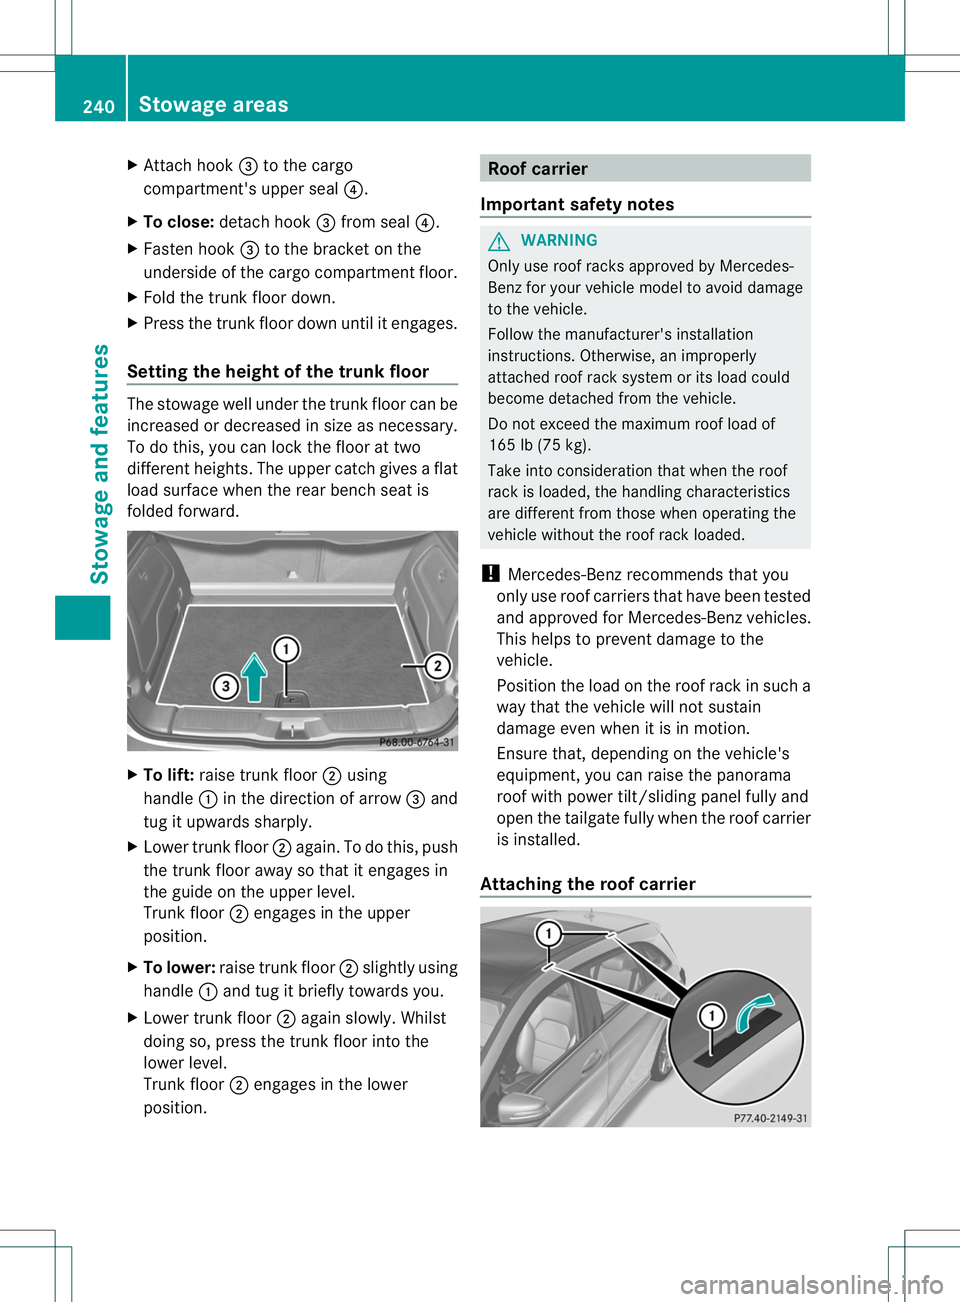
Setting the height of the trunk floor The stowage well under the trunk floor can be
increased or decreased in size as necessary.
To do this, you can lock the floor at two
differen
theights. The upper catch gives a flat
load surface when the rear bench seat is
folded forward. X
To lift: raise trunk floor ;using
handle :in the direction of arrow =and
tug it upwards sharply.
X Lower trunk floor ;again. To do this, push
the trun kfloor away so that it engages in
the guide on the upper level.
Trunk floor ;engages in the upper
position.
X To lower: raise trunk floor ;slightly using
handle :and tug it briefly towards you.
X Lower trunk floor ;again slowly. Whilst
doing so, press the trunk floor into the
lower level.
Trunk floor ;engages in the lower
position. Roof carrier
Important safety notes G
WARNING
Only use roof racks approved by Mercedes-
Ben zfor your vehicle model to avoid damage
to the vehicle.
Follow the manufacturer' sinstallation
instructions. Otherwise, an improperly
attached roo frack system or its load could
become detached from the vehicle.
Do not exceed the maximum roof load of
165 lb (75 kg).
Take into consideratio nthat when the roof
rack is loaded, the handling characteristics
are different from those when operating the
vehicle without the roof rack loaded.
! Mercedes-Benzr ecommends that you
only use roof carriers that have been tested
and approved for Mercedes-Benzv ehicles.
This helps to preven tdamage to the
vehicle.
Positio nthe load on the roof rack in such a
way that the vehicle will not sustain
damage even when it is in motion.
Ensure that, depending on the vehicle's
equipment, you can raise the panorama
roof with power tilt/sliding panel fully and
open the tailgate fully when the roof carrier
is installed.
Attaching the roof carrier 240
Stowage areasStowage and features
Page 256 of 336
X
To start route guidance: selectYes .
An overview of the route is shown in the
display.
i If you select No , the saved route can be
called up later in the navigation menu.
X Select Start .
Route guidance is started.
i Downloaded and saved data can be called
up again in COMAND. Further information
can be found in the "COMAND", "Online
and Internet services" and "Download
destination/route" sections.
Speed alert You can define the uppe
rspeed limit, which
must not be exceeded by the vehicle. If this
selected speed is exceeded by the vehicle, a
message will be sent to the Customer
Assistance center. The Customer Assistance
center then forwards this information to you.
You can select the way in which you receive
this information beforehand. Possible options
include SMS, E-Mail or an automated call.
The data which is sent to the Customer
Assistance center contains the following
information:
R the location where the speed limit was
exceeded
R the time at which the speed limit was
exceeded
R the selected speed limit which was
exceeded
Geo fencing Geo fencing allows you to select areas which
the vehicle should not enter or leave. You will
be informed if the vehicle crosses the
boundaries of the selected areas. You can
select the way in which you receive this
information beforehand. Possible options
include SMS, E-Mail or an automated call.
The area can be determined as either a circle
or a polygon with a maximum of ten corners.
You can specify up to ten areas simultaneously. Different settings are
possible for each area.
USA only: these settings can be called up
under "Owners Online" at http://
www.mbusa.com.
Alternatively, you can trigger an MB Info call
and inform the customer service
representative that you wish to activate geo
fencing.
Currently inactive areas can be activated by
SMS.
Triggering the vehicle alarm
With this function, you can trigger the
vehicle's panic alarm via SMS. An alarm
sounds and the exterior lighting flashes.
Depending on the setting, the panic alarm
lasts five or ten seconds. Afterwards, the
alarm switches off.
Garage door opener
Important safety notes G
WARNING
Before programming the integrated remote
control to a garage door opener or gate
operator, make sure people and objects are
out of the way of the device to prevent
potential harm or damage. When
programming a garage door opener, the door
moves up or down. When programming a gate
operator, the gate opens or closes.
Do not use the integrated remote control with
any garage door opener that lacks safety stop
and reverse features as required by U.S.
federal safety standards (this includes any
garage door opener model manufactured
before April 1, 1982). A garage door that
cannot detect an object - signaling the door
to stop and reverse - does not meet current
U.S .federal safety standards.
When programming a garage door opener,
park vehicle outside the garage. Features
253Stowage and features
Z
Page 263 of 336
Useful information
i This Operator's Manual describes all
models and all standard and optional
equipment of your vehicle available at the
time of publication of the Operator's
Manual. Country-specific differences are
possible. Please note that your vehicle may
not be equipped with all features
described. This also applies to safety-
related systems and functions.
i Please read the information on qualified
specialist workshops (Y page 23).Engine compartment
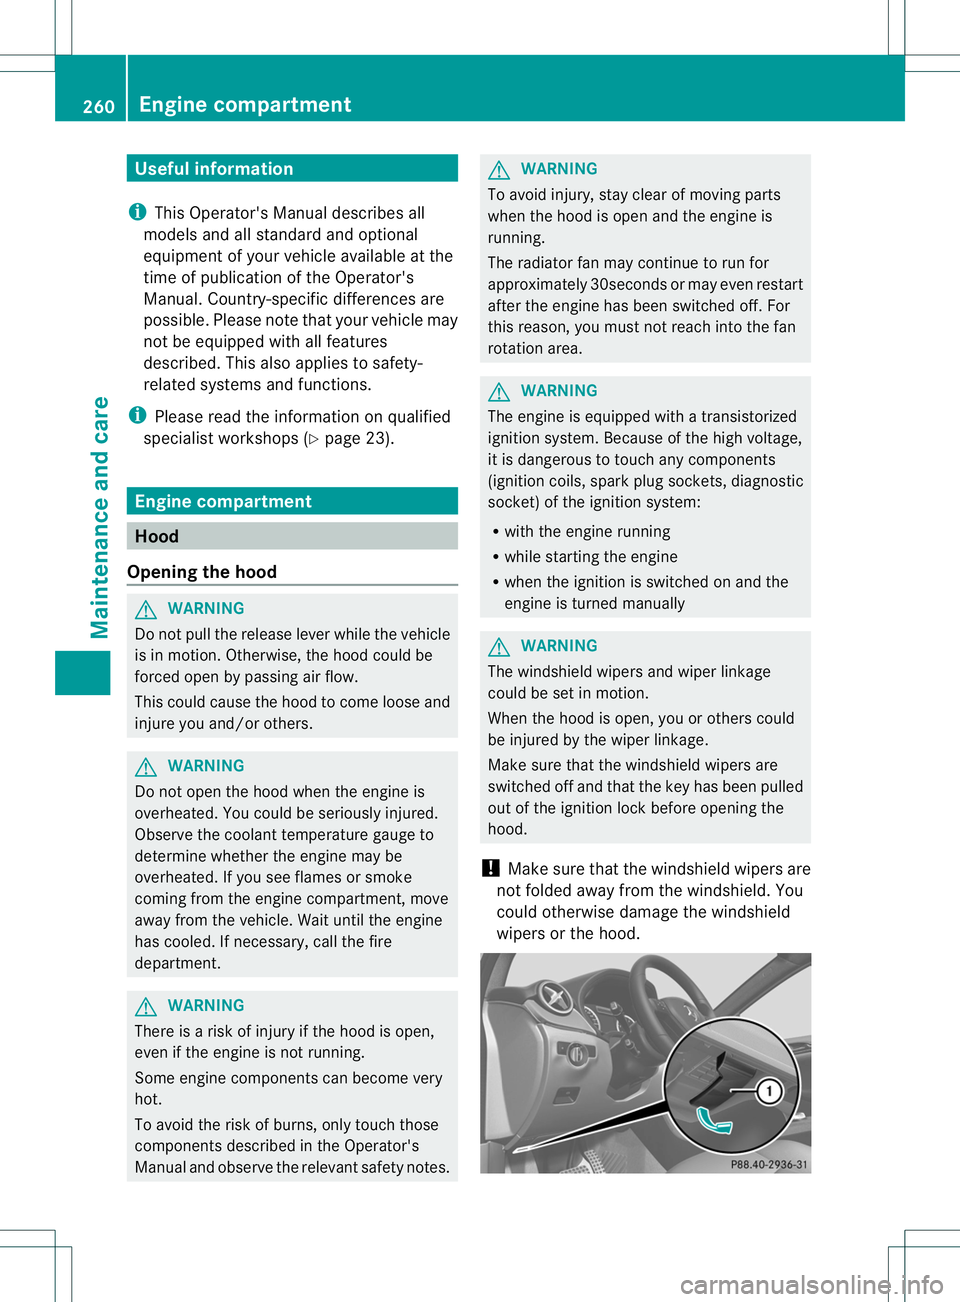
Hood
Opening the hood G
WARNING
Do not pull the release lever while the vehicle
is in motion. Otherwise, the hood could be
forced open by passing air flow.
This could cause the hood to come loose and
injure you and/oro thers.G
WARNING
Do not open the hood when the engine is
overheated. You could be seriously injured.
Observe the coolant temperature gauge to
determine whether the engine may be
overheated. If you see flames or smoke
coming from the engine compartment, move
away fro mthe vehicle. Wait until the engine
has cooled. If necessary, call the fire
department. G
WARNING
There is a risk of injury if the hood is open,
even if the engine is not running.
Some engine components can become very
hot.
To avoid the risk of burns, only touch those
components described in the Operator's
Manual and observe the relevant safety notes. G
WARNING
To avoid injury, stay clear of moving parts
when the hood is open and the engine is
running.
The radiator fan may continue to run for
approximately 30seconds or may even restart
after the engine has been switched off. For
this reason, you must not reach into the fan
rotation area. G
WARNING
The engine is equipped with a transistorized
ignition system. Because of the high voltage,
it is dangerous to touch any components
(ignition coils, spark plug sockets, diagnostic
socket) of the ignition system:
R with the engine running
R while starting the engine
R when the ignition is switched on and the
engine is turned manually G
WARNING
The windshield wipers and wiper linkage
could be set in motion.
When the hood is open, you or others could
be injured by the wiper linkage.
Make sure that the windshield wipers are
switched off and that the key has been pulled
out of the ignition lock before opening the
hood.
! Make sure that the windshield wipers are
not folded away from the windshield. You
could otherwise damage the windshield
wipers or the hood. 260
Engine compartmentMaintenance and care
Page 278 of 336
X
Open the tailgate.
X Lift the cargo compartment floor up
(Y page 239).
i Towing eye ;is located under tire
inflation compressor :.
Vehicles with atire-change tool kit X
Open the tailgate.
X Lift the cargo compartment floor up
(Y page 239).
X Remove the tire-change toolk it.
The tire-change tool kit contains:
R Jack
R Lug wrench
R One pair of gloves
R Folding wheel chock Flat tire
Preparing the vehicle
Your vehicle may be equipped with:
R MOExtended tires (tires with run-flat
properties) (Y page 275)
R a TIREFIT kit
Information on mounting a wheel
(Y page 312).
Vehicle preparation is not necessary on
vehicles with MOExtended tires.
X Stop the vehicle on solid, non-slippery and
level ground, as far away as possible from
traffic.
X Switch on the hazard warning lamps.
X Secure the vehicle against rolling away
(Y page 141).
X If possible, bring the front wheels into the
straight-ahead position.
X Switch off the engine.
X Remove the SmartKey from the ignition
lock. X
All occupants must get out of the vehicle.
Make sure that they are not endangered as
they do so.
X Make sure that no one is near the danger
area while a wheel is being changed.
Anyone who is not directly assisting in the
wheel change should, for example, stand
behind the barrier.
X Get out of the vehicle. Pay attention to
traffic conditions when doing so.
X Close the driver's door.
i Vehicles equipped with MOExtended tires
are not equipped with a TIREFIT kit at the
factory. It is therefore recommended that
you additionally equip your vehicle with a
TIREFIT kit if you mount tires that do not
feature run-flat properties, e.g. winter tires.
A TIREFIT kit can be obtained from a
qualified specialist workshop. MOExtended tires (tires with run-flat
properties)
G
WARNING
When driving in emergency mode, the driving
characteristics deteriorate, e.g. when
cornering, accelerating quickly and when
braking. There is a risk of an accident.
Do not exceed the stated maximum speed.
Avoid abrupt steering and driving maneuvers,
and driving over obstacles (curbs, potholes,
off-road). This applies in particular to a laden
vehicle.
Stop driving in emergency mode if:
R you hear banging noises.
R the vehicle starts to shake.
R you see smoke and smell rubber.
R ESP ®
is intervening constantly.
R there are tears in the sidewalls of the tire.
After driving in emergency mode, have the
wheel rims checked at a qualified specialist
workshop with regard to their further use. The
defective tire must be replaced in every case. Flat tire
275Breakdown assistance Z
Page 279 of 336
With MOExtended tires (tires with run flat
characteristics), you can continue to drive
your vehicle even if there is a total loss of
pressure in one or more tires.
MOExtended tires may only be used in
conjunction with an active tire pressure loss
warning system.
The maximum driving distance is
approximately 50 miles (80 km) when the
vehicle is partially laden and approximately
18 miles (30 km) when the vehicle is fully
laden.
In addition to the vehicle load, the driving
distance possible depends upon:
R
speed
R road condition
R outside temperature
The driving distance possible in run-flat mode
may be reduced by extreme driving
conditions/maneuvers, or it can be increased
through a moderate style of driving.
The maximum permissible distance which
can be driven in run-flat mode is counted from
the momen tthe tire pressure loss warning
appears in the multifunction display.
You must not exceed a maximum speed of
50 mph (80 km/h).
i When changing or replacing one or all of
the tires, note the label "MOExtended".
Take note also of the size specified for the
vehicle.
i Vehicles equipped with MOExtended tires
are not equipped with a TIREFIT kit at the
factory. It is therefore recommended that
you additionally equip your vehicle with a
TIREFIT kit if you mount tires that do not
feature run-flat properties, e.g. winter tires.
AT IREFIT kit is available, for example, from
a qualified specialist workshop. TIREFI
Tkit
Using the TIREFIT kit TIREFIT is a tire sealant.
TIREFIT can be used to seal small punctures
of up to 0.16 inches (4 mm), particularly on
the tire tread. You can use TIREFIT at outside
temperatures down to
Ò4 ‡ (Ò20 †). G
WARNING
In the following situations ,the tire sealant is
unable to provide sufficient breakdown
assistance, as it is unable to seal the tire
properly:
R there are cuts or punctures in the tire larger
than those mentioned above.
R the wheel rim is damaged.
R you have driven at very low tire pressures
or on a flat tire.
There is a risk of an accident.
Do not drive any further. Contact a qualified
specialist workshop. G
WARNING
The tire sealant is harmful and causes
irritation. It must not come into contact with
your skin, eyes or clothing or be swallowed.
Do not inhale TIREFIT fumes. Keep tire sealant
away from children. There is a risk of injury.
If you come into contact with the tire sealant,
observe the following:
R Rinse off the tire sealant from your skin
immediately with water.
R If the tire sealant comes into contact with
your eyes, immediately rinse them
thoroughly with clean water.
R If tire sealant is swallowed, immediately
rinse your mouth out thoroughly and drink
plenty of water. Do not induce vomiting,
and seek medical attention immediately.
R Immediately change out of clothing which
has come into contact with tire sealant.
R If an allergic reaction occurs, seek medical
attention immediately. 276
Flat tireBreakdown assistance
Page 295 of 336
Useful information
i This Operator's Manual describes all
models and all standard and optional
equipment of your vehicle available at the
time of publication of the Operator's
Manual. Country-specific differences are
possible. Please note that your vehicle may
not be equipped with all features
described. This also applies to safety-
related systems and functions.
i Please read the information on qualified
specialist workshops (Y page 23).Important safety notes
G
WARNING
If wheels and tires of the wrong size are used,
the wheel brakes or suspension components
may be damaged. There is arisk of accident.
Always replace wheels and tires with those
that fulfill the specifications of the original
part (designation, manufacturer, model). G
WARNING
Af lat tire severely impairs the driving,
steering and braking characteristics of the
vehicle. There is a risk of accident.
Tires without run-flat characteristics:
R do not drive with aflat tire.
R immediately replace the flat tire with your
emergency spare wheel or spare wheel, or
consult a qualified specialist workshop.
Tires with run-flat characteristics:
R pay attention to the information and
warning notices on MOExtended tires (tires
with run-flat characteristics).
Accessories that are not approved for your
vehicle by Mercedes-Ben zorare not being
used correctly can impair the operating
safety. Before purchasing and using non-approved
accessories, visit a qualified specialist
workshop and inquire about:
R
suitability
R legal stipulations
R factory recommendations
For information on dimensions and types of
wheels and tires for yourv ehicle, see
(Y page 316).
Information on air pressure for the tires on
your vehicle can be found:
R on the vehicle's Tire and Loading
Information placard on the B-pillar
R on the tire pressure label on the fuel filler
flap
R under "tire pressure"
i Further information on wheels and tires
can be obtained at any qualified specialist
workshop. Operation
Information on driving
R If the vehicle is heavily laden, chec kthe tire
pressures and correct them if necessary.
R While driving, pay attention to vibrations,
noises and unusual handling
characteristics, e.g. pulling to one side.
This may indicate that the wheels or tires
are damaged. If you suspect that a tire is
defective, reduce your speed immediately.
Stop the vehicle as soon as possible to
check the wheels and tires for damage.
Hidden tire damage could also be causing
the unusual handling characteristics. If you
find no signs of damage, have the wheels
and tires checked at a qualified specialist
workshop.
R When parking your vehicle, make sure that
the tires do not get deformed by the curb
or other obstacles. If it is necessary to drive
over curbs, speed humps or similar
elevations, try to do so slowly and at an
obtuse angle. Otherwise, the tires, 292
OperationWheels and tires