Page 344 of 415

342
1. TELEPHONE OPERATION (HANDS-FREE SYSTEM FOR CELLULAR PHONES)
IS300h/250_Navi_EE
1Display the “Messages” screen.
(P.340)
2Select the desired message from the
list.
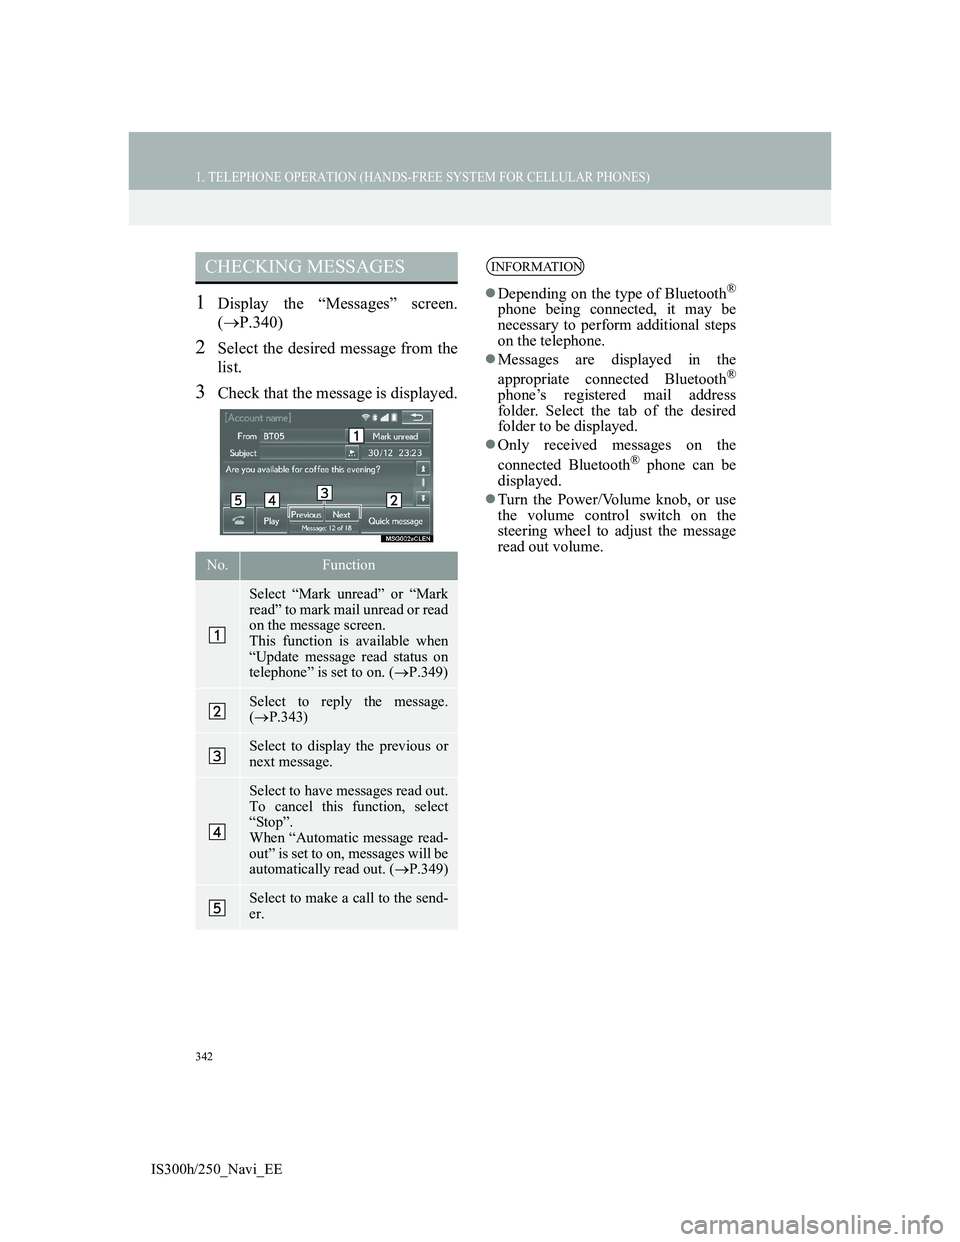
3Check that the message is displayed.
CHECKING MESSAGES
No.Function
Select “Mark unread” or “Mark
read” to mark mail unread or read
on the message screen.
This function is available when
“Update message read status on
telephone” is set to on. (P.349)
Select to reply the message.
(P.343)
Select to display the previous or
next message.
Select to have messages read out.
To cancel this function, select
“Stop”.
When “Automatic message read-
out” is set to on, messages will be
automatically read out. (P.349)
Select to make a call to the send-
er.
INFORMATION
Depending on the type of Bluetooth®
phone being connected, it may be
necessary to perform additional steps
on the telephone.
Messages are displayed in the
appropriate connected Bluetooth
®
phone’s registered mail address
folder. Select the tab of the desired
folder to be displayed.
Only received messages on the
connected Bluetooth
® phone can be
displayed.
Turn the Power/Volume knob, or use
the volume control switch on the
steering wheel to adjust the message
read out volume.
Page 360 of 415
358
2. SETUP
IS300h/250_Navi_EE
UPDATING THE CONTACTS IN
A DIFFERENT WAY (FROM
THE “Call history” SCREEN)
1Display the telephone top screen.
(P.328)
2Select “Call history” and select a
contact not yet registered in the con-
tact list.
3Select “Update contact”.
4Select the desired contact.
5Select a telephone type for the tele-
phone number.
1Select “New contact”.
2Enter the name and select “OK”.
3Enter the telephone number and se-
lect “OK”.
4Select the telephone type for the tele-
phone number.
5To add another number to this con-
tact, select “Yes”.
For PBAP compatible Bluetooth®
phones, this function is available
when “Automatic contact/history
transfer” is set to off. (P.351)
REGISTERING A NEW
CONTACT TO THE
CONTACT LIST
New contact data can be registered.
Up to 4 numbers per person can be
registered. For PBAP compatible
Bluetooth
® phones, this function is
available when “Automatic contact/
history transfer” is set to off.
P.351)
Page 389 of 415
386
1. CONNECTED SERVICES
IS300h/250_Navi_EE
3Select “External points”.
4Check that a confirmation screen is
displayed when the operation is
complete.
1Press the button to release the lock
and lift the armrest.
2Open the cover and connect a USB
memory.
Turn on the power of the USB memory
if it is not turned on.
To edit memory points and routes:
P.154, 158
INFORMATION
Setting “Automatic memory point
download” to “Yes” will automati-
cally download external points.
(P.393)
• If a screen related to a memory point
is changed to before automatic
memory point download begins,
automatic memory point download
will be cancelled.
If memory points which have the
same name are already stored in the
navigation system, the system may
not update those memory points.
PROCEDURE FOR
DOWNLOADING MEMORY
POINTS AND ROUTES
FROM A USB MEMORY
Page 391 of 415
388
1. CONNECTED SERVICES
IS300h/250_Navi_EE
INFORMATION
Memory points that are located out-
side of the map’s data range cannot be
registered.
A maximum of 500 memory points
can be registered.
When there are 21 or more memory
points and routes stored on a USB
memory, only 20 memory points and
routes will be displayed at a time.
Memory points acquired from Lexus
portal site can only be registered with
the registered navigation system at
the time of acquirement.
In some cases, memory points and
routes may not be able to be
imported. If this occurs, “Unable to
read memory point data. (Device ID
error)” will be displayed.
If memory points and routes which
have the same name are already
stored in the navigation system, the
system may not update those memory
points and routes.
Page 395 of 415
392
1. CONNECTED SERVICES
IS300h/250_Navi_EE
6Check that the thumbnails screen is
displayed.VIEWING A FULL SCREEN PIC-
TURE
1Select “Info” on the title bar.
2Check that a full screen view of the
picture is displayed.
No.Function
Select to display the selected pic-
ture’s title bar.
Select to display the selected pic-
ture in full screen.
Select to magnify or reduce the
map scale.
Select to display the previous 6
pictures.
Select to update the thumbnails
screen. Up to 6 pictures are dis-
played.
Select to download up to another
6 pictures when there are more
than 6 pictures available.
No.Function
Select to view user comments.
Select to set as a destination.
(P.129) If a destination has al-
ready been set, “Add to ” and
“Replace ” will be displayed.
“Add to ”: Select to add a des-
tination.
“Replace ”: Select to delete the
existing destination(s) and set a
new one.
INFORMATION
This function is not available while
driving.
Page 411 of 415
408
IS300h/250_Navi_EE
Map database information and updates
Page:
< prev 1-8 9-16 17-24