Page 93 of 415
93
1. BASIC OPERATION
IS300h/250_Navi_EE
3
NAVIGATION SYSTEM
No.FunctionPage
Select to search for a destination.114
Select to suspend or resume guidance.133
Select to change routes and/or destinations and to view route
overview.142
Select to enable changes to “Home”, “Memory points”, “Quick
access”, “Area to avoid”, etc.148
Select to set the desired map configuration.97
Select to set the Points of Interest to be displayed on the screen.102
Select to start/stop recording the route trace.104
Select to register the current position or the cursor position as a
memory point. Can be changed to a desired name, icon, etc.148
Page 104 of 415
104
1. BASIC OPERATION
IS300h/250_Navi_EE
1Select “Menu” on the map screen.
2Select “Start route trace”.
3Check that the traveled line is dis-
played.
STOP RECORDING THE ROUTE
TRACE
1Select “Stop route trace”.
2A confirmation screen will be dis-
played.
“Yes”: Select to keep the recorded route
trace.
“No”: Select to erase the recorded route
trace.
ROUTE TRACE
Up to 124 miles (200 km) of the trav-
eled route can be stored and retraced
on the display. This feature is avail-
able when the map scale is 30miles
(50 km) or less.
START RECORDING THE
ROUTE TRACE
To edit the route trace name or con-
firm the start point, etc.: P. 1 6 3
Page 215 of 415
215
3. MEDIA OPERATION
4
AUDIO/VIDEO SYSTEM
IS300h/250_Navi_EE
No.Function
Select to display the audio source selection screen.
Select to display the password input screen.
Select to display the menu screen.
Select to display the option screen. (P.217)
Select to display the DVD setting screen.
Shows progress
During playback: Select to fast forward.
During a pause: Select to slow forward.
Select to play/pause.
Select to stop the video screen.
Select to rewind.
Select to display the menu control key.
Select to display full screen video.
Tune/Scroll knob:
Turn to select a chapter.
Press to play/pause.
Press to select a chapter.
Press and hold to fast forward/rewind.
Press to select a media mode.
While in a media mode, pressing the “MEDIA” button changes media modes.
Press to eject a disc.
Power/Volume knob:
Turn to adjust volume.
Press to turn the audio system on/off.
Press and hold to restart the audio system.
Disc slot
Page 299 of 415
299
1. LEXUS PARKING ASSIST MONITOR
6
PERIPHERAL MONITORING SYS-
IS300h/250_Navi_EE
6Keep the steering wheel in its current
position and backing up.
The parallel parking assist will be can-
celed if the steering wheel is moved
while backing up. Shift the shift lever
out of the “R” position, and restart from
the procedure 1.
7A curved blue line will appear on the
screen. Keep the steering wheel in its
current position and back up slowly.
Stop when the curved blue line
meets the corner of the desired park-
ing space.
Curved blue line
CAUTION
When backing up, be careful not to
hit any obstacles with your vehicle.
Back the vehicle up slowly.
Page 300 of 415

300
1. LEXUS PARKING ASSIST MONITOR
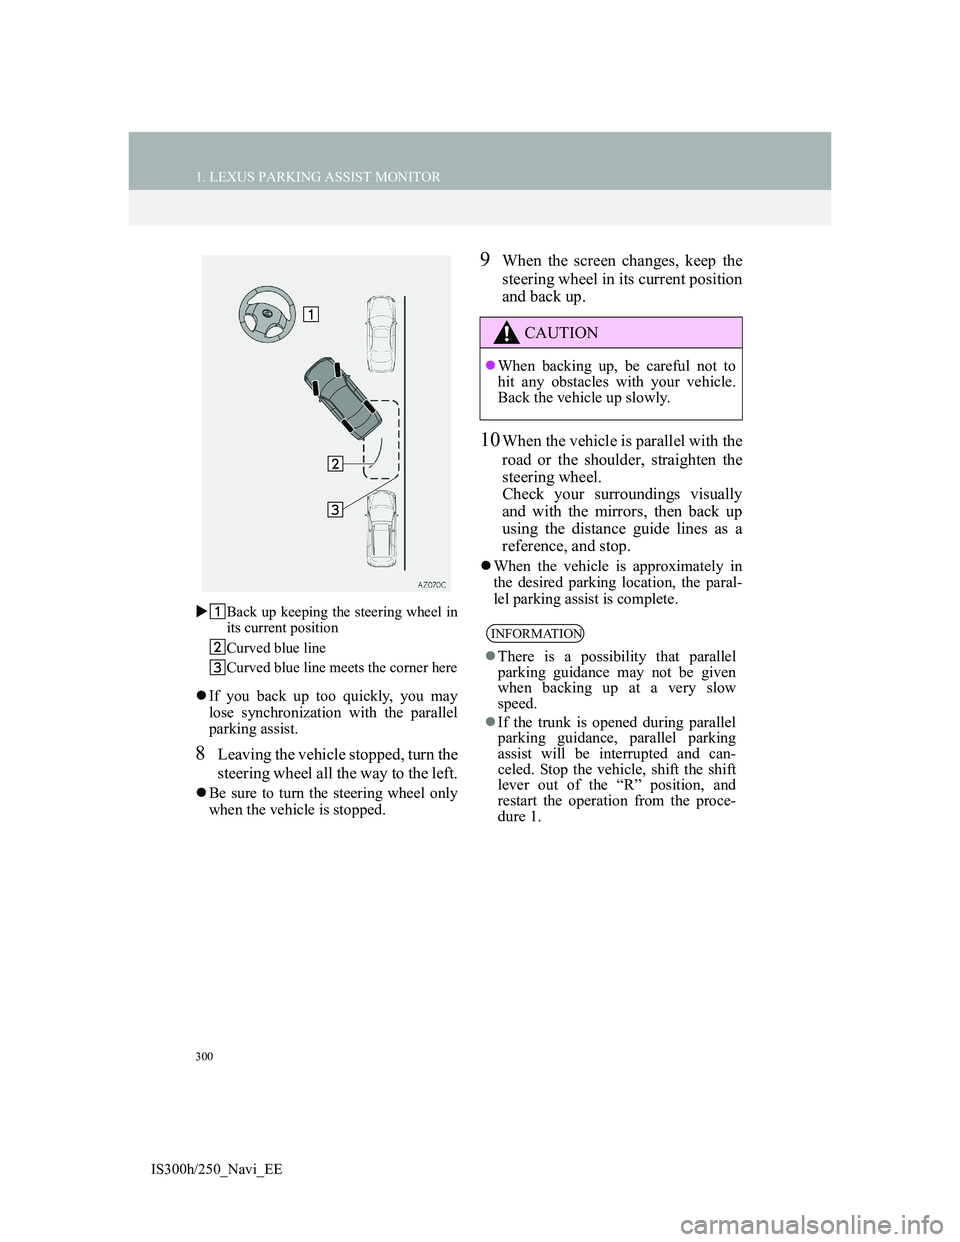
IS300h/250_Navi_EEBack up keeping the steering wheel in
its current position
Curved blue line
Curved blue line meets the corner here
If you back up too quickly, you may
lose synchronization with the parallel
parking assist.
8Leaving the vehicle stopped, turn the
steering wheel all the way to the left.
Be sure to turn the steering wheel only
when the vehicle is stopped.
9When the screen changes, keep the
steering wheel in its current position
and back up.
10When the vehicle is parallel with the
road or the shoulder, straighten the
steering wheel.
Check your surroundings visually
and with the mirrors, then back up
using the distance guide lines as a
reference, and stop.
When the vehicle is approximately in
the desired parking location, the paral-
lel parking assist is complete.
CAUTION
When backing up, be careful not to
hit any obstacles with your vehicle.
Back the vehicle up slowly.
INFORMATION
There is a possibility that parallel
parking guidance may not be given
when backing up at a very slow
speed.
If the trunk is opened during parallel
parking guidance, parallel parking
assist will be interrupted and can-
celed. Stop the vehicle, shift the shift
lever out of the “R” position, and
restart the operation from the proce-
dure 1.
Page 375 of 415
372
3. WHAT TO DO IF...
IS300h/250_Navi_EE
: For details, refer to the owner’s manual that came with the cellular phone.
Even though all
conceivable mea-
sures have been
taken, the symptom
status does not
change.
The cellular phone
is not close enough
to this system.Bring the cellular
phone closer to this
system.
Radio interference
has occurred.Turn off Wi-Fi®
devices or other de-
vices that may emit
radio waves.
The cellular phone
is the most likely
cause of the symp-
tom.
Turn the cellular
phone off, remove
and reinstall the
battery pack, and
then restart the cel-
lular phone.
Enable the cellular
phone’s
Bluetooth
® con-
nection.
Disable the Wi-Fi®
connection of the
cellular phone.
Stop the cellular
phone’s security
software and close
all applications.
Before using an ap-
plication installed
on the cellular
phone, carefully
check its source
and how its opera-
tion might affect
this system.
SymptomLikely causeSolution
Page
Cellular
phoneThis
system