Page 48 of 256

48
1. BASIC INFORMATION BEFORE OPERATION
GS450h_300h_350_250_NAVI_OM30D64E_(EE)
13.10.23 11:07
Use the scroll feature to move the
desired point to the centre of the screen
for looking at a point on the map that is
different from the current position.
To scroll over the map, place the
pointer in a position near the desired
destination and then press and hold the
Remote Touch knob. The map will con-
tinue scrolling in that direction until the
knob is released.
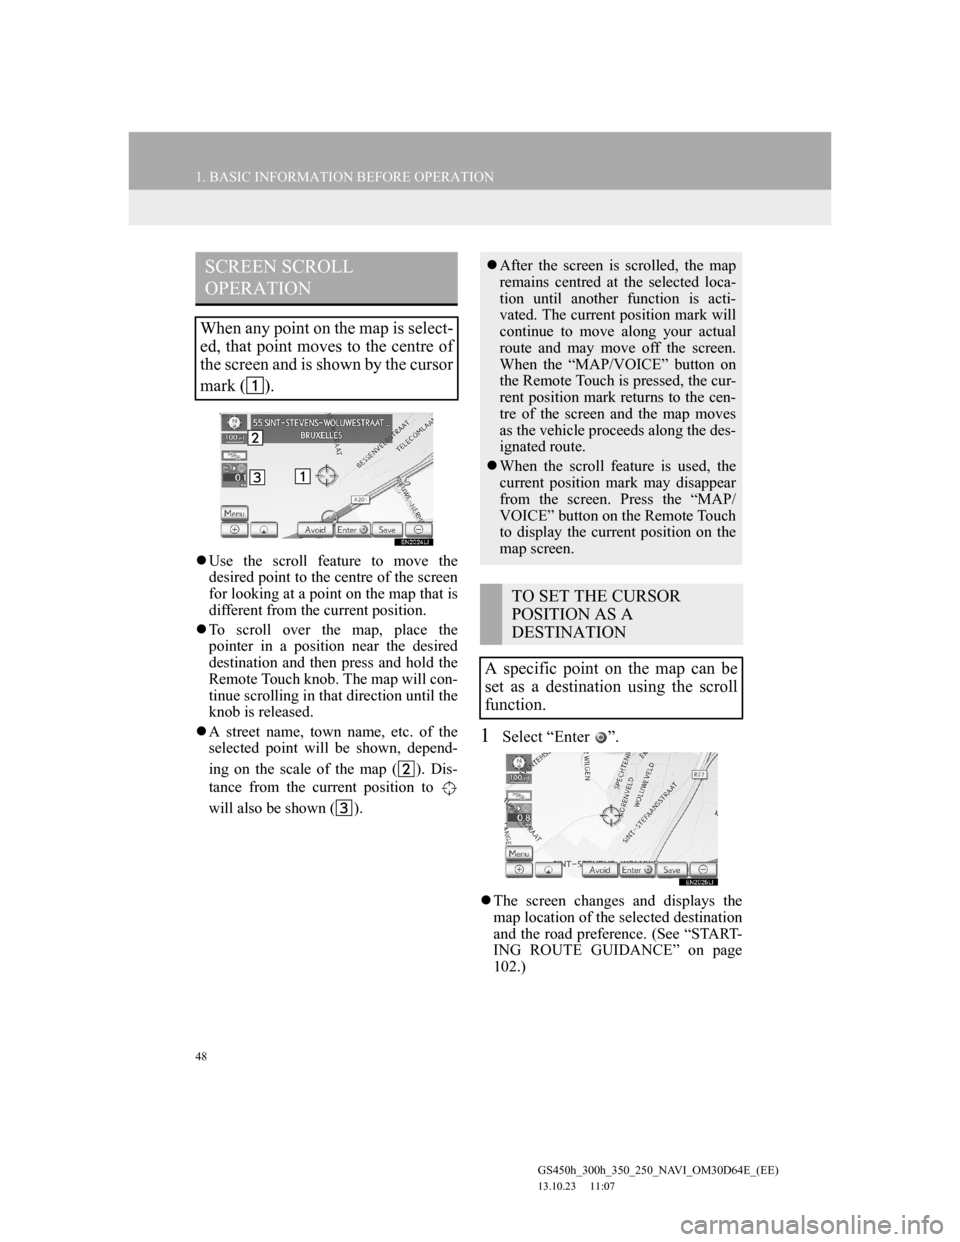
A street name, town name, etc. of the
selected point will be shown, depend-
ing on the scale of the map ( ). Dis-
tance from the current position to
will also be shown ( ).
1Select “Enter ”.
The screen changes and displays the
map location of the selected destination
and the road preference. (See “START-
ING ROUTE GUIDANCE” on page
102.)
SCREEN SCROLL
OPERATION
When any point on the map is select-
ed, that point moves to the centre of
the screen and is shown by the cursor
mark ( ).
After the screen is scrolled, the map
remains centred at the selected loca-
tion until another function is acti-
vated. The current position mark will
continue to move along your actual
route and may move off the screen.
When the “MAP/VOICE” button on
the Remote Touch is pressed, the cur-
rent position mark returns to the cen-
tre of the screen and the map moves
as the vehicle proceeds along the des-
ignated route.
When the scroll feature is used, the
current position mark may disappear
from the screen. Press the “MAP/
VOICE” button on the Remote Touch
to display the current position on the
map screen.
TO SET THE CURSOR
POSITION AS A
DESTINATION
A specific point on the map can be
set as a destination using the scroll
function.
Page 59 of 256
59
1. BASIC INFORMATION BEFORE OPERATION
2
BASIC FUNCTION
GS450h_300h_350_250_NAVI_OM30D64E_(EE)
13.10.23 11:07
: North-up symbol
Regardless of the direction of vehicle
travel, north is always up.
: Heading-up symbol (When in 2D
map mode.)
The direction of vehicle travel is always
up. A red arrow indicates north.
: Heading-up symbol (When in 3D
map mode.)
The direction of vehicle travel is always
up. A red arrow indicates north.
When in 3D map mode, only the head-
ing up map orientation is available.
STANDARD MAP ICONS
IconDescription
Town with > 1 million
people
Town with 500,000-1
million people
Town with 200,000-
500,000 people
Town with 100,000-
200,000 people
Town with 20,000-
100,000 people
Town with 10,000-20,000
people
Town with < 10,000 peo-
ple
Park/Monument
Golf Course
Airport
Hospital/Polyclinic
Shopping centre
University/College
IconDescription
Page 84 of 256

84
1. DESTINATION SEARCH
GS450h_300h_350_250_NAVI_OM30D64E_(EE)
13.10.23 11:07
1Select “Menu”.
2Select “Destination” on the naviga-
tion menu screen.
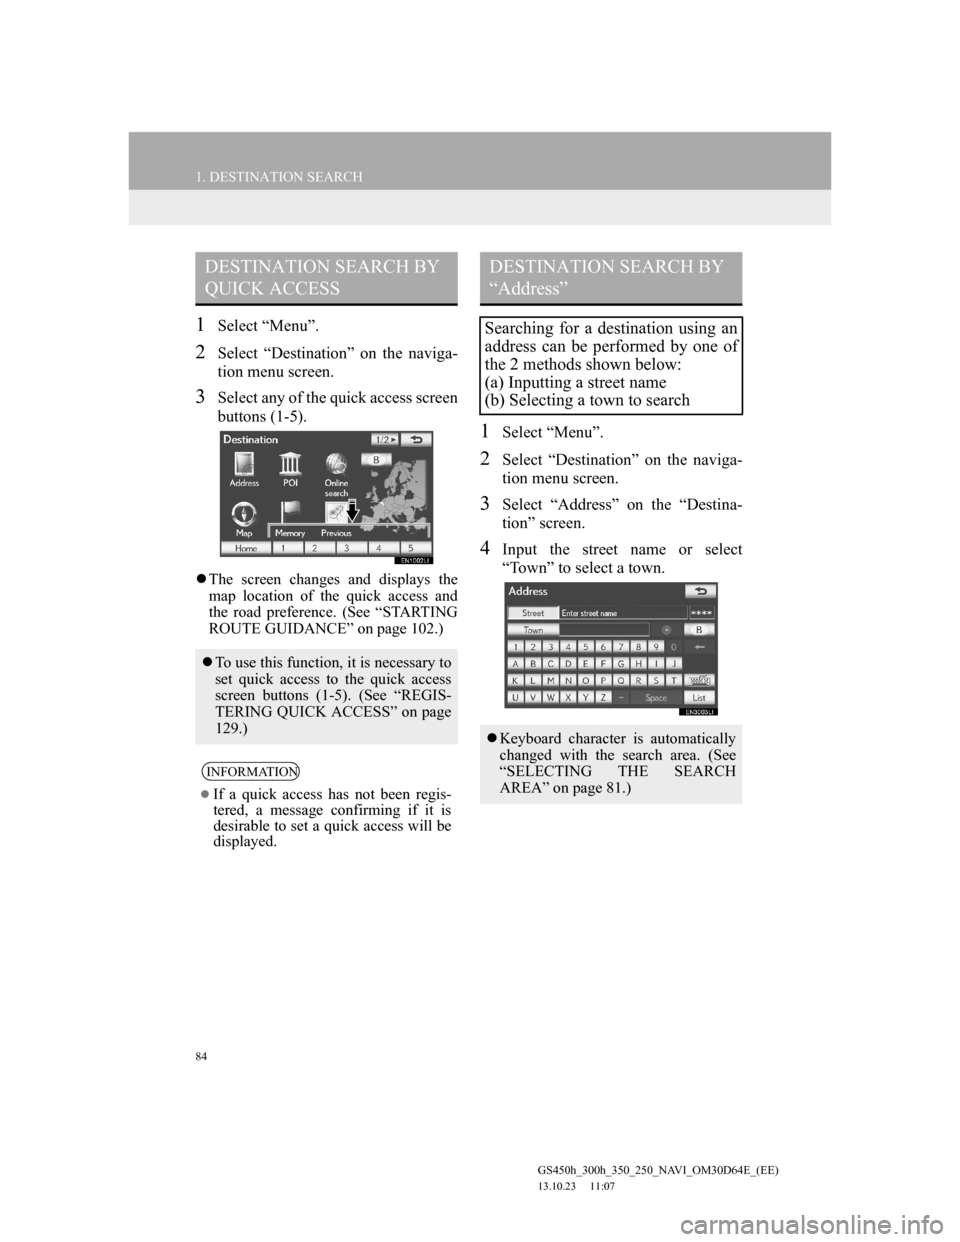
3Select any of the quick access screen
buttons (1-5).
The screen changes and displays the
map location of the quick access and
the road preference. (See “STARTING
ROUTE GUIDANCE” on page 102.)
1Select “Menu”.
2Select “Destination” on the naviga-
tion menu screen.
3Select “Address” on the “Destina-
tion” screen.
4Input the street name or select
“Town” to select a town.
DESTINATION SEARCH BY
QUICK ACCESS
To use this function, it is necessary to
set quick access to the quick access
screen buttons (1-5). (See “REGIS-
TERING QUICK ACCESS” on page
129.)
INFORMATION
If a quick access has not been regis-
tered, a message confirming if it is
desirable to set a quick access will be
displayed.
DESTINATION SEARCH BY
“Address”
Searching for a destination using an
address can be performed by one of
the 2 methods shown below:
(a) Inputting a street name
(b) Selecting a town to search
Keyboard character is automatically
changed with the search area. (See
“SELECTING THE SEARCH
AREA” on page 81.)
Page 85 of 256

85
1. DESTINATION SEARCH
3
NAVIGATION SYSTEM
GS450h_300h_350_250_NAVI_OM30D64E_(EE)
13.10.23 11:07
1Select “Menu”.
2Select “Destination” on the naviga-
tion menu screen.
3Select “Address” on the “Destina-
tion” screen.
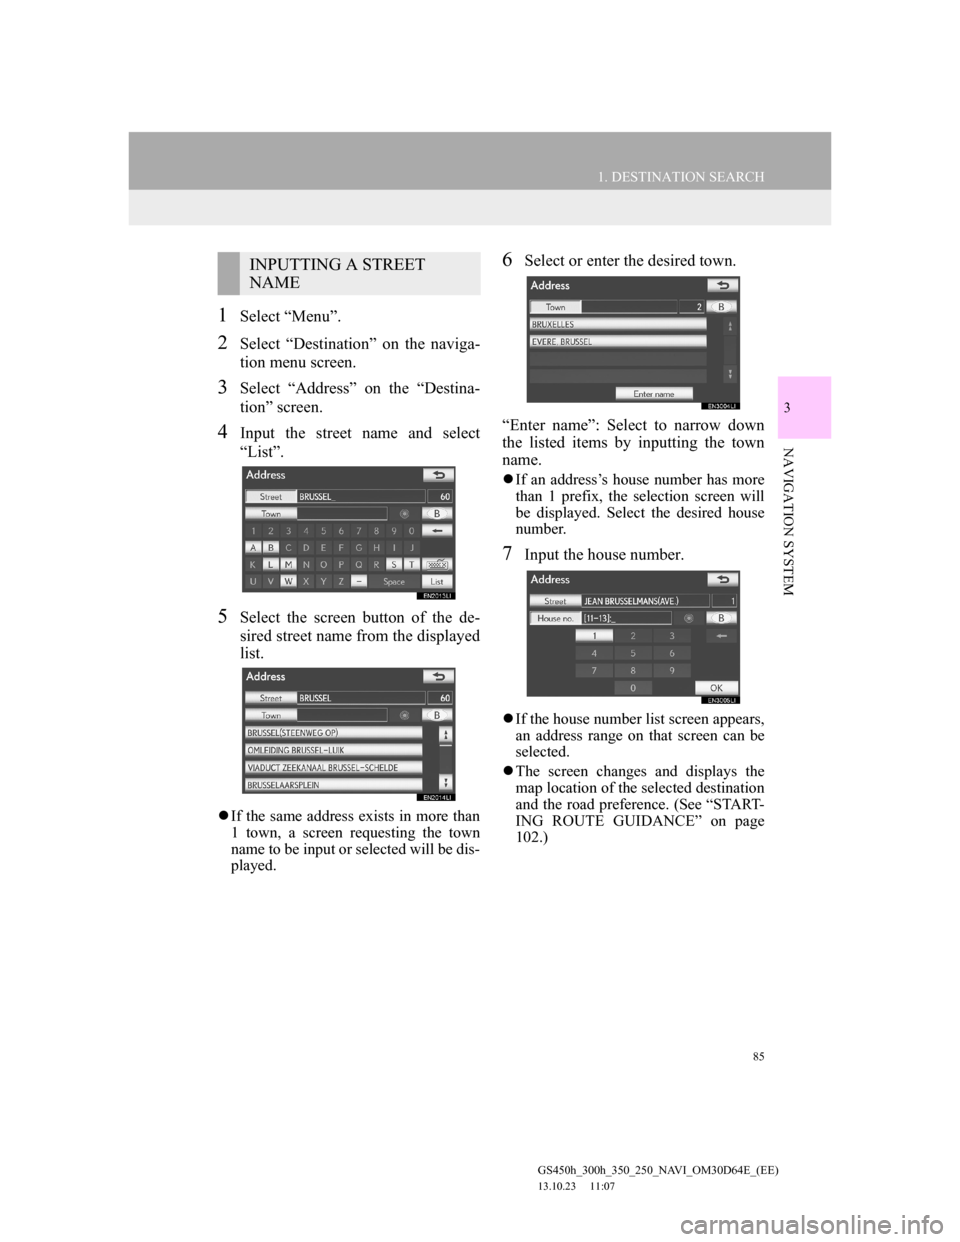
4Input the street name and select
“List”.
5Select the screen button of the de-
sired street name from the displayed
list.
If the same address exists in more than
1 town, a screen requesting the town
name to be input or selected will be dis-
played.
6Select or enter the desired town.
“Enter name”: Select to narrow down
the listed items by inputting the town
name.
If an address’s house number has more
than 1 prefix, the selection screen will
be displayed. Select the desired house
number.
7Input the house number.
If the house number list screen appears,
an address range on that screen can be
selected.
The screen changes and displays the
map location of the selected destination
and the road preference. (See “START-
ING ROUTE GUIDANCE” on page
102.)
INPUTTING A STREET
NAME
Page 86 of 256
86
1. DESTINATION SEARCH
GS450h_300h_350_250_NAVI_OM30D64E_(EE)
13.10.23 11:07
1Select “Menu”.
2Select “Destination” on the naviga-
tion menu screen.
3Select “Address” on the “Destina-
tion” screen.
4Select “Town”.
5Select the desired screen button.
On this screen, the following operations
can be performed:
SELECTING A TOWN TO
SEARCH
No.Function
Input the town name
Select from the nearest 5 towns
Input the postal code
Cancel the town setting
Select from the last 5 towns
Page 87 of 256
87
1. DESTINATION SEARCH
3
NAVIGATION SYSTEM
GS450h_300h_350_250_NAVI_OM30D64E_(EE)
13.10.23 11:07
INPUTTING THE TOWN NAME
1Select “Town name”.
2Input the town name.
3Select the screen button of the de-
sired town name from the displayed
list.
: Select to display the selected des-
tination and the road preference. (See
“STARTING ROUTE GUIDANCE”
on page 102.)
The current screen changes to the
screen for inputting a street name. After
inputting a street name, the screen may
change to the screen for inputting a
house number or a street map.
SELECTING FROM THE NEAR-
EST 5 TOWNS
1Select “Nearest 5 towns”.
2Select the screen button of the de-
sired town name from the displayed
list.
The current screen changes to the
screen for inputting a street name. After
inputting a street name, the screen may
change to the screen for inputting a
house number or a street map.
INPUTTING THE POSTAL
CODE
1Select “Postal code”.
2Input the postal code.
Page 88 of 256

88
1. DESTINATION SEARCH
GS450h_300h_350_250_NAVI_OM30D64E_(EE)
13.10.23 11:07
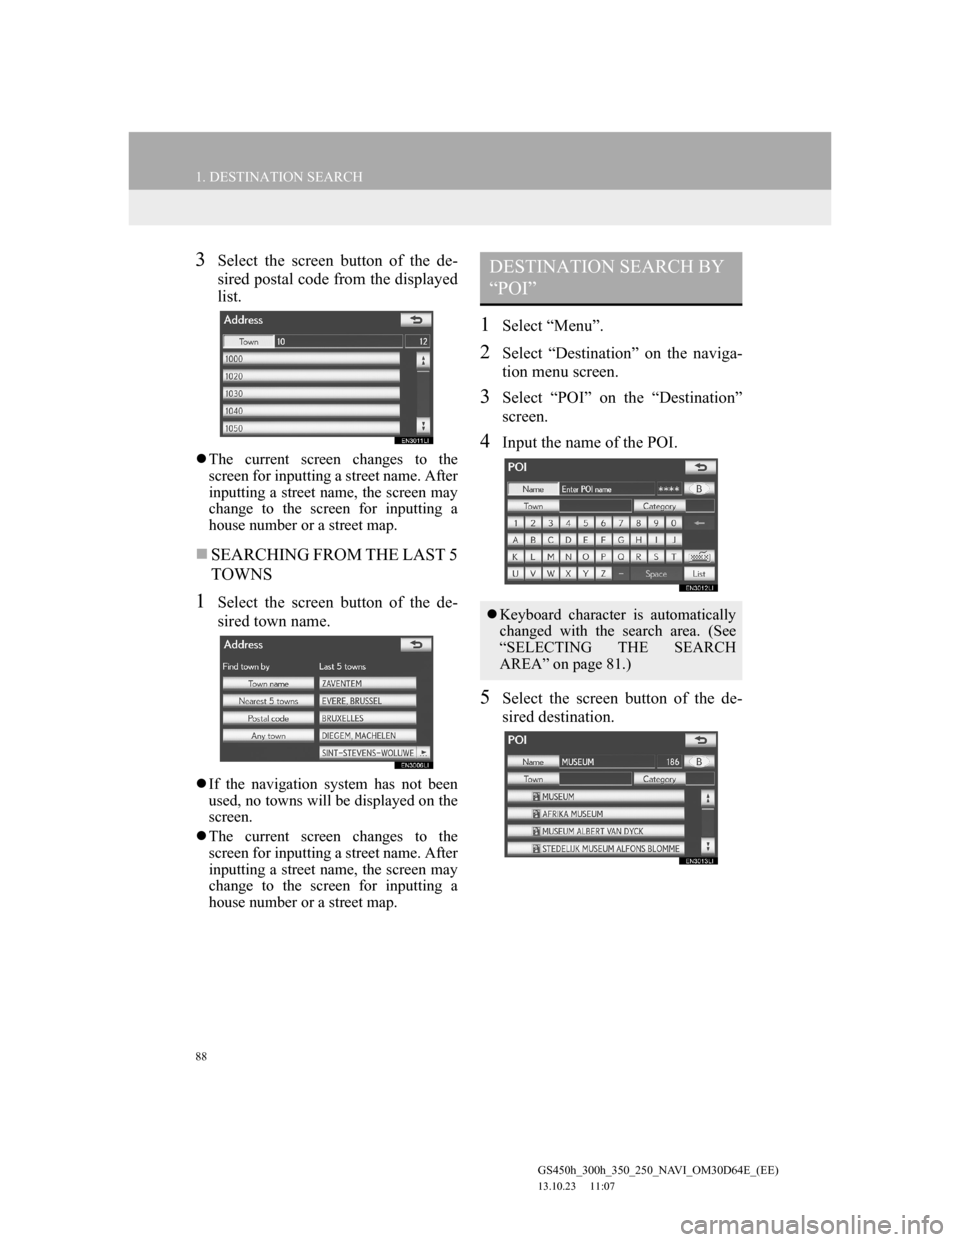
3Select the screen button of the de-
sired postal code from the displayed
list.
The current screen changes to the
screen for inputting a street name. After
inputting a street name, the screen may
change to the screen for inputting a
house number or a street map.
SEARCHING FROM THE LAST 5
TOWNS
1Select the screen button of the de-
sired town name.
If the navigation system has not been
used, no towns will be displayed on the
screen.
The current screen changes to the
screen for inputting a street name. After
inputting a street name, the screen may
change to the screen for inputting a
house number or a street map.
1Select “Menu”.
2Select “Destination” on the naviga-
tion menu screen.
3Select “POI” on the “Destination”
screen.
4Input the name of the POI.
5Select the screen button of the de-
sired destination.
DESTINATION SEARCH BY
“POI”
Keyboard character is automatically
changed with the search area. (See
“SELECTING THE SEARCH
AREA” on page 81.)
Page 89 of 256
89
1. DESTINATION SEARCH
3
NAVIGATION SYSTEM
GS450h_300h_350_250_NAVI_OM30D64E_(EE)
13.10.23 11:07
The screen changes and displays the
map location of the selected destination
and the road preference. (See “START-
ING ROUTE GUIDANCE” on page
102.)
• If the same name exists in more than 1
town, a search can be performed more
easily using “Town” or “Category”.
(See “SELECTING A TOWN TO
SEARCH” on page 89 and “SELECT-
ING FROM THE CATEGORIES” on
page 92.)
When inputting the name of a specific
POI, and there are 2 or more sites with
the same name, the list screen is dis-
played.
1Select the screen button of the de-
sired destination.
1Select “Menu”.
2Select “Destination” on the naviga-
tion menu screen.
3Select “POI” on the “Destination”
screen.
4Select “Town”.
The desired POI can be displayed on
the map screen. (See “DISPLAY POI
ICONS” on page 122.)
SELECTING A TOWN TO
SEARCH