Page 31 of 256
31
3. QUICK REFERENCE
1
QUICK GUIDE
GS450h_300h_350_250_NAVI_OM30D64E_(EE)
13.10.23 11:07
No.NameFunctionPage
“General”
Select to change the selected language, oper-
ation sound, automatic screen change set-
tings, etc.
60
“Voice”Select to set the voice guidance settings.73
“Navigation”Select to access the page which enables the
setting of the average speed, displayed screen
contents, POI categories, etc.148
“Vehicle”Select to set vehicle information such as
maintenance information.154
“Info”Select to set traffic information, traffic predic-
tion information and parking information.181
“Audio”Select to set sound, radio and iPod settings.Owner’s
Manual
“Bluetooth*”Select to set Bluetooth® phones and
Bluetooth® audio devices.
Owner’s
Manual
“Telephone”Select to set the telephone sound, phonebook,
message settings, etc.Owner’s
Manual
*: Bluetooth is a registered trademark of Bluetooth SIG, Inc.
Page 72 of 256
72
2. SETUP
GS450h_300h_350_250_NAVI_OM30D64E_(EE)
13.10.23 11:07
The following personal data can be
deleted or returned to their default set-
tings:
• Maintenance conditions
• Maintenance information off setting
• Memory point
• Password settings for backing up and
copying memory points
• Areas to avoid
• Previous points
• Route guidance
• Route trace
• Phonebook data
• Call history data
• Speed dial data
• Bluetooth
® phone data
• Phone sound settings
• Phone display settings
• Message settings
• Audio setting
• Bluetooth
® audio setting
• Search engine settings
• Opening image data
• Screen off image data
INFORMATION
This function is not available while
driving.
Page 112 of 256
112
2. ROUTE GUIDANCE
GS450h_300h_350_250_NAVI_OM30D64E_(EE)
13.10.23 11:07
ROUTE INCLUDING IPD
ROADS
After the system has calculated a route,
it will advise the user whether IPD
roads are included in the route or not.
The portion of the route that covers IPD
roads is indicated by light blue.
*: The area that includes IPD roads.
No.Voice guidance
“There is the possibility that there
are traffic regulations that are not
known on the way to the destina-
tion.” (start point)
“In 400 meters, left turn.”
“Next left. Please obey all traffic
regulations.”
IPD roads are roads that are not yet
completely digitized in our database.
However, their geometry, name and
administrative coding are already
known.
*
CAUTION
Be sure to obey the traffic regulations
and keep the road condition in mind
especially when you are driving on
IPD roads. The route guidance may
not have the updated information
such as the direction of a one way
street.
Page 178 of 256

178
1. INFORMATION DISPLAY
GS450h_300h_350_250_NAVI_OM30D64E_(EE)
13.10.23 11:07
1Press the “MENU” button on the
Remote Touch. (See “Remote
Touch” on page 12.)
2Select “Info” on the “Menu” screen.
3Select “Traffic prediction”.
4Scroll the map to the point that it is
desired to view traffic prediction in-
formation for.
The time of the traffic prediction infor-
mation can be viewed in 15-minute
steps.
“+”: Moves the time forward 15 min-
utes.
“-”: Moves the time back 15 minutes.
No.NameFunction
Traffic
informa-
tion icon
Icons are displayed
on the map. To dis-
play information,
select the corre-
sponding icon on
the screen.
Traffic
informa-
tion arrow
Using traffic infor-
mation, the system
displays arrows
along a route. The
colour of the arrow
indicates specific
road condition in-
formation.
“Red” indicates
normal traffic
flow.
“Orange” indicates
a traffic jam.
“Blue” indicates a
closed road, acci-
dent and so on.
Traffic
informa-
tion
indicatorThe indicator
comes on when
traffic information
is received.
TRAFFIC PREDICTION
INFORMATION
Traffic prediction information rele-
vant to the area around the current
position or the cursor position can be
viewed.
Page 187 of 256
6
187
1
2
3
4
5
6
7
GS450h_300h_350_250_NAVI_OM30D64E_(EE)
13.10.23 11:07
1. CONNECTED SERVICES
OVERVIEW ................................. 188
BEFORE USING CONNECTED
SERVICES ........................................... 190
2. SETTINGS REQUIRED FOR USING
THE SERVICE ............................. 191
OBTAINING A PORTAL SITE
ACCOUNT .......................................... 191
SETTING A Bluetooth
® DUN
COMPATIBLE CELLULAR PHONE 192
SETTING A Bluetooth
® DUN PROFILE .....
194
3. USING CONNECTED SERVICES 197
ONLINE SEARCH ................................. 197
IMPORTING MEMORY POINTS ........ 201
1. ONLINE SEARCH SETTINGS...... 206
SCREENS FOR ONLINE SEARCH
SETTINGS ........................................... 206
1CONNECTED SERVICES
2SETUP
CONNECTED SERVICES
Page 190 of 256

190
1. CONNECTED SERVICES
GS450h_300h_350_250_NAVI_OM30D64E_(EE)
13.10.23 11:07
In order to use this service, a
Bluetooth® DUN compatible cellular
phone with sufficient network coverage
and a SIM card with a contract that
allows access to the internet are
required.
Before using this service, it is necessary
to access Lexus’s portal site via a per-
sonal computer and create an account.
When creating an account, “Navigation
Identification” will be required. (For
details about “CHECKING NAVIGA-
TION IDENTIFICATION”, see page
191.)
When using the connected services,
depending on your telephone subscrip-
tion, some related fees might apply.
When a cellular phone is used in a
roaming situation (when outside the
geographical coverage area of mobile
network provider) connection fees will
be more expensive.
Bluetooth is a registered trademark of
Bluetooth SIG, Inc.
BEFORE USING
CONNECTED SERVICESINFORMATION
This system supports the following
service:
• Bluetooth
® Specification
Ver.1.1 or higher
(Recommended: Ver.2.1 + EDR or
higher)
•Profiles
HFP (Hands Free Profile)
Ver.1.0 or higher
(Recommended: Ver.1.5 or higher)
OPP (Object Push Profile)
Ver.1.1 or higher
PBAP (Phone Book Access Profile)
Ver.1.0 or higher
DUN (Dial-Up Networking Profile)
Ver.1.1 or higher
If your cellular phone does not sup-
port HFP, you cannot register the
Bluetooth
® DUN compatible cellular
phone, or use DUN, OPP or PBAP
profiles individually.
If the connected Bluetooth® DUN
compatible cellular phone version is
older than recommended or incom-
patible, this function may not be used.
Page 192 of 256

192
1. CONNECTED SERVICES
GS450h_300h_350_250_NAVI_OM30D64E_(EE)
13.10.23 11:07
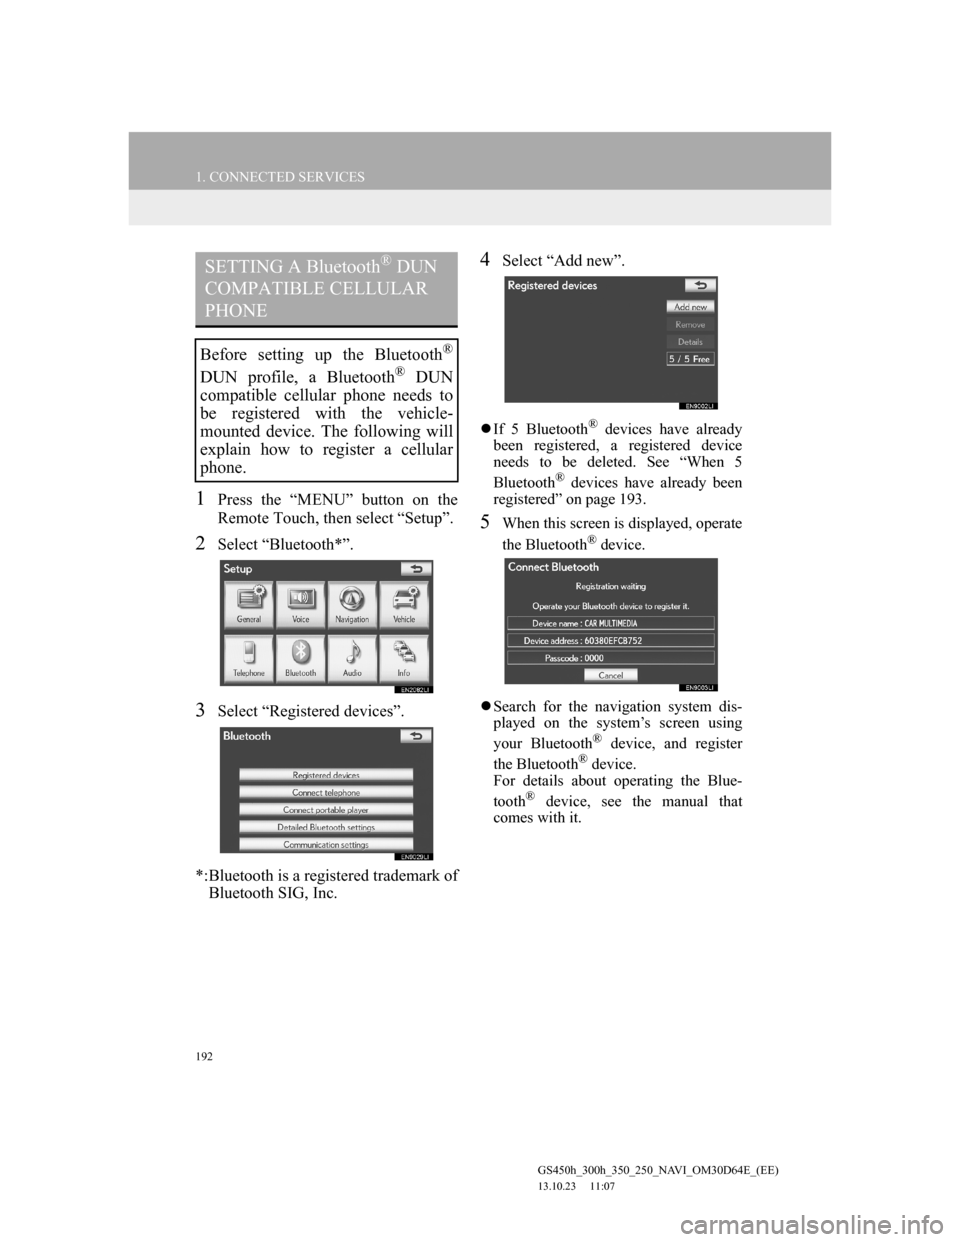
1Press the “MENU” button on the
Remote Touch, then select “Setup”.
2Select “Bluetooth*”.
3Select “Registered devices”.
*:Bluetooth is a registered trademark of
Bluetooth SIG, Inc.
4Select “Add new”.
If 5 Bluetooth® devices have already
been registered, a registered device
needs to be deleted. See “When 5
Bluetooth
® devices have already been
registered” on page 193.
5When this screen is displayed, operate
the Bluetooth® device.
Search for the navigation system dis-
played on the system’s screen using
your Bluetooth
® device, and register
the Bluetooth® device.
For details about operating the Blue-
tooth
® device, see the manual that
comes with it.
SETTING A Bluetooth® DUN
COMPATIBLE CELLULAR
PHONE
Before setting up the Bluetooth®
DUN profile, a Bluetooth® DUN
compatible cellular phone needs to
be registered with the vehicle-
mounted device. The following will
explain how to register a cellular
phone.
Page 193 of 256

193
1. CONNECTED SERVICES
6
CONNECTED SERVICES
GS450h_300h_350_250_NAVI_OM30D64E_(EE)
13.10.23 11:07
A passcode is not required for SSP
(Secure Simple Pairing) compatible
Bluetooth
® devices. Depending on the
type of Bluetooth® DUN compatible
cellular phone being connected, a mes-
sage confirming registration may be
displayed on the “Connect Bluetooth*”
screen. Respond and operate the
Bluetooth
® DUN compatible cellular
phone according to the confirmation
message.
To cancel the registration, select “Can-
cel”.
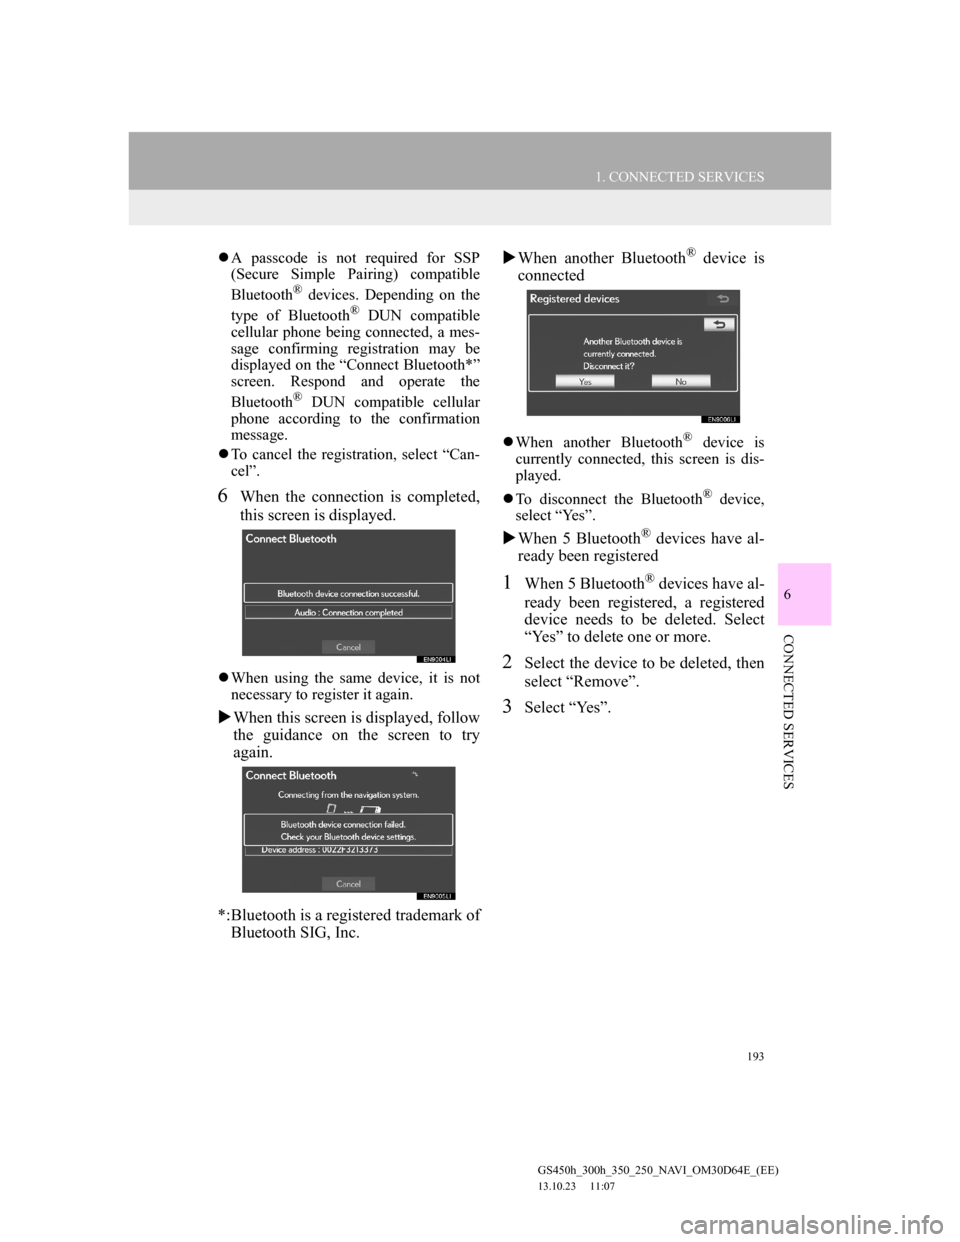
6When the connection is completed,
this screen is displayed.
When using the same device, it is not
necessary to register it again.
When this screen is displayed, follow
the guidance on the screen to try
again.
*:Bluetooth is a registered trademark of
Bluetooth SIG, Inc.When another Bluetooth
® device is
connected
When another Bluetooth® device is
currently connected, this screen is dis-
played.
To disconnect the Bluetooth
® device,
select “Yes”.
When 5 Bluetooth® devices have al-
ready been registered
1When 5 Bluetooth® devices have al-
ready been registered, a registered
device needs to be deleted. Select
“Yes” to delete one or more.
2Select the device to be deleted, then
select “Remove”.
3Select “Yes”.