2013 Lexus CT200h tom tom
[x] Cancel search: tom tomPage 377 of 688
3735-13. Using the audio system (Lexus Display Audio System)
5
Audio system
CT200h_OM_OM76102E_(EE)
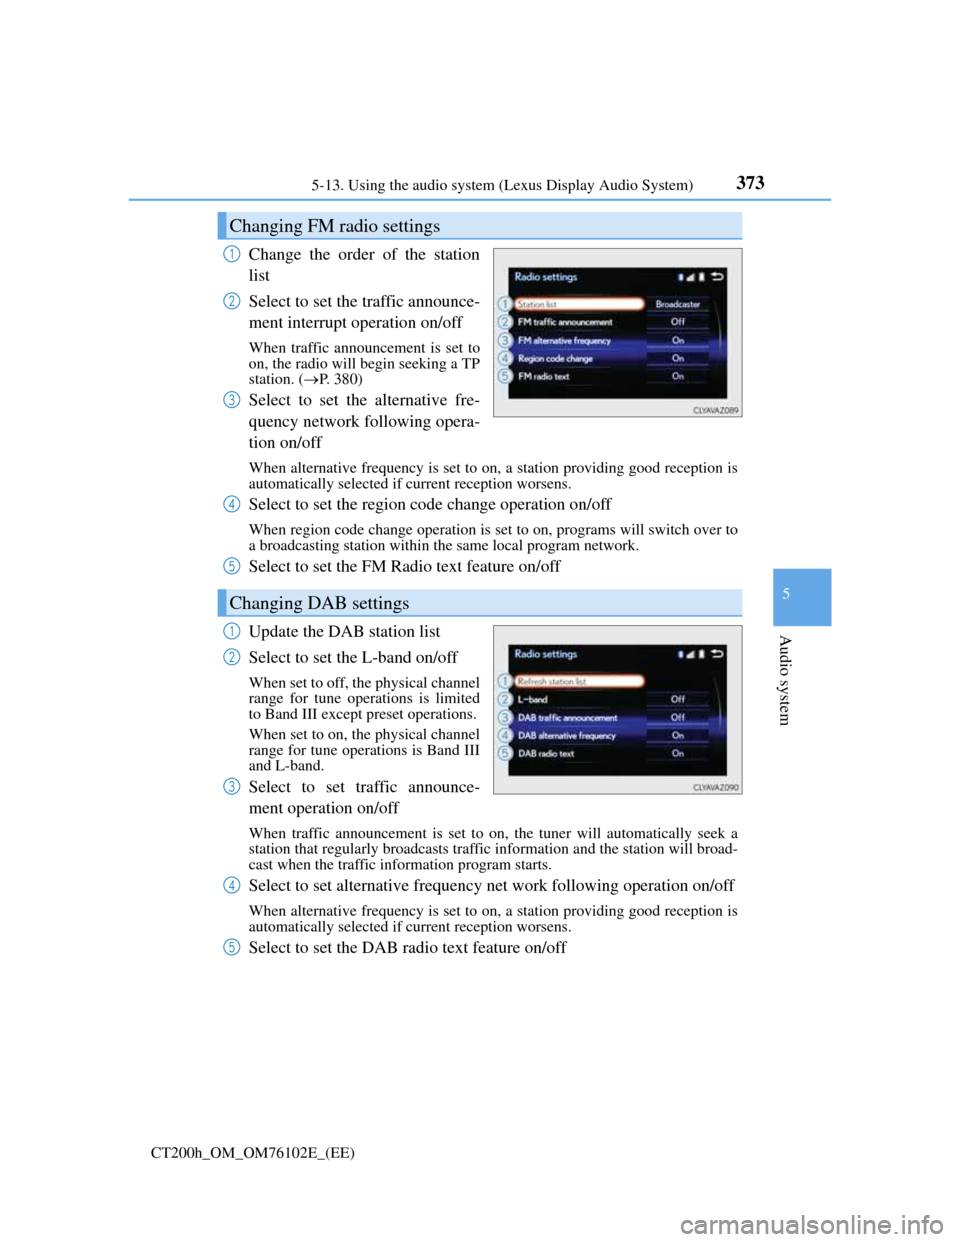
Change the order of the station
list
Select to set the traffic announce-
ment interrupt operation on/off
When traffic announcement is set to
on, the radio will begin seeking a TP
station. (P. 380)
Select to set the alternative fre-
quency network following opera-
tion on/off
When alternative frequency is set to on, a station providing good reception is
automatically selected if current reception worsens.
Select to set the region code change operation on/off
When region code change operation is set to on, programs will switch over to
a broadcasting station within the same local program network.
Select to set the FM Radio text feature on/off
Update the DAB station list
Select to set the L-band on/off
When set to off, the physical channel
range for tune operations is limited
to Band III except preset operations.
When set to on, the physical channel
range for tune operations is Band III
and L-band.
Select to set traffic announce-
ment operation on/off
When traffic announcement is set to on, the tuner will automatically seek a
station that regularly broadcasts traffic information and the station will broad-
cast when the traffic information program starts.
Select to set alternative frequency net work following operation on/off
When alternative frequency is set to on, a station providing good reception is
automatically selected if current reception worsens.
Select to set the DAB radio text feature on/off
Changing FM radio settings
1
2
3
Changing DAB settings
4
5
1
2
3
4
5
Page 384 of 688
3805-14. Using the radio (Lexus Display Audio System)
CT200h_OM_OM76102E_(EE)
Manual tuning (manual screen)
Turn the “TUNE•SCROLL” knob or turn the controller.
Station list (preset or station list screen)
Select the desired station by pressing “<” or “>”, turn the
“TUNE•SCROLL” knob or controller.
Radio stations can be preset.
Search for desired stations.
Turn the controller to select one of the stations and then press the
controller until you hear a beep while on the preset selection screen.
The broadcast you are currently listening to can be re-listened to at any
time.
Move the controller to the right and then select “Time shift”.
Turn the “TUNE•SCROLL” knob to set the desired offset.
An offset playback time can also be set on the menu screen. (P. 3 7 6 )
To cancel the time shift operation while in time shift mode, move the control-
ler to the left and select “Time shift off”. If the time shift display is left show-
ing “-0’ 00”” for 6 seconds without any operation, the time shift operation will
be canceled.
Reception sensitivity
Maintaining perfect radio reception at all times is difficult due to the continu-
ally changing position of the antenna, differences in signal strength and sur-
rounding objects, such as trains, transmitters, etc.
The radio antenna is mounted inside the rear window. To maintain clear radio
reception, do not attach metallic window tinting or other metallic objects to the
antenna wire mounted inside the rear window.
Traffic announcement operation
When traffic announcement is set to on, “TP” will appear on the screen and the
radio will begin seeking a TP station. If the radio seeks out a TP station, the pro-
gram name will appear on the screen. If a traffic announcement station is
received, the radio will be switched to the traffic information program automati-
cally. When the program ends, the initial operation will resume.
Setting station presets (preset screen)
Time shift operation (DAB)
1
2
1
2
Page 386 of 688
3825-15. Playing an audio CD and MP3/WMA/AAC discs(Lexus Display Audio Sys-
CT200h_OM_OM76102E_(EE)
Error messages
If the following error messages appear on the screen, refer to the table and take
the appropriate measures. If the problem is not rectified, take the vehicle to any
authorized Lexus dealer or repairer, or another duly qualified and equipped pro-
fessional.
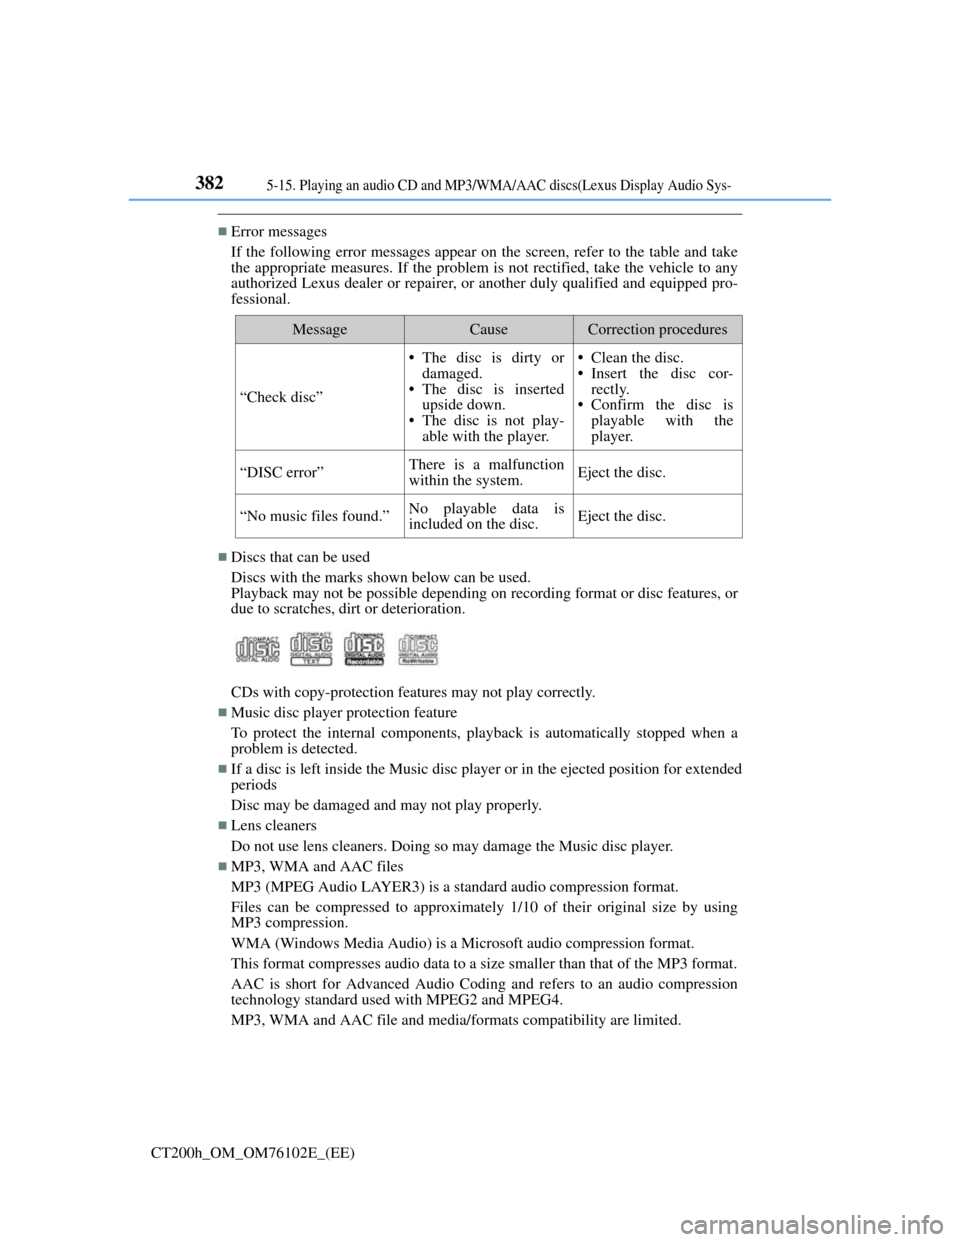
Discs that can be used
Discs with the marks shown below can be used.
Playback may not be possible depending on recording format or disc features, or
due to scratches, dirt or deterioration.
CDs with copy-protection features may not play correctly.
Music disc player protection feature
To protect the internal components, playback is automatically stopped when a
problem is detected.
If a disc is left inside the Music disc player or in the ejected position for extended
periods
Disc may be damaged and may not play properly.
Lens cleaners
Do not use lens cleaners. Doing so may damage the Music disc player.
MP3, WMA and AAC files
MP3 (MPEG Audio LAYER3) is a standard audio compression format.
Files can be compressed to approximately 1/10 of their original size by using
MP3 compression.
WMA (Windows Media Audio) is a Microsoft audio compression format.
This format compresses audio data to a size smaller than that of the MP3 format.
AAC is short for Advanced Audio Coding and refers to an audio compression
technology standard used with MPEG2 and MPEG4.
MP3, WMA and AAC file and media/formats compatibility are limited.
MessageCauseCorrection procedures
“Check disc”
• The disc is dirty or
damaged.
• The disc is inserted
upside down.
• The disc is not play-
able with the player.• Clean the disc.
• Insert the disc cor-
rectly.
• Confirm the disc is
playable with the
player.
“DISC error”There is a malfunction
within the system.Eject the disc.
“No music files found.”No playable data is
included on the disc.Eject the disc.
Page 405 of 688

401
5 5-17. Connecting Bluetooth® (Lexus Display Audio System)
Audio system
CT200h_OM_OM76102E_(EE)
Connecting a Bluetooth® audio player
When the portable audio player is in standby for a connection, it will be
automatically connected whenever the power switch is in either ACCES-
SORY or ON mode.
Operate the portable player and connect it to the Bluetooth
® audio sys-
tem.
Go to “Bluetooth
* setup”: “MENU” button “Setup” “Blue-
tooth
*”
Select the device to connect.
Select “Connect all” or “Connect as audio player”.
If the desired Bluetooth
® device is not displayed, register the device.
(P. 399)
*: Bluetooth is a registered trademark of Bluetooth SIG, Inc.
There are 2 portable audio player connection settings available: connect-
ing from the vehicle and connecting from the portable player.
Connecting method is set to “Vehicle”
Connecting method is set to “Device”
1
2
3
Page 406 of 688
4025-17. Connecting Bluetooth® (Lexus Display Audio System)
CT200h_OM_OM76102E_(EE)
Connecting a Bluetooth® phone
When you register a phone, auto connection will be activated. Always set
it to this mode and leave the Bluetooth® phone in a place where a connec-
tion can be established.
When the power switch is turned to ACCESSORY or ON mode, the sys-
tem will search for a nearby cellular phone you have registered.
The system automatically connects with the most recent phone that was
connected. The connected result is displayed.
When auto connection has failed or “Bluetooth
* power” is turned off,
you must connect the Bluetooth® device manually.
Go to “Bluetooth
* setup”: “MENU” button “Setup” “Blue-
tooth
*”
Select the device to connect.
Select “Connect all”, “Connect as a telephone” or “Connect as audio
player”.
If the desired Bluetooth
® device is not displayed, register the device.
(P. 399)
*: Bluetooth is a registered trademark of Bluetooth SIG, Inc.
Reconnecting a Bluetooth® phone
If the system cannot connect due to poor signal strength with the power switch in
ACCESSORY or ON mode, the system will automatically attempt to reconnect.
If the phone is turned off, the system will not attempt to reconnect. In this case,
the connection must be made manually, or the phone must be reselected.
Connecting a phone while Bluetooth® audio is playing
Bluetooth® audio will stop temporarily.
It may take time to connect.
There are two connecting methods available: automatic and manual.
Auto connection
Manual connection
1
2
3
Page 414 of 688

4105-19. Bluetooth® Phone (Lexus Display Audio System)
CT200h_OM_OM76102E_(EE)
You can transfer the phone numbers in a Bluetooth® phone to the system.
Operation methods differ between PBAP (Phone Book Access Profile)
compatible and PBAP incompatible Bluetooth
® phones. If the cellular
phone does not support either PBAP or OPP (Object Push Profile) ser-
vice, you cannot transfer contacts.
Press the off-hook switch on the steering wheel.
If the phonebook is empty, a message will be displayed.
For a PBAP compatible Bluetooth® phone and “Automatic transfer” is
off
To transfer new contacts from a
cellular phone, select “Always”
and then enable “Automatic
transfer”.
(P. 421)
Select “Once” if you want to
transfer new contacts from a cel-
lular phone.
For a PBAP incompatible and OPP compatible Bluetooth® phone
Select “Transfer” and operate
your cellular phone to transfer
new contacts from a cellular
phone.
Select “Add” if you want to add a
new contact manually.
When the phonebook is empty
1
2
2
Page 417 of 688

413
5 5-19. Bluetooth® Phone (Lexus Display Audio System)
Audio system
CT200h_OM_OM76102E_(EE)
Speaking on the phone
Select “Transmit volume”. To restore default volume, move the controller
to the left on the “Transmit volume” screen and then select “Default”.
Move the controller to the left and then select “In-call volume”. You can
also adjust the volume using the “PWR•VOL” knob or the steering
switches.
Select “Mute”.
When using phone services such as an answering service or a bank, you
can store phone numbers and code numbers in the contacts using “p” or
“w” symbols (eg. 056133 w 0123p#1).
Contact including a phone number only
Move the controller to the left and then select “0-9”.
Input the number.
Phone number containing a “p” symbol
When the “p” symbol is dialed in an outgoing call, there will be a pause
for 2 seconds before the following digits are dialed automatically.
The following screen is displayed when speaking on the phone.
To adjust the transmit volume
To adjust in call volume
To prevent the other party from hearing your voice
Inputting tones
1
2
Page 425 of 688
421
5 5-20. Phonebook (Lexus Display Audio System)
Audio system
CT200h_OM_OM76102E_(EE)
Contact settings
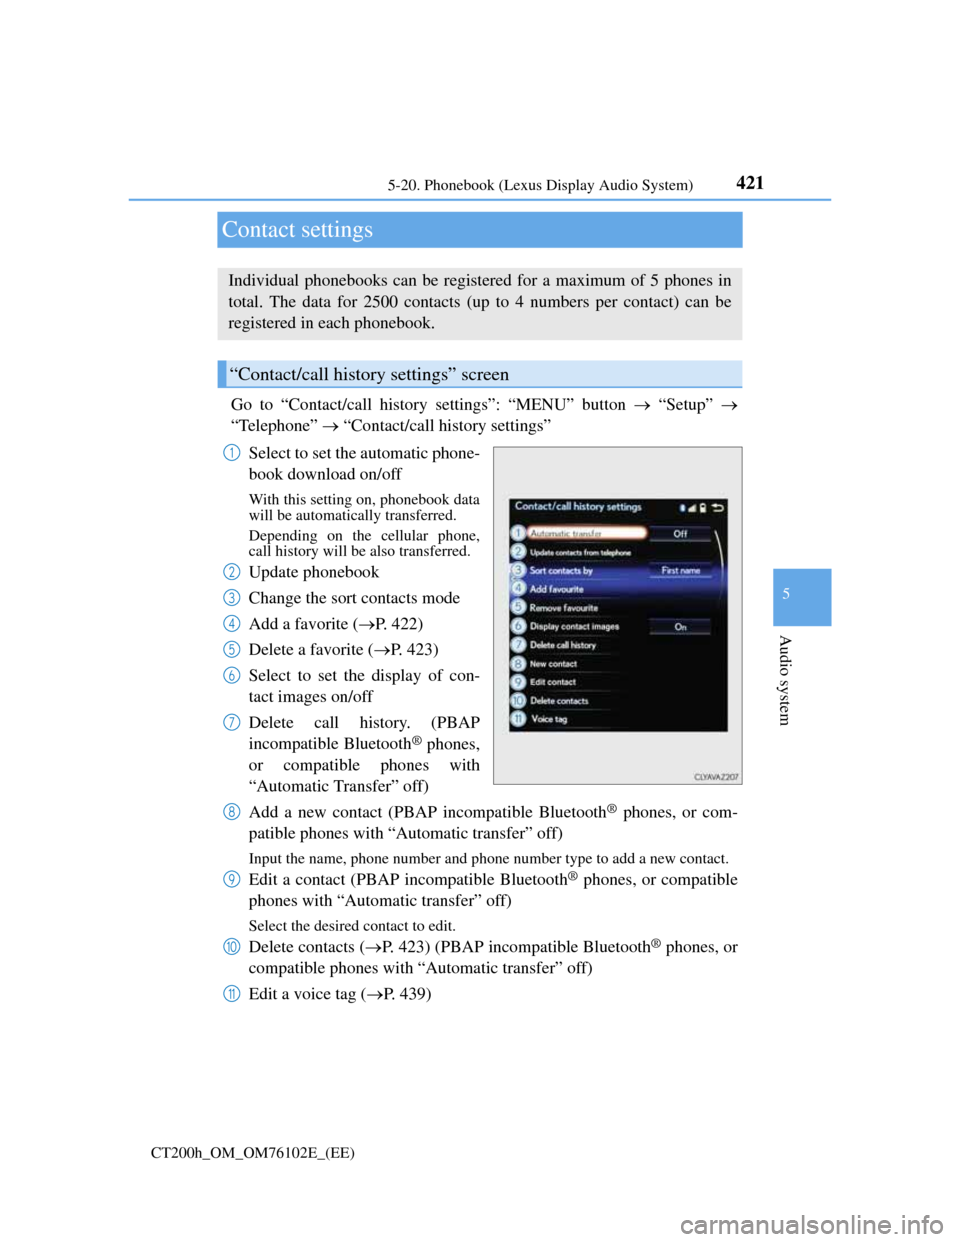
Go to “Contact/call history settings”: “MENU” button “Setup”
“Telephone” “Contact/call history settings”
Select to set the automatic phone-
book download on/off
With this setting on, phonebook data
will be automatically transferred.
Depending on the cellular phone,
call history will be also transferred.
Update phonebook
Change the sort contacts mode
Add a favorite (P. 422)
Delete a favorite (P. 423)
Select to set the display of con-
tact images on/off
Delete call history. (PBAP
incompatible Bluetooth
® phones,
or compatible phones with
“Automatic Transfer” off)
Add a new contact (PBAP incompatible Bluetooth
® phones, or com-
patible phones with “Automatic transfer” off)
Input the name, phone number and phone number type to add a new contact.
Edit a contact (PBAP incompatible Bluetooth® phones, or compatible
phones with “Automatic transfer” off)
Select the desired contact to edit.
Delete contacts (P. 423) (PBAP incompatible Bluetooth® phones, or
compatible phones with “Automatic transfer” off)
Edit a voice tag (P. 439)
Individual phonebooks can be registered for a maximum of 5 phones in
total. The data for 2500 contacts (up to 4 numbers per contact) can be
registered in each phonebook.
“Contact/call history settings” screen
1
2
3
4
5
6
7
8
9
10
11