2013 Lancia Thema CD player
[x] Cancel search: CD playerPage 84 of 336

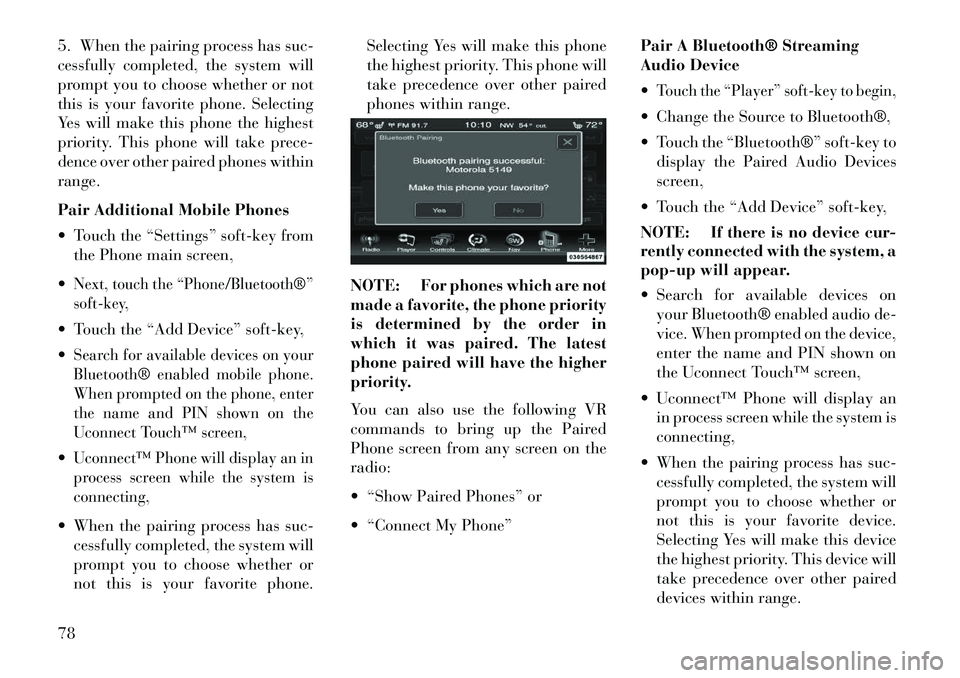
5. When the pairing process has suc-
cessfully completed, the system will
prompt you to choose whether or not
this is your favorite phone. Selecting
Yes will make this phone the highest
priority. This phone will take prece-
dence over other paired phones within
range.
Pair Additional Mobile Phones
Touch the “Settings” soft-key fromthe Phone main screen,
Next, touch the “Phone/Bluetooth®”
soft-key, Touch the “Add Device” soft-key,
Search for available devices on your
Bluetooth® enabled mobile phone.
When prompted on the phone, enter
the name and PIN shown on the
Uconnect Touch™ screen,Uconnect™ Phone will display an in
process screen while the system is
connecting, When the pairing process has suc- cessfully completed, the system will
prompt you to choose whether or
not this is your favorite phone. Selecting Yes will make this phone
the highest priority. This phone will
take precedence over other paired
phones within range.
NOTE: For phones which are not
made a favorite, the phone priority
is determined by the order in
which it was paired. The latest
phone paired will have the higher
priority.
You can also use the following VR
commands to bring up the Paired
Phone screen from any screen on the
radio:
“Show Paired Phones” or
“Connect My Phone” Pair A Bluetooth® Streaming
Audio Device
Touch the “Player” soft-key to begin, Change the Source to Bluetooth®,
Touch the “Bluetooth®” soft-key to
display the Paired Audio Devices
screen,
Touch the “Add Device” soft-key,
NOTE: If there is no device cur-
rently connected with the system, a
pop-up will appear.
Search for available devices on your Bluetooth® enabled audio de-
vice. When prompted on the device,
enter the name and PIN shown on
the Uconnect Touch™ screen,
Uconnect™ Phone will display an in process screen while the system is
connecting,
When the pairing process has suc- cessfully completed, the system will
prompt you to choose whether or
not this is your favorite device.
Selecting Yes will make this device
the highest priority. This device will
take precedence over other paired
devices within range.
78
Page 98 of 336

GENERAL INFORMATION
This device complies with Part 15
of the FCC rules and RSS 210 of
Industry Canada. Operation is subject
to the following conditions:
Changes or modifications not ex-
pressly approved by the party re-
sponsible for compliance could void
the user's authority to operate the
equipment. This device may not cause harmfulinterference.
This device must accept any inter-
ference received, including inter-
ference that may cause undesired
operation.VOICE COMMAND
Uconnect Touch™
8.4/8.4 Nav The Uconnect™ Voice
Command system allows
you to control your AM, FM
radio, satellite radio, disc
player, SD Card or USB/iPod. NOTE:
Take care to speak into
the Voice Command system as
calmly and normally as possible.
The ability of the Voice Command
system to recognize user voice com-
mands may be negatively affected
by rapid speaking or a raised voice
level.
WARNING!
Any voice commanded system
should be used only in safe driving
conditions following all applicable
laws, including laws regarding
phone use. All attention should be
kept on the roadway ahead. Failure
to do so may result in an accident
causing serious injury or death.
When you press the Uconnect™ Voice
Command
button, you will hear
a beep. The beep is your signal to give
a command.
If no command is spoken the system
will say one of two responses:
I didn't understand
I didn't get that, etc., If a command is not spoken a second
time, the system will respond with an
error and give some direction as what
can be said based on the context you
are in. After three consecutive failures
of a spoken command the VR session
with end.
Pressing the Uconnect™ Voice Com-
mand
button while the system is
speaking is known as “barging in.”
The system will be interrupted, and
after the beep, you can say a com-
mand. This will become helpful once
you start to learn the options.
NOTE: At any time, you can say
the words “Cancel” or “Help”.
These commands are universal and
can be used from any menu. All other
commands can be used depending
upon the active application.
When using this system, you should
speak clearly and at a normal speak-
ing volume.
The system will best recognize your
speech if the windows are closed, and
the heater/air conditioning fan is set
to low.
92
Page 99 of 336

At any point, if the system does not
recognize one of your commands, you
will be prompted to repeat it.
To hear available commands, press
the Uconnect™ Voice Command
button and say “Help”. You will
hear available commands for the
screen displayed.
Natural Speech
Natural speech allows the user to
speak commands in phrases or com-
plete sentences. The system filters out
certain non-word utterances and
sounds such as “ah” and “eh”. The
system handles fill-in words such as
“I would like to”.
The system handles multiple inputs in
the same phrase or sentence such as
“make a phone call” and “to Kelly
Smith”. For multiple inputs in the
same phrase or sentence, the system
identifies the topic or context and pro-
vides the associated follow-up prompt
such as “Who do you want to call?” in
the case where a phone call was re-
quested but the specific name was not
recognized.
The system utilizes continuous dialog;
when the system requires more infor-
mation from the user it will ask a ques-
tion to which the user can respond
without pressing the Uconnect™ Voice
Command
button.
Uconnect™ Voice
Commands
The Uconnect™ Voice Command sys-
tem understands two types of com-
mands. Universal commands are avail-
able at all times. Local commands are
available if the supported radio mode is
active.Start a dialogue by pressing the
Uconnect™ Voice Commandbutton.
Changing the Volume
1. Start a dialogue by pressing the
Voice Command
button.
2. Say a command (e.g., “Help”). 3.
Use the ON/OFF VOLUME rotary
knob to adjust the volume to a com-
fortable level while the Voice Com-
mand system is speaking. Please note
the volume setting for Voice Command
is different than the audio system.
Starting Voice Recognition (VR)
Session in Radio/Player Modes
In this mode, you can say the follow-
ing commands:
NOTE:
The commands can be
said on any screen when a call is not
active after pushing the Uconnect™
Voice Command
button.
Disc
To switch to the disc mode, say
“Change source to Disc”. This com-
mand can be given in any mode or
screen: “Track” (#) (to change the track)
93
Page 100 of 336

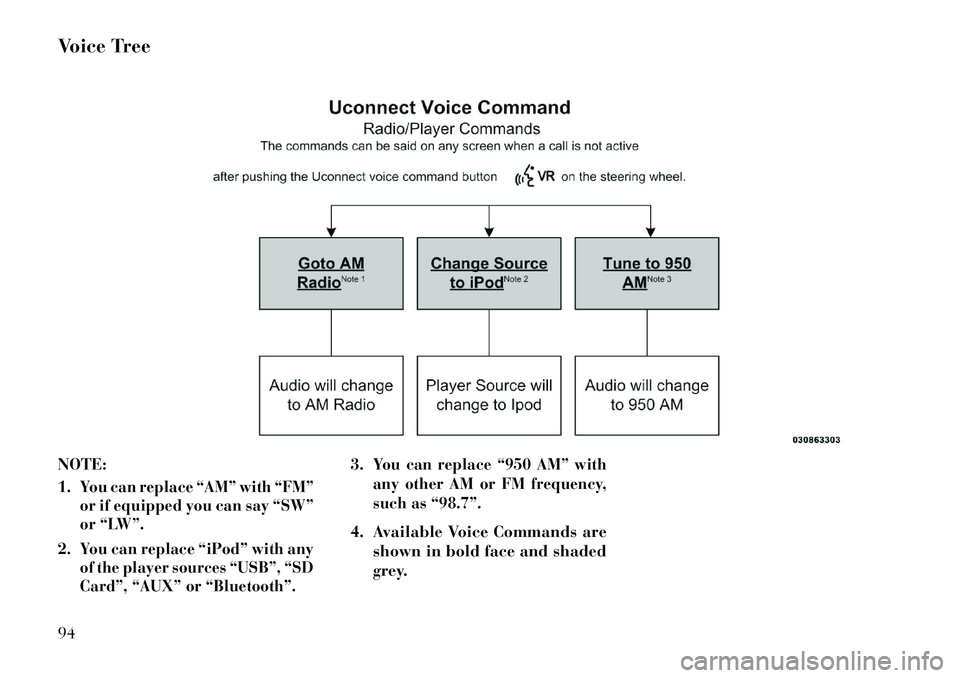
Voice Tree
NOTE:
1.
You can replace “AM” with “FM”
or if equipped you can say “SW”
or “LW”.
2.
You can replace “iPod” with any
of the player sources “USB”, “SD
Card”, “AUX” or “Bluetooth”.
3.
You can replace “950 AM” with
any other AM or FM frequency,
such as “98.7”.
4. Available Voice Commands are shown in bold face and shaded
grey.
94
Page 103 of 336

NOTE:
1. Only available with Navigationequipped vehicles.
2.
You can replace “Player” with
“Radio”, “Navigation”, “Phone”,
“Climate”, “More” or “Settings”.
3.
Navigation commands only work
if equipped with Navigation.
4.
Available Voice Commands are
shown in bold face and shaded
grey.
97
Page 110 of 336

HEAD RESTRAINTSHead restraints are designed to reduce
the risk of injury by restricting head
movement in the event of a rear im-
pact. Head restraints should be ad-
justed so that the top of the head
restraint is located above the top of
your ear.WARNING!
The head restraints for all occu-
pants must be properly adjusted
prior to operating the vehicle or
occupying a seat. Head restraints
should never be adjusted while the
vehicle is in motion. Driving a ve-
hicle with the head restraints im-
properly adjusted or removed could
cause serious injury or death in the
event of a collision.
Active Head Restraints — Front
Seats
The front driver and passenger seats
are equipped with Active Head Re-
straints (AHR). In the event of a rear
impact the AHRs will automatically
extend forward minimizing the gap
between the back of the occupants
head and the AHR. The AHRs will automatically return
to their normal position following a
rear impact. If the AHRs do not return
to their normal position see your au-
thorized dealer immediately.
To raise the head restraint, pull up-
ward on the head restraint. To lower
the head restraint, press the push but-
ton, located at the base of the head
restraint, and push downward on the
head restraint.
NOTE:
The head restraints should
only be removed by qualified tech-
nicians, for service purposes only.
If either of the head restraints re-
quire removal, see your authorized
dealer.
WARNING!
Do not place items over the top of
the Active Head Restraint, such as
coats, seat covers or portable DVD
players. These items may interfere
with the operation of the Active
Head Restraint in the event of a
collision and could result in serious
injury or death.
Rear Head Restraints
The center head restraint has two po-
sitions, up or down. When the center
seat is being occupied the head re-
straint should be in the raised posi-
tion. When there are no occupants in
the center seat the head restraint can
be lowered for maximum visibility for
the driver.
Push Button
104
Page 155 of 336

Inside the center console armrest,
there is a removable upper storage
tray that can be slid forward/
rearward on rails for access to the
lower storage area. This tray has an
integrated coin holder, along with ad-
ditional area for small items like an
ipod or phone. Below the upper tray,
the lower storage compartment is
made for larger items, like CDs and
tissue boxes. In addition, the 12 volt
power outlet, USB and Aux jack are
located here.WARNING!Do not operate this vehicle with a
console compartment lid in the open
position. Cellular phones, music
(Continued)
WARNING!(Continued)players, and other handheld elec-
tronic devices should be stowed
while driving. Use of these devices
while driving can cause an accident
due to distraction, resulting in death
or injury.DOOR STORAGEThe door panels contain storage areas.REAR SEAT ARMREST
STORAGE (for versions/
markets, where provided)
For rear passengers there is a storage
bin located in the armrest. Lift up-
ward on the latch to open the storage
compartment. CARGO AREA — VEHICLES
EQUIPPED WITH 60/40
SPLIT-FOLDING REAR
SEAT
The 60/40 split-folding rear seat pro-
vides cargo-carrying versatility. The
seatbacks fold down easily by pulling
nylon tabs between the seatbacks and
the bolsters. When the seats are folded
down, they provide a continuous,
nearly-flat extension of the load floor.
When the seatback is folded to the
upright position, make sure it is
latched by strongly pulling on the top
of the seatback above the seat strap.
Upper Storage Tray
Front Door Trim Storage
Rear Armrest Storage
149
Page 160 of 336

VEHICLE INFO (CUSTOMER INFORMATIONFEATURES) (for versions/markets, where
provided) . . . . . . . . . . . . . . . . . . . . . . . . . . . . .171
MESSAGES # . . . . . . . . . . . . . . . . . . . . . . . . . .172
TURN MENU OFF . . . . . . . . . . . . . . . . . . . . . . .172
Uconnect Touch™ SETTINGS . . . . . . . . . . . . . . .172
HARD-KEYS . . . . . . . . . . . . . . . . . . . . . . . . . .172
SOFT-KEYS . . . . . . . . . . . . . . . . . . . . . . . . . . .172
CUSTOMER PROGRAMMABLE FEATURES —Uconnect Touch™ SYSTEM 8.4 SETTINGS . . .172
SOUND SYSTEMS . . . . . . . . . . . . . . . . . . . . . . .181
NAVIGATION SYSTEM (for versions/markets, where provided) . . . . . . . .181
SETTING THE ANALOG CLOCK . . . . . . . . . . . . .181
iPod®/USB/MP3 CONTROL (for vehicles/markets, where provided) . . . . . . . .182
HARMAN KARDON® Logic7® HIGH PERFORMANCE MULTICHANNEL SURROUND
SOUND SYSTEM WITH DRIVER-SELECTABLE
SURROUND (DSS) (for versions/markets,
where required) . . . . . . . . . . . . . . . . . . . . . . . . . .182
STEERING WHEEL AUDIO CONTROLS . . . . . . .183 Radio Operation . . . . . . . . . . . . . . . . . . . . . . . .183
CD Player . . . . . . . . . . . . . . . . . . . . . . . . . . . . .183
CD/DVD DISC MAINTENANCE . . . . . . . . . . . . . .184
154