2013 Lancia Thema reset
[x] Cancel search: resetPage 32 of 336

Reset Auto-Up
Should the Auto Up feature stop
working, the window probably needs
to be reset. To reset Auto Up:
1.
Pull the window switch up to close
the window completely and continue
to hold the switch up for an additional
two seconds after the window is closed.
2. Push the window switch down
firmly to the second detent to open the
window completely and continue to
hold the switch down for an addi-
tional two seconds after the window is
fully open.
Window Lockout Switch
The window lockout switch on the
driver's door trim panel allows you to
disable the window controls on the
rear passenger doors and the rear sun-
screen (for versions/markets, where
provided). To disable the window
controls and the rear sunscreen, press
and release the window lockout but-
ton (setting it in the DOWN position).
To enable the window controls and
the rear sunscreen, press and release
the window lockout button again (set-
ting it in the UP position). WIND BUFFETING
Wind buffeting can be described as the
perception of pressure on the ears or a
helicopter-type sound in the ears. Your
vehicle may exhibit wind buffeting
with the windows down, or the sunroof
(for versions/markets, where pro-
vided) in certain open or partially open
positions. This is a normal occurrence
and can be minimized. If the buffeting
occurs with the rear windows open,
then open the front and rear windows
together to minimize the buffeting. If
the buffeting occurs with the sunroof
open, then adjust the sunroof opening
to minimize the buffeting.
TRUNK LOCK AND
RELEASE
The trunk lid can be released from
inside the vehicle by pressing the
TRUNK RELEASE button located on
the instrument panel to the left of the
steering wheel.
NOTE: The transmission must be
in PARK before the button will op-
erate.
The trunk lid
can be released
from outside
the vehicle by
pressing the
TRUNK button
on the Remote
Keyless Entry
(RKE) trans-
mitter twice
within five seconds or by using the
external release switch located on the
underside of the decklid overhang. The
release feature will function only when
the vehicle is in the unlock condition.
Window Lockout Switch
Trunk Release Button
26
Page 40 of 336

Service Active Hood System
If the ORC has deployed the Active
Hood, or if it detects a malfunction in
any part of the system, it turns on the
Air Bag Warning Light and it will
display the “SERVICE ACTIVE
HOOD” message in the Electronic
Vehicle Information Center (EVIC),
for versions/markets, where pro-
vided. A single chime will sound if the
Air Bag Warning Light comes on
again after initial startup. It also in-
cludes diagnostics that will illuminate
the Air Bag Warning Light if a mal-
function is noted that could affect the
Active Hood system. The diagnostics
also record the nature of the malfunc-
tion. If the Air Bag Warning Light is
illuminated, or if “SERVICE ACTIVE
HOOD” appears in the EVIC, see
your authorized dealer.In the event of an Active Hood deploy-
ment, the vehicle should be serviced by
an authorized dealer. The hood hinges
must be serviced and the actuator as-
semblies replaced to restore system
functionality.
Following an Active Hood deploy-
ment, the hood position can be tem-
porarily reset by pushing down at the
rear edge over the hood hinges as the
internal pressure of each actuator is
relieved. The temporary hood reset
position is intended to improve for-
ward driving visibility over the hood
until the vehicle can be serviced. The
temporary hood reset position will
leave the hood approximately 5 mm
above the fender surface.
The front bumper assembly may af-
fect proper operation of the Active
Hood system. The front bumper com-
ponents should be inspected for dam-
age and replaced if necessary in the
event of a frontal impact, even if it
occurs at a low rate of speed.NOTE: After any Active Hood
deployment, the vehicle should
be taken to an authorized dealer
immediately.
CAUTION!To prevent possible damage, do not
slam the rear of the hood to reset it.
Press the rear of the hood down until
it is approximately 5 mm above the
fender. This should secure both hood
hinge reset mechanisms.WARNING!
Ignoring the Air Bag Warning
Light in your instrument panel or
the “SERVICE ACTIVE HOOD”
message in the EVIC could mean
you won’t have the Active Hood to
enhance pedestrian protection. If
the light does not come on as a
bulb check when the ignition is
first turned on, stays on after you
start the vehicle, or if it comes on
as you drive, see your authorized
dealer.
(Continued)
Service Active Hood Deployment
34
Page 49 of 336

The SAB fully inflate in about 10 milli-
seconds. The side air bag moves at a
very high speed and with such a high
force that it could injure you if you are
not seated properly, or if items are
positioned in the area where the side
air bag inflates. This especially ap-
plies to children.
Supplemental Side Air Bag
Inflatable Curtain (SABIC)
Inflator Units
During collisions where the impact is
confined to a particular area of the
side of the vehicle, the ORC may de-
ploy the SABIC air bags, depending
on the severity and type of collision.
In these events, the ORC will deploy
the SABIC only on the impact side of
the vehicle.
A quantity of non-toxic gas is gener-
ated to inflate the side curtain air bag.
The inflating side curtain air bag
pushes the outside edge of the head-
liner out of the way and covers the
window. The air bag inflates in about
30 milliseconds (about one-quarter of
the time that it takes to blink your
eyes) with enough force to injure youif you are not belted and seated prop-
erly, or if items are positioned in the
area where the side curtain air bag
inflates. This especially applies to
children. The side curtain air bag is
only about 9 cm thick when it is in-
flated.
Because air bag sensors estimate de-
celeration over time, vehicle speed
and damage are not good indicators of
whether or not an air bag should have
deployed.
NOTE: In a rollover the preten-
sioners and/or SAB and SABIC air
bags may deploy on both sides of
the vehicle.
Front And Side Impact Sensors
In front and side impacts, impact sen-
sors can aid the ORC in determining
appropriate response to impact events.Enhanced Accident Response
System
In the event of an impact causing air
bag deployment, if the communica-
tion network remains intact, and the
power remains intact, depending on
the nature of the event the ORC willdetermine whether to have the En-
hanced Accident Response System
perform the following functions:
Cut off fuel to the engine.
Flash hazard lights as long as the
battery has power or until the igni-
tion is cycled off.
Turn on the interior lights, which
remain on as long as the battery has
power or until the ignition key is
removed. Unlock the doors automatically.
In order to reset the Enhanced Acci-
dent Response System functions after
an event, the ignition switch must be
changed from IGN ON to IGN OFF.
If A Deployment Occurs
The Advanced Front Air Bags are
designed to deflate immediately after
deployment.
NOTE:
Front and/or side air bags
will not deploy in all collisions.
This does not mean something is
wrong with the air bag system.
43
Page 87 of 336

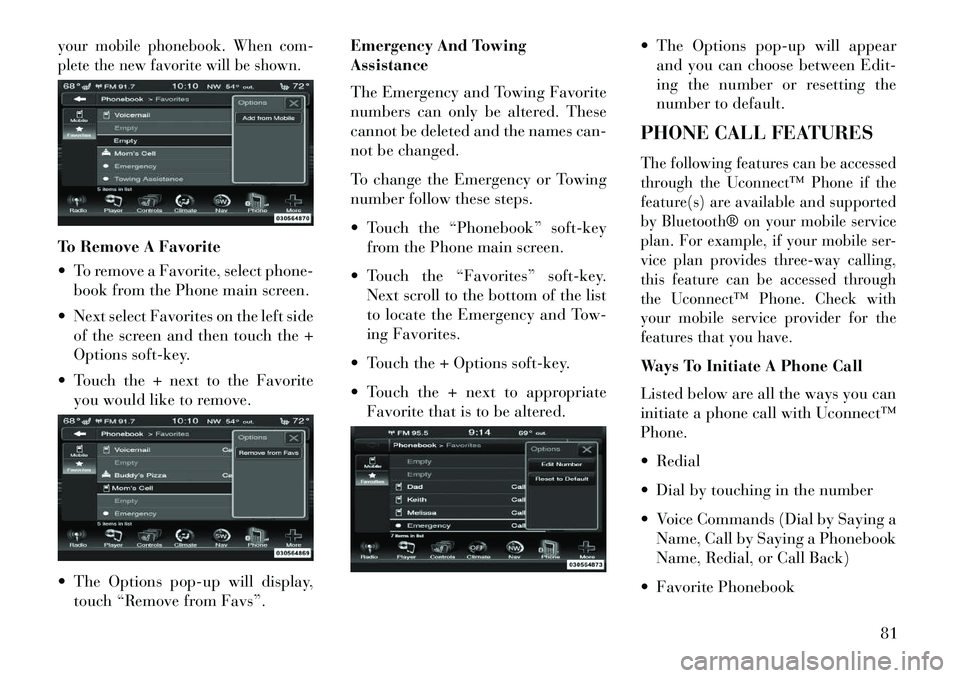
your mobile phonebook. When com-
plete the new favorite will be shown.To Remove A Favorite
To remove a Favorite, select phone-book from the Phone main screen.
Next select Favorites on the left side of the screen and then touch the +
Options soft-key.
Touch the + next to the Favorite you would like to remove.
The Options pop-up will display, touch “Remove from Favs”. Emergency And Towing
Assistance
The Emergency and Towing Favorite
numbers can only be altered. These
cannot be deleted and the names can-
not be changed.
To change the Emergency or Towing
number follow these steps.
Touch the “Phonebook” soft-key
from the Phone main screen.
Touch the “Favorites” soft-key. Next scroll to the bottom of the list
to locate the Emergency and Tow-
ing Favorites.
Touch the + Options soft-key.
Touch the + next to appropriate Favorite that is to be altered. The Options pop-up will appear
and you can choose between Edit-
ing the number or resetting the
number to default.
PHONE CALL FEATURES
The following features can be accessed
through the Uconnect™ Phone if the
feature(s) are available and supported
by Bluetooth® on your mobile service
plan. For example, if your mobile ser-
vice plan provides three-way calling,
this feature can be accessed through
the Uconnect™ Phone. Check with
your mobile service provider for the
features that you have.Ways To Initiate A Phone Call
Listed below are all the ways you can
initiate a phone call with Uconnect™
Phone.
Redial
Dial by touching in the number
Voice Commands (Dial by Saying a Name, Call by Saying a Phonebook
Name, Redial, or Call Back)
Favorite Phonebook
81
Page 94 of 336

Far End Audio Performance
Audio quality is maximized under: low-to-medium blower setting,
low-to-medium vehicle speed,
low road noise,
smooth road surface,
fully closed windows,
dry weather conditions, and
operation from the driver's seat.
Performance, such as audio clarity, echo, and loudness to a large degree
rely on the phone and network, and
not the Uconnect™ Phone.
Echo at the far end can sometimes be reduced by lowering the in-
vehicle audio volume.
In a convertible vehicle, system per- formance may be compromised
with the convertible top down.
SMS
Uconnect™ Phone can read or send
new messages on your phone.Your phone must support SMS over
Bluetooth® in order to use this feature.
If the Uconnect™ Phone determines
your phone is not compatible with SMS messaging over Bluetooth® the “Mes-
saging” button will be greyed out and
the feature will not be available for use.
NOTE: Uconnect™ Phone SMS
is only available when the vehicle
is not in moving.
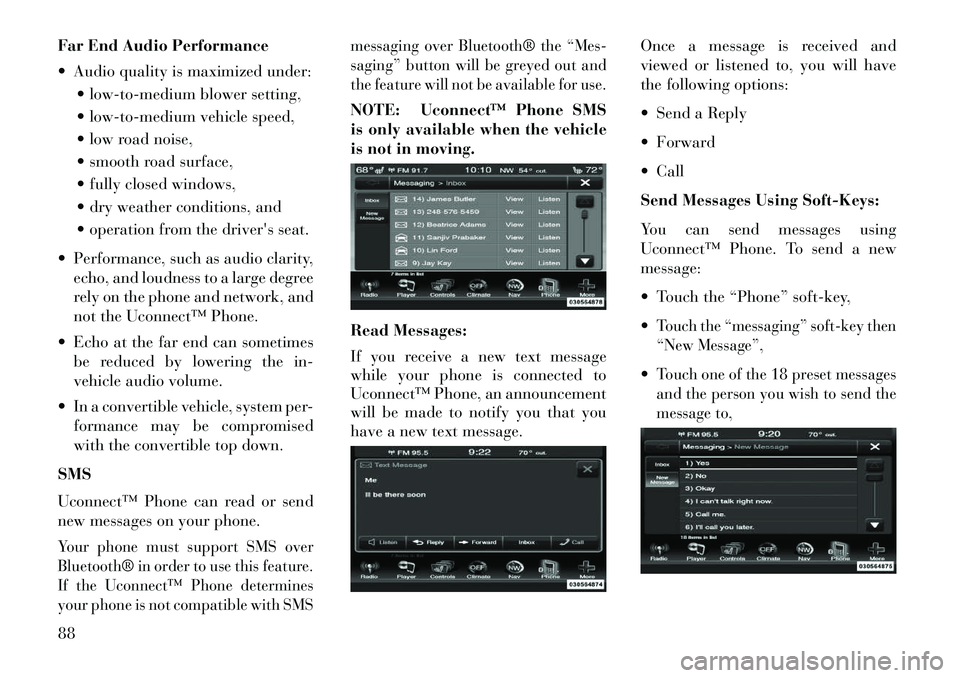
Read Messages:
If you receive a new text message
while your phone is connected to
Uconnect™ Phone, an announcement
will be made to notify you that you
have a new text message.
Once a message is received and
viewed or listened to, you will have
the following options:
Send a Reply
Forward
Call
Send Messages Using Soft-Keys:
You can send messages using
Uconnect™ Phone. To send a new
message:
Touch the “Phone” soft-key,
Touch the “messaging” soft-key then
“New Message”,Touch one of the 18 preset messages
and the person you wish to send the
message to,
88
Page 95 of 336

If multiple numbers are availablefor the contact select which number
you would like to have the message
sent,
Press “Send” or “Cancel”.
Send Messages Using Voice
Commands:
Press the
button,
After the “Listening” prompt and
the following beep, say “Send mes-
sage to John Smith mobile”,After the system prompts you for
what message you want to send, say
the message you wish to send or say
“List”. There are 18 preset messages.While the list of defined messages are
being read, you can interrupt the sys-
tem by pressing the
button and
saying the message you want to send.
After the system confirms that you
want to send your message to John
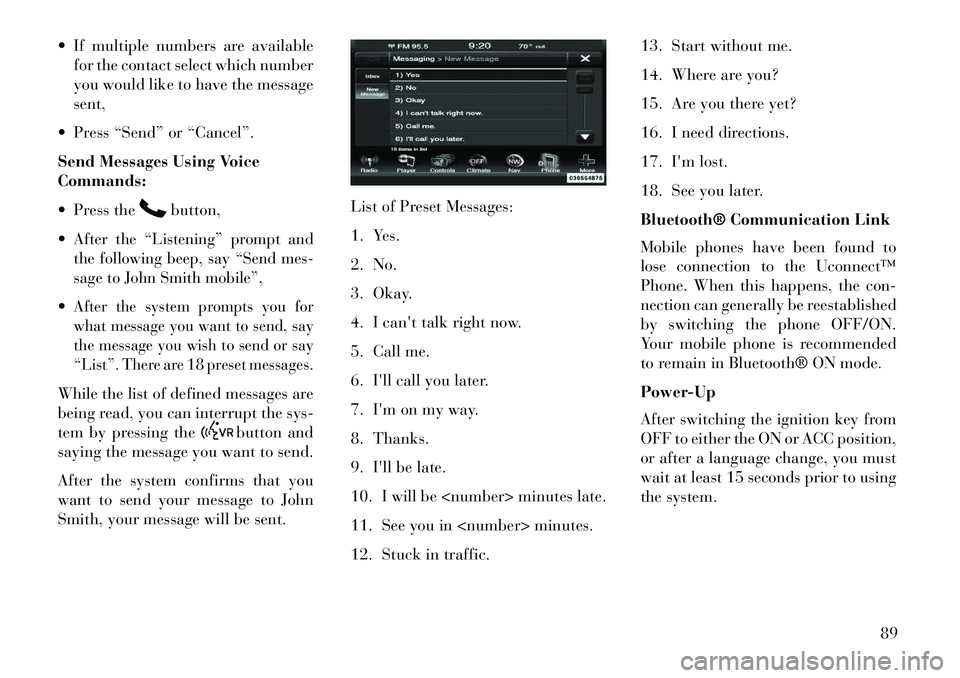
Smith, your message will be sent. List of Preset Messages:
1. Yes.
2. No.
3. Okay.
4. I can't talk right now.
5. Call me.
6. I'll call you later.
7. I'm on my way.
8. Thanks.
9. I'll be late.
10. I will be
11. See you in
12. Stuck in traffic.13. Start without me.
14. Where are you?
15. Are you there yet?
16. I need directions.
17. I'm lost.
18. See you later.
Bluetooth® Communication Link
Mobile phones have been found to
lose connection to the Uconnect™
Phone. When this happens, the con-
nection can generally be reestablished
by switching the phone OFF/ON.
Your mobile phone is recommended
to remain in Bluetooth® ON mode.
Power-Up
After switching the ignition key from
OFF to either the ON or ACC position,
or after a language change, you must
wait at least 15 seconds prior to using
the system.
89
Page 112 of 336

desired position settings for the driver
seat, side mirrors, adjustable pedals
(for versions/markets, where pro-
vided), and power tilt and telescopic
steering column (for versions/
markets, where provided) and a set of
desired radio station presets. Your Re-
mote Keyless Entry (RKE) transmit-
ter can also be programmed to recall
the same positions when the UN-
LOCK button is pressed.
NOTE:
Only one RKE transmitter canbe linked to each of the memory
positions.
Passive Entry door handles can- not be linked to the memory
function. Use either the memory
recall switch or the RKE trans-
mitter (if linked to the memory
feature) to recall memory posi-
tions 1 or 2.
The memory seat switch is located
on the driver's door trim panel. The
switch consists of three buttons:
The (S) button, which is used to acti-
vate the memory save function and the (1) and (2) buttons which are
used to recall either of two pre-
programmed memory profiles.
PROGRAMMING THE
MEMORY FEATURE
To create a new memory profile, per-
form the following:
1. Cycle the ignition to the RUN po-
sition.
2.
Adjust all memory profile settings
to desired preferences (i.e., seat, side
mirror, adjustable pedals [for versions/
markets, where provided], power tilt
and telescopic steering column [for
versions/markets, where provided],
and radio station presets).
3. Press and release the SET (S) but-
ton on the memory switch.
4. Within five seconds, press and re-
lease the MEMORY button 1 or 2. The
Electronic Vehicle Information Center
will display which memory position
has been set.
NOTE:
Memory profiles can be set with- out the vehicle in PARK, but the
vehicle must be in PARK to re-
call a memory profile.
The Recall Memory with Remote
Key Unlock feature can be turned
on and off using the Uconnect
Touch™ System, refer to
“Uconnect Touch™ Settings” in
“Understanding Your Instrument
Panel” for further information.
Memory Seat Switch
106
Page 126 of 336

ELECTRONIC SPEED
CONTROL
When engaged, the Electronic Speed
Control takes over accelerator opera-
tions at speeds greater than 40 km/h.
The Electronic Speed Control buttons
are located on the right side of the
steering wheel.
NOTE: In order to ensure proper
operation, the Electronic Speed
Control System has been designed
to shut down if multiple Speed
Control functions are operated at
the same time. If this occurs, the
Electronic Speed Control System
can be reactivated by pushing theElectronic Speed Control ON/OFF
button and resetting the desired
vehicle set speed.
TO ACTIVATE
Push the ON/OFF button. The Cruise
Indicator Light in the Electronic
Vehicle Information Center (EVIC)
will illuminate. To turn the system off,
push the ON/OFF button a second
time. The Cruise Indicator Light will
turn off. The system should be turned
off when not in use.
WARNING!
Leaving the Electronic Speed Con-
trol system on when not in use is
dangerous. You could accidentally
set the system or cause it to go
faster than you want. You could
lose control and have an accident.
Always leave the system OFF when
you are not using it.
TO SET A DESIRED SPEEDTurn the Electronic Speed Control ON.
When the vehicle has reached the de-
sired speed, press the SET (-) button
and release. Release the accelerator
and the vehicle will operate at the
selected speed.
NOTE: The vehicle should be
traveling at a steady speed and on
level ground before pressing the
SET button.
TO DEACTIVATE
A soft tap on the brake pedal, pushing
the CANCEL button, or normal brake
pressure while slowing the vehicle will
deactivate Electronic Speed Control
without erasing the set speed memory.
Pressing the ON/OFF button or turn-
ing the ignition switch OFF erases the
set speed memory.
TO RESUME SPEED
To resume a previously set speed,
push the RES (+) button and release.
Resume can be used at any speed
above 32 km/h.
TO VARY THE SPEED
SETTING
When the Electronic Speed Control is
set, you can increase speed by pushing
the RES (+) button. If the button is
continually pressed, the set speed will
continue to increase until the button is
released, then the new set speed will
be established.
Electronic Speed Control Buttons1 — ON/OFF 2 — RES +
4 — CANCEL 3 — SET -
120