Page 98 of 573
Continued97
uuLocking and Unlocking the DoorsuLocking/Unlocking the Doors from the Outside
Controls
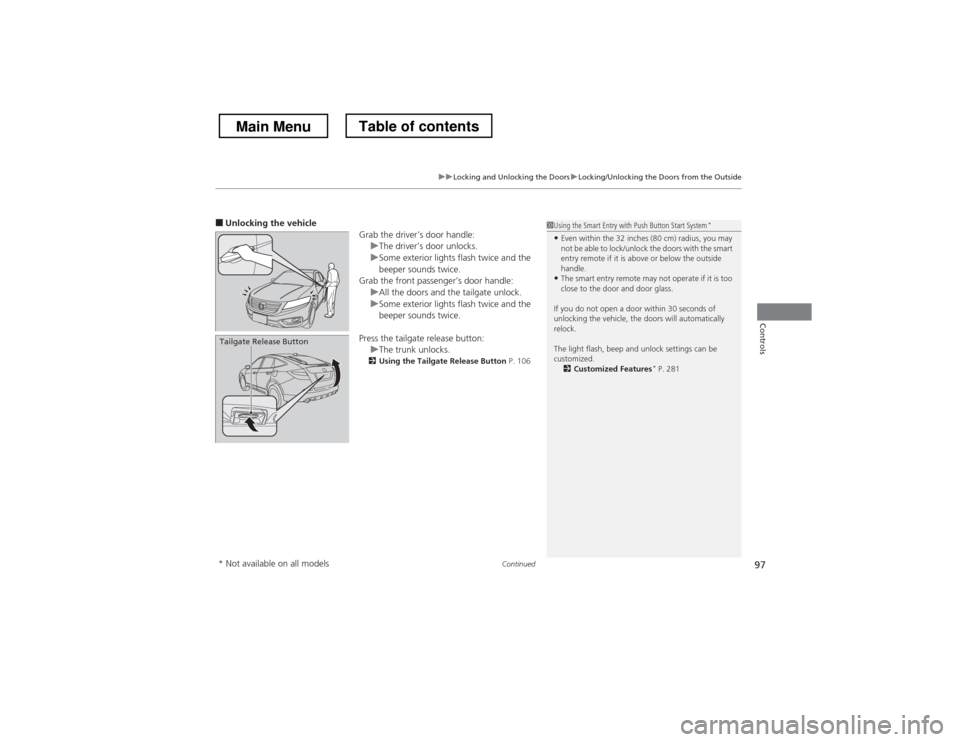
■Unlocking the vehicle
Grab the driver’s door handle:
uThe driver’s door unlocks.uSome exterior lights flash twice and the
beeper sounds twice.
Grab the front passenger’s door handle:
uAll the doors and the tailgate unlock.uSome exterior lights flash twice and the
beeper sounds twice.
Press the tailgate release button:
uThe trunk unlocks.
2 Using the Tailgate Release Button P. 106Tailgate Release Button
1Using the Smart Entry with Push Button Start System*
• Even within the 32 inches (80 cm) radius, you may
not be able to lock/unlock the doors with the smart
entry remote if it is above or below the outside
handle.
• The smart entry remote may not operate if it is too
close to the door and door glass.
If you do not open a door within 30 seconds of
unlocking the vehicle, the doors will automatically
relock.
The light flash, beep and unlock settings can be
customized. 2 Customized Features *
P. 281
* Not available on all models
Main MenuTable of contents
Page 104 of 573
103
uuLocking and Unlocking the DoorsuCustomizing the Auto Door Locking/Unlocking Setting*
Continued
Controls
■Customizing Flow for Auto Door Locking Options
StepsDrive Lock ModePark Lock ModeOff
1Apply the parking brake. Make sure the shift lever is in (P
.
2Turn the ignition switch to ON (w .
3The driver’s door must be closed at this stage.Open the driver’s door.
4Move the shift lever out of (P with the
brake pedal depressed.—Pull the lock tab rearward.
5
Press and hold the front of the master door lock switch on the driver’s door for more
than five seconds. Release the switch after you hear a click twice.Press and hold the front of the master
door lock switch on the driver’s door for
more than five seconds. Release the switch
after you hear one click.
6Move the shift lever to (P .—
7Turn the ignition switch to LOCK (0 within five seconds.uCustomization is completed.
Main MenuTable of contents
Page 109 of 573
uuSecurity SystemuSecurity System Alarm
108
Controls
■ Setting the security system alarm
The security system alarm automatically sets when the following conditions have
been met: • The ignition switch is in LOCK
(0 *1
, and the key has been removed from the
ignition switch.
• The hood and tailgate are closed.
• All doors are locked with the key, remote transmitter, or smart entry system.
■ When the security system alarm sets
The security system alarm indicator in the instrument panel blinks. When the
blinking interval changes after about 15 seconds, the security system alarm is set.
■ To cancel the security system alarm
The security system alarm is canceled when the vehicle is unlocked using the key,
remote transmitter, or smart entry system, or the ignition switch is turned to ON
(w *1
. The security system alarm indicator goes off at the same time.
*1: Models with the smart entry system have an ENGINE START/STOP button instead of an
ignition switch.
1Security System Alarm
Do not set the security system alarm when someone
is in the vehicle or a window is open. The system can
accidentally activate when:
• Unlocking the door with the lock tab or the master
door lock switch.
If the battery goes dead after you have set the
security system alarm, the security alarm may go off
once the battery is recharged or replaced.
If this occurs, deactivate the security system alarm by
unlocking a door using the key or remote transmitter.
Do not attempt to alter this system or add another device to it.
Main MenuTable of contents
Page 110 of 573
109
uuSecurity SystemuSecurity System Alarm
Controls
■The panic button on the remote
transmitter
If you press the panic button for
approximately one second, the following will
occur for about 30 seconds: • The horn sounds.
• Some exterior lights flash.
■ Canceling panic mode
Press any button on the remote transmitter, or turn the ignition switch to ON
(w *1
.
*1: Models with the smart entry system have an ENGINE START/STOP button instead of an
ignition switch.
■Panic Mode
Panic Button
Main MenuTable of contents
Page 121 of 573
uuOperating the Switches Around the Steering WheeluLight Switches
120
Controls
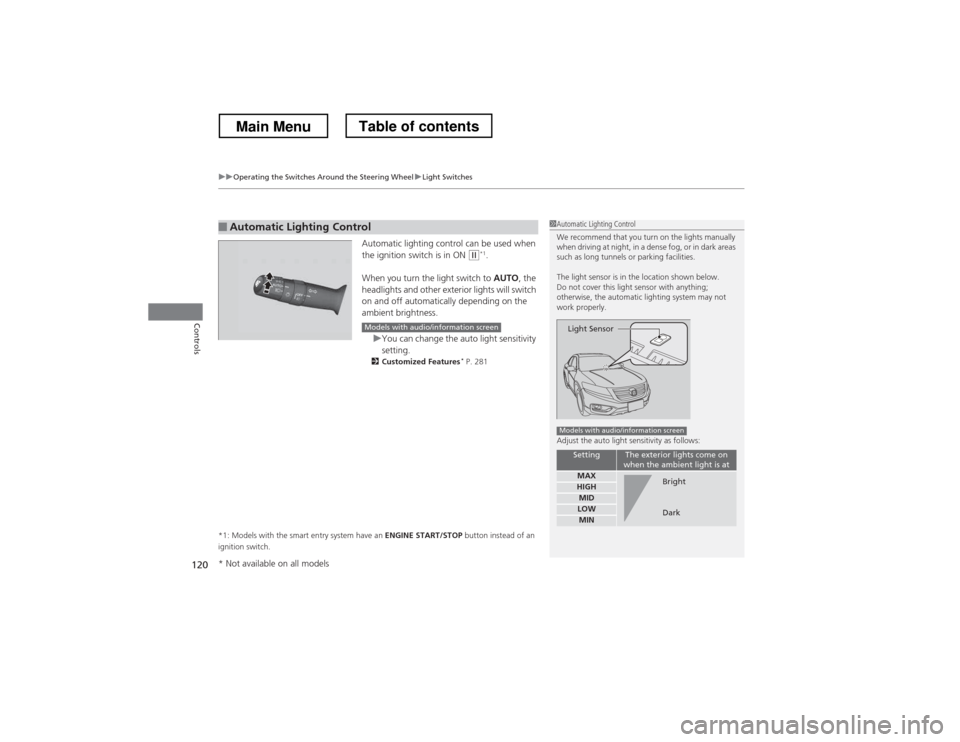
Automatic lighting control can be used when
the ignition switch is in ON (w *1
.
When you turn the light switch to AUTO, the
headlights and other exterior lights will switch
on and off automatically depending on the
ambient brightness.
uYou can change the auto light sensitivity setting.
2 Customized Features *
P. 281
*1: Models with the smart entry system have an ENGINE START/STOP button instead of an
ignition switch.
■Automatic Lighting Control1Automatic Lighting Control
We recommend that you turn on the lights manually
when driving at night, in a dense fog, or in dark areas
such as long tunnels or parking facilities.
The light sensor is in the location shown below.
Do not cover this light sensor with anything;
otherwise, the automatic lighting system may not
work properly.
Adjust the auto light sensitivity as follows:
SettingThe exterior lights come on
when the ambient light is at
MAXHIGHMIDLOWMIN
Light Sensor
Models with audio/information screen
Bright
Dark
Models with audio/information screen
* Not available on all models
Main MenuTable of contents
Page 122 of 573
121
uuOperating the Switches Around the Steering WheeluLight Switches
Controls
The headlights, all other exterior lights, and the instrument panel lights turn off
within 15 seconds after you remove the key and close the driver’s door.
The headlights, all other exterior lights, and the instrument panel lights turn off
within 15 seconds after you set the power mode to VEHICLE OFF (LOCK), take the
remote with you, and close the driver’s door.
uYou can change the headlight auto off timer setting.
2 Customized Features *
P. 281
If you turn the ignition switch to LOCK
(0 *1
with the headlight switch on, but do
not open the door, the lights turn off after 10 minutes (three minutes, if the switch is in the AUTO position).
The lights turn on again when you unlock or open the driver’s door. If you unlock
the door, but do not open it within 15 seconds, the lights go off. If you open the
driver’s door, you will hear a lights on reminder chime.
*1: Models with the smart entry system have an ENGINE START/STOP button instead of an
ignition switch.
■Automatic Lighting Off Feature
Models without smart entry system
Models with smart entry system
All models
* Not available on all models
Main MenuTable of contents
Page 124 of 573
123
uuOperating the Switches Around the Steering WheeluWipers and Washers
Continued
Controls
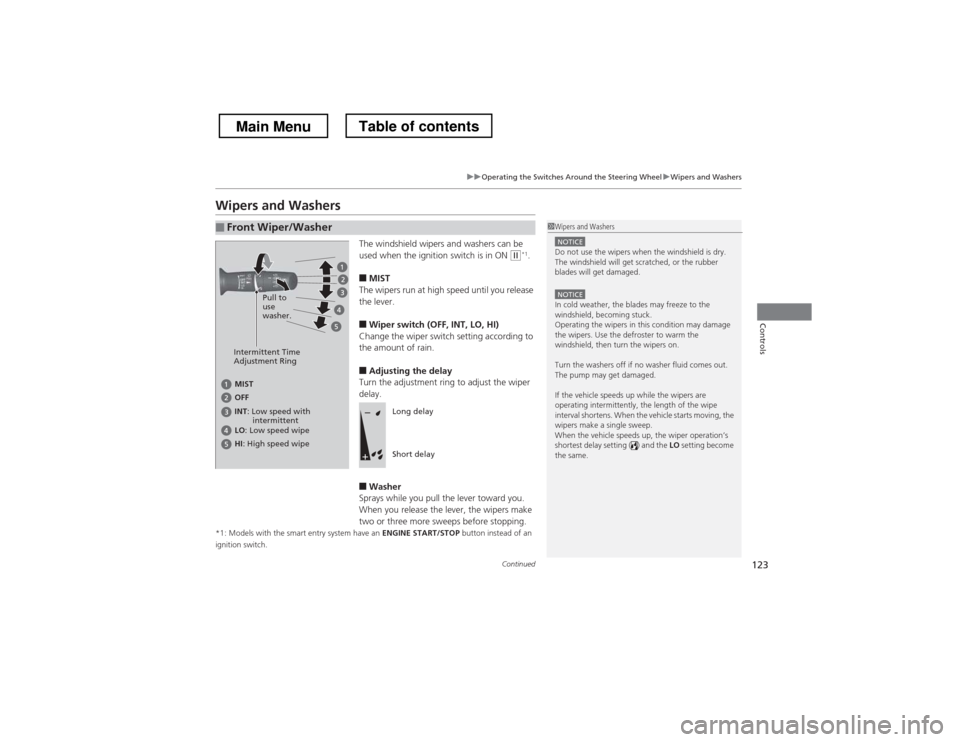
Wipers and WashersThe windshield wipers and washers can be
used when the ignition switch is in ON
(w*1
.
■ MIST
The wipers run at high speed until you release
the lever.
■ Wiper switch (OFF, INT, LO, HI)
Change the wiper switch setting according to
the amount of rain.
■ Adjusting the delay
Turn the adjustment ring to adjust the wiper
delay.
■ Washer
Sprays while you pull the lever toward you.
When you release the lever, the wipers make
two or three more sweeps before stopping.
*1: Models with the smart entry system have an ENGINE START/STOP button instead of an
ignition switch.
■Front Wiper/Washer1Wipers and Washers
NOTICEDo not use the wipers when the windshield is dry.
The windshield will get scratched, or the rubber
blades will get damaged.
NOTICEIn cold weather, the blades may freeze to the
windshield, becoming stuck.
Operating the wipers in this condition may damage
the wipers. Use the defroster to warm the
windshield, then turn the wipers on.
Turn the washers off if no washer fluid comes out.
The pump may get damaged.
If the vehicle speeds up while the wipers are
operating intermittently, the length of the wipe
interval shortens. When the vehicle starts moving, the
wipers make a single sweep.
When the vehicle speeds up, the wiper operation’s
shortest delay setting ( ) and the LO setting become
the same.
Intermittent Time
Adjustment Ring Pull to use
washer.
MIST INT
: Low speed with
intermittent
OFF LO
: Low speed wipe
HI : High speed wipe
Long delay
Short delay
Main MenuTable of contents
Page 126 of 573
125
uuOperating the Switches Around the Steering WheeluBrightness Control
Controls
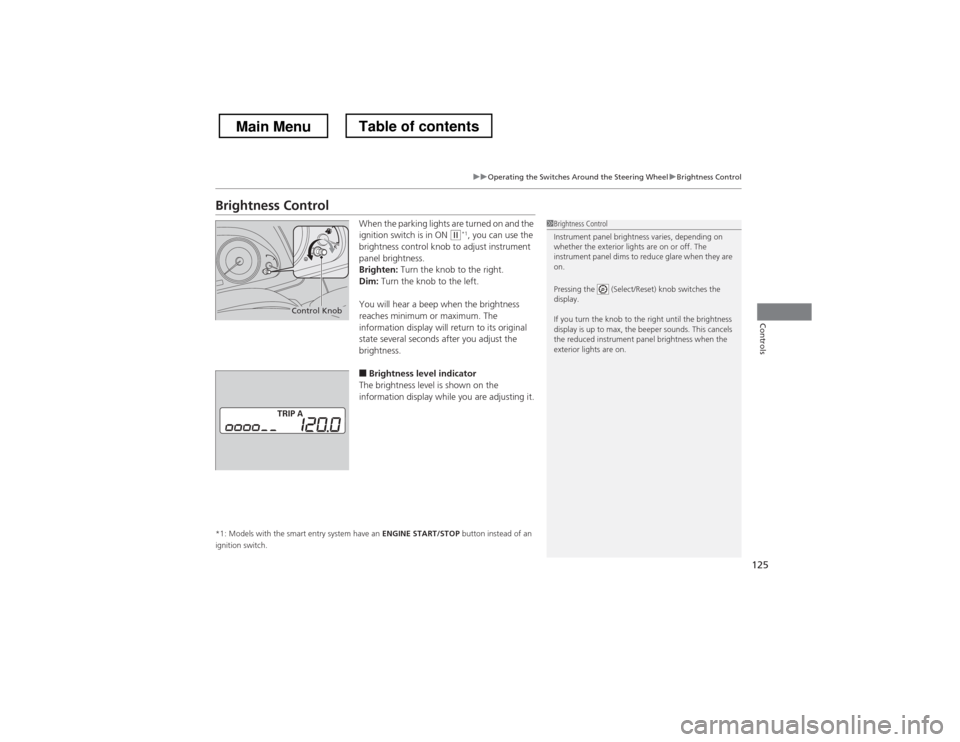
Brightness ControlWhen the parking lights are turned on and the
ignition switch is in ON
(w*1
, you can use the
brightness control knob to adjust instrument
panel brightness.
Brighten: Turn the knob to the right.
Dim: Turn the knob to the left.
You will hear a beep when the brightness
reaches minimum or maximum. The
information display will return to its original
state several seconds after you adjust the
brightness.
■ Brightness level indicator
The brightness level is shown on the
information display while you are adjusting it.
*1: Models with the smart entry system have an ENGINE START/STOP button instead of an
ignition switch.1Brightness Control
Instrument panel brightness varies, depending on
whether the exterior lights are on or off. The
instrument panel dims to reduce glare when they are on.
Pressing the (Select/Reset) knob switches the
display.
If you turn the knob to the right until the brightness
display is up to max, the beeper sounds. This cancels
the reduced instrument panel brightness when the
exterior lights are on.
Control Knob
Main MenuTable of contents