Page 57 of 157

Hitches
Do not use a hitch that either clamps onto the bumper or attaches to the
axle. Distribute the trailer load so 10–15% of the total trailer weight is on
the tongue.
Weight-Distributing Hitch
When hooking-up a trailer using a weight-distributing hitch, always use
the following procedure:
1. Park the loaded vehicle (without the trailer) on a level surface.
2. Measure the height to the top of the vehicle front wheel opening on
the fender, this is H1.
3. Securely attach the loaded trailer to the vehicle without the
weight-distributing bars connected.
4. Measure the height to the top of the vehicle front wheel opening on
the fender a second time, this is H2.
5. Install and adjust the tension in the weight-distributing bars so that
the height of the vehicle’s front wheel opening on the fender is
approximately halfway between H1 and H2.
6. Check that the trailer is level or slightly nose down. If not, adjust the
ball height accordingly and repeat Steps 1 through 6.
7. Lock bar tension adjuster in place.
8. Check that the trailer tongue is securely attached and locked to the
hitch.
9. Install safety chains, lighting, and trailer brake controls as required
by law or the trailer manufacturer.
WARNING:Do not adjust a weight-distributing hitch to any
position where the rear bumper of the vehicle is higher than it
was before attaching the trailer. Doing so will defeat the function of the
weight-distributing hitch, which may cause unpredictable handling, and
could result in serious personal injury.
Safety Chains
Note:Never attach safety chains to the bumper.
Always connect the safety chains to the hook retainers of the vehicle
hitch.
To connect the safety chains, cross them under the trailer tongue and
allow enough slack for turning tight corners. Do not allow the chains to
drag on the ground.
56Towing
2013 Motorhome(mot)
Owners Guide gf, 1st Printing
USA(fus)
Page 58 of 157

Trailer Brakes
Electric brakes and manual, automatic or surge-type brakes are safe if
installed properly and adjusted to the manufacturer’s specifications. The
trailer brakes must meet local and Federal regulations.
WARNING:Do not connect a trailer’s hydraulic brake system
directly to your vehicle’s brake system. Your vehicle may not have
enough braking power and your chances of having a collision greatly
increase.
The towing vehicle braking system is rated for operation at the
GVWR, not the GCWR.
Separate functioning brake systems are required for safe control
of towed vehicles and trailers weighing more than 1,500 lb
(680 kg) when loaded.
Trailer Lamps
Trailer lamps are required on most towed vehicles. Make sure all running
lights, brake lights, turn signals and hazard lights are working. Contact
your authorized dealer or trailer rental agency for proper instructions
and equipment for hooking up the lamps.
Before Towing a Trailer
Practice turning, stopping and backing-up to get the feel of the
vehicle-trailer combination before starting on a trip. When turning, make
wider turns so the trailer wheels will clear curbs and other obstacles.
When Towing a Trailer
•Do not drive faster than 70 mph (113 km/h) during the first 500 miles
(800 kilometers).
•Do not make full-throttle starts.
•Check your hitch, electrical connections and trailer wheel lug nuts
thoroughly after you have traveled 50 miles (80 kilometers).
•When stopped in congested or heavy traffic during hot weather, place
gearshift in P (Park) to aid engine and transmission cooling and to
help A/C performance.
•Turn off the speed control with heavy loads or in hilly terrain. The
speed control may turn off automatically when you are towing on
long, steep grades.
Towing57
2013 Motorhome(mot)
Owners Guide gf, 1st Printing
USA(fus)
Page 59 of 157

•Shift to a lower gear when driving down a long or steep hill. Do not
apply the brakes continuously, as they may overheat and become less
effective.
•If your transmission is equipped with a Grade Assist or Tow/Haul
feature, use this feature when towing. This provides engine braking
and helps eliminate excessive transmission shifting for optimum fuel
economy and transmission cooling.
•Allow more distance for stopping with a trailer attached; anticipate
stops and brake gradually.
•Avoid parking on a grade. However, if you must park on a grade:
1. Turn the steering wheel to point the vehicle tires away from
traffic flow
2. Set the vehicle parking brake
3. Place the automatic transmission in P (Park) or manual
transmission in a high gear
4. Place wheel chocks under in front and back of the trailer wheels.
(Chocks not equipped with vehicle.)
Launching or Retrieving a Boat or Personal Water Craft (PWC)
Note:Disconnect the wiring to the trailerbeforebacking the trailer into
the water.
Note:Reconnect the wiring to the trailer after the trailer is removed
from the water.
When backing down a ramp during boat launching or retrieval:
1. Do not allow the static water level to rise above the bottom edge of
the rear bumper.
2. Do not allow waves to break higher than six inches (15 centimeters)
above the bottom edge of the rear bumper.
Exceeding these limits may allow water to enter vehicle components:
1. Causing internal damage to the components.
2. Affecting driveability, emissions, and reliability.
Replace the rear axle lubricant any time the rear axle has been
submerged in water. Water may have contaminated the rear axle
lubricant, which is not normally checked or changed unless a leak is
suspected or other axle repair is required.
58Towing
2013 Motorhome(mot)
Owners Guide gf, 1st Printing
USA(fus)
Page 60 of 157

WRECKER TOWING
If you need to have your vehicle towed, contact a professional towing
service or, if you are a member of a roadside assistance program, your
roadside assistance service provider. When calling for a tow truck, let the
operator know what kind of vehicle you have.
It is recommended that your vehicle be towed with a wheel lift (with the
rear wheels on the ground and front wheels off the ground) or flatbed
equipment. If the vehicle is towed by other means, or incorrectly, vehicle
damage may occur.
To avoid transmission damage when towing your vehicle from the front
with the rear wheels on the ground, do not exceed a maximum distance
of 50 miles (80 kilometers) and maximum speed of 35 mph (56 km/h). If
the maximum distance or speed is to be exceeded, the driveshaft must
be removed by a qualified technician or transmission damage will result.
TOWING THE VEHICLE ON FOUR WHEELS
Emergency Towing
In the event your vehicle becomes disabled (without access to wheel
dollies, car-hauling trailer, or flatbed transport vehicle), it can be
flat-towed (all wheels on the ground, regardless of the
powertrain/transmission configuration) under the following conditions:
•The vehicle is facing forward so that it is towed in a forward direction.
•The transmission is placed in N (Neutral). Refer toAutomatic
transmissionin theTransmissionchapter if you cannot move the
transmission into N (Neutral).
•Maximum speed is 35 mph (56 km/h).
•Maximum distance is 50 miles (80 kilometers).
Towing59
2013 Motorhome(mot)
Owners Guide gf, 1st Printing
USA(fus)
Page 61 of 157
. During this time, your vehicle may exhibit some unique
driving characteristics. Avoid driving too fast during t")
BREAKING-IN
You need to break in new tires for approximately 300 miles
(480 kilometers). During this time, your vehicle may exhibit some unique
driving characteristics. Avoid driving too fast during the first 1000 miles
(1600 kilometers). Vary your speed frequently and change up through
the gears early. Do not labor the engine. Do not tow during the first
1000 miles (1600 kilometers).
ECONOMICAL DRIVING
Fuel economy is affected by several things such as how you drive, the
conditions you drive under and how you maintain your vehicle.
There are some things to keep in mind that may improve your fuel
economy:
•Accelerate and slow down in a smooth, moderate fashion.
•Drive at steady speeds without stopping.
•Anticipate stops; slowing down may eliminate the need to stop.
•Combine errands and minimize stop-and-go driving.
•Close the windows for high-speed driving.
•Drive at reasonable speeds (traveling at 55 mph [88 km/h] uses 15%
less fuel than traveling at 65 mph [105 km/h]).
•Keep the tires properly inflated and use only the recommended size.
•Use the recommended engine oil.
•Perform all regularly scheduled maintenance.
There are also some things you may not want to do because they may
reduce your fuel economy:
•Sudden or hard accelerations.
•Rev the engine before turning it off.
•Idle for periods longer than one minute.
•Warm up your vehicle on cold mornings.
•Use the air conditioner or front defroster.
•Use the speed control in hilly terrain.
•Rest your foot on the brake pedal while driving.
•Drive a heavily loaded vehicle or tow a trailer.
60Driving Hints
2013 Motorhome(mot)
Owners Guide gf, 1st Printing
USA(fus)
Page 62 of 157
![FORD F SERIES MOTORHOME AND COMMERCIAL CHASSIS 2013 12.G Owners Manual •Carry unnecessary weight (approximately 1 mpg [0.4 km/L] is lost for
every 400 lb [180 kg] of weight carried).
•Add particular accessories to your vehicle (e.g. bug deflectors,
rollbars/light bar](/manual-img/11/5009/w960_5009-61.png "FORD F SERIES MOTORHOME AND COMMERCIAL CHASSIS 2013 12.G Owners Manual •Carry unnecessary weight (approximately 1 mpg [0.4 km/L] is lost for
every 400 lb [180 kg] of weight carried).
•Add particular accessories to your vehicle (e.g. bug deflectors,
rollbars/light bar")
•Carry unnecessary weight (approximately 1 mpg [0.4 km/L] is lost for
every 400 lb [180 kg] of weight carried).
•Add particular accessories to your vehicle (e.g. bug deflectors,
rollbars/light bars, running boards, ski racks).
•Drive with the wheels out of alignment.
DRIVING THROUGH WATER
If driving through deep or standing
water is unavoidable, proceed very
slowly. Never drive through water
that is higher than the bottom of
the wheel rims (for cars) or the
bottom of the hubs (for trucks).
When driving through water, traction or brake capability may be limited.
Also, water may enter your engine’s air intake and severely damage your
engine or your vehicle may stall.
Note:Driving through deep water where the transmission vent tube is
submerged may allow water into the transmission and cause internal
transmission damage.
Note:Once through the water, always dry the brakes by moving your
vehicle slowly while applying light pressure on the brake pedal. Wet
brakes do not stop the vehicle as quickly as dry brakes.
Driving Hints61
2013 Motorhome(mot)
Owners Guide gf, 1st Printing
USA(fus)
Page 63 of 157

ROADSIDE ASSISTANCE
Vehicles sold in the U.S. : Getting roadside assistance
To fully assist you should you have a vehicle concern, Ford Motor
Company offers a complimentary roadside assistance program. This
program is separate from the New Vehicle Limited Warranty. The service
is available:
•24–hours, seven days a week
•for the coverage period listed on the Roadside Assistance Card
included in your Owner Guide portfolio.
Roadside assistance will cover:
•a flat tire change with a good spare, if provided with the vehicle
(except vehicles that have been supplied with a tire inflation kit)
•battery jump start
•lock-out assistance (key replacement cost is the customer’s
responsibility)
•fuel delivery – Independent Service Contractors, if not prohibited by
state, local or municipal law shall deliver 5 gallons (18.9L) of fuel to a
disabled vehicle. Fuel delivery service is limited to two no-charge
occurrences within a 12-month period.
•towing – Ford and Lincoln eligible vehicle towed to an authorized
dealer within 35 miles (56.3 km) of the disablement location or to the
nearest authorized dealer. If a member requests to be towed to an
authorized dealer more than 35 miles (56.3 km) from the disablement
location, the member shall be responsible for any mileage costs in
excess of 35 miles (56.3 km).
Trailers shall be covered up to $200 if the disabled eligible vehicle
requires service at the nearest authorized dealer. If the trailer is disabled,
but the towing vehicle is operational, the trailer does not qualify for any
roadside services.
62Roadside Emergencies
2013 Motorhome(mot)
Owners Guide gf, 1st Printing
USA(fus)
Page 64 of 157

Vehicles sold in the U.S. : Using roadside assistance
Customers who require roadside assistance, may contact 1-800-444-3311.
Vehicles sold in Canada : Getting roadside assistance
Canadian customers who require roadside assistance, call
1–800–665–2006.
Vehicles sold in Canada : Using roadside assistance
Complete the roadside assistance identification card and place it in your
wallet for quick reference. In Canada, the card is found in the Warranty
Guide in the glove box.
Canadian Roadside coverage and benefits may differ from the U.S.
coverage. Please refer to your Warranty Guide or visit our website at
www.ford.ca for information on Canadian services and benefits.
Canadian customers who need to obtain roadside information, call
1-800-665-2006 or visit our website at www.ford.ca.
Hazard Flasher Control
Note:With extended use, the flasher may run down your battery.
The hazard flasher is located on the
steering column, just behind the
steering wheel. The hazard flashers
will operate when the ignition is in
any position or if the key is not in
the ignition.
•Press the flasher control and all
front and rear direction signals
will flash.
•Press the flasher control again to turn them off.
Use it when your vehicle is disabled and is creating a safety hazard for
other motorists.
Roadside Emergencies63
2013 Motorhome(mot)
Owners Guide gf, 1st Printing
USA(fus)
 1
1 2
2 3
3 4
4 5
5 6
6 7
7 8
8 9
9 10
10 11
11 12
12 13
13 14
14 15
15 16
16 17
17 18
18 19
19 20
20 21
21 22
22 23
23 24
24 25
25 26
26 27
27 28
28 29
29 30
30 31
31 32
32 33
33 34
34 35
35 36
36 37
37 38
38 39
39 40
40 41
41 42
42 43
43 44
44 45
45 46
46 47
47 48
48 49
49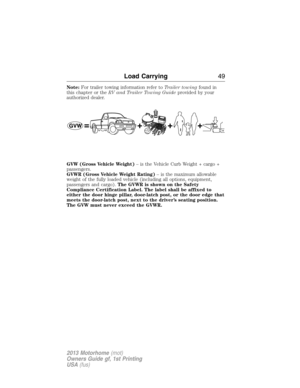 50
50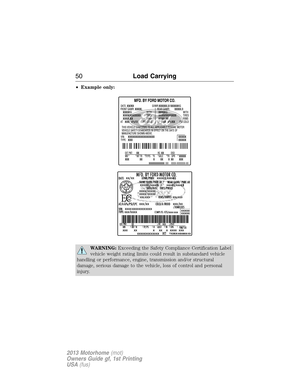 51
51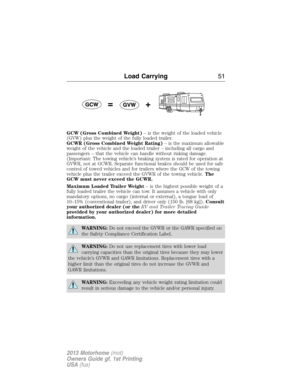 52
52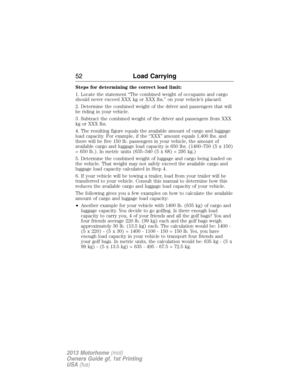 53
53 54
54 55
55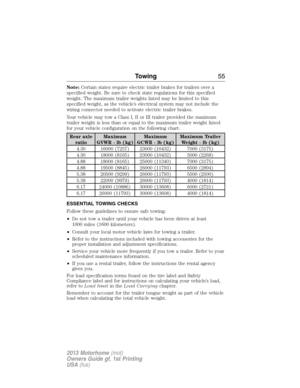 56
56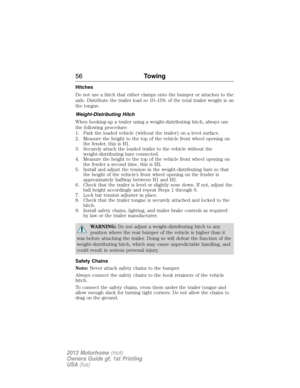 57
57 58
58 59
59 60
60 61
61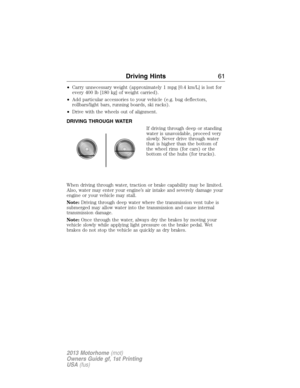 62
62 63
63 64
64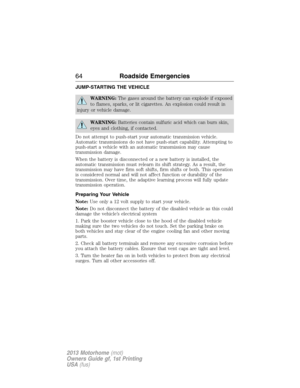 65
65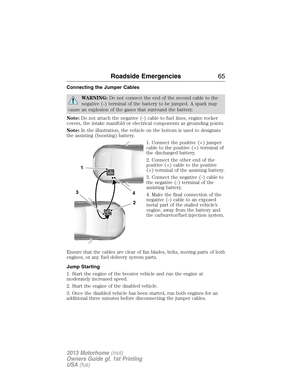 66
66 67
67 68
68 69
69 70
70 71
71 72
72 73
73 74
74 75
75 76
76 77
77 78
78 79
79 80
80 81
81 82
82 83
83 84
84 85
85 86
86 87
87 88
88 89
89 90
90 91
91 92
92 93
93 94
94 95
95 96
96 97
97 98
98 99
99 100
100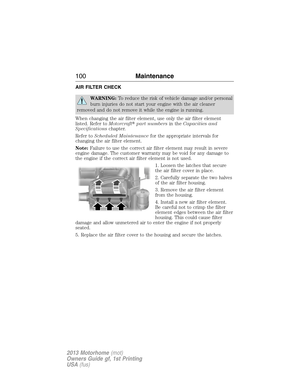 101
101 102
102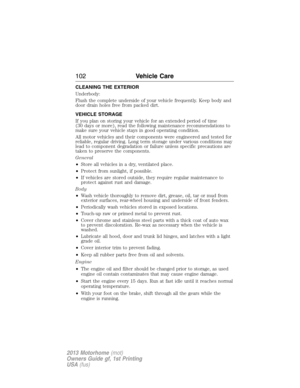 103
103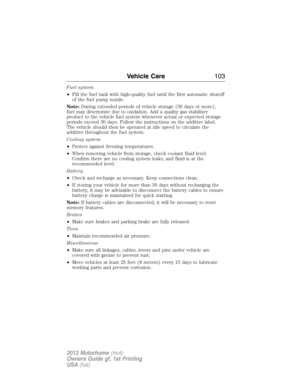 104
104 105
105 106
106 107
107 108
108 109
109 110
110 111
111 112
112 113
113 114
114 115
115 116
116 117
117 118
118 119
119 120
120 121
121 122
122 123
123 124
124 125
125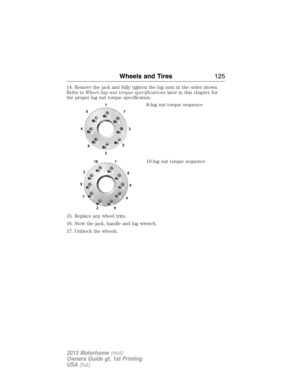 126
126 127
127 128
128 129
129 130
130 131
131 132
132 133
133 134
134 135
135 136
136 137
137 138
138 139
139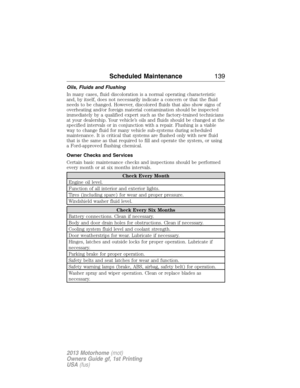 140
140 141
141 142
142 143
143 144
144 145
145 146
146 147
147 148
148 149
149 150
150 151
151 152
152 153
153 154
154 155
155 156
156