2013 FORD ESCAPE wheel
[x] Cancel search: wheelPage 262 of 423

Tire Change Procedure
WARNINGS
When one of the front wheels is off
the ground, the transmission alone
will not prevent the vehicle from
moving or slipping off the jack, even if the
vehicle is in position P.
To help prevent the vehicle from
moving when you change a tire, be
sure the parking brake is set, then
block (in both directions) the wheel that
is diagonally opposite (other side and end
of the vehicle) to the tire being changed.
If the vehicle slips off the jack, you or
someone else could be seriously
injured.
Do not attempt to change a tire on
the side of the vehicle close to
moving traffic. Pull far enough off the
road to avoid the danger of being hit when
operating the jack or changing the wheel.
To lessen the risk of personal injury,
do not put any part of your body
under the vehicle while changing a
tire. Do not start the engine when your
vehicle is on the jack. The jack is only
meant for changing the tire.
Note: Passengers should not remain in the
vehicle when the vehicle is being jacked.
1. Park on a level surface, set the parking
brake and activate the hazard flashers.
2. Place the gearshift lever in position P and turn the engine off.
3. Remove the carpeted wheel cover.
4. Remove the lug wrench and jack from the foam holder. Then, remove the flat
tire retainer strap from the jack base.
5. Block the diagonally opposite wheel.
6. Loosen each wheel lug nut one-halfturn counterclockwise but do not
remove them until the wheel is raised
off the ground.
7. The vehicle jacking points are shown here, and are depicted on the yellow
warning label on the jack. Jack at the
specified locations to avoid
damage to the vehicle.
262
Wheels and Tires
E142550
E142551
Page 263 of 423

8.Small arrow-shaped marks on the sills
show the location of the jacking points.
9. Remove the lug nuts with the lug
wrench.
Note: If equipped with full wheel covers
with exposed wheel nuts, the wheel nuts
must be removed prior to removing the
wheel cover or damage to the wheel cover
may occur.
10. Replace the flat tire with the spare tire, making sure the valve stem is
facing outward. Reinstall the lug nuts
until the wheel is snug against the
hub. Do not fully tighten the lug nuts
until the wheel has been lowered. 11. Lower the wheel by turning the jack
handle counterclockwise.
12.Remove the jack and fully tighten the
lug nuts in the order shown. See
Technical Specifications (page
265).
Stowing the flat tire
1. Put the jack and lug wrench away. Make sure the jack is fastened so it
does not rattle when you drive.
2. Unblock the wheels.
263
Wheels and Tires
E142552
E142553
12
3
4
5
E75442
Page 264 of 423

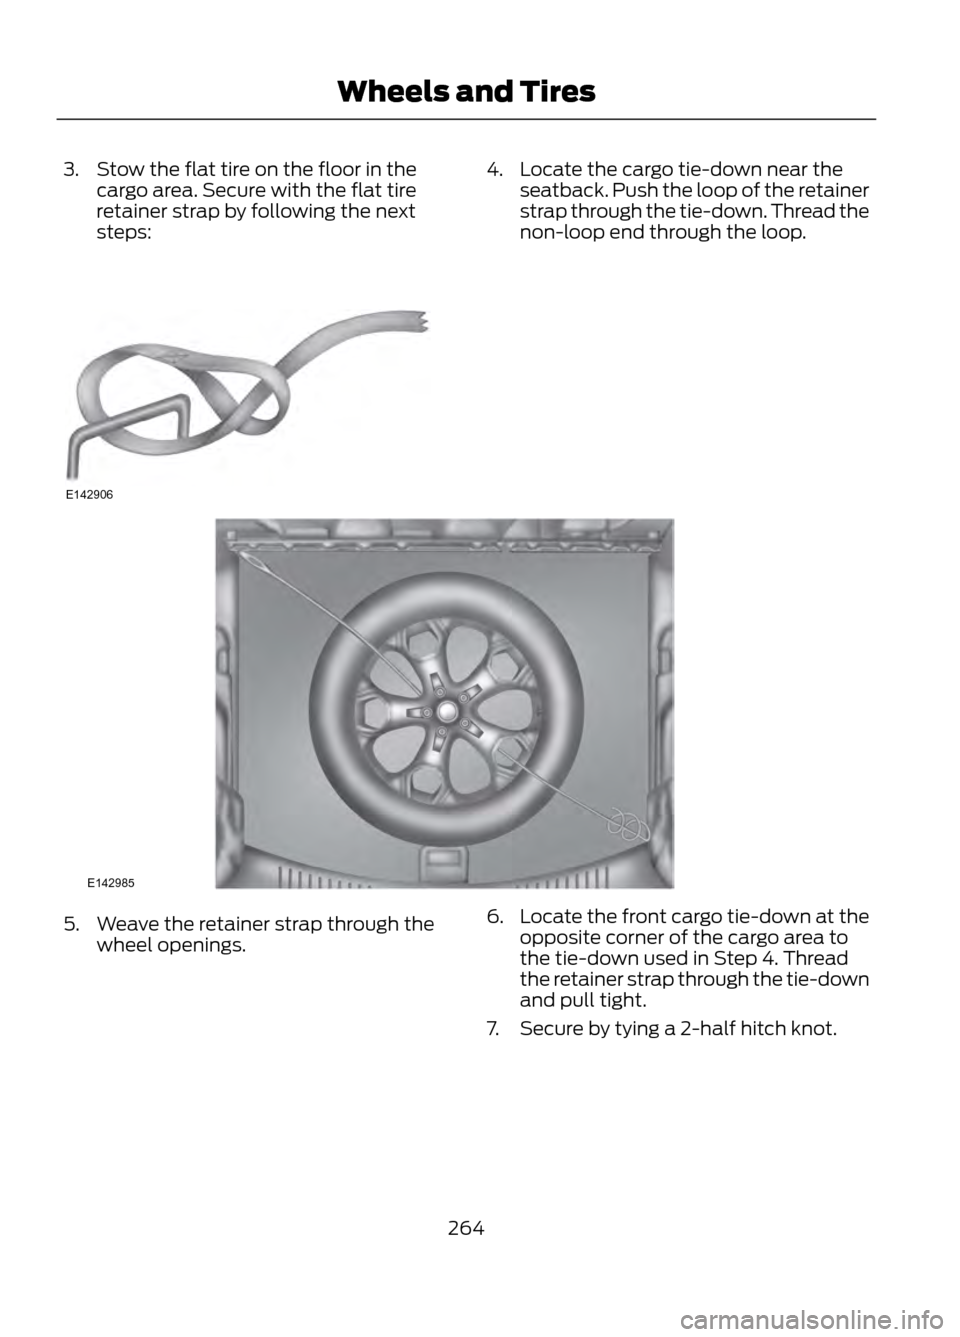
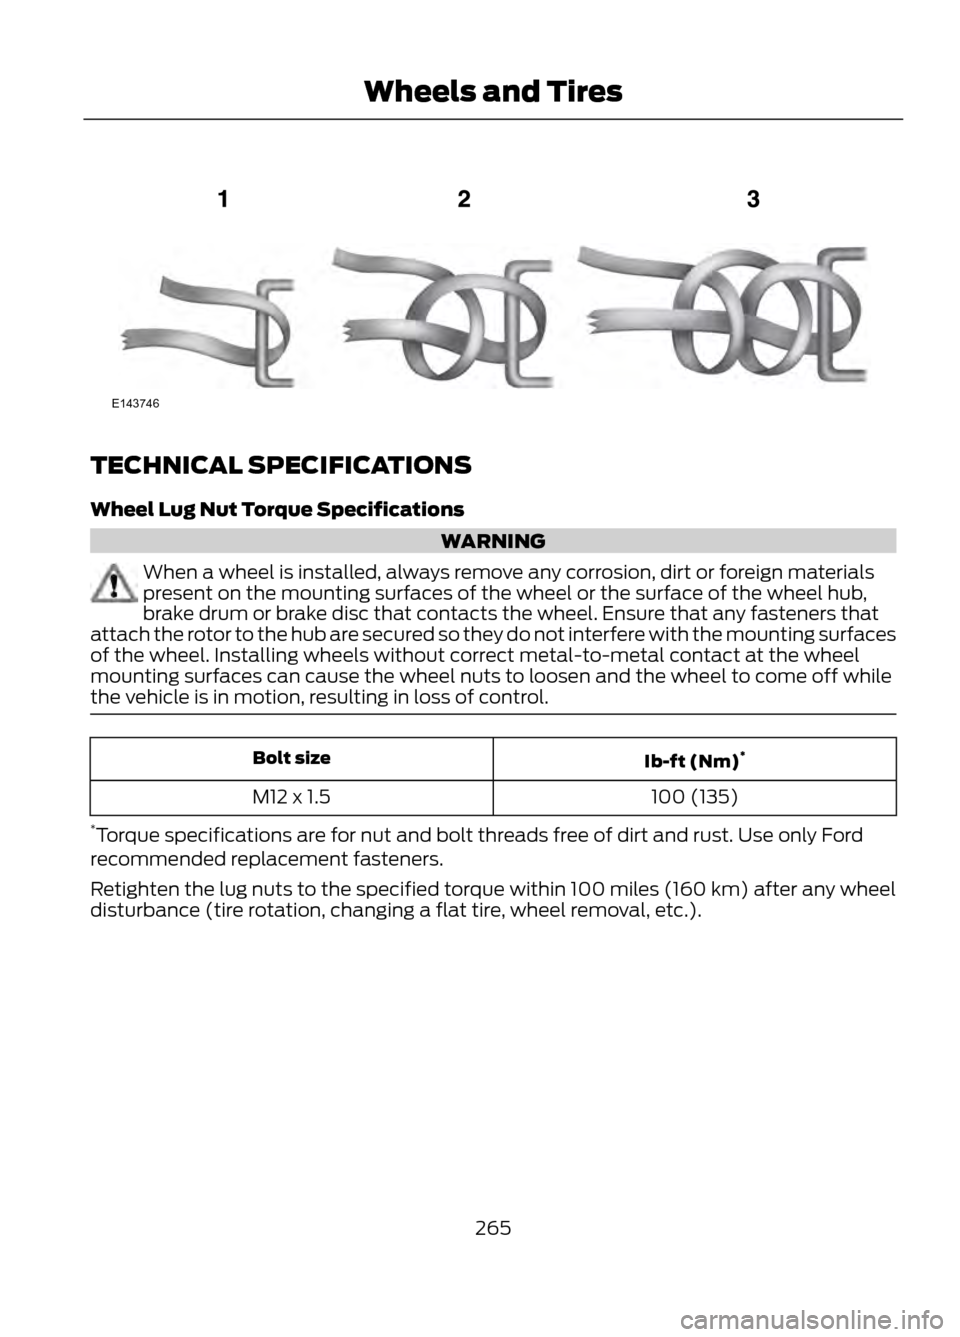
3. Stow the flat tire on the floor in thecargo area. Secure with the flat tire
retainer strap by following the next
steps:4. Locate the cargo tie-down near theseatback. Push the loop of the retainer
strap through the tie-down. Thread the
non-loop end through the loop.
5. Weave the retainer strap through thewheel openings. 6.
Locate the front cargo tie-down at the
opposite corner of the cargo area to
the tie-down used in Step 4. Thread
the retainer strap through the tie-down
and pull tight.
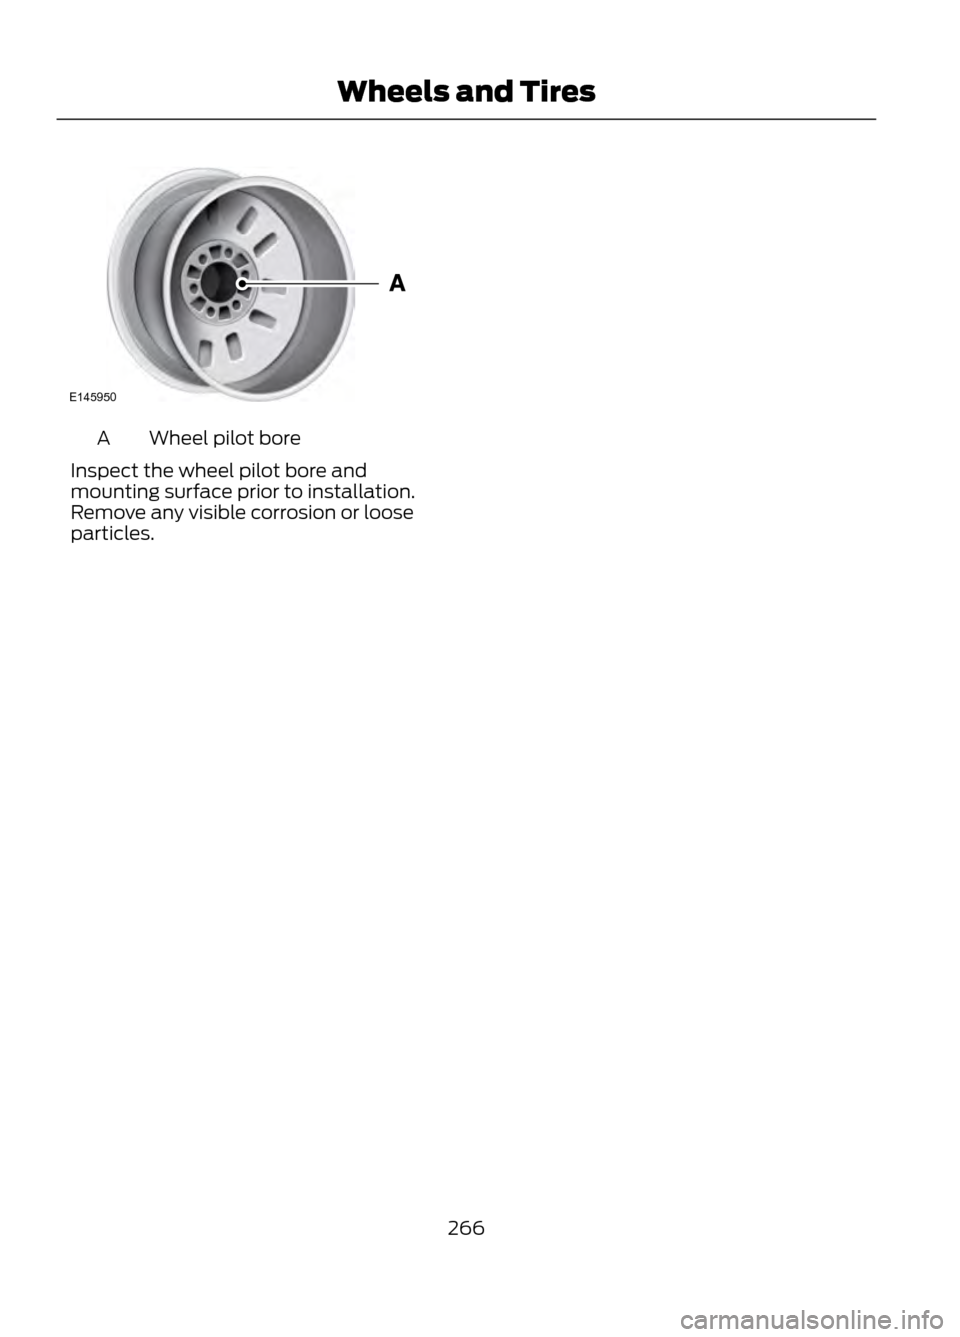
7. Secure by tying a 2-half hitch knot.
264
Wheels and Tires
E142906
E142985
Page 265 of 423

TECHNICAL SPECIFICATIONS
Wheel Lug Nut Torque Specifications
WARNING
When a wheel is installed, always remove any corrosion, dirt or foreign materials
present on the mounting surfaces of the wheel or the surface of the wheel hub,
brake drum or brake disc that contacts the wheel. Ensure that any fasteners that
attach the rotor to the hub are secured so they do not interfere with the mounting surfaces
of the wheel. Installing wheels without correct metal-to-metal contact at the wheel
mounting surfaces can cause the wheel nuts to loosen and the wheel to come off while
the vehicle is in motion, resulting in loss of control.
Ib-ft (Nm) *
Bolt size
100 (135)
M12 x 1.5
* Torque specifications are for nut and bolt threads free of dirt and rust. Use only Ford
recommended replacement fasteners.
Retighten the lug nuts to the specified torque within 100 miles (160 km) after any wheel
disturbance (tire rotation, changing a flat tire, wheel removal, etc.).
265
Wheels and Tires
E143746
Page 266 of 423

Wheel pilot bore
A
Inspect the wheel pilot bore and
mounting surface prior to installation.
Remove any visible corrosion or loose
particles.
266
Wheels and Tires
E145950
Page 274 of 423

For a complete listing of the accessories
that are available for your vehicle, please
contact your dealer or visit our online store
at: Accessories.Ford.com (U.S. only).
Ford Custom Accessories are available for
your vehicle through your local Ford or Ford
of Canada dealer. Ford Motor Company
will repair or replace any properly
dealer-installed Ford Custom Accessories
found to be defective in factory-supplied
materials or workmanship during the
warranty period, as well as any component
damaged by the defective accessories. The
accessories will be warranted for
whichever provides you the greatest
benefit:
•12 months or 12,000 miles (20,000
km) (whichever occurs first), or
• the remainder of your new vehicle
limited warranty.
Contact your dealer for details and a copy
of the warranty.
Exterior style
• Asterisk hood deflectors
• Side window deflectors
• Splash guards
• Custom graphics*
Interior style
• Floor mats
Lifestyle
• Ash cup / smoker's packages
• Soft cargo organizers
• Cargo net*
• Roof racks and carriers*
Peace of mind
• Keyless entry keypad
• Remote start •
Vehicle security systems
• Wheel locks
• Bumper mounted parking assist
system*
*Ford Licensed Accessories (FLA) are
warranted by the accessory
manufacturer's warranty. Ford Licensed
Accessories are fully designed and
developed by the accessory manufacturer
and have not been designed or tested to
Ford Motor Company engineering
requirements. Contact your Ford dealer for
details regarding the manufacturer's
limited warranty and a copy of the FLA
product limited warranty offered by the
accessory manufacturer.
For maximum vehicle performance, keep
the following information in mind when
adding accessories or equipment to your
vehicle:
• When adding accessories, equipment,
passengers and luggage to your
vehicle, do not exceed the total weight
capacity of the vehicle or of the front
or rear axle (GVWR or GAWR as
indicated on the Safety Compliance
Certification label). Consult your
authorized dealer for specific weight
information.
• The Federal Communications
Commission (FCC) and Canadian
Radio Telecommunications
Commission (CRTC) regulate the use
of mobile communications systems —
such as two-way radios, telephones
and theft alarms - that are equipped
with radio transmitters. Any such
equipment installed in your vehicle
should comply with FCC or CRTC
regulations and should be installed
only by a qualified service technician.
• Mobile communications systems may
harm the operation of your vehicle,
particularly if they are not properly
designed for automotive use.
274
Accessories
Page 281 of 423

System data cannot be accessed without
special equipment and access to the
vehicle's SYNC module. Ford Motor
Company and Ford of Canada will not
access the system data for any purpose
other than as described absent consent, a
court order, or where required by law
enforcement, other government
authorities, or other third parties acting
with lawful authority. Other parties may
seek to access the information
independently of Ford Motor Company and
Ford of Canada. For further privacy
information, see the sections on 911 Assist
(if equipped), Vehicle Health Report (if
equipped), and Traffic, Directions and
Information (if equipped).
USING VOICE RECOGNITION
This system helps you control many
features using voice commands. This
allows you to keep your hands on the
wheel and focus on what is in front of you.Helpful Hints
Make sure the interior of the vehicle is as
quiet as possible. Wind noise from open
windows and road vibrations may prevent
the system from correctly recognizing
spoken commands.
After pressing the voice icon, wait until
after the tone sounds and "Listening"
appears before saying a command. Any
command spoken prior to this does not
register with the system.
Speak naturally, without long pauses
between words.
At any time you can interrupt the system
while it is speaking by pressing the voice
icon.
Initiating a Voice Session
Push the voice icon; a tone
sounds and "Listening" appears
in the display. Say any of the
following:
If You Want To
Say
Stream audio from your phone.
"Bluetooth audio"
Cancel the requested action.
"Cancel"
Access the device connected to the auxiliary input jack.
"Line in"
Access mobile applications.
"Mobile apps" *
Make calls.
"Phone"
Access the SYNC Services portal.
"Services" *
Return to the main menu.
"SYNC"
Access the device connected to your USB port.
"USB"
Run a vehicle health report.
"Vehicle health report" *
281
SYNC®
E142599
Page 296 of 423

See Supplementary Restraints System
(page 35). Important information
regarding airbag deployment is in this
chapter.
See Roadside Emergencies (page 197).
Important information regarding the fuel
pump shut-off is in this chapter.
Setting 911 Assist On
1. Press the phone button to enter thePhone menu.
2. Scroll until 911 Assist is selected.
3. Press OK to confirm and enter the 911 Assist menu.
4. Scroll to choose between the On and Off selections.
5. Press OK when the desired option appears in the radio display. Set On or
Set Off appears in the display as
confirmation.
Off selections include: Off with reminder
and Off without reminder. Off with
reminder provides a display and voice
reminder at phone connection at vehicle
start. Off without reminder provides a
display reminder only without a voice
reminder at phone connection.
To make sure that 911 Assist works
properly:
• SYNC must be powered and working
properly at the time of the incident and
throughout feature activation and use.
• The 911 Assist feature must be set on
prior to the incident.
• A Bluetooth-enabled and compatible
phone has to be paired and connected
to SYNC.
• A connected Bluetooth-enabled phone
must have the ability to make and
maintain an outgoing call at the time
of the incident. •
A connected Bluetooth-enabled phone
must have adequate network coverage,
battery power and signal strength.
• The vehicle must have battery power
and be located in the U.S., Canada or
in a territory in which 911 is the
emergency number.
In the Event of a Crash
Not all crashes deploy an airbag or activate
the fuel pump shut-off (which would
activate 911 Assist); however, if 911 Assist
is triggered, SYNC tries to contact
emergency services. If a connected phone
is damaged or loses connection to SYNC,
SYNC searches for, and tries to connect
to, any available previously paired phone
and tries to make the call to 911.
Before making the call:
• SYNC provides a short window of time
(about 10 seconds) to cancel the call.
Failure to cancel the call results in
SYNC attempting to dial 911.
• SYNC says the following, or a similar
message: "SYNC will attempt to call
911, to cancel the call, press Cancel on
your screen or press and hold the
phone button on your steering wheel."
If the call is not cancelled and a successful
call is made, a pre-recorded message is
played for the 911 operator, then the
occupant(s) in the vehicle is able to talk
with the operator. Be prepared to provide
your name, phone number and location
immediately, because not all 911 systems
are capable of receiving this information
electronically.
296
SYNC®