2013 FORD ESCAPE manual transmission
[x] Cancel search: manual transmissionPage 58 of 423

Three warning chimes will sound once as
the liftgate begins to power close. Five
short chimes indicate a problem with the
open or close request, caused by:
•the ignition is on and the transmission
is not in P (Park);
• or the battery voltage is below the
minimum operating voltage;
• or the vehicle speed is at or above 3
mph (5 km/h).
If the liftgate falls to the closed direction
after the liftgate has stopped in the open
position, four short warning chimes
indicate excessive weight on the gate or a
possible gas strut failure. See your
authorized dealer if you still have the issue
after the load is removed.
Opening and Closing the Liftgate
WARNING
Make sure all persons are clear of the
power liftgate area before using the
power liftgate control.
Note: Be careful when opening or closing
the liftgate in a garage or other enclosed
area to avoid damaging the liftgate.
Note: Do not leave the liftgate open while
driving. This could damage the liftgate and
its components.
To open or close from the
instrument panel: Press the
instrument panel button.
To open or close with the
remote control: Press the
remote control button twice
within three seconds.
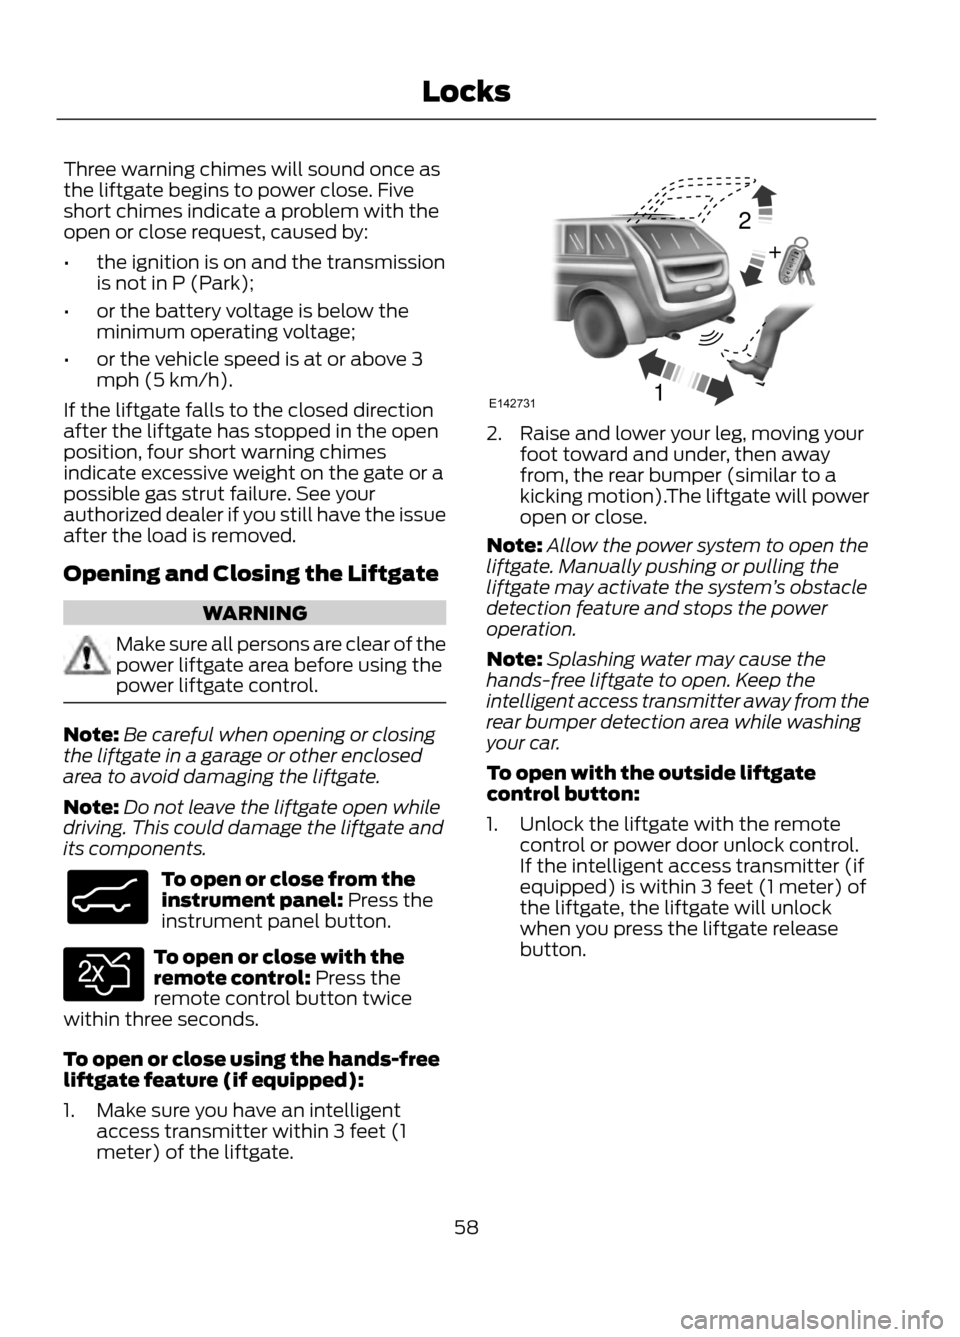
To open or close using the hands-free
liftgate feature (if equipped):
1. Make sure you have an intelligent access transmitter within 3 feet (1
meter) of the liftgate.
2. Raise and lower your leg, moving yourfoot toward and under, then away
from, the rear bumper (similar to a
kicking motion).The liftgate will power
open or close.
Note: Allow the power system to open the
liftgate. Manually pushing or pulling the
liftgate may activate the system ’s obstacle
detection feature and stops the power
operation.
Note: Splashing water may cause the
hands-free liftgate to open. Keep the
intelligent access transmitter away from the
rear bumper detection area while washing
your car.
To open with the outside liftgate
control button:
1. Unlock the liftgate with the remote control or power door unlock control.
If the intelligent access transmitter (if
equipped) is within 3 feet (1 meter) of
the liftgate, the liftgate will unlock
when you press the liftgate release
button.
58
Locks
E138633
E138630
12
+E142731
Page 118 of 423

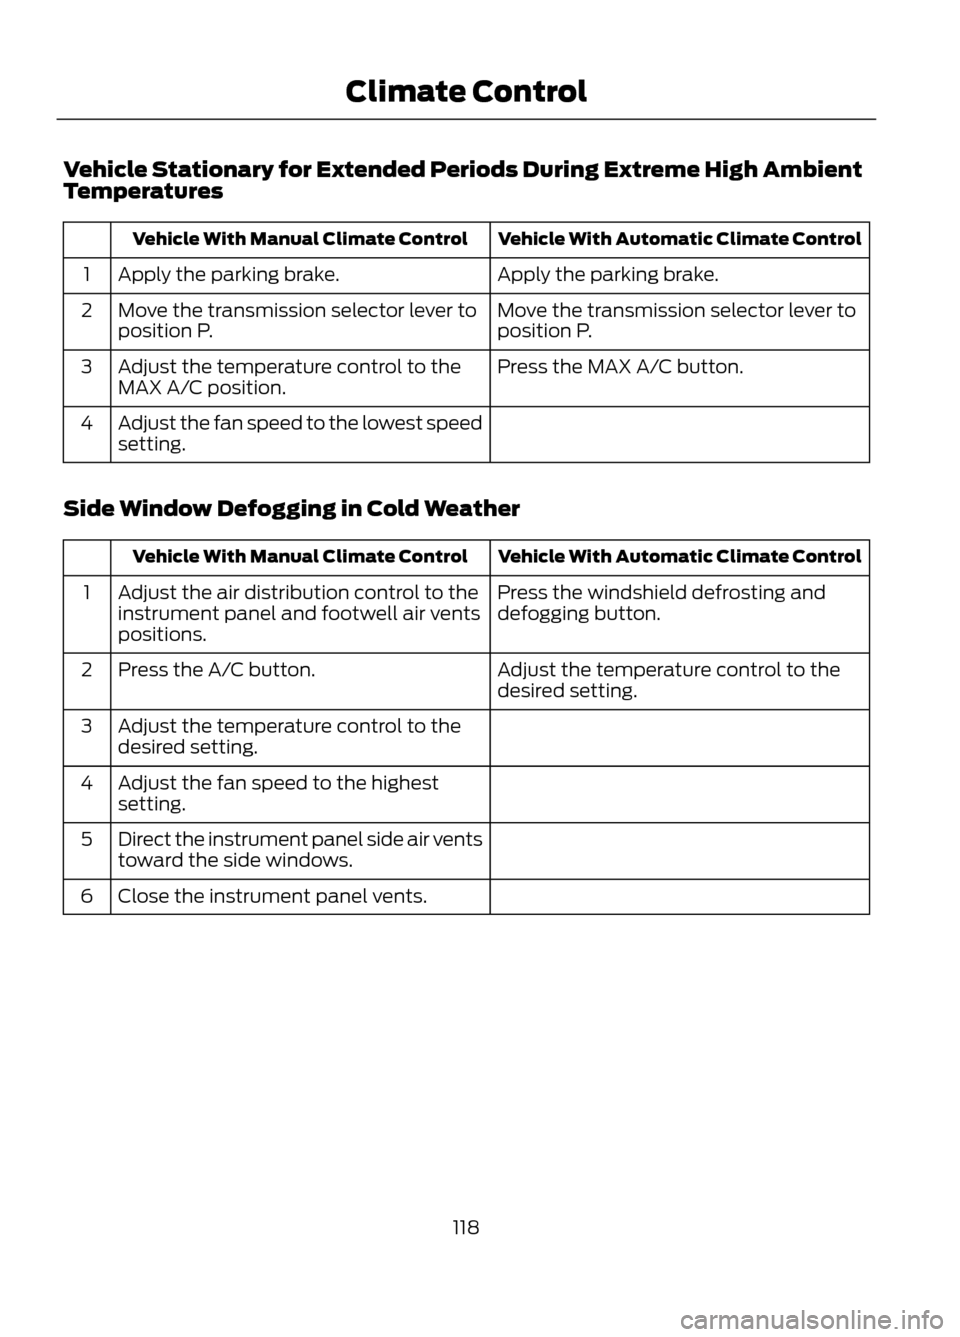
Vehicle Stationary for Extended Periods During Extreme High Ambient
Temperatures
Vehicle With Automatic Climate Control
Vehicle With Manual Climate Control
Apply the parking brake.
Apply the parking brake.
1
Move the transmission selector lever to
position P.
Move the transmission selector lever to
position P.
2
Press the MAX A/C button.
Adjust the temperature control to the
MAX A/C position.
3
Adjust the fan speed to the lowest speed
setting.
4
Side Window Defogging in Cold Weather
Vehicle With Automatic Climate Control
Vehicle With Manual Climate Control
Press the windshield defrosting and
defogging button.
Adjust the air distribution control to the
instrument panel and footwell air vents
positions.
1
Adjust the temperature control to the
desired setting.
Press the A/C button.
2
Adjust the temperature control to the
desired setting.
3
Adjust the fan speed to the highest
setting.
4
Direct the instrument panel side air vents
toward the side windows.
5
Close the instrument panel vents.
6
118
Climate Control
Page 148 of 423

SelectShift Automatic®
Transmission (If Equipped)
Your SelectShift automatic transmission
gives you the ability to manually change
gears if you'd like. To use SelectShift, move
the gearshift lever into S (Sport). Now you
can use the +/- buttons on the side of your
gearshift lever to select gears.
When using the toggle for manual shifting:
•Press the (+) button to upshift.
• Press the (-) button to downshift.
Note: After you have assumed manual
control with SelectShift your vehicle will
remain in this mode until you return the
gearshift lever from (S) Sport, back to (D)
Drive.
Upshift to the recommended shift speeds
according to the following chart:
Upshifts when accelerating (recom- mended for best fuel economy)
Shift from:15 mph (24 km/h)
1 - 2
25 mph (40 km/h)
2 - 3
40 mph (64 km/h)
3 - 4
45 mph (72 km/h)
4 - 5
50 mph (80 km/h)
5 - 6
The instrument cluster will display the
selected gear that you are currently in.
SelectShift will automatically make some
shifts for you in the event that your engine
speed is running at too high, or to low an
RPM.
Note: Engine damage may occur if
excessive engine revving is held without
shifting. Brake-Shift Interlock
WARNINGS
Do not drive your vehicle until you
verify that the brake lamps are
working.
When doing this procedure, you will
be taking the vehicle out of park
which means the vehicle can roll
freely. To avoid unwanted vehicle
movement, always fully set the parking
brake prior to doing this procedure. Use
wheel chocks if appropriate.
If the parking brake is fully released,
but the brake warning lamp remains
illuminated, the brakes may not be
working properly. See your authorized
dealer.
Use the brake shift interlock lever to move
the gearshift lever from the park position
in the event of an electrical malfunction or
if your vehicle has a dead battery.
Apply the parking brake and turn the
ignition off before performing this
procedure.
1. Insert a screwdriver (or similar tool) between the shifter bezel and the top
finish panel.
2. Use the tool to unsnap the shifter bezel
from the finish panel.
148
Transmission
E142627
Page 154 of 423

After driving through mud, clean off residue
stuck to rotating driveshafts and tires.
Excess mud stuck on tires and rotating
driveshafts causes an imbalance that
could damage drive components.
Note:Driving through deep water may
damage the transmission. If the front or rear
axle is submerged in water, the axle
lubricant and power transfer unit lubricant
should be checked and changed if
necessary.
“Tread Lightly ” is an educational program
designed to increase public awareness of
land-use regulations and responsibilities
in our nations wilderness areas. Ford Motor
Company joins the U.S. Forest Service and
the Bureau of Land Management in
encouraging you to help preserve our
national forest and other public and private
lands by “treading lightly ”.
Driving on hilly or sloping terrain
Although natural obstacles may make it
necessary to travel diagonally up or down
a hill or steep incline, you should always
try to drive straight up or straight down.
Note: Note: Avoid driving crosswise or
turning on steep slopes or hills. A danger lies
in losing traction, slipping sideways and
possibly rolling over. Whenever driving on a
hill, determine beforehand the route you will
use. Do not drive over the crest of a hill
without seeing what conditions are on the
other side. Do not drive in reverse over a hill
without the aid of an observer.
When climbing a steep slope or hill, start
in a lower gear rather than downshifting to
a lower gear from a higher gear once the
ascent has started. This reduces strain on
the engine and the possibility of stalling. If you do stall out, do not try to turnaround
because you might roll over. It is better to
back down to a safe location.
Apply just enough power to the wheels to
climb the hill. Too much power will cause
the tires to slip, spin or lose traction,
resulting in loss of vehicle control.
Descend a hill in the same gear you would
use to climb up the hill to avoid excessive
brake application and brake overheating.
Do not descend in neutral; instead,
disengage overdrive or manually shift to a
lower gear. When descending a steep hill,
avoid sudden hard braking as you could
lose control. The front wheels have to be
turning in order to steer the vehicle.
Your vehicle has anti-lock brakes, therefore
apply the brakes steadily. Do not
“pump”
the brakes.
Driving on snow and ice
WARNING
If you are driving in slippery
conditions that require tire chains or
cables, then it is critical that you drive
cautiously. Keep speeds down, allow for
longer stopping distances and avoid
aggressive steering to reduce the chances
of a loss of vehicle control which can lead
to serious injury or death. If the rear end of
the vehicle slides while cornering, steer in
the direction of the slide until you regain
control of the vehicle.
154
Four-Wheel Drive (If Equipped)
E143950
E143949
Page 165 of 423

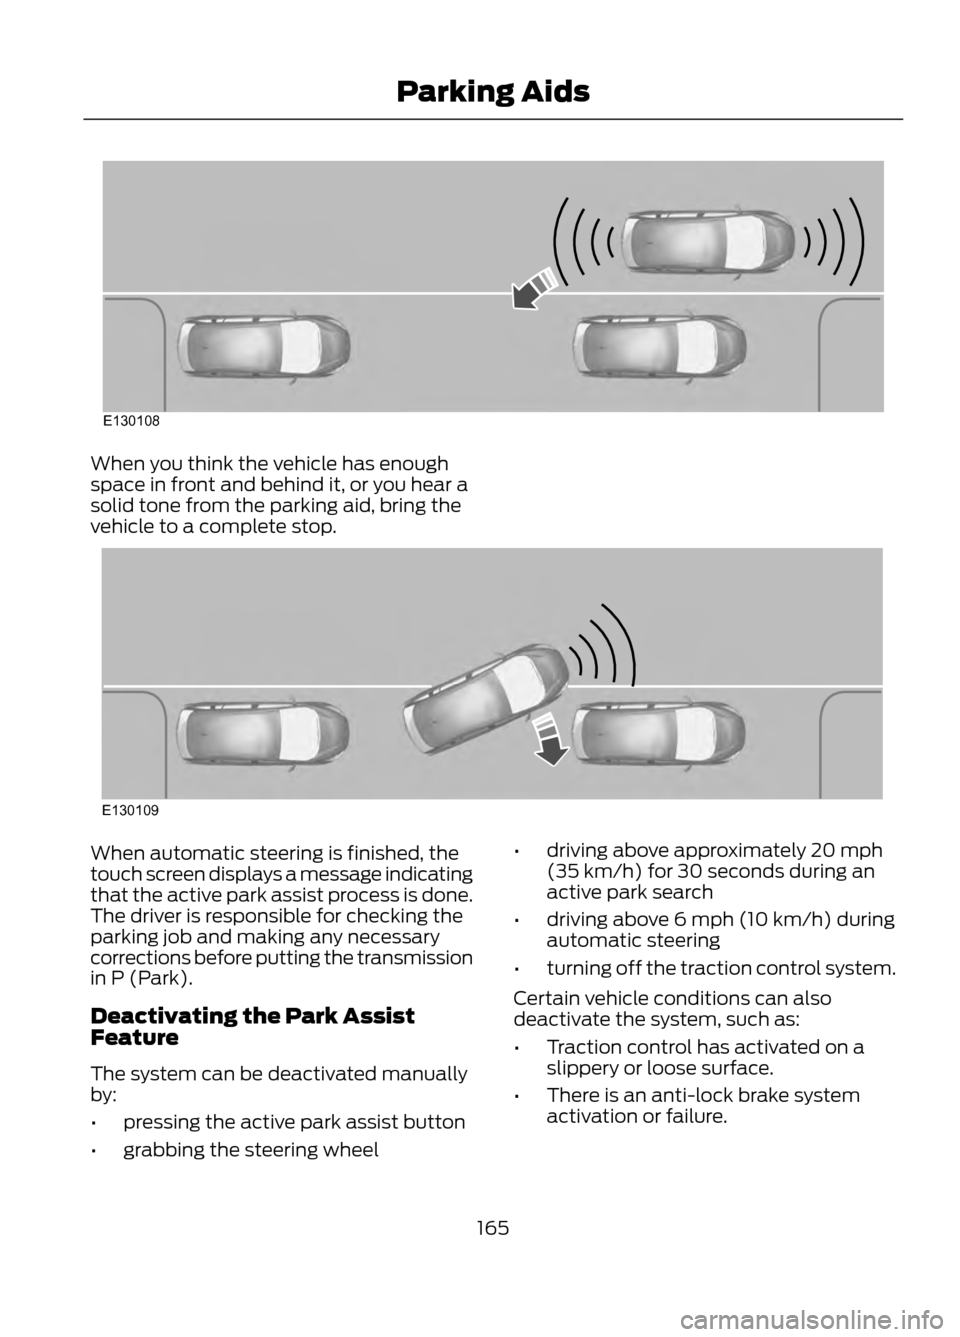
When you think the vehicle has enough
space in front and behind it, or you hear a
solid tone from the parking aid, bring the
vehicle to a complete stop.
When automatic steering is finished, the
touch screen displays a message indicating
that the active park assist process is done.
The driver is responsible for checking the
parking job and making any necessary
corrections before putting the transmission
in P (Park).
Deactivating the Park Assist
Feature
The system can be deactivated manually
by:
•pressing the active park assist button
• grabbing the steering wheel •
driving above approximately 20 mph
(35 km/h) for 30 seconds during an
active park search
• driving above 6 mph (10 km/h) during
automatic steering
• turning off the traction control system.
Certain vehicle conditions can also
deactivate the system, such as:
• Traction control has activated on a
slippery or loose surface.
• There is an anti-lock brake system
activation or failure.
165
Parking Aids
E130108
E130109
Page 169 of 423

Active guidelines are only shown with fixed
guidelines. To use active guidelines, turn
the steering wheel to point the guidelines
toward an intended path. If the steering
wheel position is changed while reversing,
the vehicle might deviate from the original
intended path.
The fixed and active guidelines fade in and
out depending on the steering wheel
position. The active guidelines are not
shown when the steering wheel position
is straight.
Always use caution while reversing.
Objects in the red zone are closest to your
vehicle and objects in the green zone are
farther away. Objects are getting closer to
your vehicle as they move from the green
zone to the yellow or red zones. Use the
side view mirrors and rear view mirror to
get better coverage on both sides and rear
of the vehicle.
Selectable settings for this feature are
ACTIVE + FIXED, FIXED and OFF.
Visual Park Aid Alert
Note:Visual park alert is only available
when the transmission is in R (Reverse).
Note: The reverse sensing system is not
effective at speeds above 3 mph (5 km/h)
and may not detect certain angular or
moving objects.
The system uses red, yellow and green
highlights which appear on top of the video
image when an object is detected by the
reverse sensing system. The alert highlights
the closest object detected. The reverse
sensing alert can be disabled and if visual
park aid alert is enabled, highlighted areas
are still displayed.
Selectable settings for this feature are ON
and OFF. Manual Zoom
WARNING
When manual zoom is on, the full
area behind the vehicle is not shown.
Be aware of your surroundings when
using the manual zoom feature.
Note: Manual zoom is only available when
the transmission is in R (Reverse).
Note: When manual zoom is enabled, only
the centerline is shown.
This allows you to get a closer view of an
object behind the vehicle. The zoomed
image keeps the bumper in the image to
provide a reference. The zoom is only
active while the transmission is in R
(Reverse). When the transmission is
shifted out of R (Reverse), the feature
automatically turns off and must be reset
when it is used again.
Selectable settings for this feature are OFF,
Level 1, Level 2 or Level 3. Press the up and
down arrows to change the view. The
selection level appears between the
buttons (i.e. Level 1). The default setting
for the manual zoom is OFF.
Rear Camera Delay
When shifting the transmission out of R
(Reverse) and into any gear other than P
(Park), the camera image remains in the
display until the vehicle speed reaches 5
mph (8 km/h). This occurs when the rear
camera delay feature is on, or until a radio
button is selected.
Selectable settings for this feature are ON
and OFF. The default setting for the rear
camera delay is OFF.
169
Parking Aids
Page 192 of 423

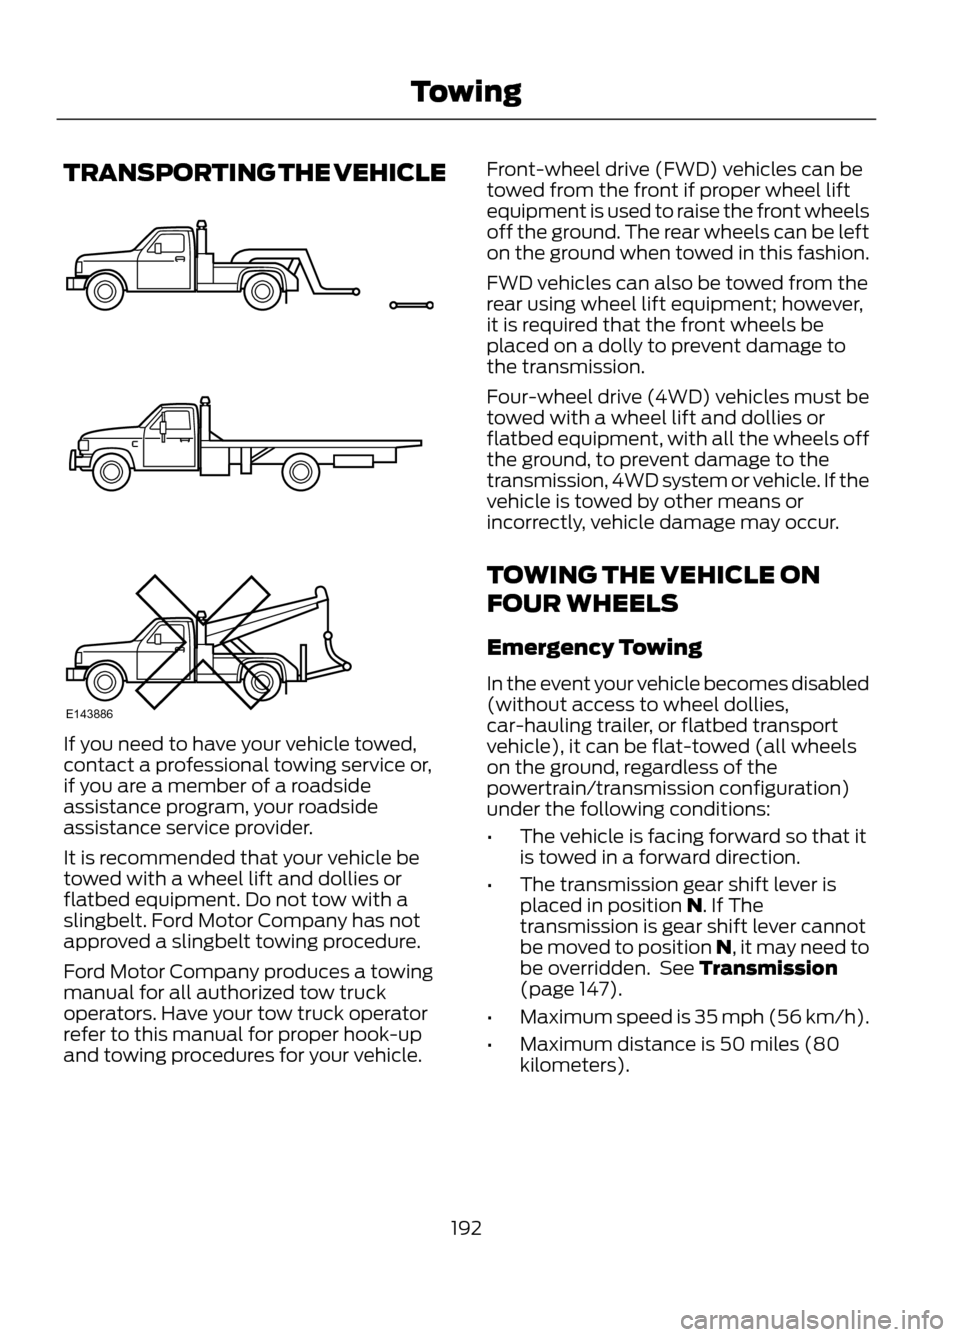
TRANSPORTING THE VEHICLE
If you need to have your vehicle towed,
contact a professional towing service or,
if you are a member of a roadside
assistance program, your roadside
assistance service provider.
It is recommended that your vehicle be
towed with a wheel lift and dollies or
flatbed equipment. Do not tow with a
slingbelt. Ford Motor Company has not
approved a slingbelt towing procedure.
Ford Motor Company produces a towing
manual for all authorized tow truck
operators. Have your tow truck operator
refer to this manual for proper hook-up
and towing procedures for your vehicle.Front-wheel drive (FWD) vehicles can be
towed from the front if proper wheel lift
equipment is used to raise the front wheels
off the ground. The rear wheels can be left
on the ground when towed in this fashion.
FWD vehicles can also be towed from the
rear using wheel lift equipment; however,
it is required that the front wheels be
placed on a dolly to prevent damage to
the transmission.
Four-wheel drive (4WD) vehicles must be
towed with a wheel lift and dollies or
flatbed equipment, with all the wheels off
the ground, to prevent damage to the
transmission, 4WD system or vehicle. If the
vehicle is towed by other means or
incorrectly, vehicle damage may occur.
TOWING THE VEHICLE ON
FOUR WHEELS
Emergency Towing
In the event your vehicle becomes disabled
(without access to wheel dollies,
car-hauling trailer, or flatbed transport
vehicle), it can be flat-towed (all wheels
on the ground, regardless of the
powertrain/transmission configuration)
under the following conditions:
•
The vehicle is facing forward so that it
is towed in a forward direction.
• The transmission gear shift lever is
placed in position N. If The
transmission is gear shift lever cannot
be moved to position N, it may need to
be overridden. See Transmission
(page 147).
• Maximum speed is 35 mph (56 km/h).
• Maximum distance is 50 miles (80
kilometers).
192
Towing
E143886
Page 227 of 423

When a battery replacement is required,
the battery should only be replaced with
a Ford recommended replacement battery
that matches the electrical requirements
of the vehicle.
When the battery is disconnected or a new
battery installed, the automatic
transmission must relearn its adaptive
strategy. As a result of this, the
transmission may shift firmly when first
driven. This operation is considered normal
and will fully update transmission
operation to its optimum shift feel.
If the battery has been disconnected or a
new battery has been installed, the clock
and the preset radio stations must be reset
once the battery is reconnected.
Note:Always dispose of automotive
batteries in a responsible manner. Follow
your local authorized standards for disposal.
Call your local authorized recycling center
to find out more about recycling automotive
batteries.
CHECKING THE WIPER
BLADES
Run the tip of your fingers over the edge of
the blade to check for roughness.
Clean the wiper blades with washer fluid
or water applied with a soft sponge or
cloth. CHANGING THE WIPER
BLADES
The wiper arms can be manually moved
when the ignition is off. This allows for ease
of blade replacement and cleaning under
the blades.
1. Pull the wiper blade and arm away
from the glass.
2. Press the locking buttons together.
3. Rotate and remove the wiper blade.
4. Install in the reverse order.
Note: Make sure that the wiper blade locks
into place. Lower the wiper arm and blade
back to the windshield. The wiper arms will
automatically return to their normal position
when the ignition is turned on.
To change the rear blades, do the
following:
227
Maintenance
E142463
E129990
1
1 2