2013 FORD ESCAPE light
[x] Cancel search: lightPage 85 of 423

Trip 1 and 21
Speed
Ford EcoMode 2
1 See Trip Computer (page 86).
2 See Eco Mode (page 175).
Information
Intelligent 4WD
MyKey Dist.
MyKey Info
Settings On or Off
Traction Ctrl
Driver Assist
On or Off
Blind spot
On or Off
Cross traffic alert
On or Off
Hill Start Assist
On or Off
Rear Park Aid
On or Off
Rain Light
Lighting
Auto or Manual
Dimming
Off or xx Seconds
Autolamp delay
Always off, On guidance or Always on
Navigation info
Display
Choose your applicable setting
Language
Choose your applicable setting
Distance
Choose your applicable setting
Temperature
Park Slot Information Warning
Chimes
On or Off
Display
Compass
(non–navigation
systems only)
Convenience
Zone (1–15)
Set Zone
85
Information Displays
Page 91 of 423

Action
Message
Indicator
Message
Displayed as a reminder to press the brakewhile starting the vehicle.
-
Press brake to start
Displayed when a valid key is not detected
within the vehicle. See Keyless Starting (page 135).
Red
Ford KeyFree Key not
inside car
Displays when the key battery is low. Change
the battery as soon as possible. See Remote Control (page 44).
-
Key Battery low Replace
soon
Lighting
Action
Message
Indicator
Message
Displays when the brake lamp bulb has burnedout. Contact your authorized dealer.
-
Brake lamp Bulb fault
Displays when the low beam headlamp bulb
has burned out. Contact your authorized dealer.
-
Low beam Bulb fault
Displays when an electrical system problem
occurs with the headlamp system. Contact your authorized dealer.
Amber
Headlamp fault Service
required
91
Information Displays
Page 97 of 423

GENERAL INFORMATION
Radio Frequencies and Reception
FactorsAM and FM frequencies are established by
the Federal Communications Commission
(FCC) and the Canadian Radio and
Telecommunications Commission (CRTC).
Those frequencies are:
•
AM: 530, 540-1700, 1710 kHz
• FM: 87.9-107.7, 107.9 MHz
Radio Reception Factors
The further you travel from an FM station, the weaker the
signal and the weaker the reception.
Distance/Strength
Hills, mountains, tall buildings, bridges, tunnels, freeway
overpasses, parking garages, dense tree foliage and
thunderstorms can interfere with your reception.
Terrain
When you pass a ground-based broadcast repeating
tower, a stronger signal may overtake a weaker one and
result the audio system muting.
Station overload
CD and CD Player Information
Note: CD units are designed to play
commercially-pressed 4.75 inch (12
centimeter) audio compact discs only. Due
to technical incompatibility, certain
recordable and re-recordable compact discs
may not function correctly when used in
Ford CD players.
Note: CDs with homemade paper
(adhesive) labels should not be inserted
into the CD player as the label may peel and
cause the CD to become jammed. It is
recommended that homemade CDs be
identified with permanent felt tip marker
rather than adhesive labels. Ballpoint pens
may damage CDs. Please contact your
authorized dealer for further information.
Note: Do not use any irregularly shaped
discs or discs with a scratch protection film
attached. Always handle discs by their edges only.
Clean the disc with an approved CD
cleaner only, wiping from the center of the
disc toward the edge. Do not clean in a
circular motion.
Do not expose discs to direct sunlight or
heat sources for extended periods of time.
MP3 Track and Folder Structure
Audio systems capable of recognizing and
playing MP3 individual tracks and folder
structures work as follows:
•
There are two different modes for MP3
disc playback: MP3 track mode
(system default) and MP3 folder
mode.
• MP3 track mode ignores any folder
structure on the MP3 disc. The player
numbers each MP3 track on the disc
(noted by the .mp3 file extension) from
T001 to a maximum of T255. The
maximum number of playable MP3
files may be less depending on the
structure of the CD and exact model
of radio present.
97
Audio System
Page 107 of 423

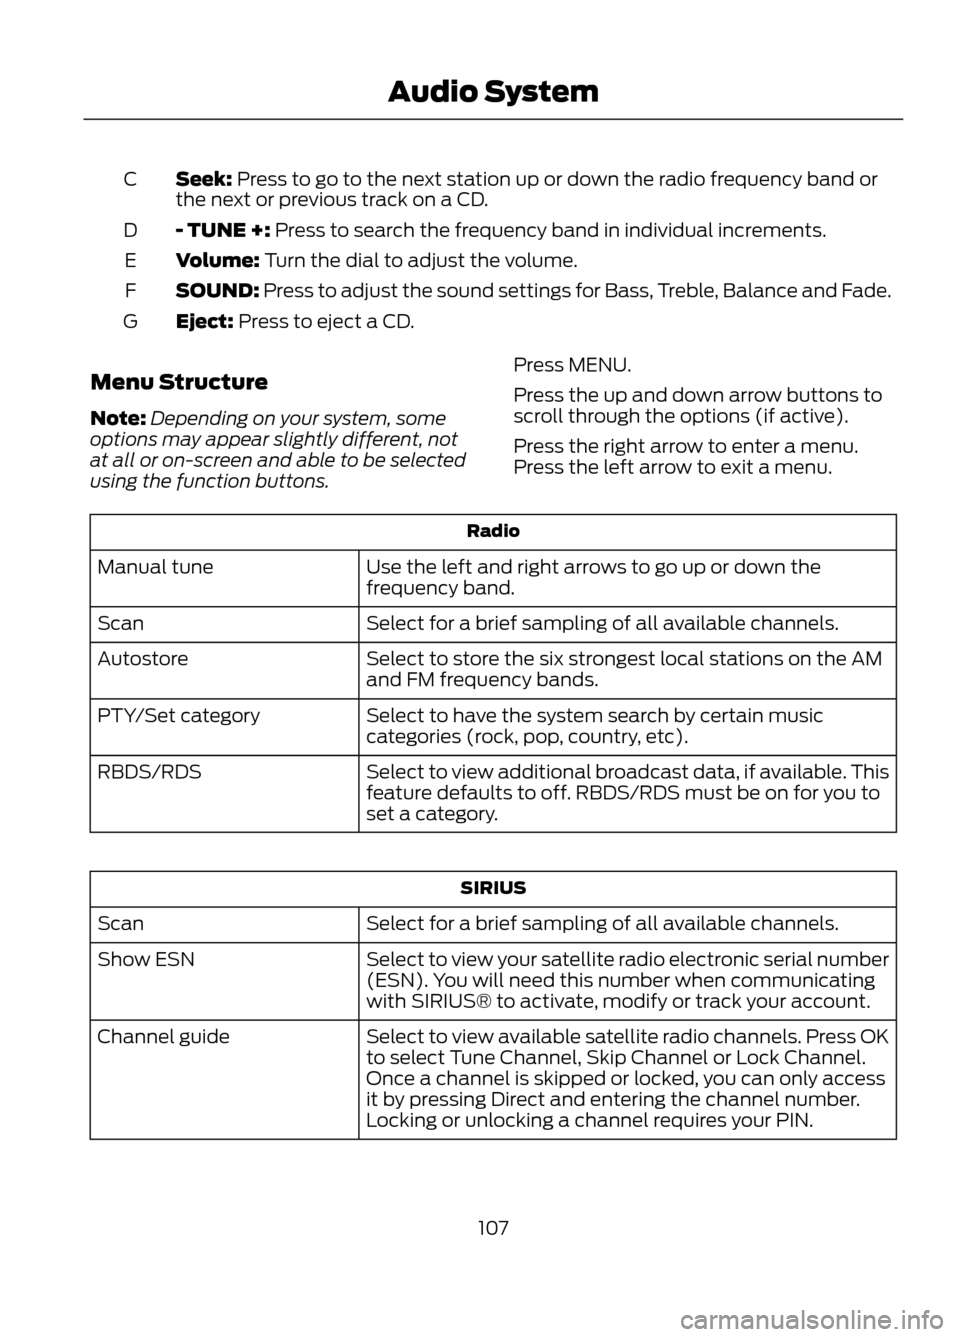
Seek: Press to go to the next station up or down the radio frequency band or
the next or previous track on a CD.
C
- TUNE +: Press to search the frequency band in individual increments.
D
Volume: Turn the dial to adjust the volume.
E
SOUND: Press to adjust the sound settings for Bass, Treble, Balance and Fade.
F
Eject: Press to eject a CD.
G
Menu Structure
Note: Depending on your system, some
options may appear slightly different, not
at all or on-screen and able to be selected
using the function buttons. Press MENU.
Press the up and down arrow buttons to
scroll through the options (if active).
Press the right arrow to enter a menu.
Press the left arrow to exit a menu.
Radio
Use the left and right arrows to go up or down the
frequency band.
Manual tune
Select for a brief sampling of all available channels.
Scan
Select to store the six strongest local stations on the AM
and FM frequency bands.
Autostore
Select to have the system search by certain music
categories (rock, pop, country, etc).
PTY/Set category
Select to view additional broadcast data, if available. This
feature defaults to off. RBDS/RDS must be on for you to
set a category.
RBDS/RDS
SIRIUS
Select for a brief sampling of all available channels.
Scan
Select to view your satellite radio electronic serial number
(ESN). You will need this number when communicating
with SIRIUS® to activate, modify or track your account.
Show ESN
Select to view available satellite radio channels. Press OK
to select Tune Channel, Skip Channel or Lock Channel.
Once a channel is skipped or locked, you can only access
it by pressing Direct and entering the channel number.
Locking or unlocking a channel requires your PIN.
Channel guide
107
Audio System
Page 113 of 423

MANUAL CLIMATE CONTROL
Fan speed control: Controls the volume of air circulated in your vehicle. Adjust
to select the desired fan speed or switch off. If you switch the fan off, the
windshield may fog up.
A
Recirculated air: Press the button to switch between outside air and
recirculated air. When you select recirculated air, the button illuminates and
the air currently in the passenger compartment recirculates. This can reduce
the time needed to cool the interior and reduce unwanted odors from entering
your vehicle.
B
Temperature control: Controls the temperature of the air circulated in your
vehicle. Adjust to select the desired temperature. If you select MAX A/C, the
system distributes recirculated air through the instrument panel air vents. This
mode is more economical and efficient than normal air conditioning. When the
temperature control is in the MAX A/C position, neither the air conditioning or
recirculated air can be turned off.
C
Air conditioning: Press the button to switch the air conditioning on or off. Air
conditioning cools your vehicle using outside air. To improve air conditioning
when starting your vehicle, drive with the windows slightly open for two to three
minutes.
D
Air distribution control: Adjust to select the desired air distribution.
E
Select to distribute air through
the instrument panel air vents.
Select to distribute air through
the instrument panel and
footwell air vents.
Select to distribute air through
the footwell air vents.
Select to distribute air through
the windshield and footwell air
vents.
113
Climate Control
E141421
ABDEC
Page 115 of 423

Defrost: Press the button to distribute air through the windshield air vents. You
can also use this setting to defog and clear the windshield of a thin covering of
ice.
G
Instrument panel: Press the button to distribute air through the instrument
panel air vents.
H
Footwell: Press the button to distribute air through the footwell air vents.
I
Air conditioning: Press the button to switch the air conditioning on or off. Air
conditioning cools your vehicle using outside air. To improve air conditioning
when starting your vehicle, drive with the windows slightly open for two to three
minutes.
J
Temperature Control
You can set the temperature between
60°F (15.5°C) and 85°F (29.5°C) in steps
of 1°F (0.5°C). In position LO, 59°F (15°C),
the system switches to permanent cooling.
In position HI, 86°F (30°C), the system
switches to permanent heating.
Note: If you select either position LO or HI,
the system does not regulate a stable
temperature.
Mono Mode
In this mode, the temperature settings for
both the driver's side and passenger's side
are linked. If you adjust the setting using
the rotary control on the driver ’s side, the
system adjusts the temperature to the
same setting on the passenger ’s side. Switching Mono Mode Off
Select a temperature for the passenger
’s
side using the rotary control on the
passenger ’s side. Mono mode
automatically switches off. The
temperature on the driver ’s side remains
unchanged. You can now adjust the
driver's side and passenger's side
temperatures independently. The
temperature settings for each side are
shown in the display.
Switching Mono Mode Back On
Press and hold the AUTO button. The
passenger ’s side temperature is adjusted
to the driver ’s side temperature setting.
HINTS ON CONTROLLING THE
INTERIOR CLIMATE
General Hints
Note: Prolonged use of recirculated air may
cause the windows to fog up.
Note: A small amount of air may be felt
from the footwell air vents regardless of the
air distribution setting.
Note: To reduce humidity build-up inside
your vehicle, do not drive with the system
switched off or with recirculated air always
switched on.
115
Climate Control
E133115
Page 121 of 423

SITTING IN THE CORRECT
POSITION
WARNINGS
Sitting improperly, out of position or
with the seatback reclined too far
can take weight off the seat cushion
and affect the decision of the passenger
sensing system, resulting in serious injury
or death in the event of a collision. Always
sit upright against your seatback, with your
feet on the floor.
Do not recline the seatback as this
can cause the occupant to slide
under the safety belt, resulting in
serious injury in the event of a collision.
Do not place objects higher than the
seatback to reduce the risk of serious
injury in the event of a collision or
during heavy braking.
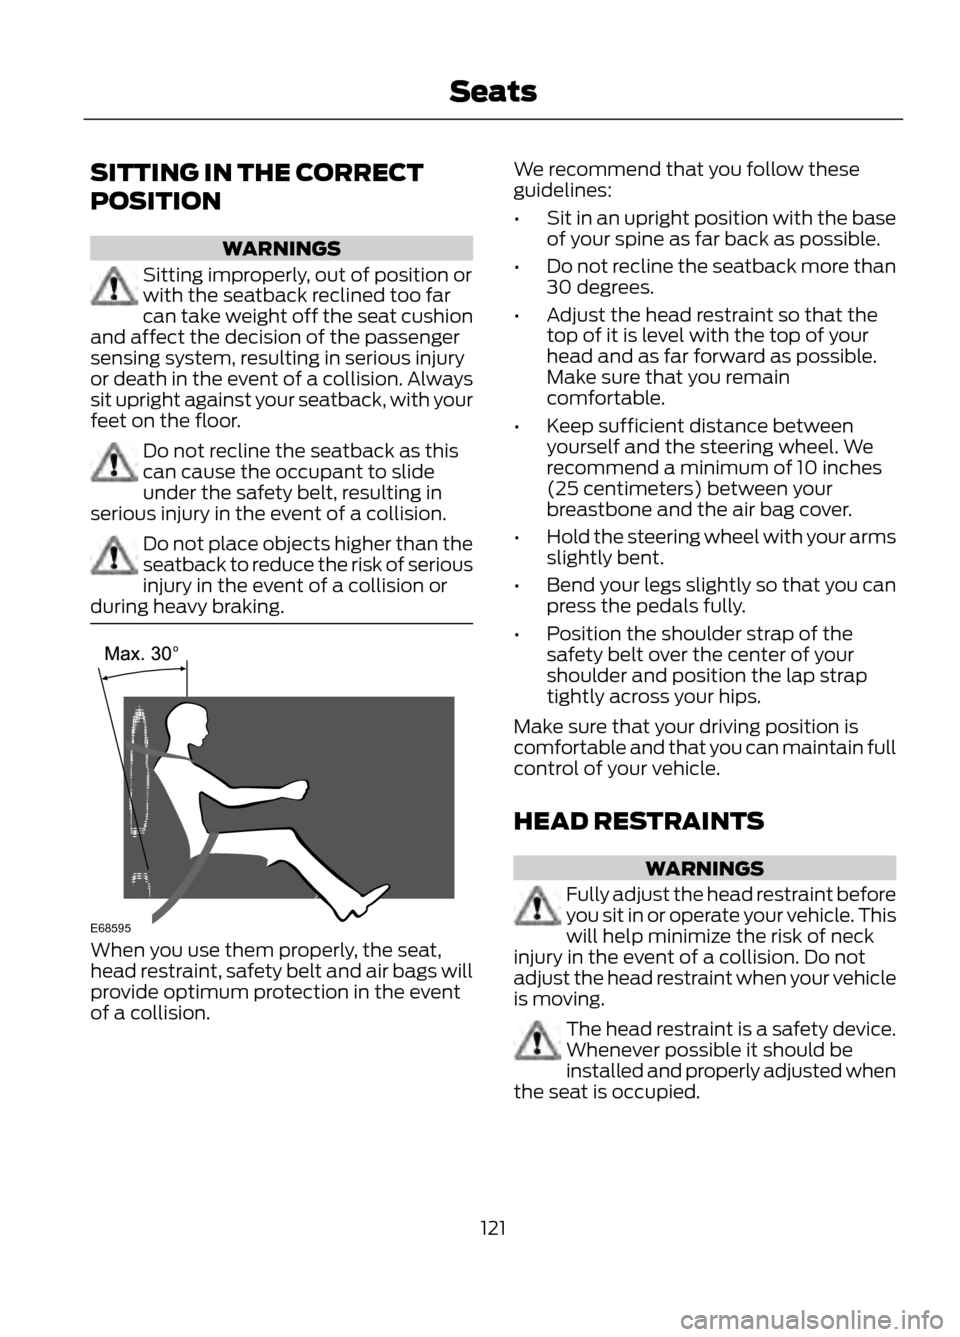
When you use them properly, the seat,
head restraint, safety belt and air bags will
provide optimum protection in the event
of a collision. We recommend that you follow these
guidelines:
•
Sit in an upright position with the base
of your spine as far back as possible.
• Do not recline the seatback more than
30 degrees.
• Adjust the head restraint so that the
top of it is level with the top of your
head and as far forward as possible.
Make sure that you remain
comfortable.
• Keep sufficient distance between
yourself and the steering wheel. We
recommend a minimum of 10 inches
(25 centimeters) between your
breastbone and the air bag cover.
• Hold the steering wheel with your arms
slightly bent.
• Bend your legs slightly so that you can
press the pedals fully.
• Position the shoulder strap of the
safety belt over the center of your
shoulder and position the lap strap
tightly across your hips.
Make sure that your driving position is
comfortable and that you can maintain full
control of your vehicle.
HEAD RESTRAINTS
WARNINGS
Fully adjust the head restraint before
you sit in or operate your vehicle. This
will help minimize the risk of neck
injury in the event of a collision. Do not
adjust the head restraint when your vehicle
is moving.
The head restraint is a safety device.
Whenever possible it should be
installed and properly adjusted when
the seat is occupied.
121
Seats
E68595
Page 128 of 423

Homelink® Wireless Control
System (If Equipped)
WARNINGS
Make sure that the garage door and
security device are free from
obstruction when you are
programming. Do not program the system
with the vehicle in the garage.
Do not use the system with any
garage door opener that does not
have the safety stop and reverse
feature as required by U.S. Federal Safety
Standards (this includes any garage door
opener manufactured before April 1, 1982).
Note: Make sure you keep the original
remote control transmitter for use in other
vehicles as well as for future system
programming.
Note: We recommend that upon the sale
or lease termination of your vehicle, you
erase the programmed function buttons for
security reasons. See Erasing the function
button codes later in this section.
Note: You can program a maximum of
three devices. To change or replace any of
the three devices after it has been initially
programmed, you must first erase the
current settings. See Erasing the function
button codes later in this section.
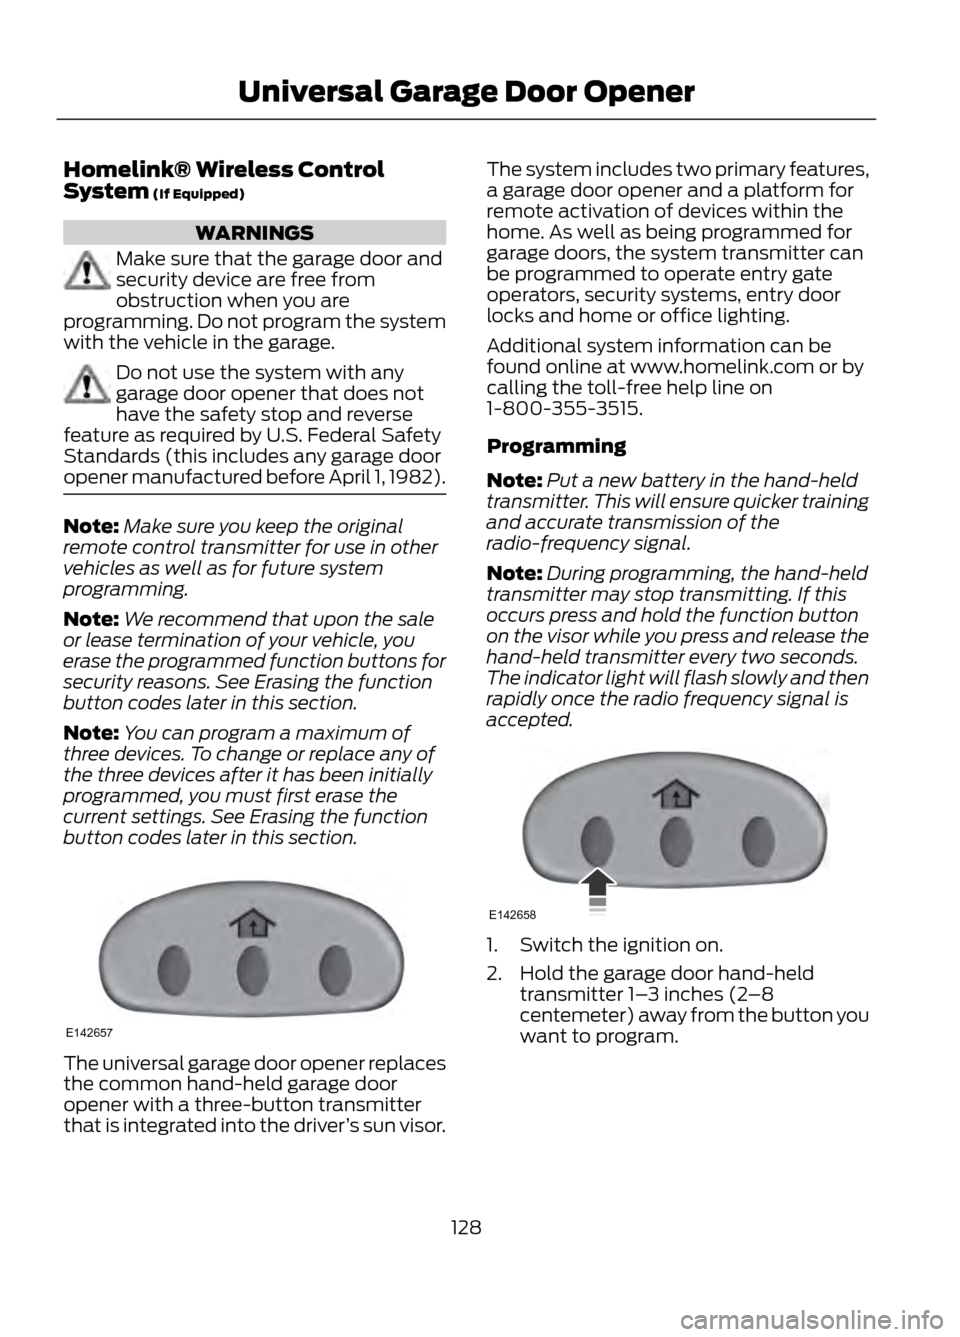
The universal garage door opener replaces
the common hand-held garage door
opener with a three-button transmitter
that is integrated into the driver ’s sun visor. The system includes two primary features,
a garage door opener and a platform for
remote activation of devices within the
home. As well as being programmed for
garage doors, the system transmitter can
be programmed to operate entry gate
operators, security systems, entry door
locks and home or office lighting.
Additional system information can be
found online at www.homelink.com or by
calling the toll-free help line on
1-800-355-3515.
Programming
Note:
Put a new battery in the hand-held
transmitter. This will ensure quicker training
and accurate transmission of the
radio-frequency signal.
Note: During programming, the hand-held
transmitter may stop transmitting. If this
occurs press and hold the function button
on the visor while you press and release the
hand-held transmitter every two seconds.
The indicator light will flash slowly and then
rapidly once the radio frequency signal is
accepted.
1. Switch the ignition on.
2. Hold the garage door hand-held transmitter 1– 3 inches (2–8
centemeter) away from the button you
want to program.
128
Universal Garage Door Opener
E142657
E142658