Page 65 of 84

FLUIDS AND CAPACITIES
Component Fluid, Lubricant, or Genuine Part Capacities
Engine Coolant1.4L Turbo
We recommend you use MOPAR®Antifreeze/Engine Coolant 10 Year/150,000 Mile Formula OAT (OrganicAdditive Technology).
4.6 Quarts(4.4 Liters)
Engine Oil withFilter 1.4L TurboWe recommend you use API CertifiedSAE 5W-40 Full Synthetic Engine Oil.4 Quarts(3.8 Liters)
Engine Oil FilterWe recommend you use MOPAR®Engine Oil Filters.—
Fuel Selection1.4L Turbo91 Octane Recommended – 87 OctaneAcceptable
10.5 Gallons(40 Liters)(Approximate)
ManualTransmissionWe recommend you use MOPAR®C635 DDCT/MTX Transmission Fluid—
Brake MasterCylinder
We recommend you use MOPAR®DOT 3, SAE J1703. If DOT 3, SAEJ1703 brake fluid is not available, thenDOT 4 is acceptable.
—
Spark PlugsWe recommend you use MOPAR®Spark Plugs - Gap 0.026 in (0.65 mm)—
CAUTION!
• Mixing of engine coolant (antifreeze) other than specified Organic Additive
Technology (OAT) engine coolant (antifreeze), may result in engine damage
and may decrease corrosion protection. Organic Additive Technology (OAT)
engine coolant is different and should not be mixed with Hybrid Organic Ad-
ditive Technology (HOAT) engine coolant (antifreeze) or any “globally com-
patible” coolant (antifreeze). If a non-OAT engine coolant (antifreeze) is intro-
duced into the cooling system in an emergency, the cooling system will need
to be drained, flushed, and refilled with fresh OAT coolant (conforming to
MS-12106), by an authorized studio as soon as possible.
•Do not use water alone or alcohol-based engine coolant (antifreeze) products.
Do not use additional rust inhibitors or antirust products, as they may not be
compatible with the radiator engine coolant and may plug the radiator.
• This vehicle has not been designed for use with propylene glycol-based en-
gine coolant (antifreeze). Use of propylene glycol-based engine coolant (anti-
freeze) is not recommended.
MAINTAINING YOUR VEHICLE
63
Page 66 of 84

MAINTENANCE SCHEDULE
Your vehicle is equipped with an automatic oil change indicator system. The oil
change indicator system will remind you that it is time to take your vehicle in for
scheduled maintenance.
Based on engine operation conditions, the oil change indicator message will illumi-
nate. This means that service is required for your vehicle. Operating conditions such
as frequent short-trips, trailer tow, extremely hot or cold ambient temperatures, and
E85 fuel usage will influence when the “Change Oil” message is displayed. Severe
Operating Conditions can cause the change oil message to illuminate as early as
3,500 miles (5,600 km) since last reset. Have your vehicle serviced as soon as pos-
sible, within the next 500 miles (805 km).
NOTE:Under no circumstances should oil change intervals exceed 10,000 miles (16,000 km) ortwelve months, whichever comes first.
Once A Month Or Before A Long Trip:
• Check engine oil level
• Check windshield washer fluid level
• Check the tire inflation pressures and look for unusual wear or damage
• Check the fluid levels of the coolant reservoir, brake master cylinder, and trans-
mission as needed
• Check function of all interior and exterior lights
Required Maintenance Intervals.
Refer to the Maintenance Schedules on the following pages for required mainte-
nance.
At Every Oil Change Interval As Indicated By Oil Change Indicator System:
•Change oil and filter.
• Rotate the tires. Rotate at the first sign of irregular wear, even if it occurs before theoil indicator system turns on.
•Inspect battery and clean and tighten terminals as required.
•Inspect brake pads, shoes, rotors, drums, hoses and park brake.
•Inspect engine cooling system protection and hoses.
•Inspect exhaust system.
•Inspect engine air cleaner if using in dusty or off-road conditions.
MAINTAINING YOUR VEHICLE
64
Page 67 of 84

20,000
30,000
40,000
50,000
60,000
70,000
80,000
90,000
100,000
110,000
120,000
130,000
140,000
150,000
Or Years: 2 3 4 5 6 7 8 9 10 11")
Maintenance ChartMileage or time passed (whichever comes first)
20,000
30,000
40,000
50,000
60,000
70,000
80,000
90,000
100,000
110,000
120,000
130,000
140,000
150,000
Or Years: 2 3 4 5 6 7 8 9 10 11 12 13 14 15Or Kilometers:
32,000
48,000
64,000
80,000
96,000
112,000
128,000
144,000
160,000
176,000
192,000
208,000
224,000
240,000
Additional InspectionsInspect the CV joints. X X X X XInspect front suspension, tie rod ends, boot seals, and replace ifnecessary.
XXX X X X X
Inspect the brake linings, parking brake function. X X X X X X XAdditional MaintenanceReplace cabin/air conditioning filter. X X X X X X XClean and lube sun roof tracks. X X X X X X XReplace engine air filter. X X X X XReplace the spark plugs. ** X X X X XFlush and replace the engine coolant at 10 years or150,000 miles (240,000 km) whichever comes first.
XX
Inspect and replace PCV valve if necessary.
X
Replace the timing belt.
X
** The spark plug change interval is mileage based only, yearly intervals do not apply.
MAINTAINING YOUR VEHICLE
65
Page 68 of 84
WARNING!
•You can be badly injured working on or around a motor vehicle. Do only service work for which you have the knowledge and theright equipment. If you have any doubt about your ability to perform a service job, take your vehicle to a competent mechanic.• Failure to properly inspect and maintain your vehicle could result in a component malfunction and effect vehicle handling andperformance. This could cause an accident.
MAINTAINING YOUR VEHICLE
66
Page 69 of 84
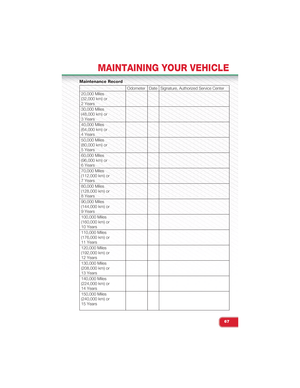
Maintenance Record
Odometer DateSignature, Authorized Service Center
20,000 Miles(32,000 km) or2 Years
30,000 Miles(48,000 km) or3 Years
40,000 Miles(64,000 km) or4 Years
50,000 Miles(80,000 km) or5 Years
60,000 Miles(96,000 km) or6 Years
70,000 Miles(112,000 km) or7 Years
80,000 Miles(128,000 km) or8 Years
90,000 Miles(144,000 km) or9 Years
100,000 Miles(160,000 km) or10 Years
110,000 Miles(176,000 km) or11 Years
120,000 Miles(192,000 km) or12 Years
130,000 Miles(208,000 km) or13 Years
140,000 Miles(224,000 km) or14 Years
150,000 Miles(240,000 km) or15 Years
MAINTAINING YOUR VEHICLE
67
Page 70 of 84
 and is located
on the drivers side under the instrument panel.
Cavity VehicleFuseNum-ber
Mini Fuse Descriptio")
FUSES
Interior Fuses
• The interior fuse panel is part of the Body Control Module (BCM) and is located
on the driver's side under the instrument panel.
Cavity VehicleFuseNum-ber
Mini Fuse Description
1 F12 7.5 Amp Brown Right Low Beam
2 F32 5 Amp TanFront and Rear Ceiling Lights Trunk andDoor Courtesy Lights
3 F53 5 Amp Tan Instrument Panel Node
4 F38 20 Amp Yellow Central Door Locking
5 F36 10 Amp RedDiagnostic Socket, Car Radio, ClimateControl System, Tire Pressure Monitor,TCU and CTM
6 F43 20 Amp Yellow Bi-Directional Washer
7 F48 20 Amp Yellow Passenger Power Window
8 F13 7.5 Amp Brown Left Low Beam
9 F50 7.5 Amp Brown Airbag
10 F51 5 Amp TanCar Radio Switch, Climate ControlSystem, Stop Light, Exterior Mirrors andSunroof Switch
11 F37 5 Amp Tan Stop Light Switch, Instrument Panel Node
12 F49 5 Amp TanExterior Mirror, GPS, Electric Mirror,Parking Sensor, Sunroof Switch
13 F31 5 Amp Tan Ignition, Climate Control, RDU and EVCU
14 F47 20 Amp Yellow Driver Power Window
MAINTAINING YOUR VEHICLE
68
Page 71 of 84

Underhood Fuses
•A second fuse panel is located on the drivers side of the engine compartment, next to
the battery. To access the fuses, press the release tabs and remove the cover.
• The ID number of the electrical component corresponding to each fuse can be
found on the back of the cover.
Cavity Maxi Fuse Mini Fuse Description
F01 60 Amp Blue Body Controller
F02 20 Amp Yellow Audio Amplifier
F03 20 Amp Yellow Ignition Switch
F04 40 Amp Orange Anti-Lock Brake Pump
F05 70 Amp Tan Electric Power Steering
F06 20 Amp Yellow Radiator Fan - Single Speed
F06 30 Amp Green Radiator Fan - Low Speed
F07 40 Amp Orange Radiator Fan - High Speed
F08 30 Amp Green Blower Motor
F09 10 Amp Red Powertrain
F10 10 Amp Red Horn
F11 15 Amp Blue Powertrain
F11 10 Amp Red Powertrain (Multiair – If Equipped)
F14 5 Amp Tan High beam (Shutter)
F15 15 Amp Blue Cigar Lighter
F16 7.5 Amp Brown Transmission
F17 25 Amp White Powertrain (Multiair – If Equipped)
F17 15 Amp Blue Powertrain
F18 15 Amp Blue Powertrain
F18 5 Amp Tan Powertrain (Multiair – If Equipped)
F19 7.5 Amp Brown Air Conditioning
F20 15 Amp Blue Heated Seats – If Equipped
F21 15 Amp Blue Fuel Pump
F23 20 Amp Yellow Anti-Lock Brake Valves
F24 7.5 Amp Brown Stability Control System
F30 15 Amp Blue Fog Lamps
F82 30 Amp Green Sunroof/Convertible Top
F84 10 Amp Red Transmission
F85 15 Amp Blue Rear Defroster, Heated Mirrors
F87 5 Amp Tan Lights
F90 5 Amp Tan Heated Mirrors
MAINTAINING YOUR VEHICLE
69
Page 72 of 84

TIRE PRESSURES
• Check the inflation pressure of each tire, at least monthly and inflate to the rec-
ommended pressure for your vehicle.
• The tire pressures recommended for your vehicle are found on the “Tire and
Loading Information” label located on the driver’s side door opening.
NOTE:
Refer to the Owner's Manual on the DVD
for more information regarding tire warn-
ings and instructions.
WARNING!
• Overloading of your tires is dangerous. Overloading can cause tire failure,
affect vehicle handling, and increase your stopping distance. Use tires of the
recommended load capacity for your vehicle. Never overload them.
• Improperly inflated tires are dangerous and can cause collisions. Under-
inflation is the leading cause of tire failure and may result in severe cracking,
component separation, or “blow out”. Over-inflation reduces a tire’s ability to
cushion shock. Objects on the road and chuck holes can cause damage
that results in tire failure. Unequal tire pressures can cause steering prob-
lems. You could lose control of your vehicle. Over-inflated or under-inflated
tires can affect vehicle handling and can fail suddenly, resulting in loss of ve-
hicle control.
MAINTAINING YOUR VEHICLE
70


 or2 Years
30,000 Miles(48,000 km) or3 Years
40,000 Miles(64,000 km) or4 Years
50,000 Miles(80,000 km) or5 Y")