2013 CITROEN NEMO DAG Handbook (in English)
-
 1
1 -
 2
2 -
 3
3 -
 4
4 -
 5
5 -
 6
6 -
 7
7 -
 8
8 -
 9
9 -
 10
10 -
 11
11 -
 12
12 -
 13
13 -
 14
14 -
 15
15 -
 16
16 -
 17
17 -
 18
18 -
 19
19 -
 20
20 -
 21
21 -
 22
22 -
 23
23 -
 24
24 -
 25
25 -
 26
26 -
 27
27 -
 28
28 -
 29
29 -
 30
30 -
 31
31 -
 32
32 -
 33
33 -
 34
34 -
 35
35 -
 36
36 -
 37
37 -
 38
38 -
 39
39 -
 40
40 -
 41
41 -
 42
42 -
 43
43 -
 44
44 -
 45
45 -
 46
46 -
 47
47 -
 48
48 -
 49
49 -
 50
50 -
 51
51 -
 52
52 -
 53
53 -
 54
54 -
 55
55 -
 56
56 -
 57
57 -
 58
58 -
 59
59 -
 60
60 -
 61
61 -
 62
62 -
 63
63 -
 64
64 -
 65
65 -
 66
66 -
 67
67 -
 68
68 -
 69
69 -
 70
70 -
 71
71 -
 72
72 -
 73
73 -
 74
74 -
 75
75 -
 76
76 -
 77
77 -
 78
78 -
 79
79 -
 80
80 -
 81
81 -
 82
82 -
 83
83 -
 84
84 -
 85
85 -
 86
86 -
 87
87 -
 88
88 -
 89
89 -
 90
90 -
 91
91 -
 92
92 -
 93
93 -
 94
94 -
 95
95 -
 96
96 -
 97
97 -
 98
98 -
 99
99 -
 100
100 -
 101
101 -
 102
102 -
 103
103 -
 104
104 -
 105
105 -
 106
106 -
 107
107 -
 108
108 -
 109
109 -
 110
110 -
 111
111 -
 112
112 -
 113
113 -
 114
114 -
 115
115 -
 116
116 -
 117
117 -
 118
118 -
 119
119 -
 120
120 -
 121
121 -
 122
122 -
 123
123 -
 124
124 -
 125
125 -
 126
126 -
 127
127 -
 128
128 -
 129
129 -
 130
130 -
 131
131 -
 132
132 -
 133
133 -
 134
134 -
 135
135 -
 136
136 -
 137
137 -
 138
138 -
 139
139 -
 140
140 -
 141
141 -
 142
142 -
 143
143 -
 144
144 -
 145
145 -
 146
146 -
 147
147 -
 148
148 -
 149
149 -
 150
150 -
 151
151 -
 152
152 -
 153
153 -
 154
154 -
 155
155 -
 156
156 -
 157
157 -
 158
158 -
 159
159 -
 160
160 -
 161
161 -
 162
162 -
 163
163 -
 164
164 -
 165
165 -
 166
166 -
 167
167 -
 168
168 -
 169
169 -
 170
170 -
 171
171 -
 172
172 -
 173
173 -
 174
174 -
 175
175 -
 176
176 -
 177
177 -
 178
178 -
 179
179
 103
4
EASE OF USE and COMFORT
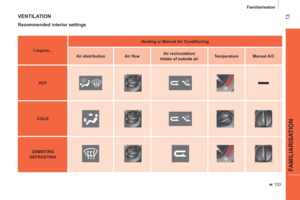
Ventilation
CORRECT USE OF THE AIR
CONDITIONING
For even air distribution, ensure that the
exterior air intake grille located at the base
of the windsc")
 104
Ventilation
These controls are located on the centre console.
Air conditioning
The air conditioning mode is operational
when the engine is running. The diode is lit.")
 105
4
EASE OF USE and COMFORT
Ventilation
Intake of exterior air
This is the preferred operating
position.
Recirculation of interior air
This position should only be
tempo")
 106
Practical information
Smokers kit
Located at the base of the centre console,
this consists of a cigar lighter and an
ashtray.
12 V socket (180 W max)
An accessory soc")
 107
4
EASE OF USE and COMFORT
Practical information
Sun visor
To avoid glare from ahead, fold and direct
the sun visor down.
Toll cards, tickets, etc. can be slipped into
the su")
 108
Practical information
LOAD SPACE FITTINGS
Stowing rings
There are 6 stowing rings on the rear floor to
secure your loads.
As a safety precaution in case of sharp
braking,")
 109
4
EASE OF USE and COMFORT
Practical information
Modular vertical grille
Operations:
3.
Lift the catch, located at the lower part of
the grille.
4.
Pivot the gril")
 11 0
Practical information
REAR LAYOUT
Stowing rings
There are 4 stowing rings on the rear floor to
secure your luggage.
Luggage retaining net
Hooked onto the")