Page 97 of 180
95
4
EASE OF USE and COMFORT
Seats
FRONT SEATS
Head restraints
Head restraint height adjustment: to raise or
lower the head restraint, slide it by pressing
the lug.
The adjustment is correct when the upper
edge of the head restraint is level with the
top of the head.
To remove the head restraint, release the
base of the rod to press the tab and raise
the head restraint to the highest position.
To refit the head restraint, press the tab of
the lug and engage the head restraint rods
in the openings keeping them in line with the
seat back.
Never drive with the head restraints
removed. They must be in place and
adjusted correctly.
Page 98 of 180
96
Seats
Seat cushion height
To adjust the height of the driver's seat
cushion, pull the control upwards as many
times as necessary to raise.
To lower, push the control downwards as
many times as necessary.
Forwards-backwards adjustment
Heated seat control
Press the control.
The temperature is controlled automatically.
Pressing a second time stops operation. Lift the control bar and slide the seat
forwards or backwards to the required
position.
Lumbar support
Seat back angle
Turn the control to adjust the angle of the
seat back. Turn the control.
Armrest
The driver's seat may be fitted with an
armrest on the centre console side.
Raise or lower completely the armrest to
obtain the most comfortable driving position.
Page 99 of 180
97
4
EASE OF USE and COMFORT
Seats
RETRACTABLE PASSENGER SEAT
Table position
Press the head restraint to place it in
the lowest position.
Push one of the controls rearwards, located
on each side of the seat back.
Lower the seat back onto the seat cushion
to the table position.
Retracted position
After placing the seat back in the table
position, pull the seat's rear strap while
guiding the folded seat back forwards and
towards the floor.
Returning the seat to the sitting
position
Pull the seat's rear strap to unlock the seat.
Lift the seat from the front and the rear then
guide it forwards to bring it to the table position.
Push one of the controls rearwards, located on
each side of the seat back while pressing on
the seat back, then place the seat back in
the upright position.
Press on the seat back fi rmly to trigger the
locking of the seat on the fl oor.
Adjust the head restraint using the button on
the side. Only move the seat when the rear
seats are not occupied.
Page 100 of 180
98
Seats
ONE-PIECE REAR BENCH SEAT
Table position
Press the head restraint and its lug
simultaneously to place the head restraint in
the low position.
Unlock the seat back by pushing the two side
controls. The red indicator becomes visible.
Fold the seat back onto the seat cushion.
Fully folded position
After placing the seat back in the table
position, pull the central strap to unlock the
rear feet of the seat.
Lift the seat fully to secure it in the fully
folded position.
Removing the bench seat
After placing the bench seat in the fully
folded position, lower the transverse bar to
unlock the front feet of the seat.
Lift the bench seat to detach it from its front
anchorages.
When driving, to secure the bench,
detach the red retaining strap, located
on the back of the bench seat cushion, and
fix one end to a front head restraint spindle
and the other to the side of the seat cushion.
Page 101 of 180
99
4
EASE OF USE and COMFORT
Seats
Returning the bench seat to its
position
Put the bench seat in place in its front
anchorages in the fully folded position.
Fold the bench seat to the table position,
the front and rear feet of the seat lock
automatically.
Returning the bench seat to the sitting
position
Lift the bench seat back.
Take care not to trap the seat belts.
Lock the seat back by pushing it fully
towards the rear. The red indicator is no
longer visible.
Rear head restraints
The rear head restraints can be removed
and have two positions:
high, position for use,
low, storage position.
To raise or lower a head restraint, pull it
forwards sliding it at the same time.
To remove it, place it in the high position,
push the lug and pull it forwards and
upwards.
To refit it, engage the head restraint rods
in the holes taking care to remain in the
centreline of the seat back.
Never drive with the head restraints
removed, they must be in place and
correctly adjusted.
Page 102 of 180

100
Seats
SPLIT REAR BENCH SEAT
The left-hand side (2/3) or right-hand side
(1/3) of this bench seat can be folded to
adapt the load space in the boot.
Table position
Press the head restraint and its lug
simultaneously to place the head restraint in
the low position.
Unlock the seat back by pulling the
corresponding side control towards you. The
red indicator becomes visible.
Fold the corresponding seat back onto the
seat cushion.
Fully folded position
After placing the seat back in the table
position, pull the corresponding strap to
unlock the rear feet of the seat.
Lift the seat fully to secure it in the fully
folded position.
Removing the bench seat
After placing the bench seat in the fully
folded position, lower the corresponding
transverse bar to unlock the front feet of the
seat.
Lift the bench seat to detach it from its front
anchorages.
When driving, to secure the bench,
detach the red retaining strap, located
on the back of the bench seat cushion, and fi x
one end to a front head restraint spindle and
the other end to the side of the seat cushion.
Page 103 of 180
101
4
EASE OF USE and COMFORT
Seats
Returning the bench seat to its position
Put the bench seat in place in its front
anchorages in the fully folded position.
Fold the bench seat to the table position,
the front and rear feet of the seat lock
automatically.
Returning the bench seat to the sitting
position
Lift the bench seat back.
Take care not to trap the seat belts.
Lock the seat back by pushing it fully
towards the rear. The red indicator is no
longer visible.
Repeat all of these operations for the other
part of the rear bench seat.
Page 104 of 180

102
Ventilation
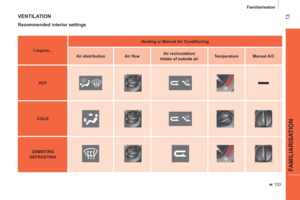
DE-ICING AND DEMISTING
Windscreen
The ventilation outlets located at the base
of the windscreen and the side vents for the
side windows increase the effectiveness of
the de-icing and demisting. Do not obstruct
these eight air outlets.
The manual air conditioning consists of the
pollen filter and air recirculation.
The pollen filter permits continuous and
effective filtering of dust.
The air recirculation (which can be activated
by the driver or the passenger) isolates the
passenger compartment from the exterior
atmosphere. However, this position should
only be used temporarily, the norm is to
drive with the control positioned with the
exterior air intake open.
Manual mode
Direct the control to this air
distribution setting.
For faster and more effective
de-icing and demisting of the
windscreen:
- increase the air flow setting,
Returning to the exterior air
intake position permits renewal
of the air in the passenger
compartment.
Rear screen and mirrors de-icing
This function only operates when
the engine is running. Pressing
this button activates the rapid
demisting/de-icing of the rear
screen and mirrors. This function switches
off automatically to prevent an excessive
consumption of energy. It switches off when
the engine is switched off. Pressing this
button switches the function off.
- move the exterior air intake
control temporarily to air
recirculation.
With Stop & Start, when the heated
rear screen is switched on, the STOP
mode is not available.