2013 CHEVROLET CAMARO wheel
[x] Cancel search: wheelPage 320 of 404

Black plate (72,1)Chevrolet Camaro Owner Manual (Include Mex) - 2012
10-72 Vehicle Care
If a tire goes flat, avoid further tire
and wheel damage by driving slowly
to a level place. Turn on the hazard
warning flashers. SeeHazard
Warning Flashers on page 6‑4.
See If a Tire Goes Flat on
page 10‑68 for other important
safety warnings.
Do not remove any objects that
have penetrated the tire.
1. Remove the tire sealant and compressor kit from its storage
location. See Storing the Tire
Sealant and Compressor Kit on
page 10‑76.
2. Unwrap the sealant/air hose (F) and the power plug (G).
3. Place the kit on the ground. Make sure the tire valve stem is
positioned close to the ground
so the hose will reach it.
4. Remove the valve stem cap from the flat tire by turning it
counterclockwise. 5. Attach the sealant/air hose (F)
onto the tire valve stem. Turn it
clockwise until it is tight.
6. Plug the power plug (G) into the accessory power outlet in the
vehicle. Unplug all items from
other accessory power outlets.
See Power Outlets on page 5‑5.
If the vehicle has an accessory
power outlet, do not use the
cigarette lighter.
If the vehicle only has a cigarette
lighter, use the cigarette lighter.
Do not pinch the power plug
cord in the door or window.
7. Start the vehicle. The vehicle must be running while using the
air compressor.
8. Turn the selector switch (B) clockwise to the Sealant + Air
position.
9. Press the on/off (A) button to turn the tire sealant and
compressor kit on. The compressor will inject
sealant and air into the tire.
The pressure gauge (D) will
initially show a high pressure
while the compressor pushes the
sealant into the tire. Once the
sealant is completely dispersed
into the tire, the pressure will
quickly drop and start to rise
again as the tire inflates with
air only.
10. Inflate the tire to the recommended inflation
pressure using the pressure
gauge (D). The recommended
inflation pressure can be found
on the Tire and Loading
Information label. See Tire
Pressure on page 10‑54.
The pressure gauge (D) may
read higher than the actual tire
pressure while the compressor
is on. Turn the compressor off
to get an accurate pressure
reading. The compressor may
be turned on/off until the
correct pressure is reached.
Page 322 of 404

Black plate (74,1)Chevrolet Camaro Owner Manual (Include Mex) - 2012
10-74 Vehicle Care
page 13‑7orRoadside
Assistance Program (Mexico)
on page 13‑9.
If the tire pressure has not
dropped more than 68 kPa
(10 psi) from the recommended
inflation pressure, use the
compressor kit to inflate the tire
to the recommended inflation
pressure.
20. Wipe off any sealant from the wheel, tire, and vehicle.
21. Dispose of the used sealant canister and sealant/air
hose (F) assembly at a local
dealer or in accordance with
local state codes and practices.
22. Replace it with a new canister available from your dealer.
23. After temporarily sealing a tire using the tire sealant and
compressor kit, take the
vehicle to an authorized dealer
within 161 km (100 mi) of
driving to have the tire repaired
or replaced.Using the Tire Sealant and
Compressor Kit without
Sealant to Inflate a Tire
(Not Punctured)
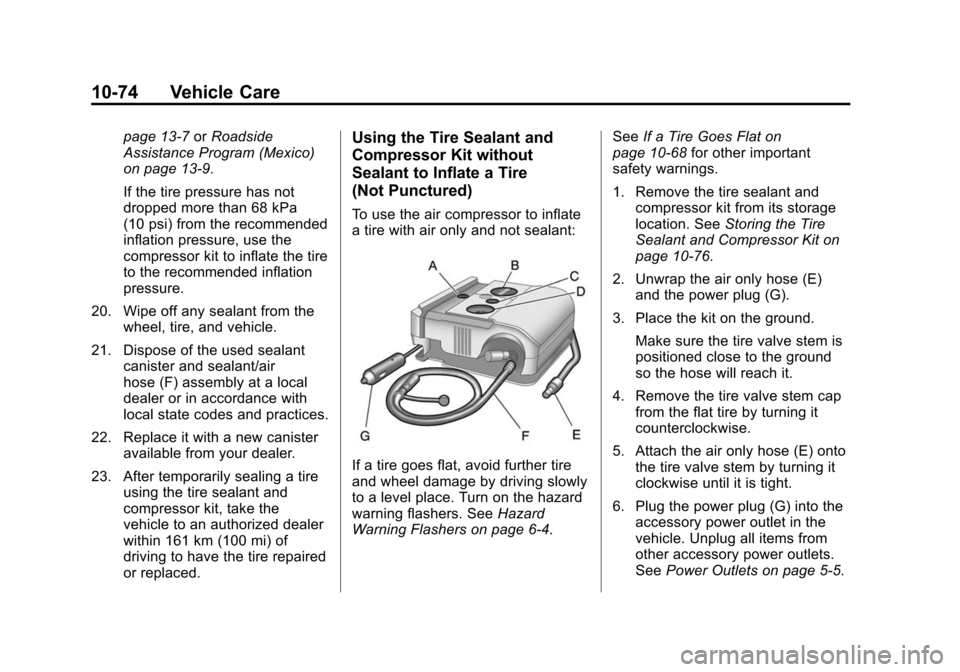
To use the air compressor to inflate
a tire with air only and not sealant:
If a tire goes flat, avoid further tire
and wheel damage by driving slowly
to a level place. Turn on the hazard
warning flashers. See Hazard
Warning Flashers on page 6‑4. See
If a Tire Goes Flat on
page 10‑68 for other important
safety warnings.
1. Remove the tire sealant and compressor kit from its storage
location. See Storing the Tire
Sealant and Compressor Kit on
page 10‑76.
2. Unwrap the air only hose (E) and the power plug (G).
3. Place the kit on the ground. Make sure the tire valve stem is
positioned close to the ground
so the hose will reach it.
4. Remove the tire valve stem cap from the flat tire by turning it
counterclockwise.
5. Attach the air only hose (E) onto the tire valve stem by turning it
clockwise until it is tight.
6. Plug the power plug (G) into the accessory power outlet in the
vehicle. Unplug all items from
other accessory power outlets.
See Power Outlets on page 5‑5.
Page 326 of 404

Black plate (78,1)Chevrolet Camaro Owner Manual (Include Mex) - 2012
10-78 Vehicle Care
A. Tool Container
B. Jack
C. End of the Jack
1. Turn the end of the jack (C)counterclockwise to loosen it.
Remove the jack (B) from the
retaining bracket.
2. Remove the tool container (A).
3. Remove the tools and tire strap from the tool container.
4. Place the tools next to the tire being changed.
Removing the Flat Tire and
Installing the Spare Tire
1. Do a safety check beforeproceeding. See If a Tire Goes
Flat on page 10‑68 for more
information.
2. If the vehicle has wheel bolt caps, remove the caps. Store
the caps with the wheel cover.
3. Use the fully extended wheelwrench to loosen all the wheel
nuts one-half turn
counterclockwise. Do not
remove them yet. Notice:
Make sure that the jack
lift head is in the correct position
or you may damage your vehicle.
The repairs would not be covered
by your warranty.
4. Position the jack lift head at the
jack location nearest the flat tire.
The location is indicated by a
mark on the bottom edge of the
vehicle. The jack must not be
used in any other position.
Raise the jack until it engages
with the jacking point.
Page 328 of 404

Black plate (80,1)Chevrolet Camaro Owner Manual (Include Mex) - 2012
10-80 Vehicle Care
6. Raise the vehicle by turning thewrench clockwise until the
vehicle is far enough off the
ground to allow enough room for
the compact spare tire to fit
under the vehicle.
Keep the hook parallel to the
ground. The wrench may need
to be removed and repositioned
to continue turning it.
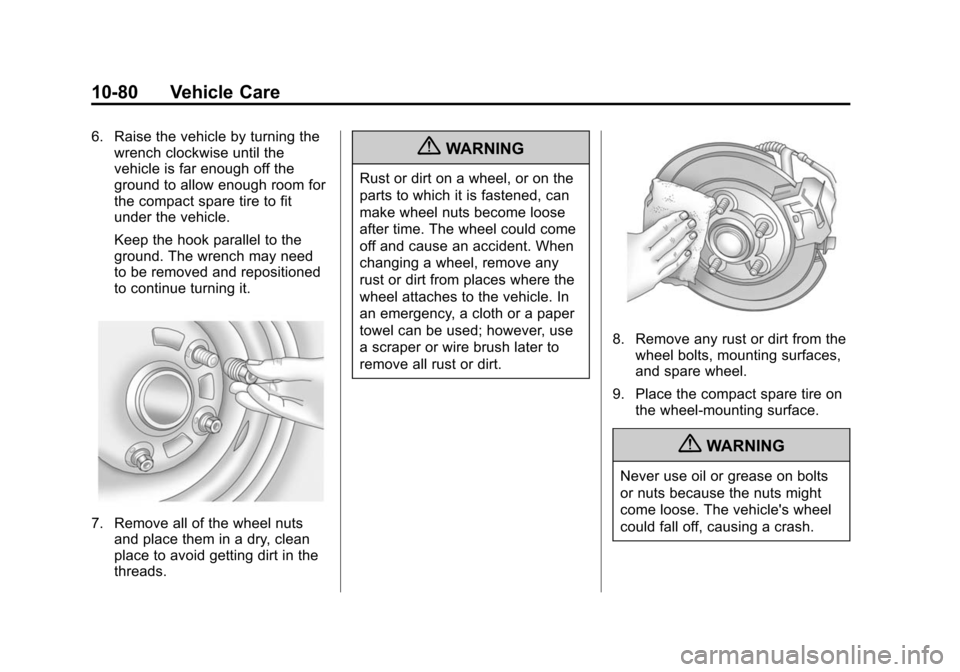
7. Remove all of the wheel nutsand place them in a dry, clean
place to avoid getting dirt in the
threads.
{WARNING
Rust or dirt on a wheel, or on the
parts to which it is fastened, can
make wheel nuts become loose
after time. The wheel could come
off and cause an accident. When
changing a wheel, remove any
rust or dirt from places where the
wheel attaches to the vehicle. In
an emergency, a cloth or a paper
towel can be used; however, use
a scraper or wire brush later to
remove all rust or dirt.
8. Remove any rust or dirt from the
wheel bolts, mounting surfaces,
and spare wheel.
9. Place the compact spare tire on the wheel-mounting surface.
{WARNING
Never use oil or grease on bolts
or nuts because the nuts might
come loose. The vehicle's wheel
could fall off, causing a crash.
Page 329 of 404

Black plate (81,1)Chevrolet Camaro Owner Manual (Include Mex) - 2012
Vehicle Care 10-81
10. Reinstall the wheel nuts withthe rounded end of the nuts
toward the wheel. Tighten each
nut as much as possible using
the wheel wrench until the
wheel is held firmly against
the hub.
Use your free hand to prevent
the wheel from turning while
you are tightening.
11. Lower the vehicle by turning the wrench counterclockwise.
Lower the jack completely.
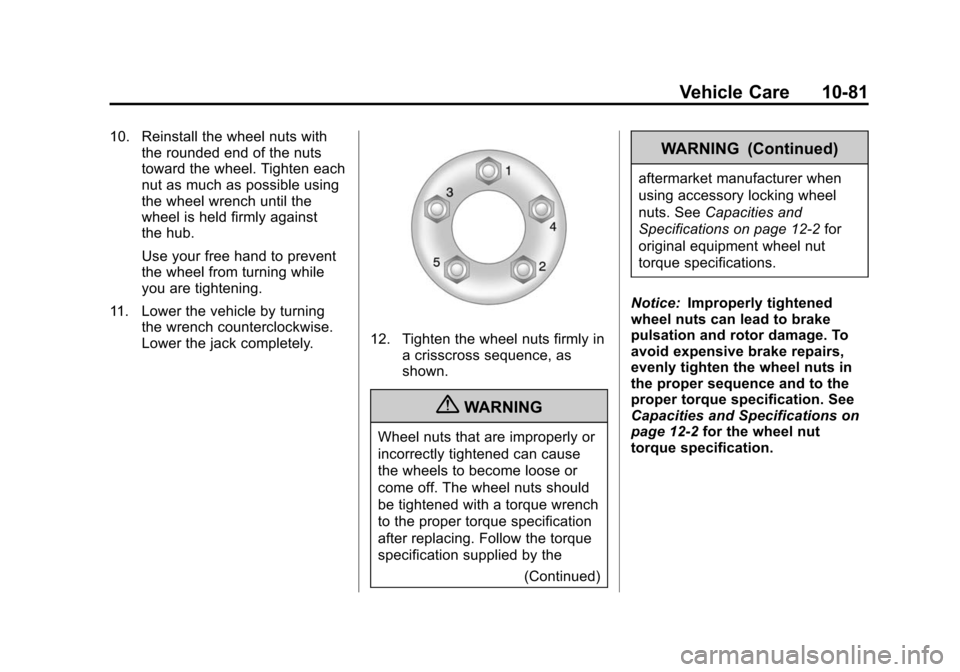
12. Tighten the wheel nuts firmly ina crisscross sequence, as
shown.
{WARNING
Wheel nuts that are improperly or
incorrectly tightened can cause
the wheels to become loose or
come off. The wheel nuts should
be tightened with a torque wrench
to the proper torque specification
after replacing. Follow the torque
specification supplied by the
(Continued)
WARNING (Continued)
aftermarket manufacturer when
using accessory locking wheel
nuts. SeeCapacities and
Specifications on page 12‑2 for
original equipment wheel nut
torque specifications.
Notice: Improperly tightened
wheel nuts can lead to brake
pulsation and rotor damage. To
avoid expensive brake repairs,
evenly tighten the wheel nuts in
the proper sequence and to the
proper torque specification. See
Capacities and Specifications on
page 12‑2 for the wheel nut
torque specification.
Page 331 of 404

Black plate (83,1)Chevrolet Camaro Owner Manual (Include Mex) - 2012
Vehicle Care 10-83
when possible. However, the
compact spare tire will last longer
and be in good shape if it is
replaced as soon as possible.
Notice:When the compact spare
is installed, do not take the
vehicle through an automatic
car wash with guide rails. The
compact spare can get caught on
the rails which can damage the
tire, wheel, and other parts of the
vehicle.
Do not use the compact spare on
other vehicles.
Do not mix the compact spare tire or
wheel with other wheels or tires.
They will not fit. Keep the spare tire
and its wheel together.
Notice: Tire chains will not fit the
compact spare. Using them can
damage the vehicle and can
damage the chains too. Do not
use tire chains on the compact
spare.Jump Starting
For more information about the
vehicle battery, see Battery on
page 10‑30.
If the battery has run down, try to
use another vehicle and some
jumper cables to start your vehicle.
Be sure to use the following steps to
do it safely.
{WARNING
Batteries can hurt you. They can
be dangerous because:
.They contain acid that can
burn you.
.They contain gas that can
explode or ignite.
.They contain enough
electricity to burn you.
If you do not follow these steps
exactly, some or all of these
things can hurt you. Notice:
Ignoring these steps
could result in costly damage to
the vehicle that would not be
covered by the warranty.
Trying to start the vehicle by
pushing or pulling it will not
work, and it could damage the
vehicle.
Page 335 of 404

Black plate (87,1)Chevrolet Camaro Owner Manual (Include Mex) - 2012
Vehicle Care 10-87
To disconnect the jumper cables
from both vehicles:
1. Disconnect the blacknegative (−) cable from the
vehicle that had the dead
battery.
2. Disconnect the black negative (−) cable from the
vehicle with the good battery.
3. Disconnect the red positive (+) cable from the vehicle with the
good battery.
4. Disconnect the red positive (+) cable from the other vehicle.
5. Return the caps over the positive (+) and negative (–)
terminals to their original
positions.Towing
Towing the Vehicle
Notice: To avoid damage, the
disabled vehicle should be towed
with all four wheels off the
ground. Care must be taken with
vehicles that have low ground
clearance and/or special
equipment. Always flatbed on a
car carrier.
Consult your dealer or a
professional towing service if the
disabled vehicle must be towed.
See Roadside Assistance Program
(U.S. and Canada) on page 13‑7 or
Roadside Assistance Program
(Mexico) on page 13‑9.
To tow the vehicle behind another
vehicle for recreational purposes,
such as behind a motor home, see
“Recreational Vehicle Towing” in this
section.
Recreational Vehicle
Towing
Notice: Dolly towing or dinghy
towing the vehicle may cause
damage because of reduced
ground clearance. Always put the
vehicle on a flatbed truck or
trailer.
The vehicle was neither designed
nor intended to be towed with any of
its wheels on the ground. If the
vehicle must be towed, see “Towing
the Vehicle” earlier in this section.
Page 338 of 404

Black plate (90,1)Chevrolet Camaro Owner Manual (Include Mex) - 2012
10-90 Vehicle Care
Wheels and Trim—Aluminum
or Chrome
Use a soft, clean cloth with mild
soap and water to clean the wheels.
After rinsing thoroughly with clean
water, dry with a soft, clean towel.
A wax may then be applied.
Keep the wheels clean using a soft,
clean cloth with mild soap and
water. Rinse with clean water. After
rinsing thoroughly, dry with a soft,
clean towel. A wax may then be
applied.
Notice: Chrome wheels and other
chrome trim may be damaged if
the vehicle is not washed after
driving on roads that have been
sprayed with magnesium,
calcium, or sodium chloride.
These chlorides are used on
roads for conditions such as ice
and dust. Always wash the
chrome with soap and water after
exposure. Notice:
To avoid surface damage,
do not use strong soaps,
chemicals, abrasive polishes,
cleaners, brushes, or cleaners
that contain acid on aluminum or
chrome-plated wheels. Use only
approved cleaners. Also, never
drive a vehicle with aluminum or
chrome-plated wheels through an
automatic car wash that uses
silicone carbide tire cleaning
brushes. Damage could occur
and the repairs would not be
covered by the vehicle warranty.
Steering, Suspension, and
Chassis Components
Visually inspect front and rear
suspension and steering system for
damaged, loose, or missing parts
or signs of wear. Inspect power
steering lines and hoses for proper
hook-up, binding, leaks, cracks,
chafing, etc. Visually check constant
velocity joints, rubber boots, and
axle seals for leaks.
Body Component Lubrication
Lubricate all key lock cylinders,
hood hinges, liftgate hinges, and
steel fuel door hinge unless the
components are plastic. Applying
silicone grease on weatherstrips
with a clean cloth will make them
last longer, seal better, and not stick
or squeak.
Underbody Maintenance
Use plain water to flush dirt and
debris from the vehicle's underbody.
Your dealer or an underbody car
washing system can do this. If not
removed, rust and corrosion can
develop.
Sheet Metal Damage
If the vehicle is damaged and
requires sheet metal repair or
replacement, make sure the body
repair shop applies anti-corrosion
material to parts repaired or
replaced to restore corrosion
protection.