2013 CHEVROLET CAMARO air conditioning
[x] Cancel search: air conditioningPage 5 of 404

Black plate (5,1)Chevrolet Camaro Owner Manual (Include Mex) - 2012
Introduction v
Vehicle Symbol Chart
Here are some additional symbols
that may be found on the vehicle
and what they mean. For more
information on the symbol, refer to
the Index.
9:Airbag Readiness Light
#:Air Conditioning
!:Antilock Brake System (ABS)
%:Audio Steering Wheel Controls
or OnStar®
$: Brake System Warning Light
":Charging System
I:Cruise Control
B: Engine Coolant Temperature
O:Exterior Lamps
#:Fog Lamps
.: Fuel Gauge
+:Fuses
3: Headlamp High/Low-Beam
Changer
j: LATCH System Child
Restraints
*: Malfunction Indicator Lamp
::Oil Pressure
}:Power
/:Remote Vehicle Start
>:Safety Belt Reminders
7:Tire Pressure Monitor
d:Traction Control/Stabilitrak®
M:Windshield Washer Fluid
Page 17 of 404

Black plate (11,1)Chevrolet Camaro Owner Manual (Include Mex) - 2012
In Brief 1-11
Climate Controls
The heating, cooling, defrosting, and ventilation for the vehicle can be
controlled with this system.
A. Fan Control
B. Heated Seats
C. Temperature Control
D. Air Delivery Mode Controls
E. Air ConditioningF. Defrost
G. Rear Window Defogger
H. Recirculation
See
Climate Control Systems on
page 8‑1.
Transmission
Automatic Transmission
Tap Shift
Tap Shift allows the driver to
manually control the automatic
transmission. To use Tap Shift, the
shift lever must be in M (Manual
Mode). Vehicles with this feature
have indicators on the steering
wheel. The controls are on the
back of the steering wheel. Tap the
left control to downshift, and the
right control to upshift. A Driver
Information Center (DIC) message
indicates the gear the vehicle is in.
See Manual Mode on page 9‑29.
Page 137 of 404

Black plate (33,1)Chevrolet Camaro Owner Manual (Include Mex) - 2012
Instruments and Controls 5-33
UNLATCH TOP
This message displays and a sound
will be heard if you try to lower the
convertible top without first
releasing the front latch. See
Convertible Top on page 2‑18.
Cruise Control Messages
CRUISE SET TO XXX
This message displays when the
cruise control is set and shows the
speed it was set to. SeeCruise
Control on page 9‑38 for more
information.
Door Ajar Messages
DRIVER DOOR OPEN
This message will display when the
driver door is open. Close the door
completely.
HOOD OPEN
This message will display when the
hood is open. Close the hood
completely.
PASSENGER DOOR OPEN
This message will display when the
passenger door is open. Close the
door completely.
TRUNK OPEN
This message will display when the
trunk is open. Close the trunk
completely.
Engine Cooling System
Messages
A/C OFF DUE TO HIGH
ENGINE TEMP
This message displays when the
engine coolant becomes hotter than
the normal operating temperature.
To avoid added strain on a hot
engine, the air conditioning
compressor automatically turns off.
When the coolant temperature
returns to normal, the air
conditioning compressor turns back
on. You can continue to drive the
vehicle. If this message continues to appear,
have the system repaired by your
dealer as soon as possible to avoid
damage to the engine.
COOLANT LEVEL LOW ADD
COOLANT
This message will display if the
coolant is low. See
Engine Coolant
on page 10‑19.
ENGINE OVERHEATED —
IDLE ENGINE
This message displays when the
engine coolant temperature is too
hot. Stop and allow the vehicle to
idle until it cools down.
ENGINE OVERHEATED —
STOP ENGINE
This message displays and a
continuous chime sounds if the
engine cooling system reaches
unsafe temperatures for operation.
Stop and turn off the vehicle as
soon as it is safe to do so to avoid
Page 141 of 404

Black plate (37,1)Chevrolet Camaro Owner Manual (Include Mex) - 2012
Instruments and Controls 5-37
Service Vehicle Messages
SERVICE AC SYSTEM
This message is displayed if there is
a problem with the air conditioning
system. Take the vehicle to your
dealer for service.
SERVICE POWER STEERING
This message is displayed if there is
a problem with the power steering
system. Take the vehicle to your
dealer for service.
SERVICE VEHICLE SOON
This message is displayed if there is
a problem with the vehicle. Take the
vehicle to your dealer for service.
Tire Messages
CHECK XXX TIRE PRESSURE
or TIRE PRESSURE LOW ADD
AIR TO TIRE
This message displays if the vehicle
detects low pressure in one or more
tires.
This message also displays LEFT
FRONT, RIGHT FRONT, LEFT
REAR, or RIGHT REAR to indicate
the location of the low tire.
The low tire pressure warning light
will also come on. SeeTire
Pressure Light on page 5‑21.
If a tire pressure message appears
on the DIC, stop as soon as you
can. Inflate the tires by adding air
until the tire pressure is equal to the
values shown on the Tire and
Loading Information label. See Tires
on page 10‑47, Vehicle Load Limits
on page 9‑12, and Tire Pressure on
page 10‑54. The DIC also shows the tire
pressure values. See
Driver
Information Center (DIC) on
page 5‑24.SERVICE TIRE MONITOR
SYSTEM
This message displays if there is a
problem with the Tire Pressure
Monitor System (TPMS). See Tire
Pressure Monitor Operation on
page 10‑57 for more information.
TIRE LEARNING ACTIVE
This message displays when the
system is learning new tires. See
Tire Pressure Monitor Operation on
page 10‑57for more information.
TIRE PRESSURE SYSTEM
RESET
This message displays when
resetting the TPMS. See Tire
Pressure Monitor Operation on
page 10‑57 for more information.
Page 191 of 404

Black plate (1,1)Chevrolet Camaro Owner Manual (Include Mex) - 2012
Climate Controls 8-1
Climate Controls
Climate Control Systems
Climate Control Systems . . . . . . 8-1
Air Vents
Air Vents . . . . . . . . . . . . . . . . . . . . . . 8-3
Climate Control Systems
The heating, cooling, defrosting, and ventilation for the vehicle can be
controlled with this system.
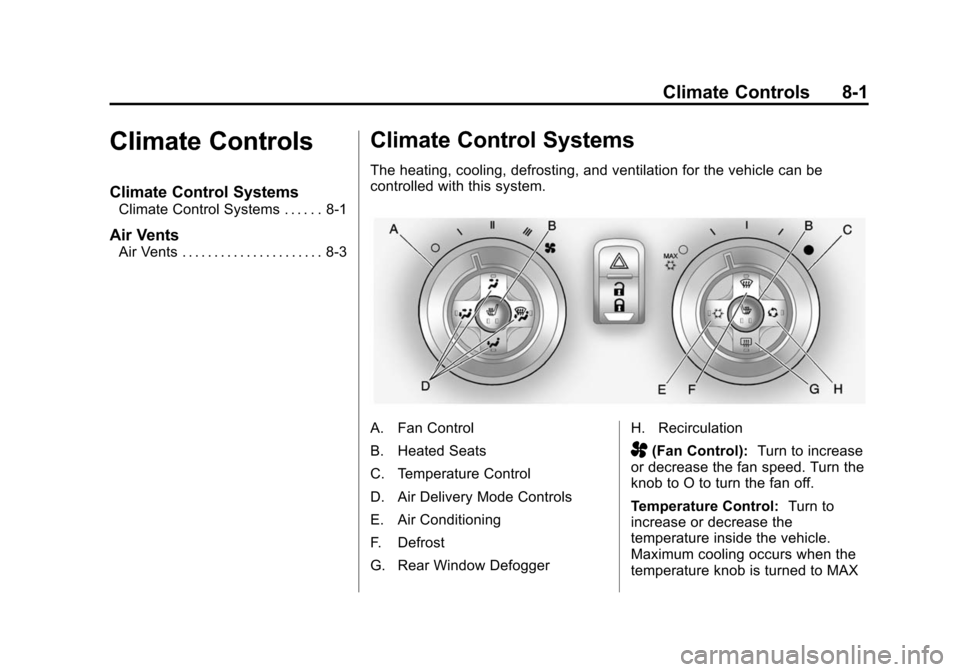
A. Fan Control
B. Heated Seats
C. Temperature Control
D. Air Delivery Mode Controls
E. Air Conditioning
F. Defrost
G. Rear Window DefoggerH. Recirculation
A(Fan Control):
Turn to increase
or decrease the fan speed. Turn the
knob to O to turn the fan off.
Temperature Control: Turn to
increase or decrease the
temperature inside the vehicle.
Maximum cooling occurs when the
temperature knob is turned to MAX
Page 192 of 404

Black plate (2,1)Chevrolet Camaro Owner Manual (Include Mex) - 2012
8-2 Climate Controls
#and the air conditioning system
is turned on and air is recirculated
inside the vehicle.
Air Delivery Mode Control: To
change the current mode, press one
of the following:
F (Vent): Air is directed to the
instrument panel outlets.
* (Bi-Level): Air is directed to the
instrument panel outlets and the
floor outlets.
7 (Floor): Air is directed to the
floor outlets.
W(Defog): Clears the windows of
fog or moisture. Air is directed to the
windshield and floor outlets.
0(Defrost): Clears the
windshield of fog or frost more
quickly. Air is directed to the
windshield and side window outlets.
For best results, clear all snow and
ice from the windshield before
defrosting.
Do not drive the vehicle until all
windows are clear.
Air Conditioning
#(Air Conditioning): Press to
turn the air conditioning on or off.
An indicator light turns on. If the
fan is turned off or the outside
temperature falls below freezing,
the air conditioning will not work.
The air conditioning might
automatically come on when
0is
selected.
)(Recirculation): Press to turn
on the recirculation. An indicator
light comes on. Air is recirculated
inside the vehicle. It helps to quickly
cool the air inside the vehicle or
prevent outside air and odors from
entering.
Operation in the recirculation mode
while the air conditioner is off
increases humidity and may cause
the windows to fog.
Recirculation is not available in the
defrost or defog modes.
To improve fuel efficiency and to
cool the vehicle faster, recirculation
may be automatically selected in warm weather. The recirculation
light will not come on. Press the
)
to select recirculation; press it again
to select outside air.
Rear Window Defogger
1(Rear Defogger):
Press to
turn the rear window defogger on
or off. The rear window defogger
turns off automatically after about
12 minutes. It can also be turned off
by turning the ignition to ACC/
ACCESSORY or LOCK/OFF.
If turned on again it runs for about
six minutes before turning off. At
higher vehicle speeds, the rear
defogger can stay on continuously.
Do not drive the vehicle until all
windows are clear.
Notice: Do not use a razor blade
or sharp object to clear the inside
rear window. Do not adhere
anything to the defogger grid
lines in the rear glass. These
actions may damage the rear
defogger. Repairs would not be
covered by your warranty.
Page 290 of 404

Black plate (42,1)Chevrolet Camaro Owner Manual (Include Mex) - 2012
10-42 Vehicle Care
The vehicle may not be equipped
with all of the fuses, relays, and
features shown.J-CaseFuses Usage
6 Wiper
12 Starter
22 Brake
Vacuum Pump
25 Power
Windows Rear
26 Power Windows
Front
27 Rear Defog
41 Cooling Fan High
43 Antilock Brake
System Pump
44 Cooling Fan Low Mini Fuses Usage
1 Air Conditioning
Compressor Clutch
2 Transmission
Control Module
5 Engine Control
Module Main
7 Pre-Catalytic
Converter Oxygen
Sensor
8 Post-Catalytic
Converter Oxygen
Sensor
9 Fuel
Injectors
–Even
10 Fuel Injectors –Odd
11 Cooling Fan Relay
14 Manifold Air Flow/
Chassis Control
15 Ignition Mini Fuses Usage
16 Run/Crank IP
17 Sensing Diagnostic
Module/Ignition
18 Run/Crank Body
19 Transmission
Control Module/
Ignition
20 Engine Control
Module/Ignition
31 Outside Rearview
Mirror
32 Canister Vent
Solenoid
33 Body Control
Module #6
34 Sunroof
35 Front Heated Seats
38 Washer Pump Front
Page 291 of 404

Black plate (43,1)Chevrolet Camaro Owner Manual (Include Mex) - 2012
Vehicle Care 10-43
Mini Fuses Usage40 Antilock Brake
System Valves
46 HID
Headlamp
–Left
Front
47 HID
Headlamp
–Right
Front
50 Fog Lamps
51 Horn
52 Spare
55 High‐Beam
Headlamp
–Right
Front
56 High‐Beam
Headlamp
–Left
Front
61 Heated Mirror Mini Relays Usage
K26 Powertrain
K50 Run/Crank
K55 Rear Defog
K612 Cooling Fan High
K614 Cooling Fan Control
Micro
Relays Usage
K61 Starter
K69 Wiper Control
K613 Cooling Fan Low
K617 Air Conditioning
Compressor Clutch
K619 Wiper Speed
K627 High Intensity
Discharge
Headlamps
K632 Brake
Vacuum PumpInstrument Panel Fuse
Block
The instrument panel fuse block is
located on the end of the instrument
panel, on the driver side of the
vehicle. To access the fuses, open
the fuse panel door by pulling out.
To reinstall the door, push the door
back into its original location.