2013.5 PEUGEOT 5008 ESP
[x] Cancel search: ESPPage 189 of 404
9
Driving187
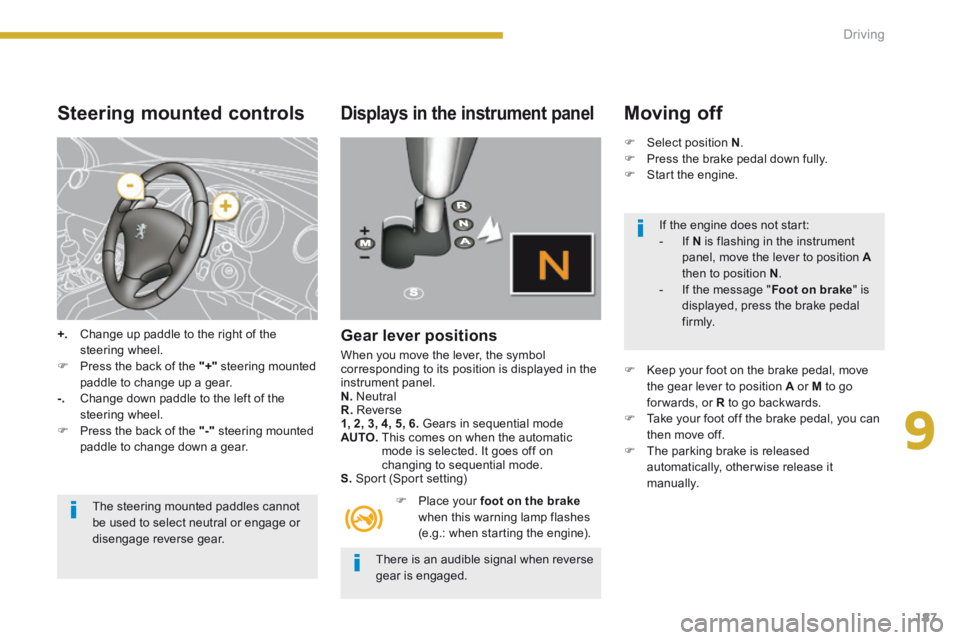
Steering mounted controls
+. Change up paddle to the right of the steering wheel. Press the back of the "+" steering mounted paddle to change up a gear. -. Change down paddle to the left of the steering wheel.
Press the back of the "-" steering mounted paddle to change down a gear.
The steering mounted paddles cannot be used to select neutral or engage or
disengage reverse gear.
Displays in the instrument panel
Gear lever positions
When you move the lever, the symbol corresponding to its position is displayed in the instrument panel. N. Neutral R. Reverse 1, 2, 3, 4, 5, 6. Gears in sequential mode AUTO. This comes on when the automatic mode is selected. It goes off on changing to sequential mode. S. Sport (Sport setting)
Place your foot on the brakewhen this warning lamp flashes (e.g.: when starting the engine).
Moving off
Select position N . Press the brake pedal down fully. Start the engine.
Keep your foot on the brake pedal, move the gear lever to position A or M to go for wards, or R to go backwards. Take your foot off the brake pedal, you can then move off. The parking brake is released automatically, otherwise release it manually.
There is an audible signal when reverse gear is engaged.
If the engine does not start: - If N is flashing in the instrument panel, move the lever to position Athen to position N . - If the message " Foot on brake " is displayed, press the brake pedal f i r m l y.
Page 193 of 404
9
Driving191
"Porsche Tiptronic System" automatic gearbox
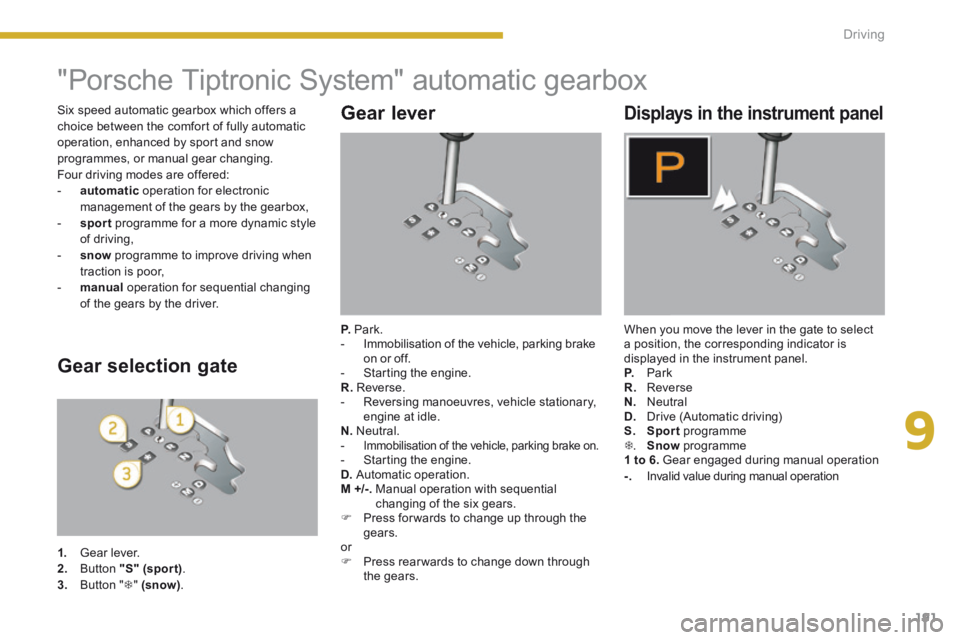
Gear lever
P. Park. - Immobilisation of the vehicle, parking brake on or off. - Starting the engine. R. Reverse. - Reversing manoeuvres, vehicle stationary, engine at idle. N. Neutral. - Immobilisation of the vehicle, parking brake on. - Starting the engine. D. Automatic operation. M +/-. Manual operation with sequential changing of the six gears. Press for wards to change up through the gears. or Press rear wards to change down through the gears.
Displays in the instrument panel
When you move the lever in the gate to select a position, the corresponding indicator is displayed in the instrument panel. P. Park R. Reverse N. Neutral D. Drive (Automatic driving) S. Sport programme . Snow programme 1 to 6. Gear engaged during manual operation -. Invalid value during manual operation
Gear selection gate
1. Gear lever. 2. Button "S" (spor t) . 3. Button " " (snow) .
Six speed automatic gearbox which offers a choice between the comfort of fully automatic operation, enhanced by sport and snow programmes, or manual gear changing. Four driving modes are offered: - automatic operation for electronic management of the gears by the gearbox, - sport programme for a more dynamic style of driving, - snow programme to improve driving when traction is poor, - manual operation for sequential changing of the gears by the driver.
Page 201 of 404

9
Driving199
The parking sensors are switched off : switched off : switched off - when you exit reverse gear, - when the speed is higher than 6 mph (10 km/h) in for ward gear, - when the vehicle has been stationary for more than three seconds in for ward gear.
Deactivation Operating fault
Reactivation
Press button A , the warning lamp comes on, the system is fully deactivated.
If an operating fault occurs, this warning lamp is displayed in the instrument panel and/or a message appears in the multifunction screen, accompanied by an audible signal (short beep), when reverse gear is engaged. Contact a PEUGEOT dealer or a qualified workshop.
In bad weather or in winter, ensure that the sensors are not covered with mud, ice or snow. When reverse gear is engaged, an audible signal (long beep) indicates that the sensors may be dirty. When the vehicle is being driven at a speed below approximately 6 mph (10 km/h), certain sources of noise (motorcycles, lorries, pneumatic drills, ...) may trigger the parking sensor audible signals.
The parking sensor system cannot, in any circumstances, replace the need for vigilance and responsibility on the part of the driver.
The system will be deactivated automatically when a trailer is being towed or when a bicycle carrier is fitted (vehicle fitted with a towbar or bicycle carrier recommended by PEUGEOT).
Press button A again, the warning lamp switches off, the system is reactivated.
Page 202 of 404
Driving
200
Reversing camera
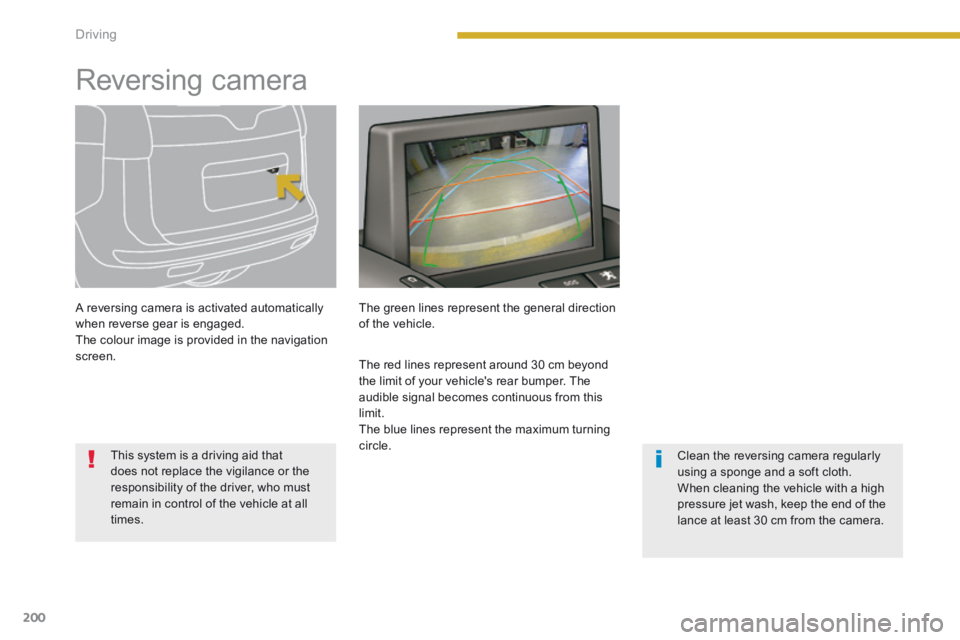
A reversing camera is activated automatically when reverse gear is engaged. The colour image is provided in the navigation screen.
This system is a driving aid that does not replace the vigilance or the responsibility of the driver, who must remain in control of the vehicle at all times.
Clean the reversing camera regularly using a sponge and a soft cloth. When cleaning the vehicle with a high pressure jet wash, keep the end of the lance at least 30 cm from the camera.
The green lines represent the general direction of the vehicle.
The red lines represent around 30 cm beyond the limit of your vehicle's rear bumper. The audible signal becomes continuous from this limit. The blue lines represent the maximum turning circle.
Page 207 of 404
10
Checks205
Running out of fuel (Diesel)
1.6 litre HDi engine
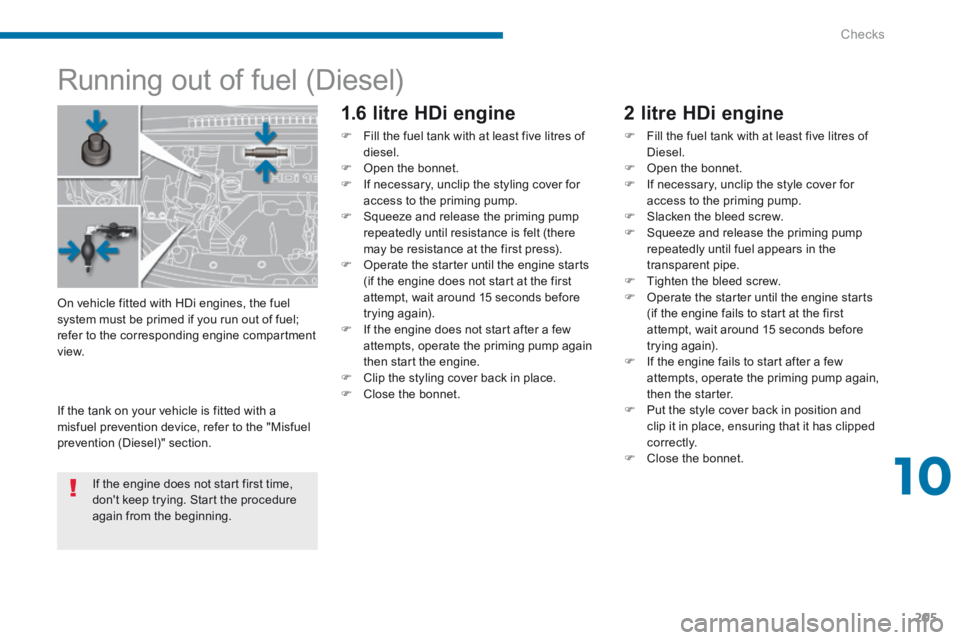
Fill the fuel tank with at least five litres of diesel. Open the bonnet. If necessary, unclip the styling cover for access to the priming pump. Squeeze and release the priming pump repeatedly until resistance is felt (there may be resistance at the first press). Operate the starter until the engine starts (if the engine does not start at the first attempt, wait around 15 seconds before trying again). If the engine does not start after a few attempts, operate the priming pump again then start the engine. Clip the styling cover back in place. Close the bonnet.
2 litre HDi engine
Fill the fuel tank with at least five litres of Diesel. Open the bonnet. If necessary, unclip the style cover for access to the priming pump. Slacken the bleed screw. Squeeze and release the priming pump repeatedly until fuel appears in the transparent pipe. Tighten the bleed screw. Operate the starter until the engine starts (if the engine fails to start at the first attempt, wait around 15 seconds before trying again). If the engine fails to start after a few attempts, operate the priming pump again, then the starter. Put the style cover back in position and clip it in place, ensuring that it has clipped
c o r r e c t l y. Close the bonnet.
On vehicle fitted with HDi engines, the fuel system must be primed if you run out of fuel; refer to the corresponding engine compartment view.
If the tank on your vehicle is fitted with a misfuel prevention device, refer to the "Misfuel prevention (Diesel)" section.
If the engine does not start first time, don't keep trying. Start the procedure again from the beginning.
Page 210 of 404

Checks
208
Checking levels
Engine oil level
The check is carried out either when the ignition is switched on using the oil level indicator in the instrument panel for vehicles with and electric oil level gauge, or using the dipstick.
Check all of these levels regularly, in line with the warranty and maintenance record. Top them up if necessary, unless other wise indicated. If a level drops significantly, have the corresponding system checked by a PEUGEOT dealer or a qualified workshop.
It is normal to top up the oil level between two services (or oil changes). PEUGEOT recommends that you check the level, and top
up if necessary, every 3 000 miles (5 000 kms).
Take care when working under the bonnet, as certain areas of the engine may be extremely hot (risk of burns) and the cooling fan could start at any time (even with the ignition off).
If you find that the level is above the A mark or below the B mark, do not star t the engine . - If the level is above the MAX mark (risk of damage to the engine), contact a PEUGEOT dealer or a qualified workshop. - If the level is below the MIN mark, you must top up the engine oil.
A = M A X
To ensure that the reading is correct, your vehicle must be on level ground and the engine has been off for more than 30 minutes.
Checking using the dipstick
B = M I N
Refer to the "Petrol engine" or "Diesel engine" section for the location of the dipstick in the engine compartment of your vehicle. - Take the dipstick by its coloured grip and remove it completely. - Wipe the end of the dipstick using a clean non-fluffy cloth. - Refit the dipstick and push fully down, then pull it out again to make the visual check: the correct level is between the marks Aand B .
Page 239 of 404

11
Practical information237
Changing a fuse
Access to the tools Changing a fuse
Use the special tweezer to extract the fuse from its housing. Always replace the faulty fuse with a fuse of the same rating. Check that the number marked on the fusebox, the rating marked on the fuse and the following tables all agree.
GoodFailed
Before changing a fuse, the cause of the failure must be identified and rectified. Identify the failed fuse by checking the condition of its filament.
Procedure for replacing a faulty fuse with a new fuse to rectify a failure of the corresponding function.
PEUGEOT will not accept responsibility for the cost incurred in repairing your vehicle or for rectifying malfunctions resulting from the installation of accessories not supplied and not recommended by PEUGEOT and not installed in accordance with its instructions, in particular when the
combined consumption of all of the additional equipment connected exceeds 10 milliamperes.
Installing electrical accessories
Your vehicle's electrical system is designed to operate with standard or optional equipment. Before installing other electrical equipment or accessories on your vehicle, contact a PEUGEOT dealer or a qualified workshop. The extraction tweezer is fitted to the back of the dashboard fusebox cover. To gain access to it: Remove the cover completely. Remove the tweezer.
The replacement of a fuse not mentioned in the tables below may cause a serious malfunction on your vehicle. Contact a PEUGEOT dealer or a qualified workshop.
Page 243 of 404
11
Practical information241
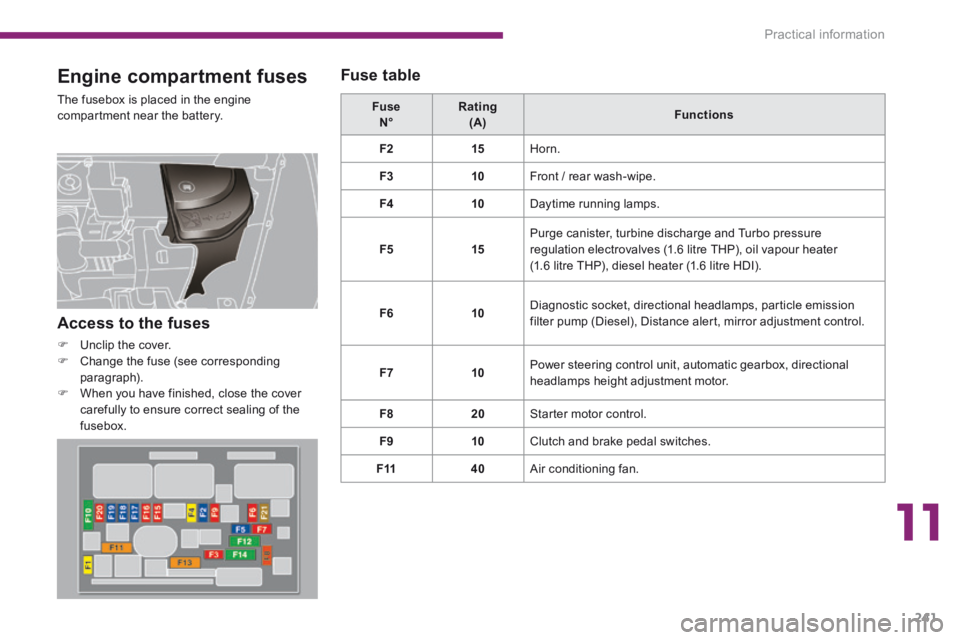
Engine compartment fuses
The fusebox is placed in the engine compartment near the battery. Fuse N° Rating (A) Functions
F215 Horn.
F310 Front / rear wash-wipe.
F410 Daytime running lamps.
F515 Purge canister, turbine discharge and Turbo pressure regulation electrovalves (1.6 litre THP), oil vapour heater (1.6 litre THP), diesel heater (1.6 litre HDI).
F610 Diagnostic socket, directional headlamps, particle emission filter pump (Diesel), Distance alert, mirror adjustment control.
F710 Power steering control unit, automatic gearbox, directional headlamps height adjustment motor.
F820 Starter motor control.
F910 Clutch and brake pedal switches.
F1140 Air conditioning fan.
Access to the fuses
Unclip the cover. Change the fuse (see corresponding paragraph). When you have finished, close the cover carefully to ensure correct sealing of the fusebox.
Fuse table