2013.5 PEUGEOT 5008 ESP
[x] Cancel search: ESPPage 95 of 404
4
Access93
Emergency control
System allowing the doors to be locked and unlocked manually in the event of a malfunction of the central locking system or battery failure.
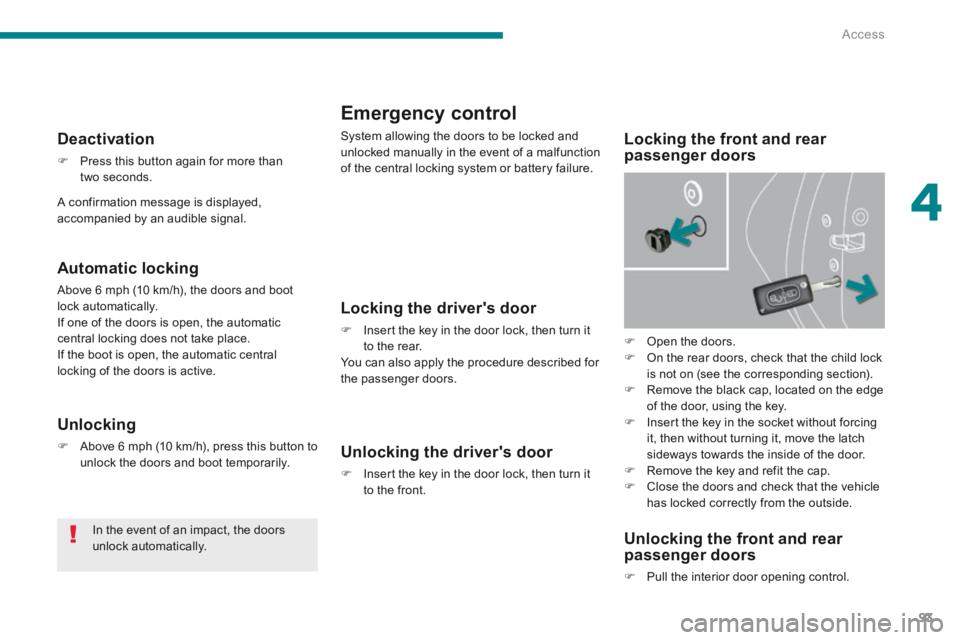
Locking the front and rear passenger doors
Locking the driver's door
Insert the key in the door lock, then turn it to the rear. You can also apply the procedure described for the passenger doors.
Unlocking the driver's door
Insert the key in the door lock, then turn it to the front.
Unlocking the front and rear passenger doors
Pull the interior door opening control.
Automatic locking
Above 6 mph (10 km/h), the doors and boot lock automatically. If one of the doors is open, the automatic central locking does not take place. If the boot is open, the automatic central locking of the doors is active.
Deactivation
Press this button again for more than two seconds.
Unlocking
Above 6 mph (10 km/h), press this button to unlock the doors and boot temporarily.
In the event of an impact, the doors unlock automatically.
Open the doors. On the rear doors, check that the child lock is not on (see the corresponding section). Remove the black cap, located on the edge of the door, using the key. Insert the key in the socket without forcing it, then without turning it, move the latch sideways towards the inside of the door. Remove the key and refit the cap. Close the doors and check that the vehicle has locked correctly from the outside.
A confirmation message is displayed, accompanied by an audible signal.
Page 103 of 404
5
Visibility101
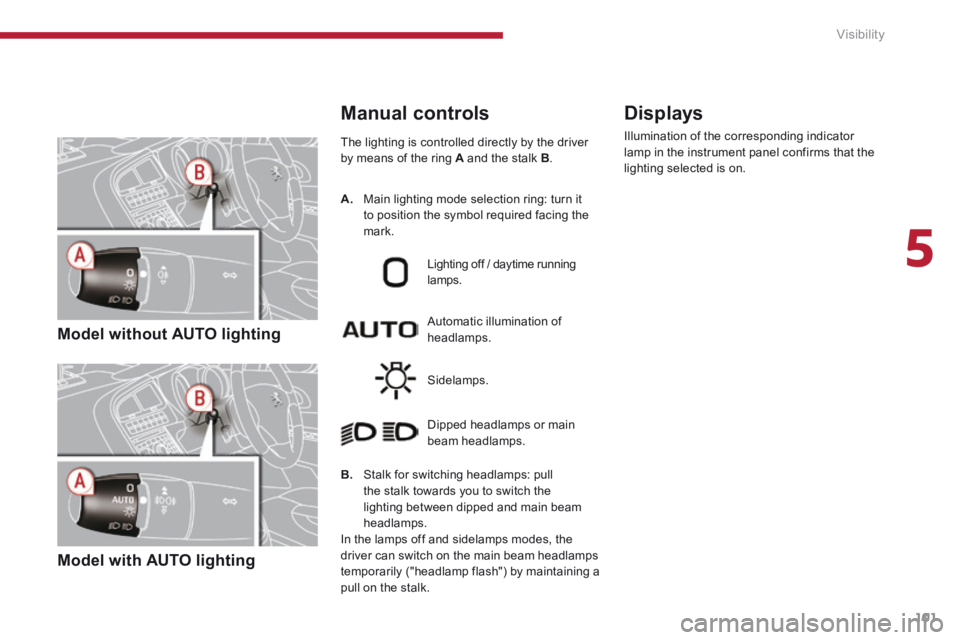
Model without AUTO lighting
Model with AUTO lighting
The lighting is controlled directly by the driver by means of the ring A and the stalk B .
B. Stalk for switching headlamps: pull the stalk towards you to switch the lighting between dipped and main beam headlamps.
In the lamps off and sidelamps modes, the driver can switch on the main beam headlamps temporarily ("headlamp flash") by maintaining a pull on the stalk.
Automatic illumination of headlamps.
Lighting off / daytime running lamps.
Sidelamps.
Dipped headlamps or main beam headlamps.
Displays
Illumination of the corresponding indicator lamp in the instrument panel confirms that the lighting selected is on.
Manual controls
A. Main lighting mode selection ring: turn it to position the symbol required facing the mark.
Page 111 of 404
5
Visibility109
Wiper controls
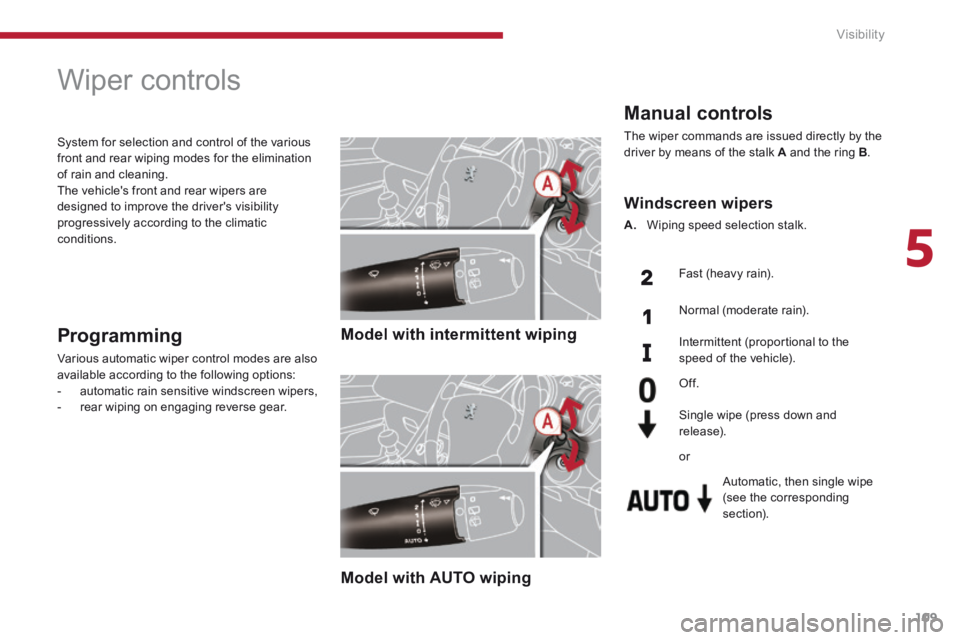
Model with intermittent wiping
Model with AUTO wiping
Programming
Various automatic wiper control modes are also available according to the following options: - automatic rain sensitive windscreen wipers, - rear wiping on engaging reverse gear.
System for selection and control of the various front and rear wiping modes for the elimination of rain and cleaning. The vehicle's front and rear wipers are designed to improve the driver's visibility progressively according to the climatic conditions.
Manual controls
The wiper commands are issued directly by the driver by means of the stalk A and the ring B .
Windscreen wipers
A. Wiping speed selection stalk.
Fast (heavy rain).
Normal (moderate rain).
Intermittent (proportional to the speed of the vehicle).
Automatic, then single wipe (see the corresponding section).
Of f.
Single wipe (press down and
release).
or
Page 116 of 404
Visibility
114
Courtesy lamps
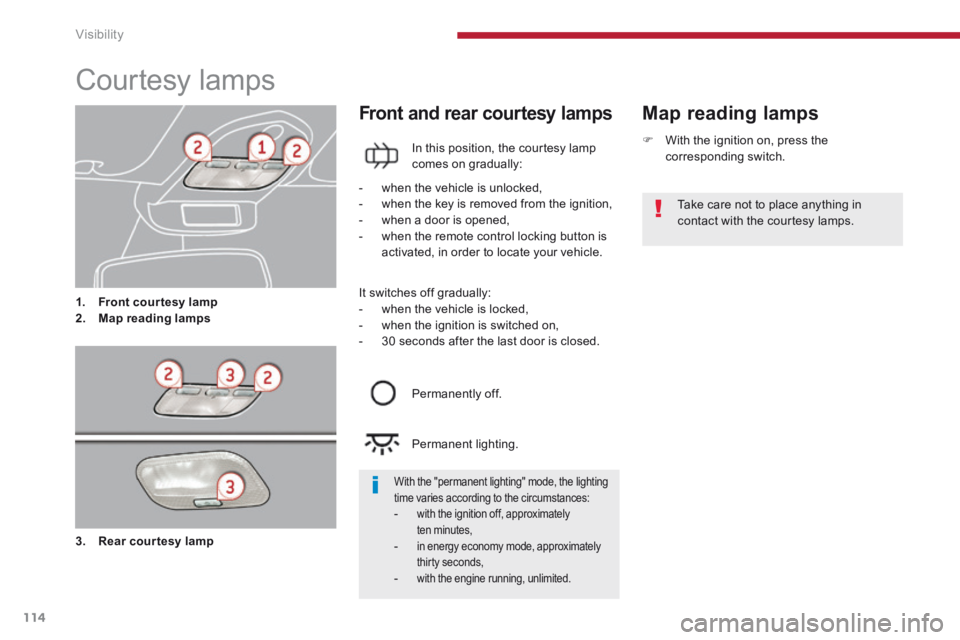
1. Front courtesy lamp2. Map reading lamps
Map reading lamps Front and rear courtesy lamps
In this position, the courtesy lamp comes on gradually:
- when the vehicle is unlocked, - when the key is removed from the ignition, - when a door is opened, - when the remote control locking button is activated, in order to locate your vehicle.
Permanently off.
Permanent lighting.
It switches off gradually: - when the vehicle is locked, - when the ignition is switched on, - 30 seconds after the last door is closed.
3. Rear courtesy lamp
Take care not to place anything in contact with the courtesy lamps.
With the "permanent lighting" mode, the lighting time varies according to the circumstances: - with the ignition off, approximately ten minutes, - in energy economy mode, approximately thirty seconds, - with the engine running, unlimited.
With the ignition on, press the corresponding switch.
Page 130 of 404

Fittings
128
High load retaining net *
To use it in row 1: fold the rear seats, open the covers of the upper fixings 1 , unroll the high load retaining net, position one of the ends of the net's metal bar in the corresponding upper fixing 1 , then do the same with the other end, slacken the straps fully, fix the snap hook of each of the straps on the corresponding Top Tether ring 3(located on the back of the folded rear side seats), tighten the straps, check that the net is hooked and tightened
c o r r e c t l y.
To use it in row 2: roll up or remove the load space screen, open the covers of the upper fixings 2 , unroll the high load retaining net, position one of the ends of the net's metal bar in the corresponding upper fixing 2 , then do the same with the other end, fix the snap hook of each of the straps in the corresponding stowing ring 4 , tighten the straps, check that the net is hooked and tightened c o r r e c t l y.
Hooked onto the special upper and lower fixings, this permits use of the entire loading volume up to the roof: - behind the front seats (row 1) when the rear seats are folded. - behind the rear seats (row 2).
* If your vehicle is equipped with this.
When positioning the net, check that the strap loops are visible from the boot; this will make slackening or tightening easier.
Page 137 of 404
7
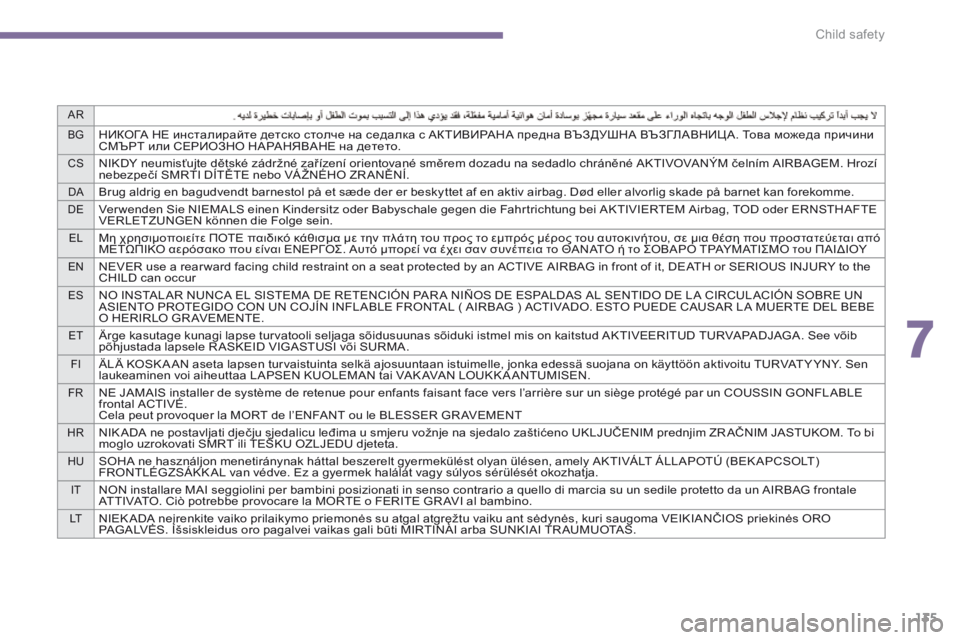
AR
BG
НИКОГА НЕ инсталирайте детско столче на седалка с АКТИВИРАНА предна ВЪЗДУШНА ВЪЗГЛАВНИЦ А. Това можеда причини
СМЪРТ или СЕРИОЗНО НАРАНЯВАНЕ на детето.
CSNIKDY neumisťujte dětské zádržné zařízení orientované směrem dozadu na sedadlo chráněné AKTIVOVANÝM čelním AIRBAGEM. Hrozí
nebezpečí SMRTI DÍTĚTE nebo VÁ ŽNÉHO ZR ANĚNÍ.
DABrug aldrig en bagudvendt barnestol på et sæde der er beskyttet af en aktiv airbag. Død eller alvorlig skade på barnet kan forekomme.
DEVer wenden Sie NIEMALS einen Kindersitz oder Babyschale gegen die Fahr trichtung bei AKTIVIERTEM Airbag, TOD oder ERNSTHAFTE
VERLETZUNGEN können die Folge sein.
ELΜη χρησιμοποιείτε ΠΟΤΕ παιδικό κάθισμα με την πλάτη του προς το εμπρός μέρος του αυτοκινήτου, σε μια θέση που προστατεύεται από
ΜΕΤΩΠΙΚΟ αερόσακο που είναι ΕΝΕΡΓΟΣ. Αυτό μπορεί να έχει σαν συνέπεια το ΘΑΝΑΤΟ ή το ΣΟΒΑΡΟ ΤΡΑΥΜΑΤΙΣΜΟ του ΠΑΙΔΙΟΥ
ENNEVER use a rear ward facing child restraint on a seat protected by an ACTIVE AIRBAG in front of it, DEATH or SERIOUS INJURY to the
CHILD can occur
ESNO INSTALAR NUNCA EL SISTEMA DE RETENCIÓN PAR A NIÑOS DE ESPALDAS AL SENTIDO DE LA CIRCULACIÓN SOBRE UN
ASIENTO PROTEGIDO CON UN COJÍN INFLABLE FRONTAL ( AIRBAG ) ACTIVADO. ESTO PUEDE CAUSAR LA MUERTE DEL BEBE
O HERIRLO GRAVEMENTE.
ETÄrge kasutage kunagi lapse tur vatooli seljaga sõidusuunas sõiduki istmel mis on kaitstud AKTIVEERITUD TURVAPADJAGA. See võib
põhjustada lapsele R ASKEID VIGASTUSI või SURMA.
FIÄLÄ KOSK A AN aseta lapsen tur vaistuinta selkä ajosuuntaan istuimelle, jonka edessä suojana on käyttöön aktivoitu TURVAT Y YNY. Sen
laukeaminen voi aiheuttaa LAPSEN KUOLEMAN tai VAK AVAN LOUKK A ANTUMISEN.
FRNE JAMAIS installer de système de retenue pour enfants faisant face vers l’arrière sur un siège protégé par un COUSSIN GONFLABLE
frontal ACTIVÉ.
Cela peut provoquer la MORT de l’ENFANT ou le BLESSER GR AVEMENT
HRNIK ADA ne postavljati dječju sjedalicu leđima u smjeru vožnje na sjedalo zaštićeno UKLJUČENIM prednjim ZR AČNIM JASTUKOM. To bi
moglo uzrokovati SMRT ili TEŠKU OZLJEDU djeteta.
HUSOHA ne használjon menetiránynak háttal beszerelt gyermekülést olyan ülésen, amely AKTIVÁLT ÁLLAPOTÚ (BEK APCSOLT)
FRONTLÉGZSÁKK AL van védve. Ez a gyermek halálát vagy súlyos sérülését okozhatja.
ITNON installare MAI seggiolini per bambini posizionati in senso contrario a quello di marcia su un sedile protetto da un AIRBAG frontale
ATTIVATO. Ciò potrebbe provocare la MORTE o FERITE GR AVI al bambino.
LTNIEK ADA neįrenkite vaiko prilaikymo priemonės su atgal atgręžtu vaiku ant sėdynės, kuri saugoma VEIKIANČIOS priekinės ORO
PAGALVĖS. Išsiskleidus oro pagalvei vaikas gali būti MIRTINAI arba SUNKIAI TR AUMUOTAS.
Child safety
135
Page 154 of 404
Safety
152
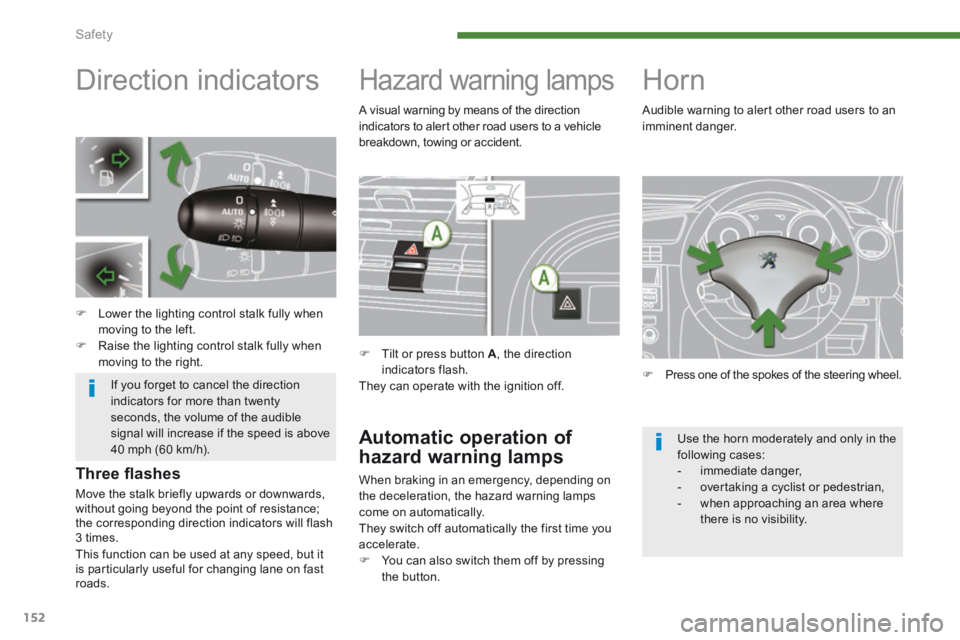
Direction indicators
Lower the lighting control stalk fully when moving to the left. Raise the lighting control stalk fully when moving to the right.
Hazard warning lamps
Tilt or press button A , the direction indicators flash. They can operate with the ignition off.
Automatic operation of
hazard warning lamps
When braking in an emergency, depending on the deceleration, the hazard warning lamps come on automatically. They switch off automatically the first time you accelerate. You can also switch them off by pressing the button.
Horn
Press one of the spokes of the steering wheel.
Audible warning to alert other road users to an imminent danger.
Three fl ashes
Move the stalk briefly upwards or downwards, without going beyond the point of resistance; the corresponding direction indicators will flash 3 times.
Use the horn moderately and only in the following cases: - immediate danger, - overtaking a cyclist or pedestrian, - when approaching an area where there is no visibility.
If you forget to cancel the direction indicators for more than twenty seconds, the volume of the audible signal will increase if the speed is above 40 mph (60 km/h).
A visual warning by means of the direction indicators to alert other road users to a vehicle breakdown, towing or accident.
This function can be used at any speed, but it is particularly useful for changing lane on fast roads.
Page 155 of 404

8
Safety153
Tyre under-infl ation detection
System which automatically checks the pressures of the tyres while driving. The system continuously monitors the pressures of the four tyres, as soon as the vehicle is moving. A pressure sensor is located in the valve of a each tyres (except the spare wheel). The system triggers an alert if a drop in pressure is detected in one or more tyres.
This system does not avoid the need to check the tyre pressures regularly (including the spare wheel) and before a long journey. Driving with under-inflated tyres adversely affects road holding, extends braking distances and causes premature tyre wear, particularly under arduous conditions (vehicle loaded, high speed, long journey).
The tyre pressures for your vehicle can be found on the tyre pressure label (see the "Identification markings" section). The tyre pressures must be checked when the tyres cold (vehicle stopped for 1 hour or after driving for less then 6 miles (10 km) at moderate speed). Other wise, add 0.3 bar to the values indicated on the label.
Driving with under-inflated tyres increases fuel consumption.
The tyre under-inflation detection system is an aid to driving which does
not replace the need for the driver to be vigilant or to drive responsibly.