Page 41 of 130
EBU28083Tires Check tire pressure r")
5-4
5
EBU19770Drive chain Check the condition of the drive chain and check
the drive chain slack. Lubricate and adjust the
drive chain as necessary. (See page 8-29.)EBU28083Tires Check tire pressure regularly to make sure it is at
the recommended specifications. Also check for
wear and damage.
Tire pressure
Use the low-pressure tire gauge to check and ad-
just tire pressures when the tires are cold. Tire
pressures must be equal on both sides.
WARNING! Operation of this vehicle with im-
proper tire pressure may cause severe injury
or death from loss of control or rollover. Tire
pressure below the minimum specified could
also cause the tire to dislodge from the rim un-
der severe riding conditions.
[EWB02541]
Set tire
pressures to the following specifications:The low-pressure tire gauge is included as stan-
dard equipment. Make two measurements of the
tire pressure and use the second reading. Dust or
dirt in the gauge could cause the first reading to be
incorrect.Recommended tire pressure:
Fron t
27.5 kPa (0.275 kgf/cm², 4.0 psi)
Rear
27.5 kPa (0.275 kgf/cm², 4.0 psi)
Minimum tire pressure:
Fron t
24.5 kPa (0.245 kgf/cm², 3.6 psi)
Rear
24.5 kPa (0.245 kgf/cm², 3.6 psi)
Maximum tire seating pressure:
Fron t
250 kPa (2.5 kgf/cm², 36 psi)
Rear
250 kPa (2.5 kgf/cm², 36 psi)
U33B71E0.book Page 4 Wednesday, August 10, 2011 9:01 AM
Page 42 of 130
5-5
5
Tire wear limit
When the tire groove decreases to 3 mm (0.12 in)
due to wear, replace the tire.Tire information
This ATV is equipped with tubeless tires with
valves.
WARNING
EWB02551Use of improper tires on this ATV may cause
loss of control, increasing your risk of an acci-
dent.After extensive tests, only the tires listed below
have been approved for this model by MBK
INDUSTRIE.
1. Low-pressure tire gauge
1. Tire wear limit
U33B71E0.book Page 5 Wednesday, August 10, 2011 9:01 AM
Page 43 of 130
5-6
5
Aftermarket tires and rims
The tires and rims that came with your ATV were
designed to match the performance capabilities
and to provide the best combination of handling,
braking, and comfort. Other tires, rims, sizes, and
combinations may not be appropriate.
EBU19840Chassis fasteners Make sure that all nuts, bolts and screws are prop-
erly tightened.
EBU19850Instruments, lights and switches Check that all instruments, lights and switches are
working properly. Correct if necessary. Fro nt:
Manufacturer/model:
MAXXIS/C9207
Size:
AT21 x 7-10
Ty p e :
Tu b e l e s s
Rear:
Manufacturer/model:
MAXXIS/M976
Size:
AT20 x 10-9
Ty p e :
Tu b e l e s s
U33B71E0.book Page 6 Wednesday, August 10, 2011 9:01 AM
Page 44 of 130

6-1
6
EBU19881
OPERATION
EBU19901Read the Owner’s Manual carefully before riding
the ATV. If there is a control or function you do not
understand, ask your Yamaha dealer.
WARNING
EWB00631Read the Owner’s Manual carefully to become
familiar with all controls in order to help pre-
vent any loss of control, which could cause an
accident or injury.EBU20184Starting a cold engine NOTICEECB00150See the “Engine break-in” section on page 6-4
prior to operating the engine for the first time.1. Set the parking brake.
2. Turn the fuel cock to “ON”.
3. Turn the key to “ON” and the engine stop
switch to“”.4. Shift the transmission into neutral. The neutral
indicator light should come on. If the indicator
light does not come on, have a Yamaha deal-
er check the electrical circuit.
TIPThis model is equipped with an ignition circuit cut-
off system. The engine can be started under the
following conditions.�The transmission is in neutral.�The clutch is disengaged with the transmission
in gear. However, it is recommended to shift into
neutral before starting the engine.5. Use the starter (choke) in reference to the fig-
ure:
Position (1):
Cold engine start with ambient temperature
below 5 °C (40 °F).
Position (2):
Cold engine start with ambient temperature
between 0 °C (30 °F) and 30 °C (90 °F).
Position (3):
Cold engine start with ambient temperature
above 25 °C (80 °F).
U33B71E0.book Page 1 Wednesday, August 10, 2011 9:01 AM
Page 45 of 130
 position
6. Completely close the throttle lever and start
the engine by pushing the start switch.
TIPIf the engine fails to start, release the start switch,
then pu")
6-2
6 Ambient temp./starter (choke) position
6. Completely close the throttle lever and start
the engine by pushing the start switch.
TIPIf the engine fails to start, release the start switch,
then push it again. Pause a few seconds before
the next attempt. Each cranking should be as short
as possible to preserve battery energy. Do not
crank the engine more than 10 seconds on each
attempt.
7. If the engine is started with the starter (choke)
in position (1), the starter (choke) should be
returned to position (2) to warm up the engine.
If the engine is started with the starter (choke)
in position (2), keep the starter (choke) in this
position to warm up the engine.
8. Continue warming up the engine until it idles
smoothly, then return the starter (choke) to
position (3) before riding.TIPThe engine is warm when it responds quickly to the
throttle with the starter (choke) turned off.NOTICEECB00163For maximum engine life, never accelerate
hard when the engine is cold!EBU20291Starting a warm engine Follow the same procedure as for starting a cold
engine, with the exception that the starter (choke)
is not required when the engine is warm. Instead,
start the engine with the throttle slightly open.
1. Fully open
2. Half open
3. Closed
4. Starter (choke)
1
23
1234
U33B71E0.book Page 2 Wednesday, August 10, 2011 9:01 AM
Page 46 of 130

6-3
6
EBU20522Shifting This ATV has a 5-speed forward transmission. The
transmission allows you to control the amount of
power you have available at a given speed or for
starting, accelerating, climbing hills, etc.
To shift into neutral, release the throttle lever, ap-
ply the clutch, and then repeatedly depress the
shift pedal until it stops.
When it stops, it will be in first gear. Raise the pedal
slightly to reach the neutral position, and then re-
lease the clutch.
EBU28112To start out and accelerate
1. Release the throttle lever, and then release
the parking brake.NOTICEECB00200Always close the throttle before shifting gears,
otherwise damage to the engine and drive train
may result.2. Pull the clutch lever to disengage the clutch.
3. Shift into first gear.
4. Open the throttle gradually and at the same
time, release the clutch lever slowly.
WARNING! Opening the throttle abruptly
or releasing the clutch lever too quickly
could make the ATV wheelie, which would
increase the chance of an accident, includ-
ing an overturn.
[EWB00731]
WARNING
EWB02401Stones or mud may come off the rear tires and
be thrown backwards when starting or acceler-
ating. Use caution when starting out or acceler-
ating when others are behind the ATV.
1. Shift pedal
2. Neutral position
1
2
2 3 4 5N1
U33B71E0.book Page 3 Wednesday, August 10, 2011 9:01 AM
Page 47 of 130

6-4
6 5. Once the ATV has attained adequate speed,
release the throttle, and at the same time,
quickly pull in the clutch lever.
6. Shift the transmission into second gear.
(Make sure not to shift the transmission into
neutral.)
7. Open the throttle part way and gradually re-
lease the clutch lever.
8. Follow the same procedure when shifting to
the next higher gear.
EBU20650To decelerate
When slowing down or stopping, release the throt-
tle and apply the brakes smoothly and evenly. As
you slow down, shift to a lower gear. Be sure that
the engine has sufficiently slowed before engaging
a lower gear. Improper use of the brakes or shifting
can cause the tires to lose traction, reducing con-
trol and increasing the possibility of an accident.
WARNING
EWB00710Make sure the engine has sufficiently slowed
before shifting to a lower gear. Engaging a low-
er gear when the engine speed is too high
could make the wheels stop rotating and losetraction. This could cause loss of control, an
accident and injury. It could also cause engine
or drive train damage.
NOTICEECB00180�Even with the transmission in the neutral po-
sition, do not coast for long periods of time
with the engine off, and do not tow the ATV
for long distances. The transmission is prop-
erly lubricated only when the engine is run-
ning. Inadequate lubrication may damage
the transmission.�Always use the clutch when changing gears.
The engine, transmission and drive train are
not designed to withstand the shock of
forced shifting and can be damaged by shift-
ing without using the clutch.EBU20672Engine break-in TIP�For ATVs equipped with an odometer or an hour
meter, follow the figures given in km (mi) or the
figures given in hours.
U33B71E0.book Page 4 Wednesday, August 10, 2011 9:01 AM
Page 48 of 130
 or 20
ho")
6-5
6
�For ATVs not equipped with an odometer or
hour meter, follow the figures given in hours.There is never a more important period in the life of
your engine than the first 320 km (200 mi) or 20
hours of riding. For this reason, you should read
the following material carefully.
Since the engine is brand new, do not put an ex-
cessive load on it for the first 320 km (200 mi) or 20
hours. The various parts in the engine wear and
polish themselves to the correct operating clear-
ances. During this period, prolonged full-throttle
operation or any condition that might result in en-
gine overheating must be avoided.
0–160 km (0–100 mi) or 0–10 hours
Avoid prolonged operation above 1/2 throttle. Vary
the speed of the ATV regularly. Do not operate it at
one set throttle position.
160–320 km (100–200 mi) or 10–20 hours
Avoid prolonged operation above 3/4 throttle. Rev
the engine through the gears freely, but do not use
full throttle at any time.
320 km (200 mi) or 20 hours and beyond
The ATV can now be operated normally.
NOTICEECB00220If any engine trouble should occur during the
engine break-in period, immediately have a
Yamaha dealer check the ATV.EBU20722Parking When parking the ATV, shift into first gear, stop the
engine, apply the parking brake, and then turn the
fuel cock to “OFF”.1. Parking brake lever (locked position)
U33B71E0.book Page 5 Wednesday, August 10, 2011 9:01 AM
 1
1 2
2 3
3 4
4 5
5 6
6 7
7 8
8 9
9 10
10 11
11 12
12 13
13 14
14 15
15 16
16 17
17 18
18 19
19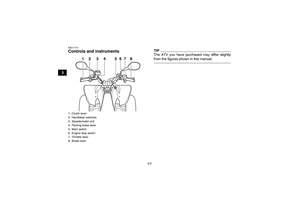 20
20 21
21 22
22 23
23 24
24 25
25 26
26 27
27 28
28 29
29 30
30 31
31 32
32 33
33 34
34 35
35 36
36 37
37 38
38 39
39 40
40 41
41 42
42 43
43 44
44 45
45 46
46 47
47 48
48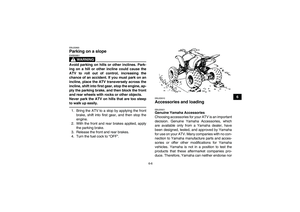 49
49 50
50 51
51 52
52 53
53 54
54 55
55 56
56 57
57 58
58 59
59 60
60 61
61 62
62 63
63 64
64 65
65 66
66 67
67 68
68 69
69 70
70 71
71 72
72 73
73 74
74 75
75 76
76 77
77 78
78 79
79 80
80 81
81 82
82 83
83 84
84 85
85 86
86 87
87 88
88 89
89 90
90 91
91 92
92 93
93 94
94 95
95 96
96 97
97 98
98 99
99 100
100 101
101 102
102 103
103 104
104 105
105 106
106 107
107 108
108 109
109 110
110 111
111 112
112 113
113 114
114 115
115 116
116 117
117 118
118 119
119 120
120 121
121 122
122 123
123 124
124 125
125 126
126 127
127 128
128 129
129
due to wear, replace the tire.Tire information
This ATV is equipped with tubeless tires with
valves.
WARNING
EWB02551Use of impro")
