Page 73 of 130

7-22
7
With practice, over a period of time, skill at con-
trolled sliding can be developed. The terrain
should be chosen carefully before attempting such
maneuvers, since both stability and control are re-
duced. Bear in mind that sliding maneuvers should
always be avoided on extremely slippery surfaces
such as ice, since all control may be lost.
WHAT TO DO IF...
This section is designed to be a reference guide
only. Be sure to read each section on riding tech-
niques completely.WHAT TO DO...
�If your ATV doesn’t turn when you want it to:
Bring the ATV to a stop and practice the turning
maneuvers again. Be sure you are putting your
weight on the footrest to the outside of the turn.
Position your weight over the front wheels for
better control. (See page 7-12.)�If your ATV begins to tip while turning:
Lean more into the turn to regain balance. If nec-
essary, gradually let off the throttle and/or steer
to the outside of the turn. (See page 7-12.)�If your ATV starts to slide sideways:
Steer in the direction of the slide if you have the
room. Applying the brakes or accelerating is not
recommended until you have corrected the
slide. (See page 7-21.)�If your ATV can’t make it up a hill you are trying
to climb:
Turn the ATV around if you still have forward
speed. If not, stop, dismount on the uphill side of
the ATV and physically turn the ATV around. If
the ATV starts to slip backwards, DO NOT USE
THE BRAKE PEDAL – the ATV may tip over on
top of you. Dismount the ATV on the uphill side.
(See page 7-13.)
U33B71E0.book Page 22 Wednesday, August 10, 2011 9:01 AM
Page 74 of 130
7-23
7
�If your ATV is traversing a sloping surface:
Be sure to ride with your weight positioned to-
wards the uphill side of the ATV to maintain
proper balance. If the ATV starts to tip, steer
down the hill (if there are no obstacles in your
way) to regain balance. If you discover that the
ATV is going to tip over, dismount on the uphill
side. (See page 7-18.)�If your ATV encounters shallow water:
Ride slowly and carefully through slow moving
water, watching for obstacles. Be sure to let wa-
ter drain from the ATV and CHECK YOUR
BRAKES AND ELECTRICAL EQUIPMENT
(turn signals, horn, headlight, etc.) FOR PROP-
ER OPERATION when you come out of the wa-
ter. Do not continue to ride your ATV until you
have regained adequate braking ability. (See
page 7-19.)
U33B71E0.book Page 23 Wednesday, August 10, 2011 9:01 AM
Page 75 of 130

8-1
8
EBU28783
PERIODIC MAINTENANCE AND ADJUSTMENT
EBU21674Periodic inspection, adjustment, and lubrication
will keep your vehicle in the safest and most effi-
cient condition possible. Safety is an obligation of
the vehicle owner/operator. The most important
points of vehicle inspection, adjustment, and lubri-
cation are explained on the following pages.
WARNING
EWB01841Failure to properly maintain the vehicle or per-
forming maintenance activities incorrectly may
increase your risk of injury or death during ser-
vice or while using the vehicle. If you are not fa-
miliar with vehicle service, have a Yamaha
dealer perform the service.
WARNING
EWB02562Turn off the engine when performing mainte-
nance unless otherwise specified.�A running engine has moving parts that can
catch on body parts or clothing and electri-
cal parts that can cause shocks or fires.
�Running the engine while servicing can lead
to eye injury, burns, fire, or carbon monoxide
poisoning - possibly leading to death. See
page 2-3 for more information about carbon
monoxide.
WARNING
EWB02690Brake discs, calipers, drums, and linings can
become very hot during use. To avoid possible
burns, let brake components cool before
touching them.The intervals given in the periodic maintenance
charts should be considered as a general guide
under normal riding conditions. However, DE-
PENDING ON THE WEATHER, TERRAIN, GEO-
GRAPHICAL LOCATION, AND INDIVIDUAL
USE, THE MAINTENANCE INTERVALS MAY
NEED TO BE SHORTENED.
U33B71E0.book Page 1 Wednesday, August 10, 2011 9:01 AM
Page 76 of 130
8-2
8
EBU29792Owner’s manual and tool kit Make sure to protect the owner’s manual by put-
ting it in the plastic bag, then by placing the bag in
the manual cover. Always carry the owner’s man-
ual along with the low-pressure tire gauge and the
owner’s tool kit under the seat.
The service information included in this manual
and the tools provided in the owner’s tool kit are in-
tended to assist you in the performance of preven-
tive maintenance and minor repairs. However,additional tools such as a torque wrench may be
necessary to perform certain maintenance work
correctly.
TIPIf you do not have the tools or experience required
for a particular job, have a Yamaha dealer perform
it for you.
1. Low-pressure tire gauge
2. Owner’s tool kit
3. Owner’s manual
4. Manual cover123
4
43
U33B71E0.book Page 2 Wednesday, August 10, 2011 9:01 AM
Page 77 of 130

8-3
8
EBU21743Periodic maintenance chart for the emission control system TIP�For ATVs not equipped with an odometer or an hour meter, follow the month maintenance intervals.�For ATVs equipped with an odometer or an hour meter, follow the km (mi) or hours maintenance inter-
vals. However, keep in mind that if the ATV isn’t used for a long period of time, the month maintenance
intervals should be followed.�Items marked with an asterisk should be performed by a Yamaha dealer as they require special tools,
data and technical skills.NO. ITEMCHECK OR MAINTENANCE
JOBINITIAL EVERY
Whichev-
er comes
firstmonth136612
km
(mi)320
(200)1300
(800)2500
(1600)2500
(1600)5000
(3200)
hours 20 80 160 160 320
1*Fuel lineCheck fuel hoses for cracks or other damage, and
replace if necessary.√√√
2 Spark plugCheck condition and clean, regap, or replace if
necessary.√√√√√
3*ValvesCheck valve clearance and adjust if necessary.√ √√√
4*CarburetorCheck starter (choke) operation and correct if nec-
essary.
Check engine idling speed and adjust if neces-
sary.√√√√
5*Crankcase breather
systemCheck breather hose for cracks or other damage,
and replace if necessary.√√√
U33B71E0.book Page 3 Wednesday, August 10, 2011 9:01 AM
Page 78 of 130
8-4
8
6*Exhaust systemCheck for leakage and replace gasket(s) if neces-
sary.
Check for looseness and tighten all screw clamps
and joints if necessary.√√√
7 Spark arresterClean.√√√
8*Air induction sys-
temCheck the air cut-off valve, reed valve, and hose
for damage.
Replace any damaged parts if necessary.√√√√√ NO. ITEMCHECK OR MAINTENANCE
JOBINITIAL EVERY
Whichev-
er comes
firstmonth136612
km
(mi)320
(200)1300
(800)2500
(1600)2500
(1600)5000
(3200)
hours 20 80 160 160 320U33B71E0.book Page 4 Wednesday, August 10, 2011 9:01 AM
Page 79 of 130

8-5
8
EBU21865General maintenance and lubrication chart TIP�For ATVs not equipped with an odometer or an hour meter, follow the month maintenance intervals.�For ATVs equipped with an odometer or an hour meter, follow the km (mi) or hours maintenance inter-
vals. However, keep in mind that if the ATV isn’t used for a long period of time, the month maintenance
intervals should be followed.�Items marked with an asterisk should be performed by a Yamaha dealer as they require special tools,
data and technical skills.NO. ITEMCHECK OR MAINTENANCE
JOBINITIAL EVERY
Whichev-
er comes
firstmonth136612
km
(mi)320
(200)1300
(800)2500
(1600)2500
(1600)5000
(3200)
hours 20 80 160 160 320
1 Air filter elementClean and replace if necessary.Every 20–40 hours (more often in wet or
dusty areas)
2*ClutchCheck operation and adjust if necessary.√ √√√
3*Front brakeCheck operation and correct if necessary.
Check fluid level and ATV for fluid leakage, and
correct if necessary.√√√√√
Replace brake pads. Whenever worn to the limit
4*Rear brakeCheck operation and correct if necessary.
Check fluid level and ATV for fluid leakage, and
correct if necessary.√√√√√
Replace brake pads. Whenever worn to the limit
U33B71E0.book Page 5 Wednesday, August 10, 2011 9:01 AM
Page 80 of 130

8-6
8
5*Brake hosesCheck for cracks or other damage, and replace if
necessary.√√√√
Replace. Every 4 years
6*Parking bra keCheck operation and adjust if necessary.√√√√√
7*WheelsCheck runout and for damage, and replace if nec-
essary.√ √√√
8*TiresCheck tread depth and for damage, and replace if
necessary.
Check air pressure and balance, and correct if
necessary.√ √√√
9*Wheel hub bearingsCheck for looseness or damage, and replace if
necessary.√ √√√
10*Swingarm pivotsCheck operation and for excessive play, and re-
place bearings if necessary.
Lubricate with lithium-soap-based grease.√√√
11*Upper and lower
arm pivotsLubricate with lithium-soap-based grease.√√√
12 Drive chainCheck chain slack and adjust if necessary.
Check rear wheel alignment and correct if neces-
sary.
Clean and lubricate.√√√√√
13*Drive chain rollerCheck for wear and replace if necessary.√√√ NO. ITEMCHECK OR MAINTENANCE
JOBINITIAL EVERY
Whichev-
er comes
firstmonth136612
km
(mi)320
(200)1300
(800)2500
(1600)2500
(1600)5000
(3200)
hours 20 80 160 160 320U33B71E0.book Page 6 Wednesday, August 10, 2011 9:01 AM
 1
1 2
2 3
3 4
4 5
5 6
6 7
7 8
8 9
9 10
10 11
11 12
12 13
13 14
14 15
15 16
16 17
17 18
18 19
19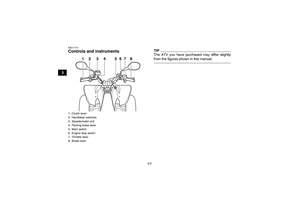 20
20 21
21 22
22 23
23 24
24 25
25 26
26 27
27 28
28 29
29 30
30 31
31 32
32 33
33 34
34 35
35 36
36 37
37 38
38 39
39 40
40 41
41 42
42 43
43 44
44 45
45 46
46 47
47 48
48 49
49 50
50 51
51 52
52 53
53 54
54 55
55 56
56 57
57 58
58 59
59 60
60 61
61 62
62 63
63 64
64 65
65 66
66 67
67 68
68 69
69 70
70 71
71 72
72 73
73 74
74 75
75 76
76 77
77 78
78 79
79 80
80 81
81 82
82 83
83 84
84 85
85 86
86 87
87 88
88 89
89 90
90 91
91 92
92 93
93 94
94 95
95 96
96 97
97 98
98 99
99 100
100 101
101 102
102 103
103 104
104 105
105 106
106 107
107 108
108 109
109 110
110 111
111 112
112 113
113 114
114 115
115 116
116 117
117 118
118 119
119 120
120 121
121 122
122 123
123 124
124 125
125 126
126 127
127 128
128 129
129

 if neces-
sary.
Check for looseness and tighten all screw clamps
and joints if necessary.√√√
7 Spark arresterClean.√√√
8*A")