2012 VOLKSWAGEN GOLF ignition
[x] Cancel search: ignitionPage 418 of 516
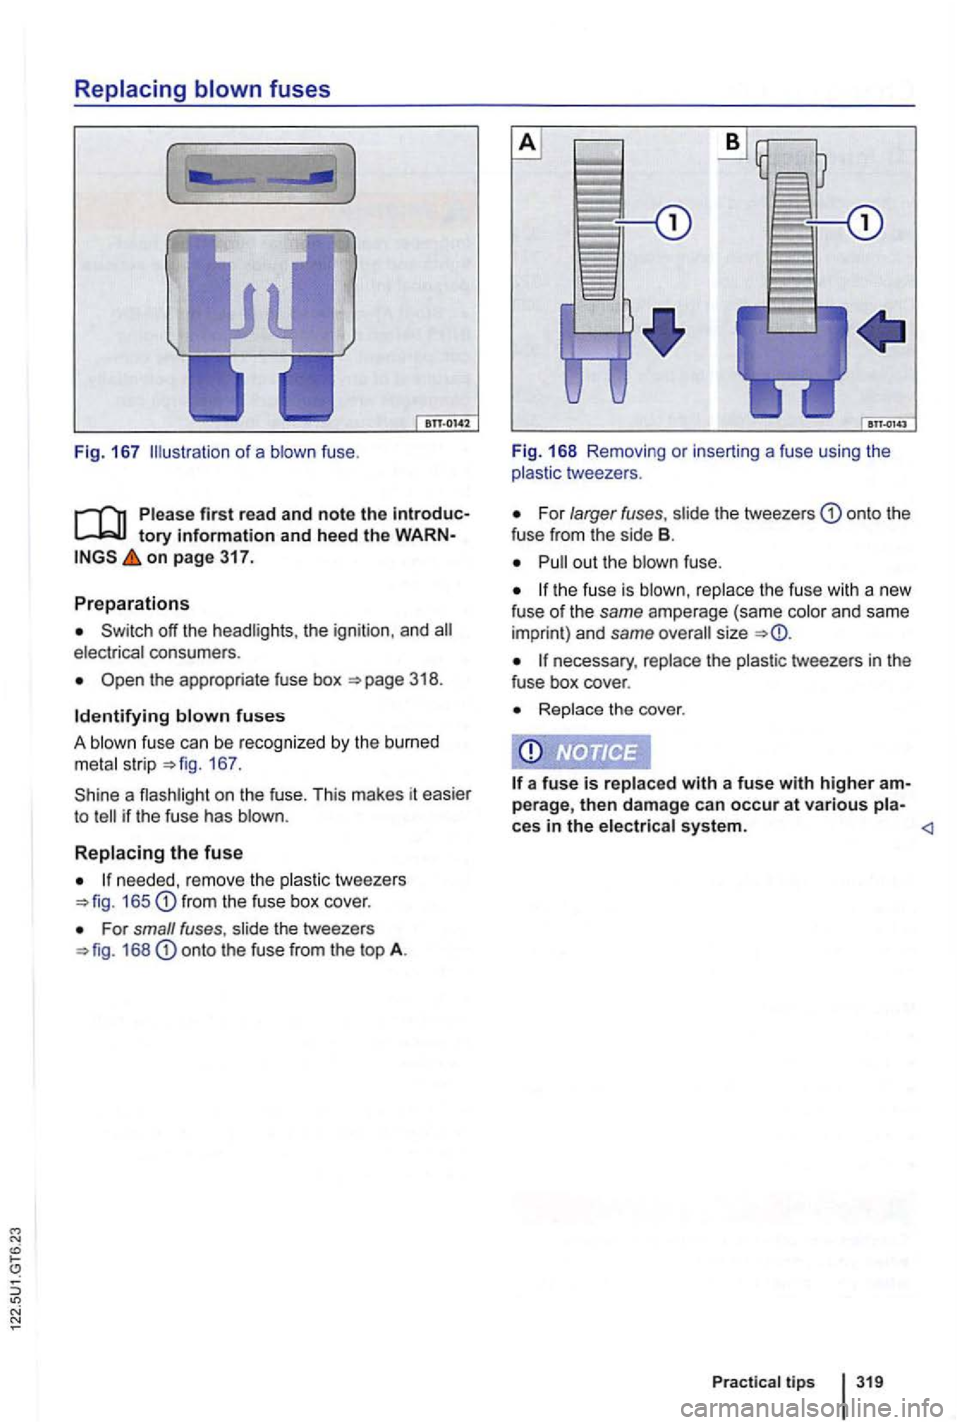
Fig. 167 o f a blown fuse.
tory information and heed the WARNon page 317.
Preparations
off the headlights . the ignition , and electrical consumers .
the appropriate fuse box
167.
a flashlight on th e fuse. This makes it easier
t o
165 fro m the fuse box cover .
For small fuses, slide the tweezers 168 onto the fuse from the top A. Fig
. 168 Removing
or inserting a fuse using the
p lastic tweezers .
For larger fuses, slide the tweezers onto the
f use from the side B.
the fuse is blown , replace the fuse with a new fuse of the same amperage (same color and same
impri nt) and same overall size
necessary, replace the plastic tweezers in the
fuse box cover .
Replace the cove r.
Practica l tips
Page 420 of 516
N
After replacing a headlight bulb or other light bulb, always make sure that the rubber covers or plastic caps have been properly and secure-
Indicator light
to help prevent water from getting into the electrical connections and headlight housing and damaging the electrical system.
on
Lights up Possible cause Proper response
Light bulb of the exterior vehicle lighting not Replace the light bulb that isn't working .
working .
When the ignition is switched on, several warning
and indicator lights come on briefly for a function
check . They go
out after a few seconds.
WARNING
Failure to heed warning lights and instrument cluster text messages can cause the vehicle to break down in traffic and result in a
can result in vehicle damage.
indicated. However, indicator light come on if LEO s fail.
on
Checklist
for replacing a light bulb. Please carry out these steps only in the order listed
1.
179.
3.
4.
5.
6 .
7.
8.
9 .
position
122 .
Automatic transmission :
the transmission into Park (P) 171.
the engine and remove the key from the ignition switch 165.
Manual transmission: Engage a gear
122.
Let the burned
out light cool down.
Check
if the fuse is blown 317 .
Replace the burned
out light according to
Practical tips 321
Page 427 of 516
{continued)
the non-insulated parts of the
battery clamps to touch.
the jumper cable attached to the positive battery terminal to contact metal parts of the vehicle.
Using jumper cables
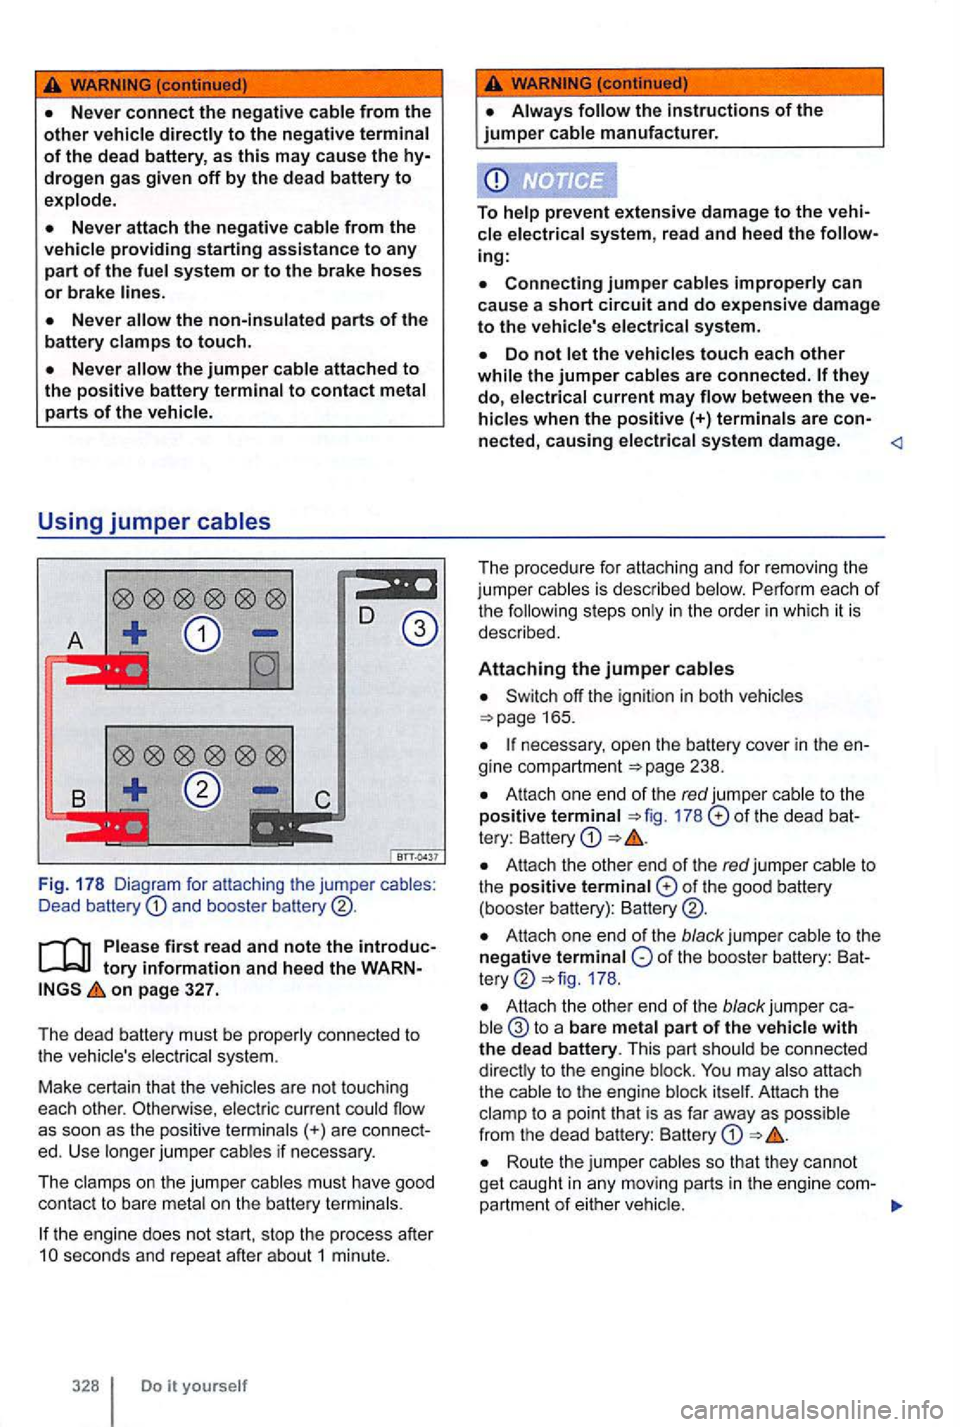
Fig . 17 8 Diagram for attaching the jumper cables:
Dead battery and booste r
on page 327.
The dead battery must be properly connected to
the vehicle's electr ical system .
Make ce
rtain tha t the vehicles are not touchi ng
each other. Otherwise , electric curr ent could flow
as soo n as the positive terminal
s(+) are connec t
ed. Use longer jumper cables if necessary .
Th e clamps on the jumper cables must have good
con tac t to bare metal on
the battery termina ls.
the engine does not start, stop the process after seconds and repeat after about1 minute.
cle electrical system, read and heed the
Connecting jumper cable s improperly can
ca use a short circuit and do ex pen sive dama ge to the vehicle's electrical system .
Switch off the ignition in both vehicles 165.
necessary , open the battery cover in the
At tach one end of the red jumper cable to t he
po sitive terminal 178 of the dead tery : Battery
Attach the othe r end of the red ju mper cable to the positive terminal of the good battery
(booster battery):
Atta ch one end of the black jump er of the booste r battery: 178 .
Attach the other end of the black jumper to a bare meta l part of the vehicle with the dead battery. This part shou ld be connected
dire ctly to the eng ine blo ck.
Route the jumper cables so that they cannot
ge t ca ught in any moving parts in the engine com-
partment of e ith er vehic le.
Page 428 of 516
the engine
the engine of the vehicle with the good
battery that is providing help and let it run at idle
speed .
Turn on the ignition of the vehicle with the dead
b attery. the engine starts, wait 2 to 3 minutes
the engine does
not start within about seconds , turn off the tion and wait at least 1 minute ; then try again .
Removing the jumper cables
Before you remove the jumper cables. swi tch
off the headlights (if they are on) .
the vehic le with the dead batte ry , switc h on
t he heater fa n and the rea r window defroster. This
he lps
to m in im ize voltage spikes when the cables
a re disconnected.
With the engine running , remove the jumper
nected .
Disconnect the black (- ) cab le f rom the vehicle
wit h the dead battery .
Disconnec t the black (-) cable from the other
vehicle (vehicle with the good battery) .
Disconnect the red(+) cable from the other
Disconnect the red (+ ) cable from the vehicle
with the dead battery .
Close the battery cover.
Improper use of jumper cables when starting a vehicle with a dead battery can
cause the battery to explode , leading to
Always wear proper eye protection. Never
lean over the vehicle battery.
Attach the jumper cables in the correct
Never connect the negative cable from the
vehicle providing starting assistance to parts of the fuel system or to the brake hoses or brake lines.
Never
sistance.
Avoid electrostatic discharge in the may cause the hydrogen gas escaping from the vehicle battery to ignite.
Never jump-start a vehicle with a battery
that is damaged or frozen or that was frozen
and has thawed. The battery can explode.
Always the instructions of the jumper cable manufacturer.
Never connect the negati ve cable from the other vehicle directly to the negative terminal of the dead battery . The hydrogen gas from
the battery is explosive.
Never short out the battery terminals by connecting the positive(+) and negative
Practical tips 329
Page 430 of 516
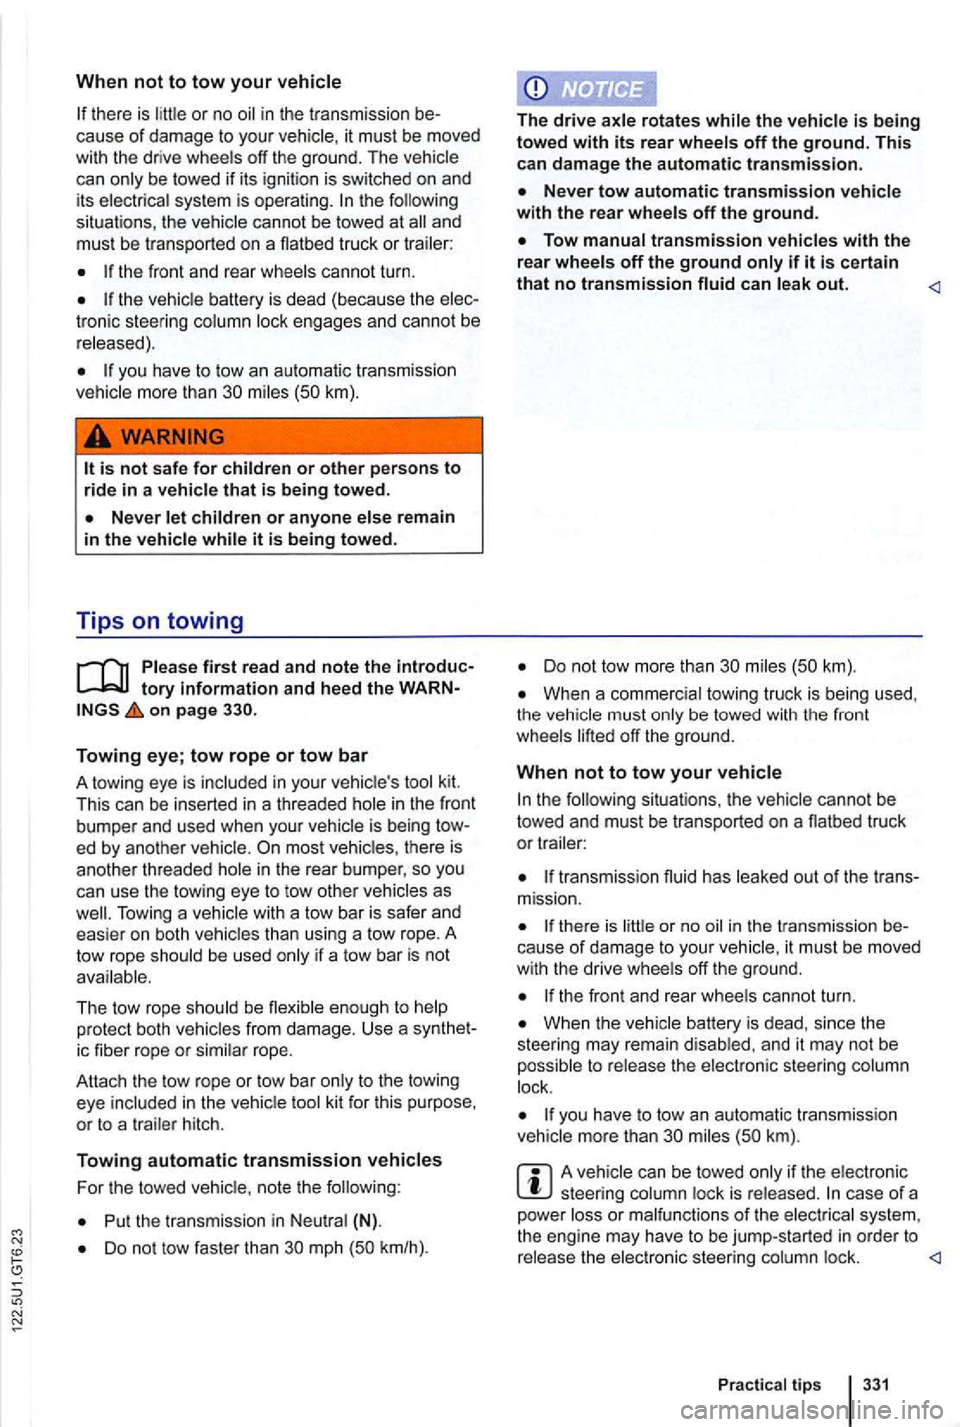
When not to tow your
there is in the tr ansmission be
cause of damage to you r it must be moved
with the drive wheels off the ground . The vehicle
can only be towed if its ignition is switched on and
i ts electrica l system is operating. the following
situat ions, the vehicle cannot be towed at
the front and rear whee ls can not turn .
the vehic le battery is dead {because the elec
troni c steering column lock engages and cannot be
r e leased).
you have to tow an automatic transmission
vehic le more than 30
first read and note the introduc
on page
Towing eye; tow rope or tow bar
A towing eye is included in your vehic le 's tool kit. This can be inserted in a threaded hole in the front
bumper and used when your vehicl e is being tow
ed by ano ther vehicle.
The tow rope should be flexib le enough to he lp
protect both vehicles from damage. Use a synthet
ic fiber rope or similar rope .
Attach the tow rope or tow bar only
to the towing
eye in the vehic le
For the towed vehic le, note the following :
Put the transmission in Neu tral (N) .
Do not tow faster than 30 mph (50 km/h). The
drive rotates while the i
s being towe d with its rear wheels off the ground. This can damage the automatic transmission .
can
Do not tow more than 30 miles (50 km).
When a commerc ial towing truck is being used,
the must be towed with the front
wheels
transmiss ion fluid ha s out of the trans
mission.
the re is in the transmissio n be
cause of damage to your vehicle, it must be moved
w ith the drive whee ls off the ground.
the front and rear whee ls cannot turn.
When the vehicle battery is dead , since the
steering may remain disabl ed, and it may not be
poss ib le to rele ase the electronic steering column
lock.
you have to tow an auto matic transmiss ion
veh icle mor e than 30 miles (50 km).
A veh icle can be towed only if the electronic steer ing column lock is r e leased. case of a
power system,
the engine may have to be jump-started in order to release the electronic steering column lock .
Page 439 of 516
Some basics . . . . . . . . . . . . . . . . . . . . . . . 31 S tarting up on . . . . . . . . . . . . 177
S toppi ng on . . . . . . . . . . . . . . . . . . . . 177
T hroug h water . . . . . . . . . . . . . . . . . . . 33 Towi ng ........................... 333
With a traile r . . . . . . . . . . . . . . . . . . . . . . 152
W it h aut oma tic transm ission . . . . . . . . . . 177
Driving abroad . . . . . . . . . . . . . . . . . . . . . . . 32
Ch ecklist . . . . . . . . . . . . . . . . . . . . . . . . . 32
Driving checklists and warnings . . . . . . . . . 3 1
Driving directions Co mpact spare . . . . . . . . . . . . . . . 269
Spare . . . . . . . . . . . . . . . . . . . . . . . 269
Dri
ving . . . . . . . . . .
. . . . . . . . . . . . . . . . . . . . . . . . . 124
Dri
ving safely . . . . . . . . . . . . . . . . . . . . . . . . . 31 Driving through
. . . . . . . . . . . . . . . . . . . . . . . . . . . Dynamic
Brak ing assistance systems . . . . . . . 186
consumers . . . . . . . . . . . . . . . . . 29 7 . . . . . . . . . . . . . . . . . . . . . . . 15 1
deactivation . . . . . . . . . . . . 241
. . . . . . . . . . . . . . . . . . 16 3 ,
sockets
1 2 . . . . . . . . . . . . . . . . . . . . . . . . . . . 163
Differentia l Lock (EDL) . . . . . . . 186
. . . . . . . . . . . . . . . .
. . . . . . . 185
Em ergency closing and opening . . . . . . . .
P assenge r doo r . . . . . . . . . . . . . . . . . . . Power sunroof . . . . . . . . . . . . . . . . . . . . R ea r doo rs . . . . . . . . . . . . . . . . . . . . . . . .
Em ergency closing or opening E mergency release for the selecto r . . . . . . . . . . . . . . . . . . . . . . . . . . . .
Em erg ency flashers . . . . . . . . . . . . . . . . . 299
Em erg
ency starting . . . . . . . . . . . . . . . . . . . 327
J umper cables . . . . . . . . . . . . . . . . . . . . . 328
Emission system . . . . . . . . . . . . . 295
I ndic ator
Engine
B rea k-in period . . . . . . . . . . . . . . . . . . . . . 283 Does not start . . . . . . . . . . . . . . . . . . . . . 297
N oises . . . . . . . . . . . . . . . . . . . . . . . . . . . 169
Engine and ignition . . . . . . . . . . . . . . . . . . . 165
1 2 . . . . . . . . . . . . 163
Ignition switch . . . . . . . . . . . . . . . . . . . . . 166 Immobi lizer ......... . . . . . . . . . . . . . .
. . . . . . 222 . . . . . . . . . . . . . . . . . . . . . . . . . 249
. . . . . . . . . . . . . . . . . . . . . . . . . 227
Plenum chamber . . . . . . . . . . . . . . . . . . . 24 9
P repara tions . . . . . . . . . . . . . . .
. . . . . . . 225 Vehicle battery . . . . . . . . . . . . . . . . . . . . . 238
En
gine . . . . . . . . . . . . . . . . . . . . . . . 295
Engine syste m . . . . . . . . . . . . . . . . 295 In dicator . . . . . . . . . . . . . . . . . . . . . . 295
Engine coolant . . . . . . . . . . . . . . . . . . . . . 23 3
Check ing coo lan t . . . . . . . . . . . . . . . 236
. . . . . . . . . . . . . . . . . . . . . . 233 Specifications . . . . . . . . . . . . . . . . . . . . . . 235
Temperature gauge . . . . . . . . . . . . . . . . . 233
T opping
off . . . . . . . . . . . . . . . . . . . . . . . . 236 Warning
. . . . . . . . . . . . . . . . . . . . . . . . . . 225
Warning . . . . . . . . . . . . . . . . . . . . . . 224
Engine identification code Determining . . . . . . . . . . . . . . .
. . . . . . . . . . . . . . . . . . . . . . . . . . 227
Adding oil . . . . . . . . . . . . . . . . . . . . . . . 229
Change . . . . . . . . . . . . . . . . . . . . . . . . . . 231 Checking . . . . . . . . . . . . . . . . . . . 229
Consumption . . . . . . . . . . . . . . . . . . . . .
openi ng . . . . . . . . . . . . . . . . . . . . . . 229
I n dica to r . . . . . . . . . . . . . . . . . . . . . . 227
Specif ica tions . . . . . . . . . . . . . . . . . . . . . . 228
Warning
driving . . . . . . . . 189 Equipment . . . . . . . . . . . . . . . . . . . . . . . . . . 284
................................ 185
Electronic Stability . . . . . . 18 5
E xte rior views . . . . . . . . . . . . . . . . . . . . . . . . . 6