2012 VOLKSWAGEN GOLF open hood
[x] Cancel search: open hoodPage 144 of 516
N
if a seco nd valid
by press ing a button on the deactivated key.
by pressing a door handle sensor when the de
activated key is outside of the vehicle , but with in
range .
by starting the engine with the starter butto n.
Automatic deactivation of sensors
deactivated .
is activated too often, for instance by a bush or hedge that rubs against the the sensors in the door handle on that side of the vehicle are
switched off for a short time.
T he door handle sensors become active again if
one of the even ts occurs:
A short time has passed.
The rear hatch is opened .
The key .
Anti-theft
tory information and hee d the WARN on page 41.
T he anti-theft alarm system makes it more difficult
for someon e to break into or steal the veh icle .
The anti-theft alarm system is
key i s within range of the vehicle.
T he door may not open if the outside and in side door handles are used at the same time.
the vehicle battery or the battery in the remote control vehicle key is weak or dead , it
might not be possible to unlock and using Keyless Access. The vehicle can locked or unlocked with the key bit
The driver message Key not in ra nge ap pears in the instrument cluster display if there
is no remote control vehicle key inside the vehicle
or if the system does not recognize the
key. The key may not be recognized , for example, if it is
covered by something that interferes with the sig
(such as a briefcase) , or if the remote control
vehicle key battery is weak. Electronic devices
such
as phones can interfere with the sig
Dirt on the door handles that conta ins a of in winter) can affect the way
the door handle sensors work.
with this problem .
Automatic transmissio n vehic les can
Opening a door that has been un
locked and not switching on the igni tion with in
about 15 seconds.
Forcibly opening a door.
Forcibly opening the engine hood.
Forcib ly opening the rea r hat ch.
and closi ng 45
Page 201 of 516
Curtain
P rotectio n® airbag system is designed to help re
du ce the likelihood of serious injury. H owever , it is
possible that a de plo yed
brui sing, frict ion burns , an d abras ions . R emembe r
too ,
if the ignition is sw itched off whe n a crash oc
curs ,
in sid e when the acceleration meas
ur ed by the senso r is too low,
in front- end
in rea r-end
in unl ess the deployment threshold
for deployment stored in the contr ol un it is met.
An
Always make sure that the
Always sit in proper seating positio n and wear safety bel ts
Never let occupants place any parts of th ei r bodies in the area where the
Before driving
Always keep the area where the clear. Never carry a ny objects or pe ts in the area betwee n them and where the airbags
Never use the
Never swing the sun visors over to the side windows if things such as pens, garage door openers , hands -free speakers, etc. are
attached to the s u n visors. They could come l oose and caus e serious
The airbag system can only be trigge red
o n ce .
Always have work involving th e curtain airbag system , re m ova l a n d installati on of the
alrbag components, or othe r repai rs per -
f o rmed by your authorized Vo lkswagen deal-er or authorized Volkswagen
Never attach objects to the cover or in the deployment zone of a
times . Never let anything or object, a pet, or a person, includ-ing an infant or child, be in the space between any vehicle occupant and an y air-
bag .
Page 322 of 516
Never open or close the engine hood if To reduce th e risk of electrica l shock and steam or coolant is escaping. Hot steam or personal injury
-Never touch ignition cables. Never ant escaping from the engine. touch other components of the high
Always the eng ine down com-age electronic ignition syste m .
opening the hood.
-Never touch the wiring of the Discharge (Xenon) headlights.
system burn skin on contact.
you are read y to open the hood: Moving parts in th e engine compartment can
- Firm ly apply the parking brake a nd shift cause serious personal injury on contact. the transmission into Park (P) (automatic)
vehicles with Keyless Access, make member that the radiator fan is temperature-
s
ure that the remote contro l vehicle key is controlled and can come on sudden ly even
out of range of th e vehicle and that the ve- when the engine
has been switched off for a
hicl e cannot be started by depres sing the 44. ignition.
-
Always keep children and others away you have to perform a check or repair from the engine compartment and never when the engine is runn ing, there are more leave them unsupervised. risks from the rotating parts, such as the
hair do not get caught in
ries. rotating engine
parts. B efore starting an y
- Turn
the cap
fluids onto hot parts of the engine o r exhaust system can
cause a fire. -
Always use
extreme caution if the ac-
ce lerato r pedal has to be depressed to perform a check. The vehicle will start to move even if the parking brake i s on.
Never leave any objects in the engine compartment, for examp le cleaning rags and tools. Objects left b ehind can cause malfunc-lions, engine damage, and even fires.
High voltage sy stems in the engine com part-ment can ca use electrica l shocks or even
electrocution, severe burns, other serious in-juries, and eve n deathl
Neve r short-circuit the electrica l syste m .
B e especially ca reful when using jumper ca-
Operating fluids and some materials in the engi ne compartment can catch fire easily, causing burns an d other serious personal in-juries
Do not smoke .
b les. The
vehicle 's battery could exp lode! Never work next to open flames or sparks .
223
Page 323 of 516
Never pour or operating or on the engine. These
work on the system or the
disconnect the 12 battery. Make sure the is when you disconnect the battery , or the
have a functional, approved fire extinguisher nearby .
Warning
When changing or topping off fluids, make sure that you pour the voirs. Adding the wrong type of operating
and are
you find spot s
o f
first read and note the introductory in formation and heed the on
icon
appea rs Engine hood not prope rly closed.
in the dis-
th e engine hood is open or not closed properly ,
t he warning comes on in the i nstrument
D epending on your vehicle 's equ ipmen t and tio n s, a symbo l showing that the hood is not closed may appea r in the instrument cluste r
disp la y instead of th e warning light. The symbol be displayed even after the ignition is
swi tched off. Th e display goes out abo ut 15
onds afte r t he vehicle has been locked with the doors closed .
224 Care, cleaning , maintenance Proper
response
and instrument cluster text messa ges can cause the to break down in traffic and sion and serious
Page 324 of 516
Getting ready to work in the engine compartment
information and heed the on page 222.
steps in the order in whic h they are
Park the vehic le in a safe place on a firm , su rface .
the brake pedal down
the par king brake to help preve nt the vehicle fr om moving 179 .
S hift th e t ra nsmiss ion
P ark (P) (automatic) or Neu tr al (manual page 171 .
Stop th e e ng in e a nd re m ove th e key f
rom th e ig nit ion sw itch 165 .
Le t the engin e down suffi cie ntly .
K eep children and others away from
the .
Make sure the ve hicle can not move unexpecte dly .
Disregarding the safety-rela ted checklist may re sult serious accept ed safety practices and use __ m_o_ n_s_e_n_s_e_. ____________________
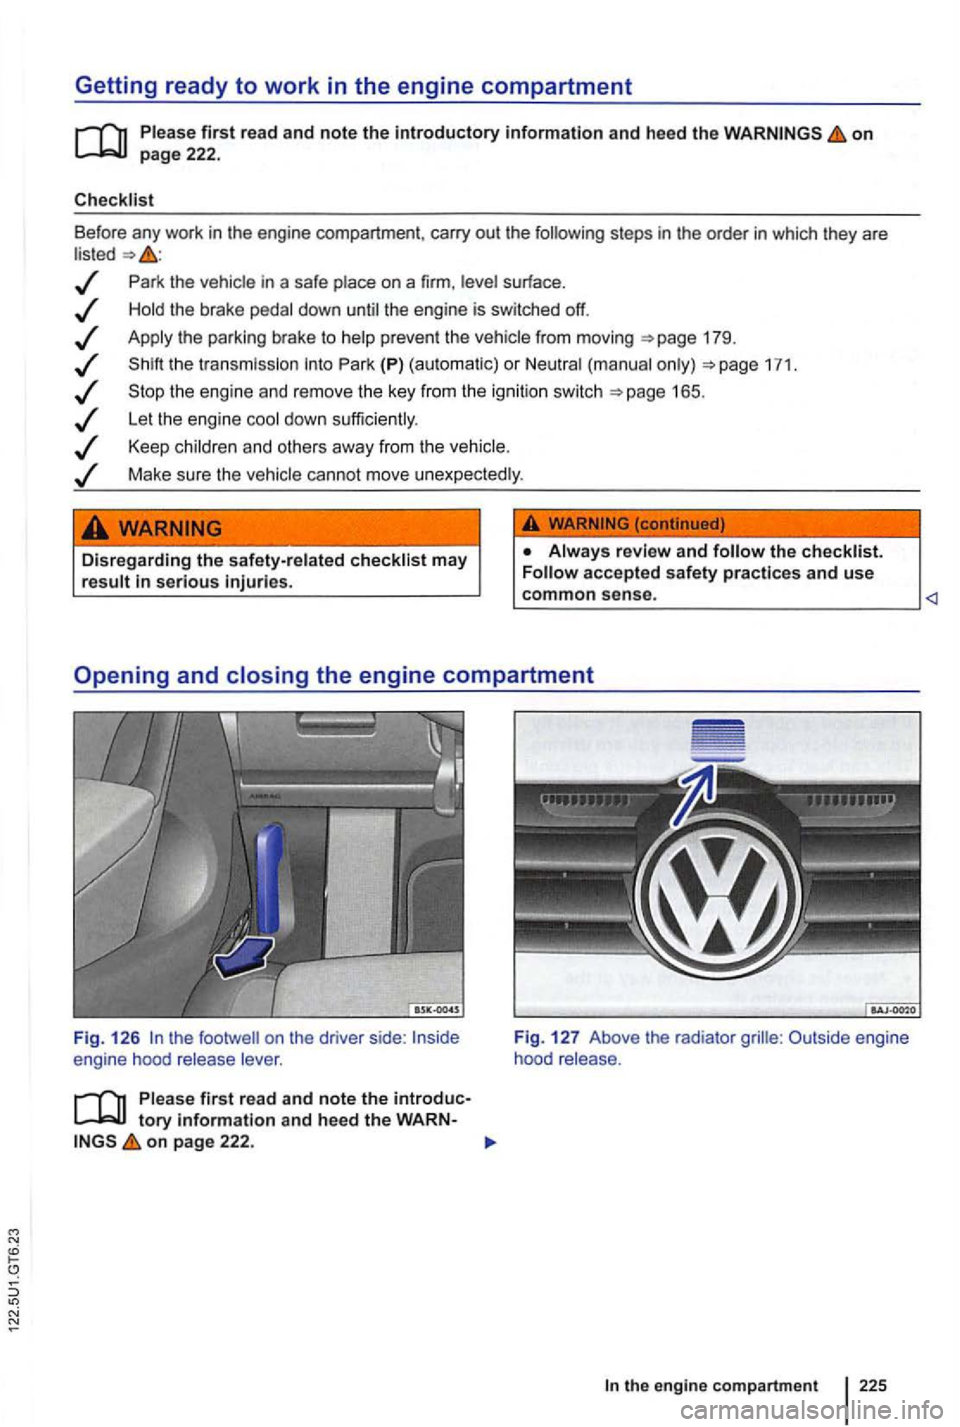
Opening and closing the engine compartment
Fig . 1 26 engi ne hood release lever.
on page 222. Fig
. 1
27 Above the rad iator Outside engine
hood release .
Page 325 of 516
Before you open the make sure that the
windshield wiper arms are resting on the
the inside hood release lever in the direction of the arrow
Push the outside hood release lever 127 (arrow) and lift the hood
the hood down to overcome the resistance of the gas-pressure strut
Lower the engine hood by hand until it is about
1 ft.
wards!
When the hood is properly closed, you can see
that it fits flush with the other body parts. T he
224 .
not closed properly ,
with the surrounding auto body parts.
Never le t anyone get in the way of the hood when closing it.
226
Always put the windshield wiper arms down against the windshield before driving the cle.
Before opening or closing the engine hood,
make sure there is enough room to do so, for exampl e when the vehicle is in a garage .
Page 328 of 516
Engine
on page 227.
Engin es Engine
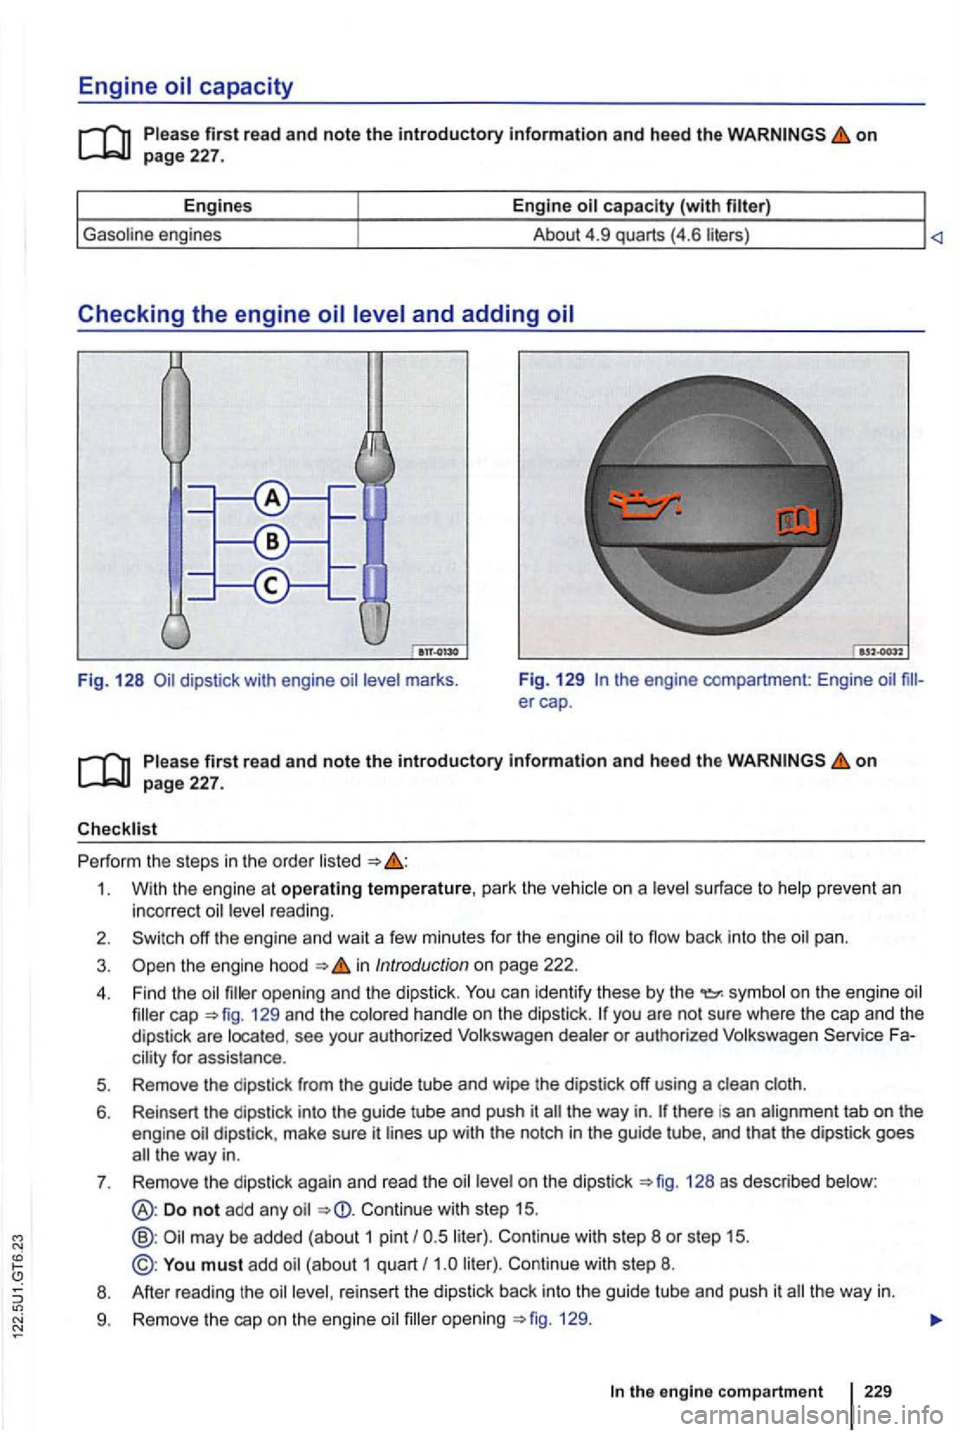
Checking the engine
Fig. 128 marks . Fig
. 129 the engine compartment: Engine
first rea d and note the introductory information and heed the on page 227.
Perf orm the steps in the order
1. With the engine at operating temperature, park the ve hic le on a surface to prevent an
incorrect r eadi ng.
2. off the engine and wait a few minutes for the engine to flow back int o the pan .
3. the engi ne hood in Introduc tion on page 222.
4. Find the opening and the dipstic k. can identify these by the on the engi ne cap =>fig . 129 and the co lo red hand le on the dipstick . dealer or aut horized Fa
the way in. dipstick, make sure it lin es up with the notch in the guide tube, and that the dipstick goes the way in.
7 . Remove the dipstick again and
read the on the dipstick 128 as described below:
Do not add any Continue with step 15.
@ : may be added (about 1 pint liter). Continue with step 8 or step 15.
©: You must add Continue with step 8.
8 . After reading the oil level , reinsert the dipstick back into the guide tube
and push it the way in.
9. Remove the cap on the engine oil opening =>fig. 129 .
the engine compartment 229
Page 335 of 516
Checking engine coolant level and topping off
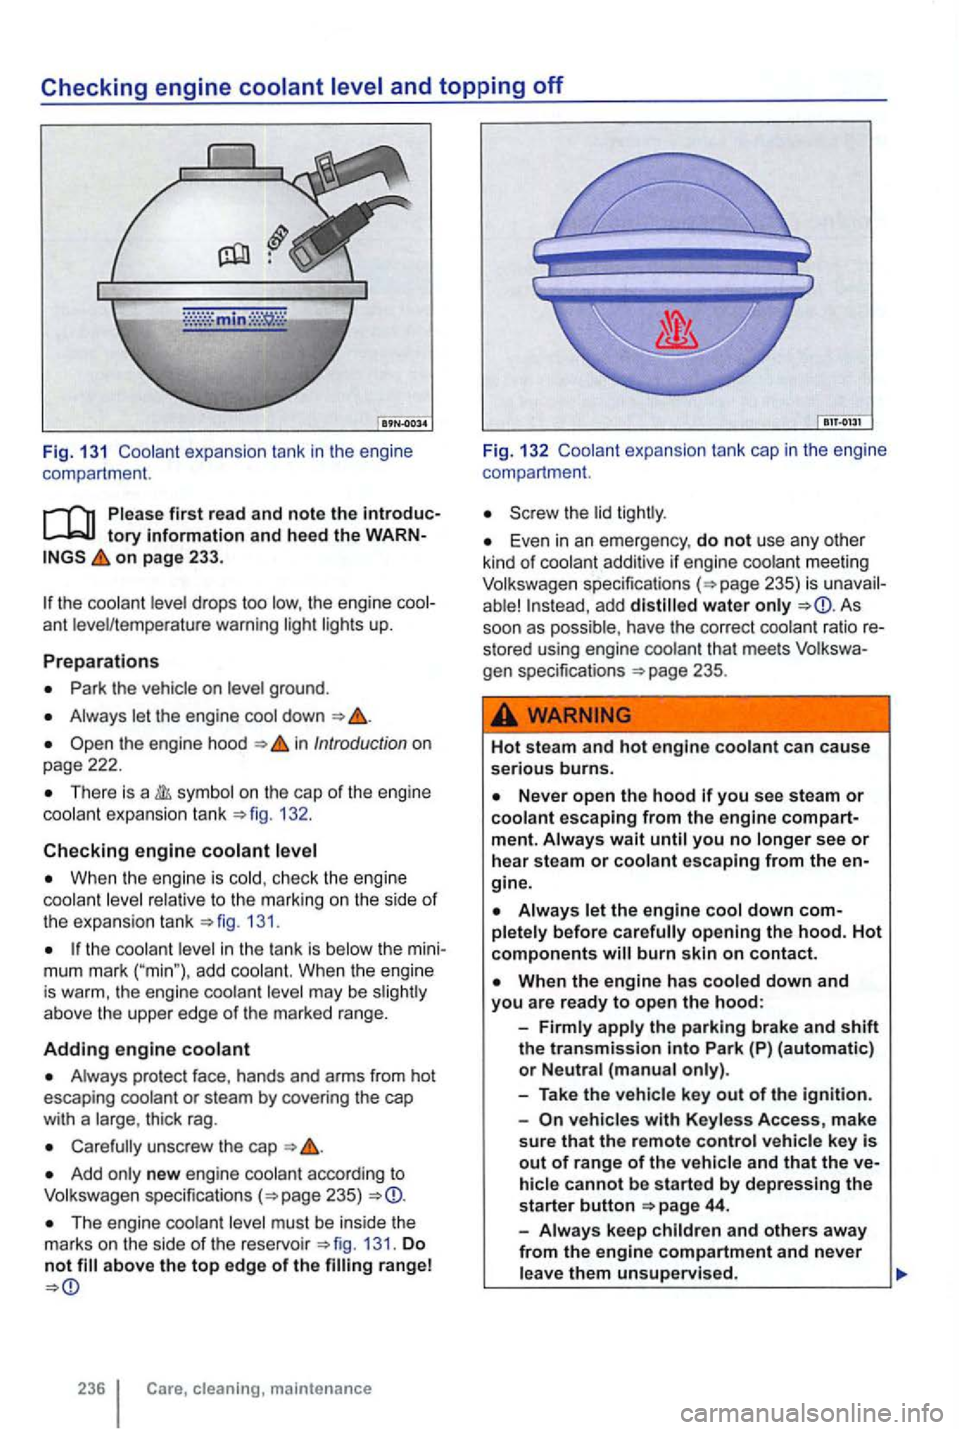
Fig. 13 1 Coolant expan sion tank in the engi ne
compartme nt.
Please first read and note the introductory Information and heed the WARN on page 233.
Park the vehicle on level ground .
Always let the engine down
the engine hood in Introduction on
page 222.
There is a sy mbol on the cap of the engine coolant expans ion tank 132 .
Checking engine coolant
When the engine is cold , check the engine
coolant level relative to the marking on the side of the expansion tank 13 1.
the coolant level in the tank is below the mini
mum mark ("min"), add coolant. When th e engi ne is warm, the engine coolant level may be slig htly
above the upper edge of the marked range.
Adding engine coolant
Always protect face, hands and arms from hot
escaping coolant or steam by covering the cap
with a large , thick rag.
Carefully unscrew the cap
Add only new engine coolant according to
The engine coolant level must be inside the
marks on the side of the reservoir 131. Do not
236 cleaning, maintenance Fig.
132 Coola nt expansion tank cap in the eng ine
compa rtment.
Screw the lid tightly .
Even in an emergency , do not use any other kind of coolant additive if engine coolant meeting
add distilled water only As
soon as possible , have the correct coolant ratio re
sto red using engine coolant that meet s
WARNING
Hot steam and hot engine coolant can cau se serious burns.
Neve r open the hood you see steam or coolant escaping from the engine compartment. Always w ai t until you no longer see or hea r steam or co olant escaping from the en
gine .
opening the hood. Hot components will burn skin on contact.
Park (P) (automatic) or Neutral (manua l only).
- Take the vehicle key
out of the ignition.
-
veh icles with Keyless Access, make
sure that the remote control vehicle key is out of range of the vehicle and that the vehicle cannot be sta rted by depressing the
starte r button 44.
-
Always keep children and others away
from the engine compartment and never
l eave them unsupervised.