2012 VOLKSWAGEN GOLF MK6 wheel
[x] Cancel search: wheelPage 159 of 516
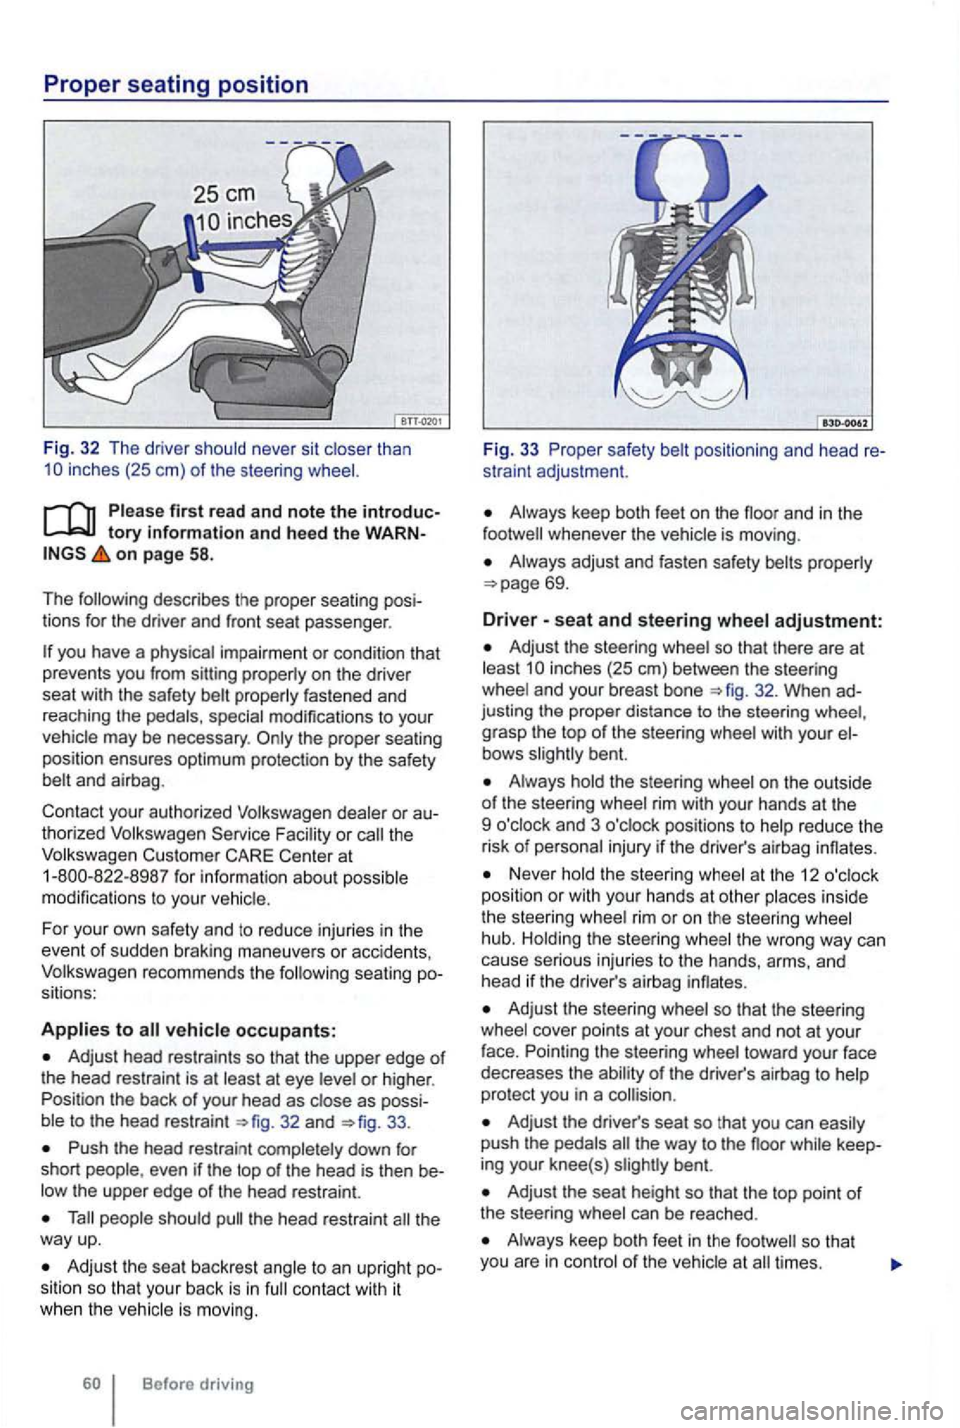
first rea d and note the introductory information and hee d the WARNon page 58.
The following describes the proper seating posi
tions for the driver and front seat passenger .
special modifications to your
vehicle may be necessary .
to
Adjust head restraints so that the upper edge of the head restraint is at least at eye
32 and 33.
Push the head restrai nt completely down for
short even if the top of the head is then be
people should the head restraint the way up.
Adjust the sea t backrest angle to an upright position so that your back is in contact with it when the veh icle is moving.
Before driving
Fig. 33 P roper safety
Always keep both feet on the whenever the vehicle is moving .
Always adjust and fasten safety belts properly
adjustment:
Adjust the steering whe el so that there are at least inches (25 em) between the steeri ng
wheel and your breast bone
grasp the top of the steering wheel with your bent.
Always hold the steering wheel on the outside of the steering wheel rim with your hands at the
9 o'clock and 3 o'clock positions to help reduce the
risk
of personal injury if the driver's airbag innates.
Never hold the steering wheel at the 12
and
head if th e driver's airbag innates.
Adjust the steering wheel so that the steering
wheel cover points at your chest and not at your
face. Pointing the steer ing wheel toward your face
dec reases the ability
of the driver's airbag to help
protec t you in a
Adjust the driver's seat so tha t you can easily push the pedals the way to the noor while keep
ing your knee(s) bent.
Adjust the seat height so that the top point o f
the steering wheel can be reached .
Always keep both feet in the times.
Page 160 of 516
N
N
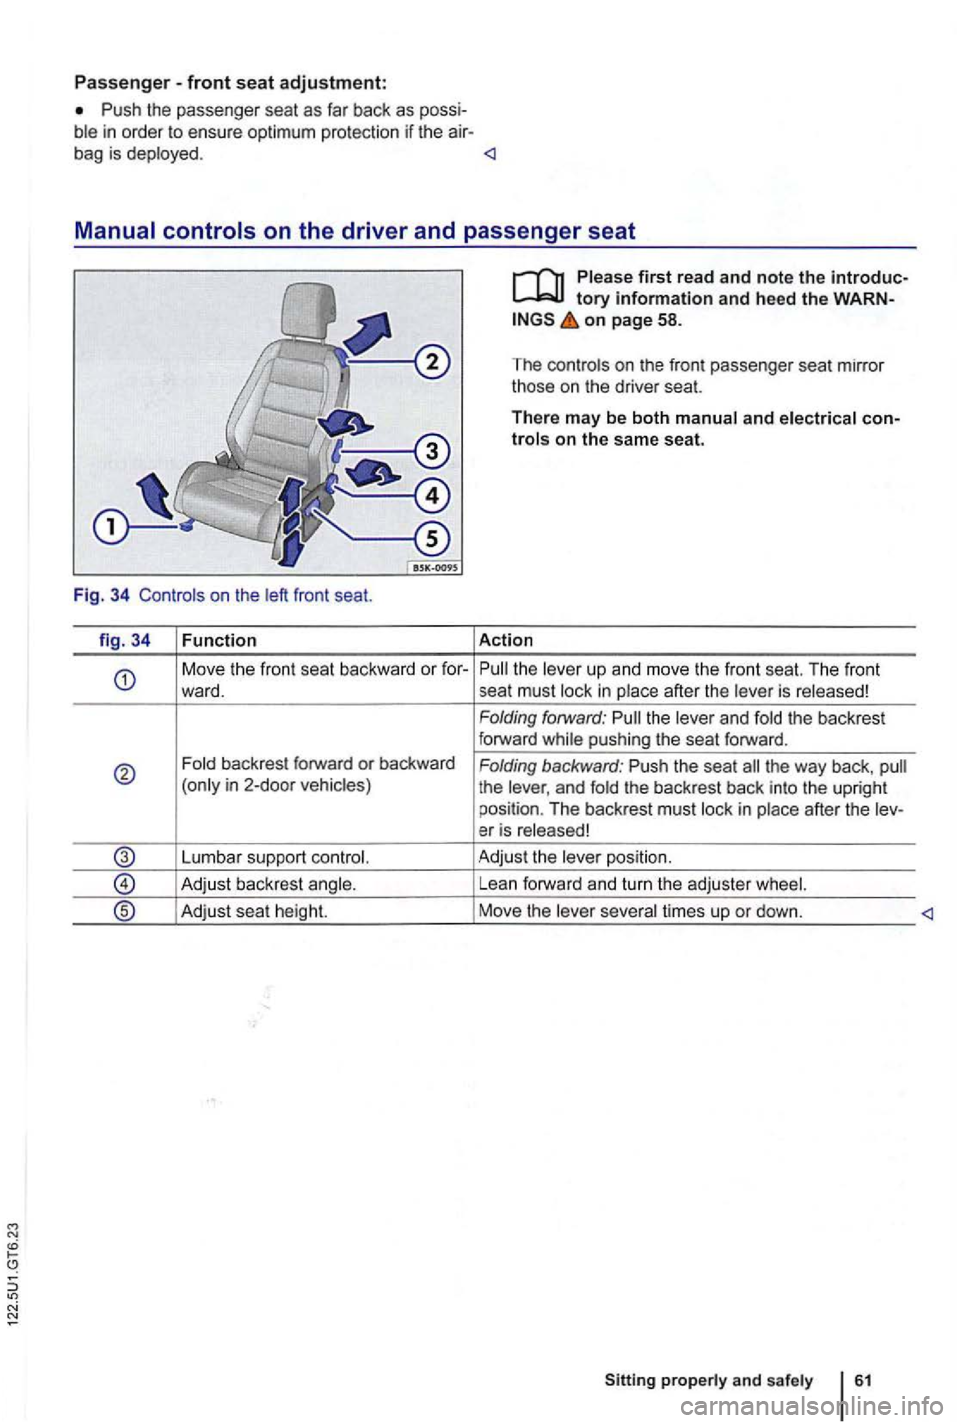
Passenger-front seat adjustment:
P ush the passe nger seat as far back as possi
M ove the front seat backward or for-ward.
Fold backrest forward o r backwa rd
(only in 2-door vehicles)
Lumbar support contro l.
Adjust back rest angle .
Adjust seat height.
on page 58.
The contr o ls on the fr on t passenger seat mirror
those on the
driver seat.
There may be both manual and electrical con
in place after the leve r is released!
Folding forwar d: Pull the
the way back , p ull
t he lever , a nd fold the back res t back into the upright
p osit
ion . The backrest must in place after the le v-
er is released!
Adj ust the leve r position.
Lea n forward and tu
rn th e adjuster wheel.
Move the lever
times up o r down .
Sitting properly and
safely
Page 164 of 516
Driving without head restraints or with properly adjusted head restraints increases
the risk of serious injuries in a
tory information and heed the on page 58.
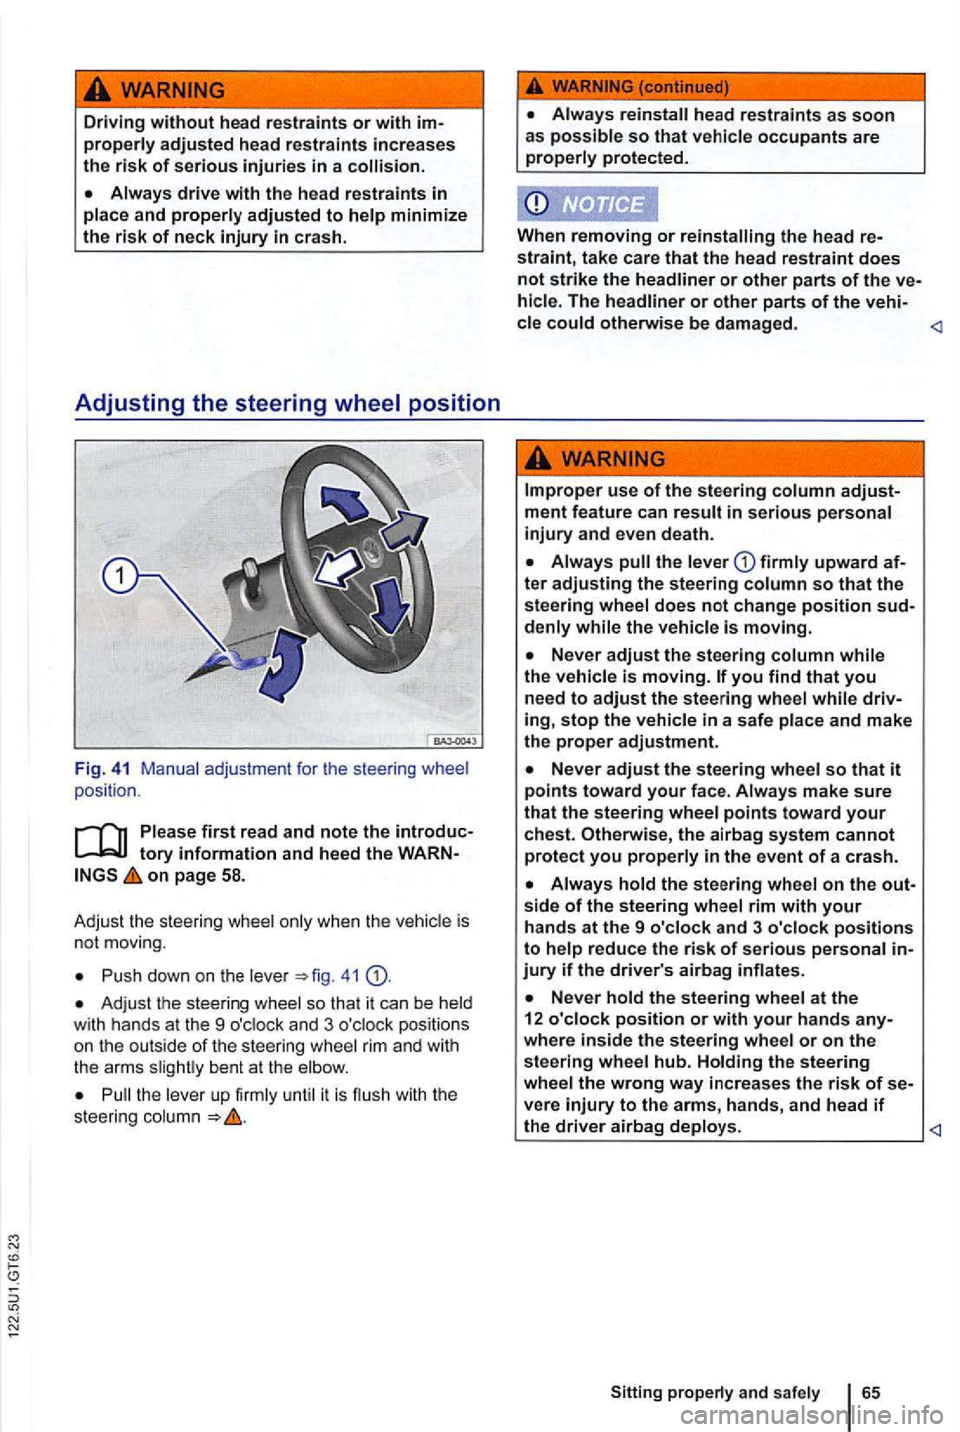
Adju st the steerin g whee l only w he n the veh icl e is
no t m ovi ng.
Push dow n o n the leve r 41
Adj ust th e steering whee l so th a t it ca n b e held w ith hands at the 9 o'cloc k and 3 o 'clock positio ns
o n the out side of the steering wheel rim and with
t he arms slightl y b ent at the elbow .
Pull the leve r up firml y until it is flu sh with th e
stee ring colum n
the lever
denly while the vehicle is moving.
Never adjust the steering wheel so that it points toward your face . Always make sure that the steering wheel points toward your chest. Otherwise, the airbag system cannot protect you properly in the event of a crash.
side of the steering wheel rim with your hands at the 9 o'clock and 3 o'clock positions to help reduce the risk of serious personal
where inside the steering wheel or on the steering wheel hub. Holding the steering wheel the wrong way increases the risk of vere injury to the arms, hands, and head if the driver airbag deploys.
Page 187 of 516

When an airbag deploys , fine dust is released.
This is normal and is not caused by a fire in the hicle . This dust is made up mostly of a powder
used to lubricate the airbags as they deploy. This
dust could irritate skin and eyes and cause
ciently when used with properly worn safety belts
and a proper seating position in Introduct ion on page 58
equipment
Your safety and the safety of your passenge rs
shouldn't be left to c hance. Advances in
gy have made a number of featu res availab le to
help reduce the risk of injury in a collision . The
Sophisticated safety belts for
belt pretensioners for driver and front
passenger .
Advanced front airbag system for driver and
front passenger .
ger.
Airbag indicato r
BAG light.
Electronic control unit and associa ted sensors.
Before driving
Head restraints with height adjustmen t
Adjustable steering column.
LATCH/U CRA lower universal and top tether
anchorages for child safety seats at the rear
These features
can't work as a system if they are not always
be tu rned
off if the weight on the front passe nger seat is less
than the amount programmed in the elect ronic
con t
rol unit . Th e front airbag on the passenge r side
will also be turned off if the combine d weigh t of an
i nfant
of about one year of age in one of the child
seats that was used to certify the Advanced Airbag
ard BAG
Never rely on airbags alone for protection.
69, Safety belts.
ery per son in the vehicle is properly seated on a sea t of his or her own, properly fastens the safety belts belonging to that seat before the vehicle starts to move, and keeps the belts properly fasten ed while riding i n the hicle. This applies eve n when just driving around town. Therefore, always wear your safety belts and make sure that everybody in your vehicle is properl y restrai ned .
too close to the steering wheel or strument panel decrease the ness of the airbags and will increase the risk of personal injury in a collision.
Page 236 of 516
Transporting
Driving tips
this sectio n
Always stow heavy objects in the luggage partment and make sure tha t the rear seat ests are securely latched. Always use the downs in the luggage compartment and secu re th e
ob jects with suita ble straps. Neve r ove rload the
hic le . R emember that the vehicle load, as
More information:
Rear hatch 49
Folding down the passenger seat backrest
Lights page 122
Luggage compartment 141
Roof rack 146
Trailer towing 149
Tires and wheels 258
Unsec ured or incorrectly stowed items can fly through the vehicle, causing serious
senger compartment by the front airbags if they To help reduce the risk of se riou s
per sonal injury:
strument panel.
nothing on
the front passenger seat when the backrest is folded forward. When the backrest is folded
forward, even
85.
scat that is
blocked by objects being carried
H eavy loads will cle handle s and increase stopping distances.
Heavy lo ads that are not properly stowed or secured can cause loss of control and ous injury.
the luggage compartment as possible.
-
Always tie down h eavy items securely with su itabl e strap s using the tie-downs in the luggage compartment.
Tran sporting
Page 245 of 516
Roof rack
Introduction
this sectio n find informa tion about:
Mo unt in g the roof rack base carrier and roof
rack
................................... 147
Securing a load on the roof rack . . . . . . . . . . . 148
The ro of o f your vehicle has been designed to
approv ed base carrie r mounts and roof racks can
be used .
When should the roof rack be removed?
When it is no longer needed .
Before driving through an automatic car was h.
When the vehic le wou ld otherwise be too high
t o ach ieve min imum clearanc e to enter, for
ple, a garage .
More information:
Lights
Transporting 137
Saving fuel and helping the envi ronment
Tires and wheels 258
283
Transporting heavy or bulky loads on the roof rack will change the way the vehicle handles by shifting the vehicle's center of gravity and
increasing the wind drag area.
146 Before driving
able and undam ag ed straps so that the load
have a negative effect on the vehicle's
aerodynamics , center of gravity and ove rall
Your vehicle is higher when the roof rack is installed , especially when it is loaded. Compare
the vehicl e he ight with existing clear ance
heights , such as underpasses and garage doors.
creases due to increased air resis ta nce.
Page 248 of 516
Introduction
this section
..
L oading the trailer
.............. ........ .
Driving with a trailer ..... . .. .. ........... .
mount .... . .
Retrofitting a trai l
er hitch ................ .
Max imum permissible trailer weight ... . 150
151
151
152
154
155
156
for
more concentratio n from the
dr iver . Always the ope rat ing and driving in
stru ctions given , and use common sense.
Un der winter conditions ,
win ter tires on the
vehicle and the trailer.
Tongue weight
The m aximum permissible tow bar tongue weight
exerted on the mount should not exceed kg).
More information:
Anti-theft a larm system
Lights page 122
Startin g assistance systems 195
Tires and wheels page 258
Parts, accessories, repairs and modifications
Riding in a trailer is dangerous and may be il
incorrect, or damaged trailer hitch can
cause the trailer to separate from the towing vehicle and cause serious personal injuries.
use an undamaged, properly mount
ed trail er hitch.
mount when you are not towing a trailer.
properly with suitable and undamaged straps so that the not shift.
and under unfavorable weather, or wind conditions.
careful when passing other vehicles.
Transporting 149
Page 276 of 516
unless the transmission senses a sit
uation where upshifting or downshifting is necessary to keep the engine from over-or under-revving.
Using Tiptronic with the selector lever
Push the selector lever sideways to the right
from Drive (D) position into the Tiptronic position
in Automatic transmission :
Briefly push the selector lever forward to up
shift into a higher gear or backward to down
shift into a lower gear 111.
Using Tiptronic with the shift paddles behind the steering wheel
Th e paddles 112 (arrows) work when the
selector lever is in the Tiptronic position or when the selector lever is in Drive (D) or
To upshift, on the right to
ward you.
Driving with automatic transmission
on page 171.
in
Neutral (N).
Reduce speed.
Downshift by the selector l ever back
briefly(-).
Downshift using the paddles on the steer
ing wheel
you should use Hold 195 as long as the engine is running .
To downshift , on the left to
ward you.
To switch off Tiptronic mode,
switch off
shift automatically into the next higher gear be
fore reaching maximum engine speed (rpm).
you use Tiptronic to shift into a lower gear, the transmission not over-rev the engine.
The kick-down feature permits maximum tion when the selector lever is in the Drive (D ), or Tiptronic mode.
you push the accelerator automatica lly downshift , depe nding on
vehicle speed and engine speed (rpm). This
With kick-down actuated, the transmission
Regulation 179.
Depress and
Move the selector lever into Driv e or Tiptronic position.
With your rig ht foot, depress the accelerator
peda l until the engine reaches about rpm.
shifting, parking