2012 VOLKSWAGEN GOLF MK6 wheel
[x] Cancel search: wheelPage 410 of 516
Preparations for changing a wheel
on page
Getting ready to cha n ge a these steps in the order here
1. you have a tire, move as fa r away from tr affic a s possi ble. Park t he
etc .
2. the parki ng brak e to fr om movi ng
165.
5 . 171.
6. Hav e
the diagonally opposite with a c hock or anot her suitab le object.
8. from the prope rly .
9. th e R emove th e luggage.
Take th e s pare or compac t spare ki t ou t of the
cove rs
may
ries.
Wheel bolts
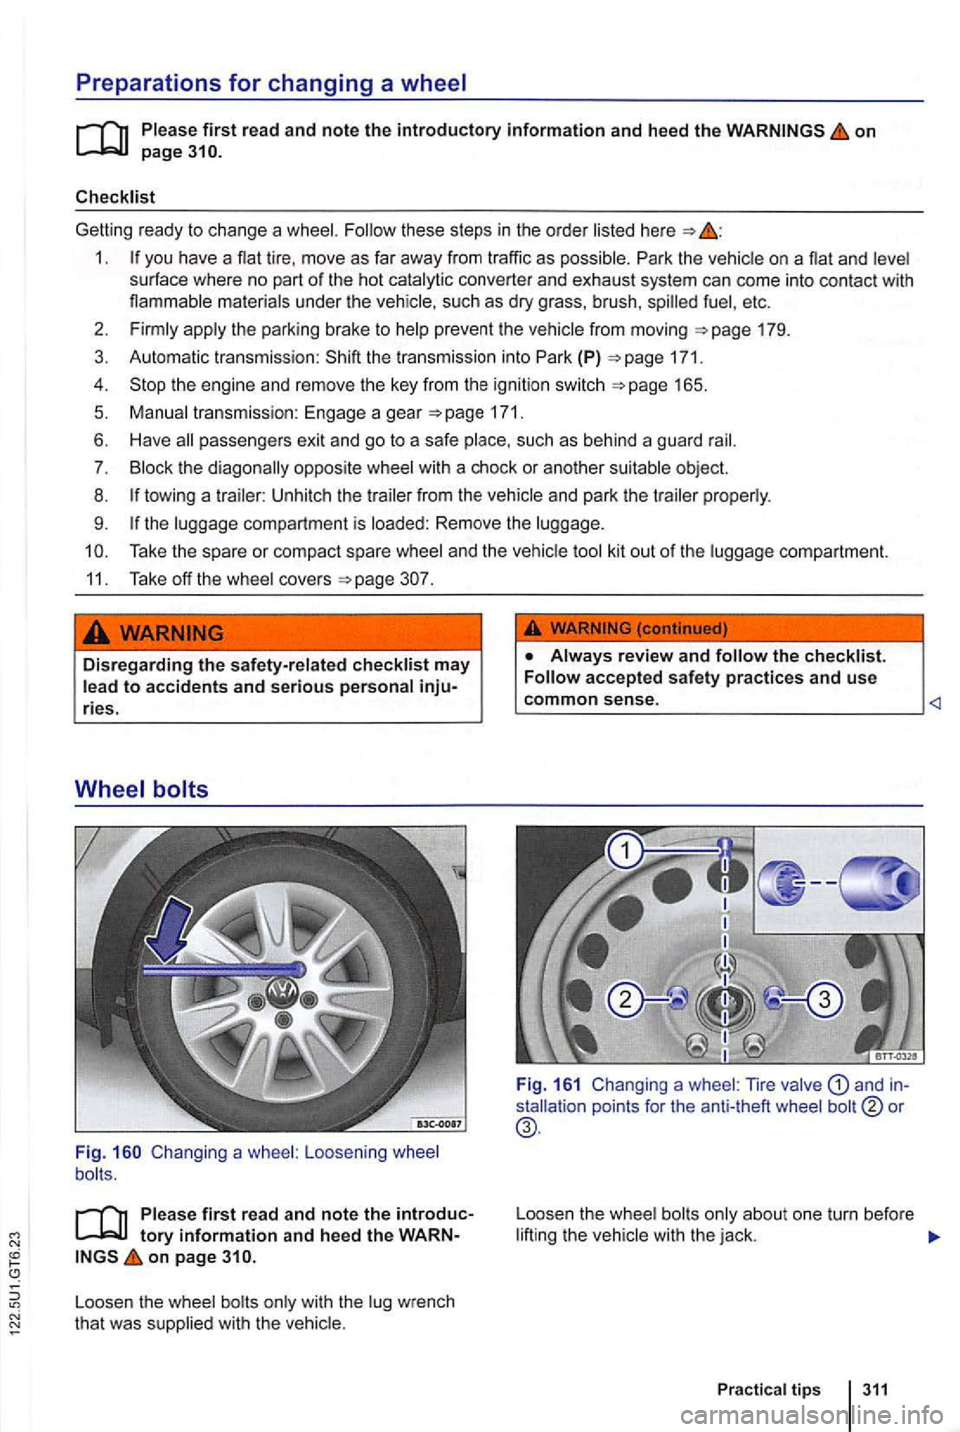
Fi g. Changing a Loosening
tory information and heed the on page
Loose n the that was
the checklist. accepted safety practices and use
L c_ o_ m __ m_o_n __ s_en_s_ e_ . ______________ ________
Fig. 161 Changing a Tire
Loosen the the
tips 311
Page 411 of 516
a wheel bolt does not come loose, ca ref ully push
the end of the lug wrench with your foot. Make
sure you are standing firmly on the ground and
hold on
to the vehicle for support .
Loosening the wheel bolts
Push the lug wrench over the wheel bolt all the
way
H oldi ng the lug wrench at the end , loosen the
wheel bolt by turning it countercloc kwise about one comp lete turn
Loosening the anti-theft wheel bolt
Take the adapter for the anti-theft wheel bolt
out of the vehicle tool kit.
Holding the lug wrench at the end , lo osen the wheel bolt by turning it counterclockwise about one comp lete turn
information regarding wheel bolts
The design of rims and whee l bolts is matched to
the factory- in sta lled whee ls . diffe re nt wheels are
ins ta lled , wheel bolts with the right length and bolt
head shape must be used . T
he a ttachment of the
wheels and function of the brake system depend
on this .
may not be possible to use wheel bolts from ferent vehicles of the same model.
a whee l with a w hee l cover , the anti-theft whee l 161 in relation to the position of the tire valve
tight ened bolts for stee l a nd alloy wheel
r im s shou ld have a torque of 88ft lbs
Do
Improperly tightened wheel bolts can come loose while driving and cause you to lose
control over the vehicle, resulting in
and grease .
Loosen the wheel bolts only about one turn before lifting the vehicle with the jack.
Never loosen bolted connections on wheel
rims with bolted rim rings.
the wheel bolts are not tig hten ed to the proper torque, the wheel can come off the
Page 414 of 516
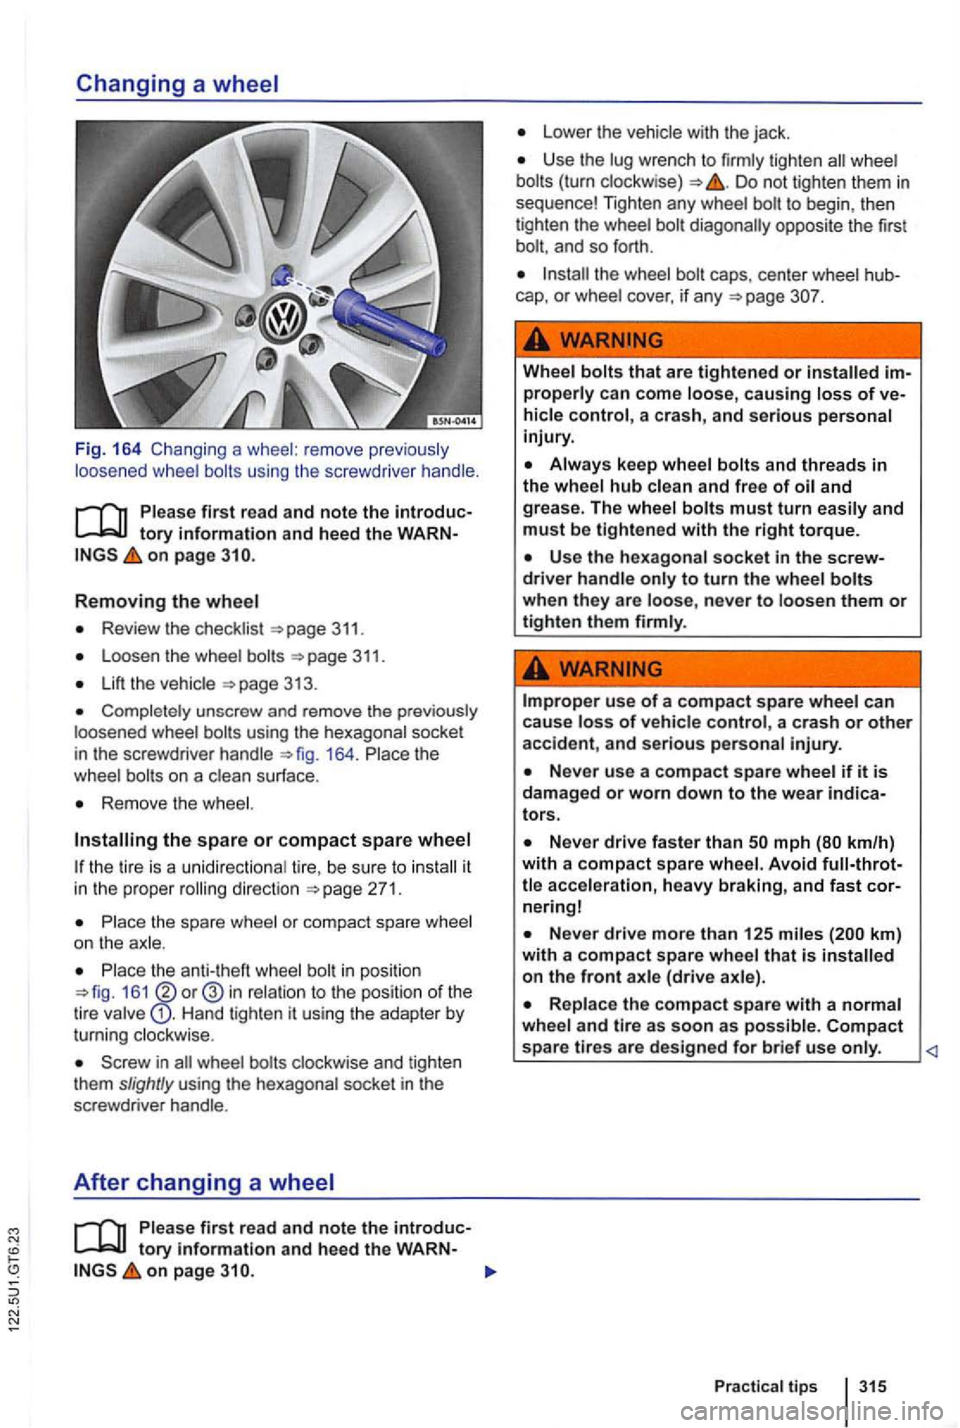
Fig. 164 Chang ing a whee l: remove previous ly
loos ened wheel bolts using the screwdrive r hand le .
on page
Removing the wheel
Review the checklist 311.
Loosen the wheel
Lift the
Completely unscrew and remove the previously
l oosened wheel
164. Place the
wheel
Remove the wheel.
the tire is a unidirectional ti r e , be sure to
Place the spare wheel or compact spare wheel
on the ax le.
in posit ion 161 in relation to the position of the
tire valve Hand tighten it using the adapter by
turning clockwise .
on page
Lower the vehicle with the jack .
Use the lug wrench to firmly tighten wheel Do not tighten them in sequence! Tighten any wheel to begin , then
tighten the wheel
and so forth .
caps , center wheel
Wheel bolts that are tightened or
Always keep wheel bolts and threads in the whee l hub clean and free of
Improper use of a compact s pare wheel can
cause loss o f vehicle control, a crash or other accident , and serious person al injury.
nering!
km ) with a compact spare wheel that is on the front axle (drive axle).
Replace the compact spare with a normal wheel and tire as soon as possible. Compact spa re tires are designed for brief use only.
Practical tip s 3 15
Page 422 of 516
Please carry out each step only in the order specified:
169 Low beam head-High beam head-Parking lights
the way to the left and it out w ith
the way
the rear. The right headlig ht assembly is th e
mirror image of the left headlig ht assembly.
in LED daytime your authori zed wagen dealer or an Authorized Volkswagen ice Facility for assistance.
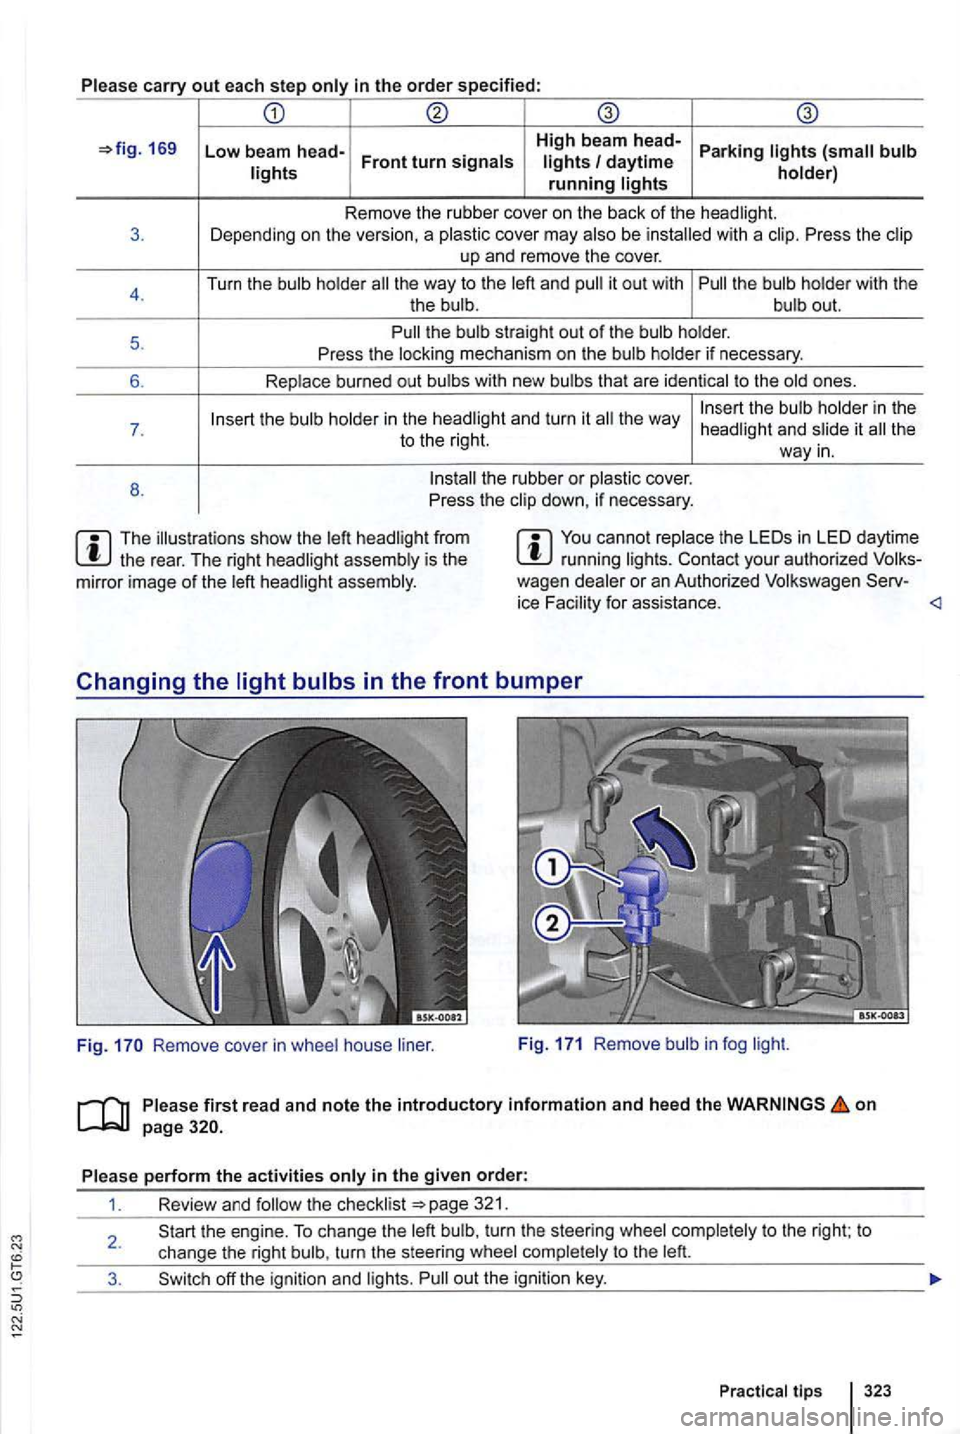
Remove cover in wheel house liner. Fi
g. 171 Remove bulb in fog light.
on page
321.
2.
323
Page 423 of 516
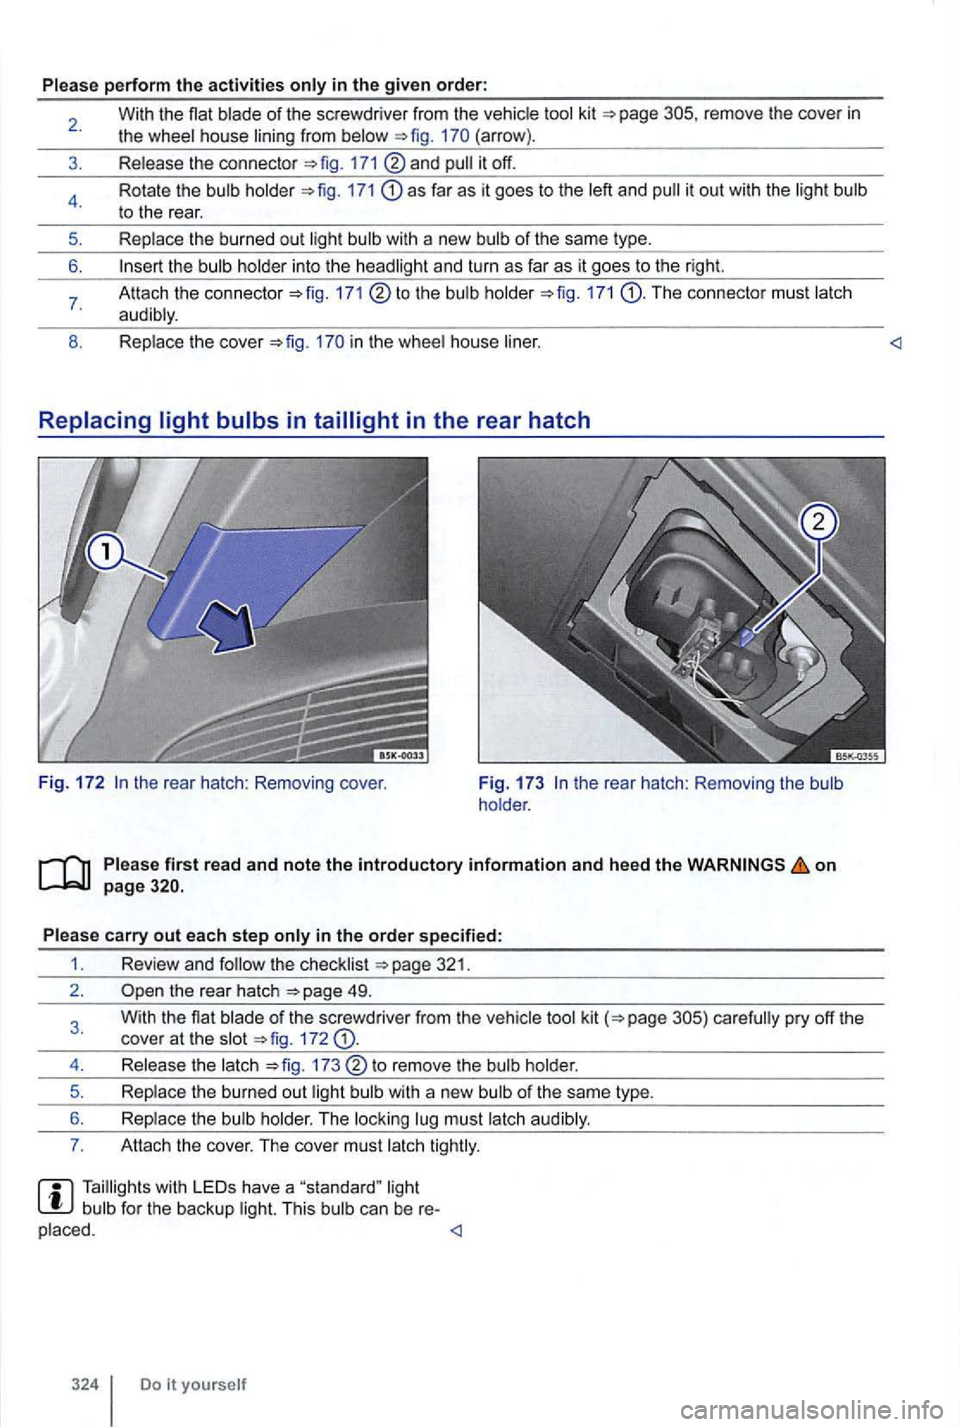
Please perform the activities
remove the cove r in the wheel house lining from (arrow) .
Release the connecto r
and
171 as far as it goes to the left and
the bulb holder into the headlight and turn as far as it goes to the right.
Attach the connector to the bulb holder The connecto r mus t latch
audibly .
Replace
the cover in the whee l house
F ig. 172 the rear hatch : Removing the bulb
ho lder.
Please first read and note the introductory information and heed the on page
in the order specified:
1 . Review and
the rear hatch
of the screwdriver from the vehicle tool kit 172
Release the latch to remove the bulb holder.
Replace the burned out light bulb with a new bulb
of the same type.
Replace the
bulb holder . The locking lug must latch audib ly .
Attach th e cover . The cover must latch
Do it yourself
Page 429 of 516
Towing
this sectio n you 'll find informat ion about:
T owing on a comme rc ia l tow truc k . . . . . . . . . .
Tips on towing .......................... 33 1
Installing the front tow ing eye . . . . . . . . . . . . . . 332
Installing th e rear towing eye . . . . . . . . . . . . . . 333 Driving tips towing 333
Exterior views
295
WARNING
Never tow a vehicle without any electrical
power.
denly engage and you would not be able to steer of control the vehicle. trol of the vehicle, crash , and seriously injure yourself and others.
Towing on a
on page
To help avoid damaging th e vehicle , h ave it towed
o n ly by a professional towing company. Read and
heed the following
information:
General information
N ever let the vehic le be towed at speeds above
km).
Towing a vehicle changes the way it handles
and brakes . To help reduce the risk of an cident and serious personal injury, note the following:
ed:
-
will have to use considerably more
force to turn the steering wheel because
the power steering is not working.
stalling and removing the towing eye and the cover for the threaded hole behind the bumper.
Towing manual transmission vehicles
Release the parking brake .
the transm ission into Neutral (N).
necessary, the vehicle can also be towed with the rea r wheels off the grou nd
Towing automatic transmission vehicles
Release the parking brake.
the transm issio n into Neutral (N).
Tow the vehicle only with its fron t wheels off the
gro und
Page 430 of 516
When not to tow your
there is in the tr ansmission be
cause of damage to you r it must be moved
with the drive wheels off the ground . The vehicle
can only be towed if its ignition is switched on and
i ts electrica l system is operating. the following
situat ions, the vehicle cannot be towed at
the front and rear whee ls can not turn .
the vehic le battery is dead {because the elec
troni c steering column lock engages and cannot be
r e leased).
you have to tow an automatic transmission
vehic le more than 30
first read and note the introduc
on page
Towing eye; tow rope or tow bar
A towing eye is included in your vehic le 's tool kit. This can be inserted in a threaded hole in the front
bumper and used when your vehicl e is being tow
ed by ano ther vehicle.
The tow rope should be flexib le enough to he lp
protect both vehicles from damage. Use a synthet
ic fiber rope or similar rope .
Attach the tow rope or tow bar only
to the towing
eye in the vehic le
For the towed vehic le, note the following :
Put the transmission in Neu tral (N) .
Do not tow faster than 30 mph (50 km/h). The
drive rotates while the i
s being towe d with its rear wheels off the ground. This can damage the automatic transmission .
can
Do not tow more than 30 miles (50 km).
When a commerc ial towing truck is being used,
the must be towed with the front
wheels
transmiss ion fluid ha s out of the trans
mission.
the re is in the transmissio n be
cause of damage to your vehicle, it must be moved
w ith the drive whee ls off the ground.
the front and rear whee ls cannot turn.
When the vehicle battery is dead , since the
steering may remain disabl ed, and it may not be
poss ib le to rele ase the electronic steering column
lock.
you have to tow an auto matic transmiss ion
veh icle mor e than 30 miles (50 km).
A veh icle can be towed only if the electronic steer ing column lock is r e leased. case of a
power system,
the engine may have to be jump-started in order to release the electronic steering column lock .
Page 436 of 516
of the vehic le . . . . . . . . . . . . . . . . . . 292
Braking assistan ce sy ste ms . . . . . . . 185
Accessories . . . . . . . . . . . . . . . . . . . . . 283, 284
Acoustic warnings Light . . . . . . . . . . . . . . . . . . . . . . . . . . . . . 124
Warning and indicator lights . . . . . . . . . . . . 15
Adapti ve Front Lighting Dynami c . . . . . . . . . . . . . . . . . . . . . . . . . 126
Adjusting Electr ically ad justable front seat . . . .
. . . 63 sea ting position . . . . . . . . . . . . . . .
. . . . . . . . . . . . . . . 95
a nd child restrain ts . . . . . . . . . . . . . . . . . ........... ..................... 126
Afte rm arket equipment . . . . . . . . . . . . . . . . 285
Aftermar ket installation ph one . . . . . . . . . . . . . . . . . . . . . . . . 287
R adio equipment . . . . . . . . . . . . . . . . . . . 287
Aftermarket installations . . . . . . . . . . . . . . 291
Airbag system . . . . . . . . . . . . . . . . . . . . . . . . 82
Adva nced Airbag s . . . . . . . . . . . . . . . . . . . 97
Advanced Airbag . . . . . . . . . . . . . . 95
C le a ning the instrument panel . . . . . . . . . 256
D ea ctivation by we ight -sensing mat . . . . . 97
Deactivation
of passenger front airbag . . . 97
Descr ipt ion . . . . . . . . . . . . . . . . . . . . . . . . . 87
Front airbags . . . . . . . . . . . . . . . . . . . . . . . 92
Fun ction ality . . . . . . . . . . . . . . . . . . . . . . . . 87
Locking ve h icle afte r inflatio n . . . . . . . . . . . 42
airbags . . . . . . . . . . . . . . . . . . . . . . . . 99 Curt ain airbags . . . . . . .
. . . . . . . . . . . . . . . . . . . . . . . . . . conside rations 211
Air conditioning . . . . . . . . . . . . . . . . . . . . . . Climatron ic . . . . . . . . . . . . . . . . . . . . . . . .
Man ual . . . . . . . . . . . . . . . . . . . . . . . .
Air recirculation . . . . . . . . . . . . . . . . . . 212
Fun ctio nality . . . . . . . . . . . . . . . . . . . . . . . 212
off.. . . . . . . . . . . . . . . . . . . . . . 212
Air vents . . . . . . . . . . . . . . . . . . . . . . . . . . 212 Alarm button in vehicle key
. . . . . . . . . . 248
Anodized surfaces . . . . . . . . . . . . . . . . . . . 248
Antenna . . . . . . . . . . . . . . . . . . . . . . . . . . . . 292
Anti-Lock Brake . . . . . . . . . 185
. . . . . . . . . 186 , 187
Anti-th eft alarm system . . . . . . . . . . . . . . . . 45
Descr iption . . . . . . . . . . . . . . . . . . . . . . . . 45
Anti-th e
ft wheel bolts .....•.... 311
Antifreeze agent . . . . . . . . . . . . . . . . . . . . . . 235
Armrest.................. ...... ...... 66
braking assistan ce syste ms . . . . . . . 187 Braking assistan ce sy ste ms . . . . . . . 186 on and off... . . . . . . . . . . . . . . 187
A ss ista nce
systems Anti -Lock Brake . . . . . . . . 185 Regulation (ASR )........ 186, 187
Br ake Assi st . . . . . . . . . . . . . . . . . . . . . . . 185
Brak e Ass ist
. . . . . . . . . . . . . . . . . 185 ccs . . . . . . . . . . . . . . . . . . . . . . . . . . . . . 197
C ru ise Control . . . . . . . . . . . . . . . 197 Elect ronic Diff eren tial Lock (EDL) . . . . . . 186 Ele ct ronic Stabil it y Cont rol . . . . . . 185 H old . . . . . . . . . . . . . . . . . . . . . . . . . . 195 nre button . . . . . . . . . . . . . . . . . . . . . . . . . .
Auto-dimming inside mirror . . . . . . . . 134 Autom atic load deactivation...... . . . . . 241
Autom atic Lock . . . . . . . . . . . . 175 Automatic transmission . . . . . . . . . . . . . 171
Dir ect . . . . . . 177 Driving . . . . . . . . . . . . . . . . . . . . . . . . . . . 177 Driving on . . . . . . . . . . . . . . . . . . . . . 177 Emergency release for the sele cto r lever
l ock . . . . . . . . . . . . . . . . . . . . . . . . . . . .