Page 400 of 700

400 3-3. Using the Bluetooth
® audio system
4RUNNER_UPress the talk switch and say “From car” or “From audio”, and
select “Confirm” using a voice command or .
Vehicles with smart key system: If “From car” is selected, the porta-
ble player will be automatically connected whenever the “ENGINE
START STOP” switch is in eit
her ACCESSORY or IGNITION ON
mode.
Vehicles without smart key system: If “From car” is selected, the por-
table player will be automatically connected whenever the engine
switch is in either the “ACC” or “ON” position.
Changing the registered name of a portable player
Select “Change Name” using a voice command or .
Select the name of the portable player to be changed by
either of the following methods, and select “Confirm” using a
voice command or :
a. Press the talk switch and say the name of desired portableplayer.
b. Press the talk switch and say “List audio players”. When the name of the desired portable player is read aloud, press the
talk switch.
Press the talk switch or select “Record Name” using ,
and say the new name.
Select “Confirm” using a voice command or .
STEP 3
STEP 1
STEP 2
STEP 3
STEP 4
Page 456 of 700
456 3-7. Other interior features
4RUNNER_U
■For quicker adjustment of the clock
To advance the minutes and hours quickly, press and hold the “M” or “H” but-
ton.
The time can be adjusted back or forth by following the procedure below:
■ The clock is displayed when
Vehicles without a smart key system
The engine switch is in the “ACC” or “ON” position.
Vehicles with a smart key system
The “ENGINE START STOP” switch is in ACCESSORY or IGNITION ON
mode.
■ When disconnecting and reco nnecting battery terminals
The clock data will be reset.
The hour or minute can be moved for-
ward or backward by pressing the
“MODE/ ” or “SET/ ” button while
pressing and holding the “H” or “M” but-
ton. If the “MODE/ ” or “SET/ ” but-
ton is also pressed and held in the above
operation, the hour or minute will move
faster.
Page 470 of 700
470
3-7. Other interior features
4RUNNER_U
Seat heaters
■The seat heaters can be used when
Vehicles without a smart key system
The engine switch is in the “ON” position.
Vehicles with a smart key system
The “ENGINE START STOP” switch is in IGNITION ON mode.
■ When not in use
Move the dial fully backward. The indicator light turns off.
: If equipped
On
The indicator light comes on.
Adjusts the seat tempera-
ture
The further you move the dial
forward, the warmer the seat
becomes.
CTH37AS005
Front passenger’s
seat
Driver’s seat
Page 473 of 700

473
3-7. Other interior features
3
Interior features
4RUNNER_U
Floor mat
CAUTION
Observe the following precautions.
Failure to do so may cause the driver's floor mat to slip, possibly interfering
with the pedals while driving. An unexpectedly high speed may result or it may
become difficult to stop the vehicle, leading to a serious accident.
■When installing the driver's floor mat
● Do not use floor mats designed for other models or different model year
vehicles, even if they are Toyota Genuine floor mats.
● Only use floor mats designed for the driver's seat.
● Always install the floor mat securely using the retaining hooks (clips) pro-
vided.
● Do not use two or more floor mats on top of each other.
● Do not place the floor mat bottom-side up or upside-down.
■ Before driving
Use only floor mats designed specifically for vehicles of the same
model and model year as your vehic le. Fix them securely in place
onto the carpet.
Fix the floor mat in place using
the retaining hooks (clips) pro-
vided.
The shape of the retaining
hooks (clips) and the fixing
procedure of the floor mat for
your vehicle may differ from
those shown in the illustration.
For details, refer to the floor
mat retention clip installation
instructions supplied with the
clips.
● Check that the floor mat is securely
fixed in the correct place with all the
provided retaining hooks (clips). Be
especially careful to perform this check
after cleaning the floor.
● With the engine stopped and the shift
lever in P, fully depress each pedal to
the floor to make sure it does not inter-
fere with the floor mat.
Page 477 of 700
477
3-7. Other interior features
3
Interior features
4RUNNER_U
Referring to the map above, press the “MODE/ ” or “SET/
” button to select the number of the zone you are in.
Press and hold the “SET/ ” button to confirm the number
and to exit deviation calibrati on mode. (If the button is pressed
for more than 6 seconds, th e number will automatically be
confirmed and the display returned to normal.)
Circling calibration
If “” appears on the left side of
the direction display, circling cali-
bration needs to be performed.
Stop the vehicle in a place where it is safe to drive in a circle. In deviation calibration mode
( P. 476), press and hold the
“MODE/ ” button to change to
circling calibration mode.
“ ” on the left side of the direction
display will blink.
STEP 3
STEP 4
STEP 1
STEP 2
Page 478 of 700

478 3-7. Other interior features
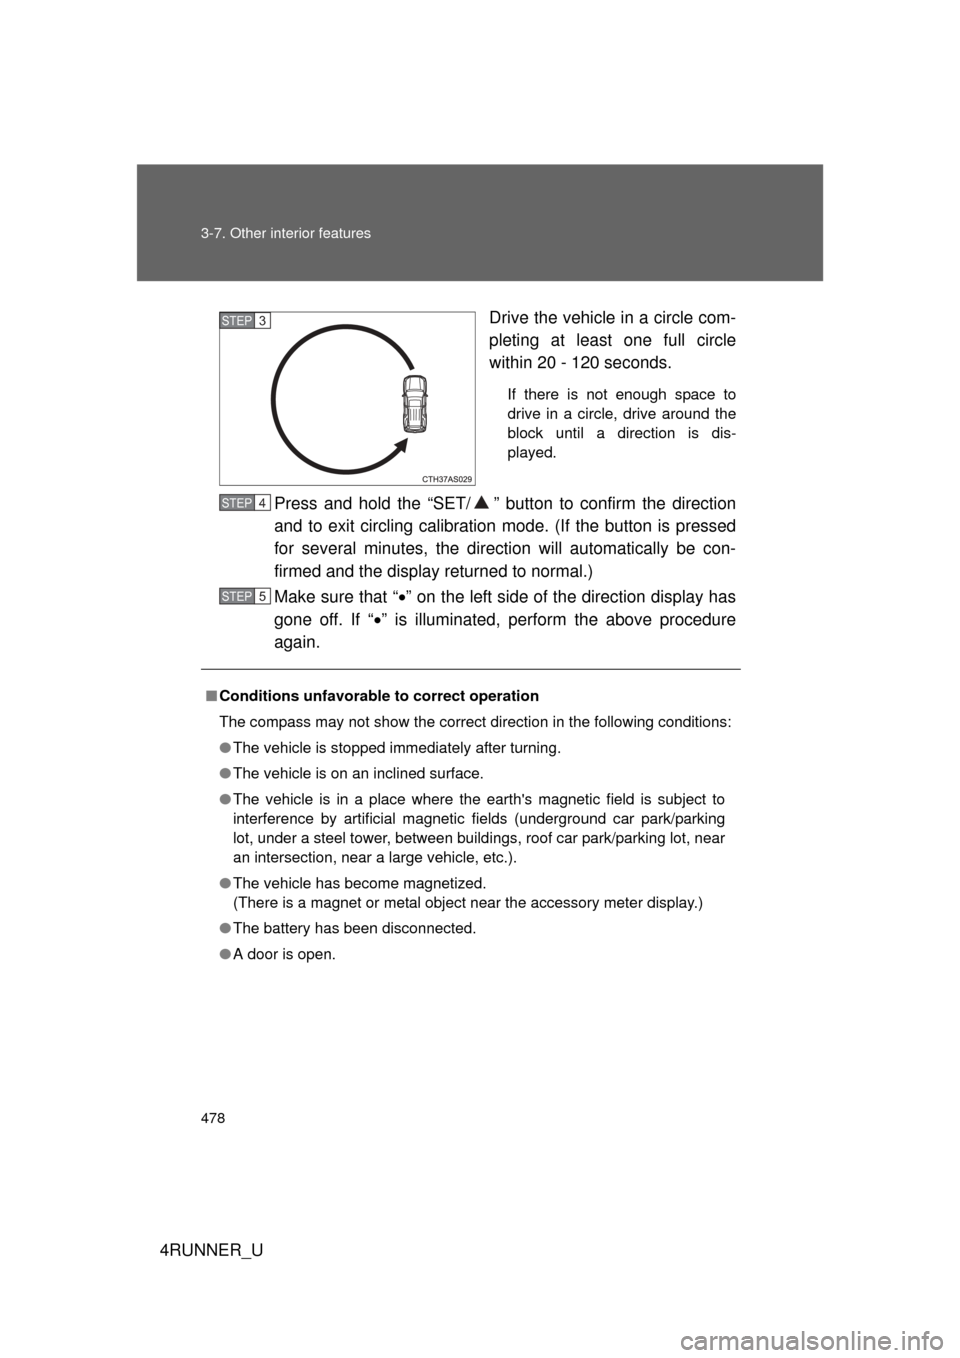
4RUNNER_UDrive the vehicle in a circle com-
pleting at least one full circle
within 20 - 120 seconds.
If there is not enough space to
drive in a circle, drive around the
block until a direction is dis-
played.
Press and hold the “SET/ ” butt
on to confirm the direction
and to exit circling calibration mode. (If the button is pressed
for several minutes, the direction will automatically be con-
firmed and the display returned to normal.)
Make sure that “ ” on the left side of the direction display has
gone off. If “ ” is illuminated, perform the above procedure
again.
STEP 3
■ Conditions unfavorable to correct operation
The compass may not show the correct direction in the following conditions:
● The vehicle is stopped immediately after turning.
● The vehicle is on an inclined surface.
● The vehicle is in a place where the earth's magnetic field is subject to
interference by artificial magnetic fields (underground car park/parking
lot, under a steel tower, between buildings, roof car park/parking lot, near
an intersection, near a large vehicle, etc.).
● The vehicle has become magnetized.
(There is a magnet or metal object near the accessory meter display.)
● The battery has been disconnected.
● A door is open.
STEP 4
STEP 5
Page 495 of 700

495
3-7. Other interior features
3
Interior features
4RUNNER_U
■
Safety Connect Services Information
● Phone calls using the vehicles Bluetooth
® technology will not be possible
during Safety Connect.
● Safety Connect is available beginning Fall 2009 on select Toyota models.
Contact with the Safety Connect response center is dependent upon the
telematics device being in operative condition, cellular connection avail-
ability, and GPS satellite signal reception, which can limit the ability to
reach the response center or receive emergency service support. Enroll-
ment and Telematics Subscription Service Agreement required. A variety
of subscription terms is available; charges vary by subscription term
selected.
● Automatic Collision Notification, Emergency Assistance, Stolen Vehicle
Location, and Enhanced Roadside Assistance will function in the United
States, including Hawaii and Alaska, and in Canada. No Safety Connect
services will function outside of the United States in countries other than
Canada.
● Safety Connect services are not subject to section 255 of the Telecom-
munications Act and the device is not TTY compatible.
■ Languages
The Safety Connect response center will offer support in multiple languages.
The Safety Connect system will offer voice prompts in English and Spanish.
Please indicate your language of choice when enrolling.
■ When contacting the response center
You may be unable to contact the response center if the network is busy.
Page 496 of 700

496 3-7. Other interior features
4RUNNER_U
Safety Connect LED light IndicatorsWhen the “ENGINE START STOP” switch is turned to IGNITION ON
mode (vehicles with a smart key system) or the engine switch is
turned to the “ON” position (vehicle s without a smart key system), the
red indicator light comes on for 2 seconds then turns off. Afterward,
the green indicator light comes on, indicating that the service is
active.
The following indicator light patter ns indicate specific system usage
conditions:
● Green indicator light on = Active service
● Green indicator light flashing = Safety Connect call in process
● Red indicator light (except at v ehicle start-up) = System malfunc-
tion (contact your Toyota dealer)
● No indicator light (off) = Safe ty Connect service not active
Safety Connect services
■ Automatic Collision Notification
In case of either airbag deployment or severe rear-end collision,
the system is design ed to automatically call the response center.
The responding agent receives th e vehicle’s location and attempts
to speak with the vehicle occup ants to assess the level of emer-
gency. If the occupants are unable to communicate, the agent
automatically treats the call as an emergency, contacts the nearest
emergency services provider to describe the situation, and
requests that assistance be sent to the location.