Page 65 of 228

vehicle and/or the child is not properly
secured in the child restraint.
G
WARNING
Never let more people ride in the vehicle
than there are seat belts available. Make
sure everyone riding in the vehicle is
correctly restrained with a separate seat
belt.
Never use a seat belt for more than one
person at a time. G
WARNING
Never ride in a moving vehicle with the seat
backrest in an excessively reclined
position as this can be dangerous. You
could slide under the seat belt in a
collision. If you slide under it, the belt
would apply force at the abdomen or neck,
causing
serious or even fatal injuries. The
seat backrest and seat belt provide the best
restraint when the wearer is in a position
that is as upright as possible and the belt
is properly positioned on the body. G
WARNING
Observe ”Safety notes“ ( Y page 35). :
Seat belt outlet
; Seat belt guide
= Latch plate
? Seat belt buckle
A Release button
X Fastening the seat belt: With a smooth
motion,
pull the seat belt out of seat belt
outlet :.
X Place the shoulder portion of the seat
belt across the top of your shoulder and
the lap portion across your hips.
X Push latch plate = into seat belt
buckle ? until it clicks.
X If necessary, tighten the lap portion of
the seat belt to a snug fit by pulling
shoulder portion up.
X Unfastening the seat belt: Press release
button A.
X Allow the retractor to completely rewind
the seat belt by guiding latch plate =.
Proper use of seat belts R
Do
not twist the seat belt when fastening.
R Adjust the seat belt so that the shoulder
portion is located as close as possible
to the middle of the shoulder (it should Seat belts
63
>> Controls. Z
Page 66 of 228
. Never pass the
shoulder portion of the seat belt under
your arm.
R Position the lap belt as low as possible
on your hips (over hip joint) and not
across the abdomen.
R Place
the")
not touch the neck). Never pass the
shoulder portion of the seat belt under
your arm.
R Position the lap belt as low as possible
on your hips (over hip joint) and not
across the abdomen.
R Place
the seat backrest in a position that
is as upright as possible.
R Never use a seat belt for more than one
person at a time.
R Do not fasten a seat belt around a person
and another object at the same time. When
using a seat belt to secure infant or
toddler restraints or children in booster
seats, always follow the child seat
manufacturer’s instructions.
R Check your seat belt during travel to
make sure it is properly positioned.
R Make sure the seat belt is always fitted
snugly. Take special care to maintain a
snug fit when wearing loose clothing. G
WARNING
Do not pass seat belts over sharp edges.
They could tear.
Do not allow the seat belt to get caught in
the door or in the seat adjustment
mechanism. This could damage the seat
belt.
Never attempt to make modifications to
seat belts. This could impair the
effectiveness of the seat belts.
Do not bleach or dye seat belts as this may
severely weaken them. In a crash they may
not
be able to provide adequate protection.
Damaged seat belts or seat belts that were
highly stressed in an accident must be
replaced. Contact an authorized smart
center. Correct driver seat adjustment
G
WARNING
Observe ”Safety notes“ ( Y page 58). X
Adjust the driver’s seat properly
(Y page 59).
Make sure that you
R are positioned as far away from the
driver’s front air bag as possible
R can reach steering wheel : with your
arms slightly bent at the elbows
R can fasten seat belt ; properly
R you have adjusted seat backrest = to
a position that is as upright as
possible
R you can move your legs freely
R you can depress the brake and
accelerator pedal safely.
X Make sure the seat belt is fastened
properly (Y page 62). Lighting
Exterior lamp switch
For safety, smart recommends that you
drive with your low‑beam headlamps on
during
the day. In certain countries, local
laws dictate that low‑beam headlamps are
switched on automatically during
operation of the vehicle. 64
Lighting
>> Controls.
Page 67 of 228

i
If you drive in countries where
vehicles drive on the other side of the
road than the country in which the
vehicle is registered, you must have the
headlamps
modified for symmetrical low
beams. Relevant information can be
obtained at any authorized smart center. Exterior lamp switch (USA only)
$
Lamps off
Daytime running lamp mode*
T Parking lamps
L Low‑beam headlamps or high‑beam
headlamps
à Automatic headlamp mode* Exterior lamp switch (Canada only)
$
Lamps off
Daytime running lamp mode
T Parking lamps
L Low‑beam headlamps or high‑beam
headlamps Parking lamps You can switch on and off the parking lamps
with the exterior lamp switch using the
manual headlamp mode.
X
Switching on: Turn the exterior lamp
switch to position T.
The parking lamps come on.
The following lamps also come on:
R Tail lamps
R License plate lamps
R Side marker lamps
Low‑beam headlamps You can switch on and off the low‑beam
headlamps with the exterior lamp switch
using the manual headlamp mode.
X
Switching on: Turn the exterior lamp
switch to position L.
The low‑beam headlamps come on.
The low‑beam headlamp indicator lamp
M
in the instrument cluster comes on.
The following lamps also come on:
R Tail and parking lamps
R License plate lamps
R Side marker lamps
Automatic headlamp mode (USA only) This feature is only available on vehicles
with rain-light sensor*.
The following lamps come on and go out
automatically
depending on the brightness
of the ambient light:
R Low‑beam headlamps
R Tail and parking lamps
R License plate lamps
R Side marker lamps G
WARNING
If the exterior lamp switch is set to
position Ã, the headlamps will not be
automatically switched on under foggy
conditions. Lighting
65
>> Controls.
* optional Z
Page 68 of 228

To minimize risk to you and to others,
activate headlamps by turning exterior
lamp
switch to position L when driving
or when traffic and/or ambient lighting
conditions require you to do so.
In low ambient lighting conditions, only
switch from position à to L with the
vehicle at a standstill in a safe location.
Switching from position à to L will
briefly switch off the headlamps. Doing so
while driving in low ambient lighting
conditions may result in an accident.
The automatic headlamp feature is only an
aid to the driver. The driver is responsible
for the operation of the vehicle’s lights at
all times.
X Turn the exterior lamp switch to position
Ã.
With the key in starter switch position
1,
the tail and parking lamps, the license
plate lamps, and the side marker lamps
will come on and go out automatically
depending on the brightness of the
ambient light.
With the engine running, the low‑beam
headlamps, the tail and parking lamps,
the license plate lamps and the side
marker lamps will come on and go out
automatically depending on the
brightness of the ambient light.
Daytime running lamp mode (Canada only) In Canada, the daytime running lamp mode
is mandatory and therefore in a constant
mode.
X
Turn the exterior lamp switch to position
$.
i With the engine running, the low‑beam
headlamps cannot be switched off
manually.
You cannot switch on the high‑beam
headlamps.
The high‑beam flasher is available at all
times. For nighttime driving you should turn the
exterior lamp switch to position
L to
permit activation of the high‑beam
headlamps.
When the engine is running, and you
R turn
the exterior lamp switch to position
T, the low‑beam headlamps, the tail
and parking lamps, the license plate
lamps and the side marker lamps come on
R turn the exterior lamp switch to position
L, the manual headlamp mode has
priority over the daytime running lamp
mode.
The corresponding exterior lamps come
on (Y page 65).
Daytime running lamp mode* (USA only) In the USA, the daytime running lamp mode
is deactivated by default.
X
Activating: Switch off the ignition.
X Switch on the high-beam flasher and
press button * on the key
simultaneously.
An acoustic signal sounds.
The daytime running lamp mode is
activated.
X Turn the exterior lamp switch to position
$.
i With the engine running, the low‑beam
headlamps cannot be switched off
manually.
i When
the daytime running lamp mode is
activated, the rain-light sensor* is
without function.
When the engine is running, and you turn
the exterior lamp switch to position T
or L, the manual headlamp mode has
priority over the daytime running lamp
mode.
The corresponding exterior lamps come on
(Y page 64). 66
Lighting
>> Controls.
* optional
Page 69 of 228

X
Deactivating: Switch off the ignition
and remove the key from the starter
switch.
X Switch on the high-beam flasher and
press button # on the key
simultaneously.
An acoustic signal sounds.
The daytime running lamp mode is
deactivated.
LED daytime running lamps* (USA only) Vehicles without rain-light sensor:
X
Switching on: Switch on the ignition.
The LED daytime running lamps are
switched on.
X Switching off: Switch on the parking
lamps or the low‑beam headlamps.
The LED daytime running lamps are
switched off.
Vehicles with rain-light sensor*:
X Turn the exterior lamp switch to position
Ã.
With the key in starter switch position
1, the LED daytime running lamps are
switched on. In low ambient light
conditions, low-beam headlamps, the
tail
and parking lamps, the license plate
lamps and the side marker lamps will
come on. The LED daytime running lamps
will then be switched off.
With the engine running, the low‑beam
headlamps, the tail and parking lamps,
the license plate lamps and the side
marker lamps will come on and go out
automatically depending on the
brightness of the ambient light.
When the engine is running, and you turn
the exterior lamp switch to position T
or L, the manual headlamp mode has
priority
over the LED daytime running lamp
mode.
The corresponding exterior lamps come on
(Y page 64). LED daytime running lamps*
(Canada only) X
Switching on: Switch on the ignition.
The LED daytime running lamps are
switched on.
X Switching off: Switch on the low‑beam
headlamps.
The LED daytime running lamps are
switched off. Combination switch (high beam, high
beam flasher and turn signals)
X Make sure the key is in starter switch
position 1.
High‑beam headlamps and high-beam
flasher X
Make sure the low‑beam headlamps are
switched on (Y page 65).
X Switching on: Push the combination
switch to position 1.
The high‑beam headlamps come on.
The
high‑beam headlamp indicator lamp
K in the instrument cluster comes on.
X Switching off: Pull the combination
switch in direction of arrow ; to its
original position.
The high‑beam headlamps go out.
The
high‑beam headlamp indicator lamp
K in the instrument cluster goes out.
X High-beam flasher:
Pull the combination
switch briefly in direction of arrow ;. Lighting
67
>> Controls.
* optional Z
Page 70 of 228

Turn signals
:
Turn signals, right
; Turn signals, left
X Switching on: Push the combination
switch in direction of arrow : or ;.
The corresponding turn signals flash.
The
corresponding turn signal indicator
lamp # or ! in the instrument
cluster flashes.
The combination switch resets
automatically after major steering
wheel movement.
i To signal minor directional changes
such as changing lanes, push the
combination switch only to the point of
resistance and release. The
corresponding turn signals will flash
three times. Coming home function
Vehicles without rain-light sensor: The
interior lamps come on and then go out
again
after 12 seconds every time when you
lock or unlock the vehicle.
Vehicles with rain-light sensor*: In
addition to the interior lamps, the
exterior lamps come on and then go out
again after 12 seconds depending on the
brightness of the ambient light when you
lock or unlock the vehicle. When leaving the vehicle X
Remove the key from the starter switch.
X Exit the vehicle.
X Press button * on the key.
The vehicle is locked.
The
interior and exterior 9
lamps come on
and then go out again after 12 seconds.
When returning to the vehicle X
Press button #
on the key either once or
twice.
The vehicle is either selectively or
globally unlocked.
The interior and exterior 9
lamps come on
and then go out again after 12 seconds. Front fog lamps
G
WARNING
Vehicles with rain-light sensor*:
In low ambient lighting or foggy
conditions, only switch from position
à to L with the vehicle at a
standstill in a safe location. Switching
from à to L will briefly switch off
the headlamps. Doing so while driving in
low
ambient lighting conditions may result
in an accident.
i Fog lamps will operate with the parking
lamps and/or the low‑beam headlamps on.
Fog lamps should only be used in
conjunction with low‑beam headlamps.
Consult your State or Province Motor
Vehicle Regulations regarding
permissible lamp operation.
i Vehicle with rain-light sensor*:
Fog lamps cannot be switched on manually
with the exterior lamp switch in
position Ã. To switch on the fog
lamps, turn the exterior lamp switch to
position L first.
9 Vehicles with rain-light sensor*. 68
Lighting
>> Controls.
* optional
Page 71 of 228

X
Make sure the parking lamps or the
low‑beam headlamps are switched on.
X Switching on: Press switch :.
The front fog lamps come on.
The indicator lamp in the switch comes
on.
X Switching off: Press switch : once
more.
The front fog lamps go out.
The indicator lamp in the switch goes
out. Hazard warning flasher
The hazard warning flasher can be switched
on at all times, even with the key removed
from the starter switch. X
Switching on: Press hazard warning
flasher switch :.
All turn signal lamps are flashing.
X Switching off: Press hazard warning
flasher switch : once more. Interior lighting
The
interior lamp comes on for a period of
time when you open the doors, or lock or
unlock the vehicle with the key.
It goes out
R immediately after switching off the
ignition with all doors closed
R after 30 seconds if the doors are not
opened
R after 15 seconds if all doors are closed
R after 10 minutes if at least one door is
open
The rocker switch can be set to three
different positions. :
Interior lamp
; Off
= Switching on the automatic control
? Continuous operation
Automatic control X
Set the rocker switch to position =.
The interior lamp comes on for a period
of time.
Switching off X
Set the rocker switch to position ;.
The interior lamp is permanently
switched off. Lighting
69
>> Controls. Z
Page 72 of 228

Continuous operation
X
Set the rocker switch to position ?.
The interior lamp is permanently
switched on.
! When leaving the vehicle, make sure the
interior lamp is not set to continuous
operation and none of the doors is left
open for a long period of time.
Doing otherwise could result in a
discharged battery.
Ambient lighting* The ambient lighting illuminates the
vehicle
interior with 6 LEDs when the low-
beam headlamps are switched on. The LEDs
can be dimmed.
The LEDS are located
R in the overhead control panel
R in the door pockets, driver’s and
passenger side
R in the storage trays to the left and right
of the steering wheel
R in the storage compartment, passenger
side
In addition to the ambient lighting, the
footwells on the driver’s and passenger
side are also illuminated by separate
lamps.
i When you open a door, the interior
lighting comes on and the brightness of
lamps in the footwells increases. X
Make sure the key is in starter switch
position 1.
X Switch on the low-beam headlamps.
X To brighten or dim ambient lighting:
Press button : repeatedly until the
desired setting is reached.
The current setting is stored.
i When adjusting the ambient lighting,
the illumination level for instrument
cluster is also changed (Y page 92). Windshield wipers
Switching windshield wipers on and off
Example illustration coupé
X
Make sure the key is in starter switch
position 1.
X Switching on: Turn the wiper switch to
position 2 or 3, depending on the
intensity of the rain.
! Do not operate the windshield wipers
when the windshield is dry. Dust that
accumulates on a windshield might
scratch the glass and/or damage the
wiper
blades when wiping occurs on a dry
windshield. If it is necessary to operate
the windshield wipers in dry weather
conditions, always operate the
windshield wipers with windshield
washer fluid.
! If anything blocks the windshield
wipers (leaves, snow, etc.), switch them
off immediately. 70
Windshield wipers
>> Controls.
* optional
 1
1 2
2 3
3 4
4 5
5 6
6 7
7 8
8 9
9 10
10 11
11 12
12 13
13 14
14 15
15 16
16 17
17 18
18 19
19 20
20 21
21 22
22 23
23 24
24 25
25 26
26 27
27 28
28 29
29 30
30 31
31 32
32 33
33 34
34 35
35 36
36 37
37 38
38 39
39 40
40 41
41 42
42 43
43 44
44 45
45 46
46 47
47 48
48 49
49 50
50 51
51 52
52 53
53 54
54 55
55 56
56 57
57 58
58 59
59 60
60 61
61 62
62 63
63 64
64 65
65 66
66 67
67 68
68 69
69 70
70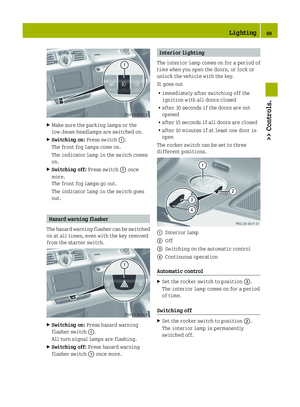 71
71 72
72 73
73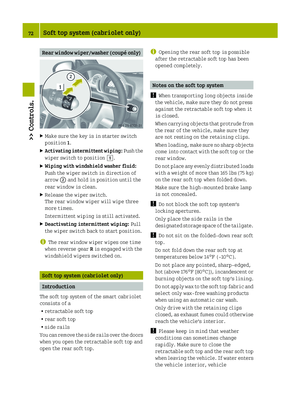 74
74 75
75 76
76 77
77 78
78 79
79 80
80 81
81 82
82 83
83 84
84 85
85 86
86 87
87 88
88 89
89 90
90 91
91 92
92 93
93 94
94 95
95 96
96 97
97 98
98 99
99 100
100 101
101 102
102 103
103 104
104 105
105 106
106 107
107 108
108 109
109 110
110 111
111 112
112 113
113 114
114 115
115 116
116 117
117 118
118 119
119 120
120 121
121 122
122 123
123 124
124 125
125 126
126 127
127 128
128 129
129 130
130 131
131 132
132 133
133 134
134 135
135 136
136 137
137 138
138 139
139 140
140 141
141 142
142 143
143 144
144 145
145 146
146 147
147 148
148 149
149 150
150 151
151 152
152 153
153 154
154 155
155 156
156 157
157 158
158 159
159 160
160 161
161 162
162 163
163 164
164 165
165 166
166 167
167 168
168 169
169 170
170 171
171 172
172 173
173 174
174 175
175 176
176 177
177 178
178 179
179 180
180 181
181 182
182 183
183 184
184 185
185 186
186 187
187 188
188 189
189 190
190 191
191 192
192 193
193 194
194 195
195 196
196 197
197 198
198 199
199 200
200 201
201 202
202 203
203 204
204 205
205 206
206 207
207 208
208 209
209 210
210 211
211 212
212 213
213 214
214 215
215 216
216 217
217 218
218 219
219 220
220 221
221 222
222 223
223 224
224 225
225 226
226 227
227