Page 121 of 228

When checking the engine oil level
R
the vehicle must be parked on level
ground
R the
vehicle must have been stationary for
at least five minutes with the engine
turned off
X Turn off the engine.
X Engage the parking brake.
X Open the tailgate.
X Open the engine compartment cover
(Y page 117).
The oil dipstick is located in the engine
compartment on the passenger side. X
Pull out oil dipstick :.
X Wipe oil dipstick : clean with a clean
cloth.
X Fully insert oil dipstick : into the
dipstick guide tube.
X Pull out oil dipstick : again after
approximately one minute to obtain
accurate reading.
The oil level is correct when it is
between lower mark = (minimum) and
upper mark ; (maximum) on both sides
of oil dipstick :.
X Fully insert oil dipstick : into the
dipstick guide tube again.
X If necessary, add engine oil
(Y page 119).
i The
filling quantity between the upper
and lower marks on the oil dipstick is
approximately 1.1 US qt (1.0 l). Adding engine oil !
Only use approved engine oils and oil
filters required for vehicles with
Maintenance System. For a listing of
approved engine oils and oil filters
contact an authorized smart center.
Using engine oils and oil filters of
specification
other than those expressly
required for the Maintenance System, or
changing of oil and oil filter at change
intervals longer than those called for by
the Maintenance System will result in
engine or emission control system
damage not covered by the smart Limited
Warranty. G
WARNING
When adding engine oil, always use a funnel
to avoid spilling oil on any hot parts such
as the catalytic converter or exhaust
system.
If this should happen, however, the engine
must be thoroughly cleaned before you
continue your trip. The engine oil could
otherwise ignite.
The filler cap is located in the engine
compartment on the passenger side. X
Unscrew filler cap : from the filler
neck.
X Add engine oil as required.
Do not add more than 0.53 US qt (0.5 l)
engine oil at a time.
X Wait one minute until the engine oil has
run into the oil pan. Engine compartment
119
>> Operation. Z
Page 122 of 228

X
Check the engine oil level once more.
X Add engine oil once more if necessary.
Be careful not to spill any oil when adding
to avoid environmental damage caused by
oil entering the ground and water.
! Excess engine oil must be siphoned or
drained
off. It could cause damage to the
engine or emission control system not
covered by the smart Limited Warranty.
X Screw filler cap : back on the filler
neck.
X Close the engine compartment cover
(Y page 117). Front compartment
Service flap
Remove the service flap to check the
coolant
level, windshield washer reservoir
level, and brake fluid level.
Insert the service flap on the front of the
vehicle so that it does not get damaged or
dirty.
i The service flap has a strap on the rear
side that ties it to the vehicle body. G
WARNING
Always turn the key to starter switch
position 0 and remove the key from the
starter switch before opening the service
flap.
If the windshield wipers should
inadvertently be switched on, you could be
seriously injured by the wiper washer
drive, which is located just below the
service flap. G
WARNING
Make sure the service flap is locked while
driving. Otherwise, the service flap could
become detached and pose a hazard to you
or others. G
WARNING
To help prevent personal injury, stay clear
of moving parts when the service flap is
open.
The radiator fan may continue to run for
approximately 30 seconds or may even
restart after the engine has been turned
off. Stay clear of fan blades.
! Check the fill levels at regular
intervals.
! Carefully remove ice, snow, and any
other deposits from the air intake
grilles above the service flap to ensure
air intake at all times.
X Park the vehicle on level ground.
X Turn off the engine.
X Engage the parking brake.
Removing X
Fold both levers ;
outward in direction
of the arrows = as far as they will go.
X Lift the front end of service flap :.
X Pull service flap :
forward slightly and
remove it upwards as indicated by
arrow ?. 120
Front compartment
>> Operation.
Page 123 of 228
X
Insert hooks A on the back of service
flap : completely into openings B.
Remounting X
Lift service flap : out of openings B.
X Insert left and right links D of service
flap : under links C on the fender. X
Insert both tabs E on the back of service
flap : completely into openings F. X
Push front end of service flap :
down in
direction of arrows G.
X Fold levers ; inward in direction of
arrows H as far as they will go. Front compartment
121
>> Operation. Z
Page 124 of 228

Coolant
G
WARNING
In order to avoid potentially serious burns:
R Use extreme caution when opening the
service flap if there are any signs of
steam or coolant leaking from the
cooling system, or if the coolant
temperature warning lamp ? in the
instrument cluster indicates that the
coolant is overheated.
R Do
not remove the pressure cap on coolant
reservoir if coolant temperature is
above 158¦ (70¥). Allow engine to cool
down before removing cap. The coolant
reservoir contains hot fluid and is under
pressure.
R Using a rag, slowly turn the cap
approximately 1
/ 2 turn to relieve excess
pressure. If opened immediately,
scalding hot fluid and steam will be
blown out under pressure.
The engine coolant is a mixture of water
and anticorrosion/antifreeze. To check the
coolant level the vehicle must be parked on
level ground and the engine must have
cooled down. For more information, see
“Coolants” (Y page 223).
Checking coolant level X
Remove the service flap and insert it on
the front of the vehicle ( Y page 120). The coolant reservoir is located in the
front compartment on the driver’s side.
X
Allow the radiator to cool down for at
least 30 minutes.
X Using a rag, slowly turn pressure
cap : approximately 1
/ 2 turn
counterclockwise to release any excess
pressure.
X Continue turning pressure cap :
counterclockwise and remove it.
The coolant level is correct if the level
R
for cold coolant: reaches marking
bar ; visible through the filling
opening
R for warm coolant: is approximately
0.6 in (1.5 cm) higher
X If necessary, add coolant.
Adding coolant X
Add coolant as required. The coolant
level
may not exceed the maximum filling
level.
X Replace and tighten pressure cap :.
X Remount the service flap and close it
(Y page 120). Windshield/rear window washer system
Both the windshield and the rear window 14
washer are supplied from the windshield
washer reservoir.
The
recommended minimum filling level is
1.06 US qt (1.0 l).
X Remove the service flap and insert it on
the front of the vehicle ( Y page 120).
The windshield washer reservoir is located
in the front compartment on the driver’s
side.
14 Coupé only.122
Front compartment
>> Operation.
Page 125 of 228

G
WARNING
Windshield washer concentrate is highly
flammable. Fire, naked flames and smoking
are prohibited when windshield washer
concentrate is being handled.
X Use a windshield washer concentrate
labeled for summer and water for
temperatures above freezing point.
X Use a windshield washer concentrate
labeled for winter and water for
temperatures below freezing point.
! Always use a windshield washer
concentrate labeled for winter where
temperatures may fall below freezing
point. Failure to do so could result in
damage to the washer system/reservoir.
X Premix the windshield washer fluid in a
suitable container.
Observe mixing ratios depending on the
outside temperature
(Y page 222).
X Use the tab to pull cap : upwards.
X Refill the windshield washer reservoir.
X Push cap : onto the windshield washer
reservoir.
X Remount the service flap and close it
(Y page 120). Brake fluid
G
WARNING
During vehicle operation, the boiling
point of the brake fluid is continuously reduced through the absorption of moisture
from the atmosphere. Under extremely
strenuous operating conditions, this
moisture content can lead to the formation
of
bubbles in the system, thus reducing the
system’s efficiency.
Therefore, the brake fluid must be replaced
regularly. Refer to your vehicle’s
Maintenance Booklet for replacement
interval.
The brake fluid level in the brake fluid
reservoir may be too low if the brake
warning lamp in the instrument cluster
comes on (Y page 22) although the parking
brake is released.
! If you find that the brake fluid in the
brake fluid reservoir has fallen to the
minimum mark or below, have the brake
system checked for brake pad thickness
and leaks immediately. Contact an
authorized smart center immediately. Do
not add brake fluid as this will not solve
the problem.
X Remove the service flap and insert it on
the front of the vehicle ( Y page 120).
The brake fluid reservoir is located in the
front compartment on the passenger side. Checking brake fluid level
X
Perform a visual check of the brake fluid
reservoir :. Front compartment
123
>> Operation. Z
Page 126 of 228

The brake fluid level is correct when it
is between the minimum mark and the
maximum mark.
R
If the brake fluid level has fallen
slightly below the minimum mark,
drive to an authorized smart center.
R If the brake fluid level has fallen
significantly below the minimum
mark, call Roadside Assistance or an
authorized smart center.
X Remount the service flap and close it
(Y page 120). Tires and wheels
Safety notes
Contact an authorized smart center for
information on tested and recommended
rims and tires for summer and winter
operation. They can also offer advice
concerning tire service and purchase. G
WARNING
Replace rims or tires with the same
designation, manufacturer and type as
shown on the original part. For further
information contact an authorized smart
center.
If incorrectly sized rims and tires
are mounted, the wheel brakes or
suspension components can be damaged.
Also, the operating clearance of the wheels
and the tires may no longer be correct. G
WARNING
Worn, old tires can cause accidents. If the
tire
tread is worn to minimum tread depth,
or if the tires have sustained damage,
replace them.
When replacing rims, only use genuine
smart wheel bolts specified for the
particular rim type. Failure to do so can
result in the bolts loosening and possibly
an accident.
Retreaded tires are not tested or
recommended by smart, since previous damage cannot always be recognized on
retreads. The operating safety of the
vehicle cannot be assured when such tires
are used.
G
WARNING
If you feel a sudden significant vibration
or ride disturbance, or you suspect that
possible damage to your vehicle has
occurred, you should turn on the hazard
warning flashers, carefully slow down, and
drive
with caution to an area which is a safe
distance from the road.
Inspect the tires and the vehicle underbody
for possible damage. If the vehicle or tires
appear unsafe, have the vehicle towed to the
nearest authorized smart center or tire
dealer for repairs. G
WARNING
Do not drive with a flat tire. A flat tire
affects the ability to steer or brake the
vehicle. You could lose control of the
vehicle.
Continued driving with a flat tire
or driving at high speed with a flat tire
will cause excessive heat build-up and
possibly a fire.
Modifications to the brake system and
wheels and the use of brake dust rings are
not permissible. Important guidelines
R Only
use sets of tires and rims of the same
type and make.
R Tires must be of the correct size for the
rim.
R Break in new tires for approximately
60 miles (100 km) at moderate speeds.
R Regularly check the tires and rims for
damage. Dented or bent rims can cause
tire pressure loss and damage to the tire
beads.124
Tires and wheels
>> Operation.
Page 127 of 228

R
If vehicle is heavily loaded, check tire
inflation pressure and correct as
required.
R Do not allow your tires to wear down too
far.
Adhesion properties on wet roads are
sharply reduced at tread depths of less
than 1
/ 8 in (3 mm). Recommended tire inflation pressure
G
WARNING
Follow recommended tire inflation
pressures.
Do not underinflate tires. Underinflated
tires wear excessively and/or unevenly,
adversely affect handling and fuel
economy, and are more likely to fail from
being overheated.
Do not overinflate tires. Overinflated
tires can adversely affect handling and
ride comfort, wear unevenly, increase
stopping distance, and result in sudden
deflation (blowout) because they are more
likely to become punctured or damaged by
road debris, potholes etc.
Do not overload the tires by exceeding the
specified load limit as indicated on the
Tire and Loading Information placard on
the
driver’s door B‑pillar. Overloading the
tires can overheat them, possibly causing
a blowout. Overloading the tires can also
result in handling or steering problems, or
brake failure.
Your vehicle is equipped with the Tire and
Loading Information placard located on
the driver’s door B‑pillar ( Y page 130).
The tire inflation pressure should be
checked regularly. Only adjust the tire
inflation pressure on cold tires. The tires
can be considered cold if the vehicle has
been parked for at least 3 hours or driven
less than 1 mile (1.6 km). Depending on the
ambient temperature, the driving speed
and the tire load, the tire temperature
changes. When the tire temperature changes by 18¦ (10¥), the tire inflation
pressure will change by approximately
10 kpa (0.1 bar, 1.5 psi). Keep this in mind
when checking tire inflation pressure on
warm tires and adjust the tire pressure
only if the tire inflation pressure is too
low for the current operating conditions.
If you check the tire inflation pressure
when the tires are warm, the reading will
be higher than the cold reading. This is
normal. Do not let air out to match the
specified cold tire inflation pressure.
Otherwise, the tire will be underinflated.
Follow recommended cold tire inflation
pressures listed on Tire and Loading
Information placard on the driver’s door
B‑pillar.
Keeping the tires properly inflated
provides the best handling, tread life and
riding comfort.
In addition to the Tire and Loading
Information placard on the driver’s door
B‑pillar, also consult the tire inflation
pressure
label (if available) on the inside
of the filler flap for any additional
information pertaining to special driving
situations. For more information, see
“Important notes on tire inflation
pressure” ( Y page 126).
i Data shown on Tire and Loading
Information placard example are for
illustration purposes only. Tire data are
specific to each vehicle and may vary
from data shown in the following
illustration. Refer to Tire and Loading
Information placard on vehicle for
actual data specific to your vehicle. Tires and wheels
125
>> Operation. Z
Page 128 of 228

The Tire and Loading Information placard
lists the recommended cold tire inflation
pressures
: for maximum loaded vehicle
weight.
The tire inflation pressures listed
apply to the tires installed as original
equipment.
Important notes on tire inflation
pressure G
WARNING
If the tire inflation pressure drops
repeatedly, check the tires for punctures
from
foreign objects and/or whether air is
leaking from the valves or from around the
rim.
Tire temperature and tire inflation
pressure are also increased while driving,
depending on the driving speed and the
tire load.
Potential problems associated with
underinflated and overinflated tires Underinflated tires
G
WARNING
Follow recommended tire inflation
pressures.
Do not underinflate tires. Underinflated
tires wear excessively and/or unevenly,
adversely affect handling and fuel
economy, and are more likely to fail from
being overheated. Underinflated tires can
R
cause excessive and uneven tire wear
R adversely affect fuel economy
R lead to tire failure from being
overheated
R adversely affect handling
characteristics
Overinflated tires G
WARNING
Follow recommended tire inflation
pressures.
Do not overinflate tires. Overinflated
tires can adversely affect handling and
ride comfort, wear unevenly, increase
stopping distance, and result in sudden
deflation (blowout) because they are more
likely to become punctured or damaged by
road debris, potholes etc.
Overinflated tires can
R adversely affect handling
characteristics
R cause uneven tire wear
R be more prone to damage from road
hazards
R adversely affect ride comfort
R increase stopping distance Checking tire inflation pressure
Safety notes G
WARNING
Follow recommended tire inflation
pressures.
Do not underinflate tires. Underinflated
tires wear excessively and/or unevenly,
adversely affect handling and fuel
economy, and are more likely to fail from
being overheated.
Do not overinflate tires. Overinflated
tires can adversely affect handling and
ride comfort, wear unevenly, increase 126
Tires and wheels
>> Operation.
 1
1 2
2 3
3 4
4 5
5 6
6 7
7 8
8 9
9 10
10 11
11 12
12 13
13 14
14 15
15 16
16 17
17 18
18 19
19 20
20 21
21 22
22 23
23 24
24 25
25 26
26 27
27 28
28 29
29 30
30 31
31 32
32 33
33 34
34 35
35 36
36 37
37 38
38 39
39 40
40 41
41 42
42 43
43 44
44 45
45 46
46 47
47 48
48 49
49 50
50 51
51 52
52 53
53 54
54 55
55 56
56 57
57 58
58 59
59 60
60 61
61 62
62 63
63 64
64 65
65 66
66 67
67 68
68 69
69 70
70 71
71 72
72 73
73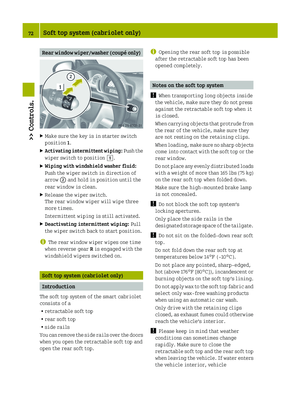 74
74 75
75 76
76 77
77 78
78 79
79 80
80 81
81 82
82 83
83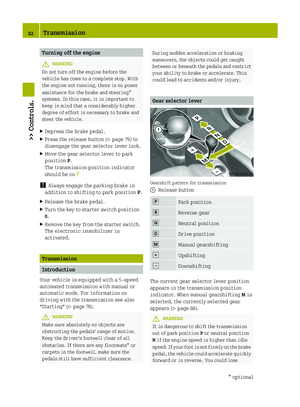 84
84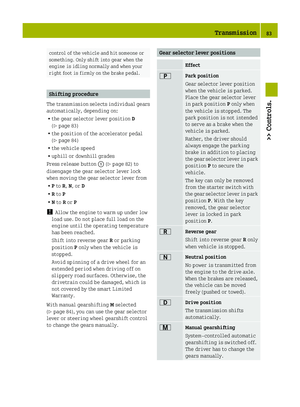 85
85 86
86 87
87 88
88 89
89 90
90 91
91 92
92 93
93 94
94 95
95 96
96 97
97 98
98 99
99 100
100 101
101 102
102 103
103 104
104 105
105 106
106 107
107 108
108 109
109 110
110 111
111 112
112 113
113 114
114 115
115 116
116 117
117 118
118 119
119 120
120 121
121 122
122 123
123 124
124 125
125 126
126 127
127 128
128 129
129 130
130 131
131 132
132 133
133 134
134 135
135 136
136 137
137 138
138 139
139 140
140 141
141 142
142 143
143 144
144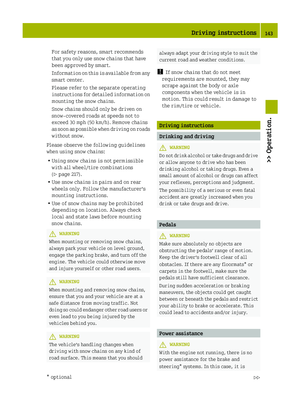 145
145 146
146 147
147 148
148 149
149 150
150 151
151 152
152 153
153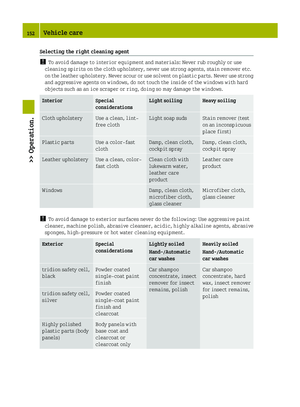 154
154 155
155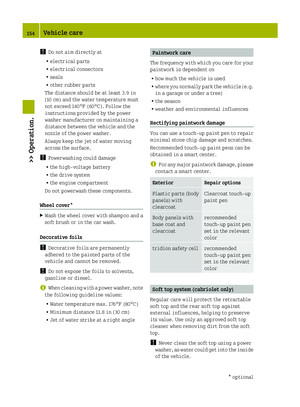 156
156 157
157 158
158 159
159 160
160 161
161 162
162 163
163 164
164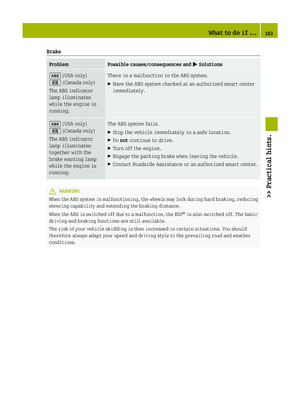 165
165 166
166 167
167 168
168 169
169 170
170 171
171 172
172 173
173 174
174 175
175 176
176 177
177 178
178 179
179 180
180 181
181 182
182 183
183 184
184 185
185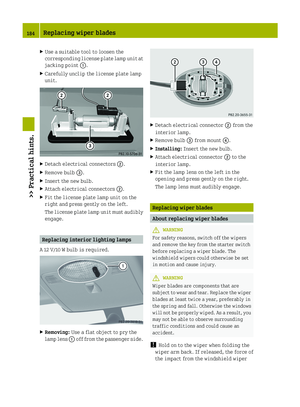 186
186 187
187 188
188 189
189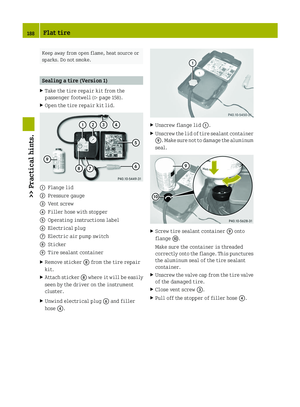 190
190 191
191 192
192 193
193 194
194 195
195 196
196 197
197 198
198 199
199 200
200 201
201 202
202 203
203 204
204 205
205 206
206 207
207 208
208 209
209 210
210 211
211 212
212 213
213 214
214 215
215 216
216 217
217 218
218 219
219 220
220 221
221 222
222 223
223 224
224 225
225 226
226 227
227