Page 153 of 225
: › Therefo")
Driving through water on the street
Fig. 134
Driving through water
The following must be observed to avoid damage to the vehicle when driving
through bodies of water (e.g. flooded roads): › Therefore determine the depth of the water before driving through bodies of
water. The water level must fit around the strut on the side member as a maxi-
mum » Fig. 134;
› Do not drive any faster than at a walking speed. At a higher speed, a water
wave can form in front of the vehicle which can cause water to penetrate into
the air induction system of the engine or into other parts of the vehicle;
› Never stop in the water, do not reverse and do not switch the engine off;
› Deactivate the START-STOP
system before driving through water » page 106,
START/STOP . WARNING
■ Driving through water, mud, sludge etc. can reduce the braking power and
extend the braking distance - risk of accident!
■ Avoid abrupt and sudden braking immediately after water crossings.
■ After driving through bodies of water, the brakes must be cleaned and dried
as soon as possible by intermittent braking. Only apply the brakes for the pur-
pose of drying and cleaning the brake discs if the traffic conditions permit this.
Do not place any other road users in jeopardy. CAUTION
■ When driving through bodies of water, parts of the vehicle such as the engine,
gearbox, chassis or electrics can be severely damaged.
■ Oncoming vehicles can generate water waves which can exceed the permissible
water level for your vehicle. ■
Potholes, mud or rocks can be hidden under the water making it difficult or im-
possible to drive through the body of water. ■ Do not drive through salt water. The salt can lead to corrosion. Any vehicle parts
that have come into contact with salt water must be rinsed immediately with
fresh water. Note
After driving through a body of water, we recommend that the vehicle is checked
by a
ŠKODA specialist garage. Ð Off-road driving
ä
Introduction
This chapter contains information on the following subjects:
Explanation of technical terms 152
Before driving off-road 153
Off-road driving 154
Changing gear when driving off-road 154
Driving at an angle on a hillside 155
Stuck vehicle 155
After driving off-road 156
We cannot discuss all the possible driving situations in this manual, because
there are so many types of terrains which may hide different risks and dangers.
The examples listed in this manual are general rules for safe off-road driving. It is
however not possible to predict if these rules are valid for all the situations which
may occur. Before driving through unknown terrain, it is therefore important that
you know what lies ahead of you. This way you can estimate any possible danger
in advance.
When driving off-road, pay attention to the national legal regulations. £
151
Driving and the Environment
Page 154 of 225

WARNING
■ Be very alert and look ahead when driving off-road. Always adjust your driv-
ing to the current of-road, traffic and weather conditions. Excessive speed or
incorrect driving manoeuvres can cause damage to the vehicle and lead to se-
rious injuries.
■ The Assistance systems of your vehicle cannot overcome the physical limits
of your vehicle.
■ Do not drive over embankments, ramps or hillsides at too high a speed. This
can lead to the wheels of the vehicle lifting off the ground so that you can no
longer steer and control the vehicle.
■ If the wheels lose contact with the ground, for example when the vehicle re-
bounds while driving over corrugations, steer straight ahead. If the wheels are
turned when making the contact with the ground again, the vehicle can roll
over.
■ There should never be any person in front or behind the vehicle when rocks,
scrub, wood pieces or other objects are placed under the wheels in order to
achieve traction on a sandy or slippery ground. Turning the wheels can trans-
form these objects into dangerous
“bullets” – risk of death!
■ Luggage and other items, which are transported on the roof of the vehicle,
additionally raise the centre of gravity and thus increase the risk of a rollover. ■ Never attempt to drive uphill or downhill if it is too steep for your vehicle.
The vehicle could slip, tilt or roll over - risk of accident! » table on page 153
■ Never attempt to make a turn on a hillside. The vehicle could tilt or roll over.
This can result in serious accidents.
■ Never let the vehicle roll down the hillside at idling speed. You can lose the
control over your vehicle.
■ If the engine cuts out, stop and restart the engine.
■ Objects trapped under the floor of the vehicle can damage the fuel lines, the
brake system, the seals and other parts of the chassis. Check the underside of
the vehicle and remove the trapped objects. Combustible objects such as dry
leaves or twigs could ignite on hot vehicle parts - risk of fire! CAUTION
■ Pay attention to the ground clearance of the vehicle! When driving over objects
which are larger than the ground clearance, the chassis and its components can
get damaged. ■ Do not leave your foot on the clutch pedal or let the clutch slip when driving off-
road. Overwise you may unintentionally depress the clutch pedal on uneven
ground leading to a loss of control over the vehicle. For the sake of the environment
Pay attention to the environment when driving off-road. Ð Explanation of technical terms
Fig. 135
Embankment angle/slope angle Fig. 136
Ground clearance/ramp angle
First read and observe the introductory information and safety warn-
ings on page 151.
The technical data » table on page 153
refer to ideal conditions. These values
may differ depending on the load and composition of the soil and the environ-
ment. The driver is responsible to decide whether a vehicle can overcome a cer-
tain situation. £
ä
152 Driving Tips
Page 155 of 225

Transition from the horizontal plane to an upward slope or from a downward
slope back to the plane. The angle indication determines the angle at which you
can driv")
A
Embankment angle (front and rear)
Transition from the horizontal plane to an upward slope or from a downward
slope back to the plane. The angle indication determines the angle at which you
can drive the vehicle down the embankment, at a slow speed, without the bump-
er or the underbody of the vehicle touching the ground. B
Slope angle
The difference of altitude (upward slope) which is overcome on a stretch of road
of 100 m, is indicated in percentage or degrees, i.e the gradiant at which the vehi-
cle can climb a hill on its own (among other things, depending on the road surface
and the engine power). C
Ground clearance
The distance between the road surface and the deepest point of the vehicle un-
derbody. D
Ramp angle
The angle indication determines the angle at which you can drive the vehicle over
a ramp, at a slow speed, without the underbody of the vehicle touching the ramp
edge.
Overhang angle (°)
Overhang angle, front 19 (17.1a)
)
Overhang angle, rear 26.7 (25.2a)
)
Ramp angle 19.4 (17.2a)
) a)
GreenLine
Slope angle (°)/ability to climb (%) 1.2 ltr./77 kW TSI 24/45
1.4 ltr./90 kW TSI 27/50
1.8 ltr./118 (112) kW TSI 29/55
1.6 ltr./77 kW TDI CR 29/55
2.0 ltr/81 kW TDI CR - MG5 29/55
2.0 l/81 kW TDI CR - MG6 4x4 31/60
2.0 ltr./103 kW TDI CR 31/60
2.0 ltr./103 kW TDI CR - Green tec 29/55
2.0 ltr./125 kW TDI CR 31/60 Ð Before driving off-road
First read and observe the introductory information and safety warn-
ings on page 151.
Important information
› The first priority should always be
safety.
› Do not drive off-road if your vehicle is not suited to it. Your vehicle is not de-
signed for expedition-like travel.
› Before every off-road journey, make sure that the vehicle is appropriately
equipped for the planned journey.
› Check the tyre inflation pressure on your vehicle and adjust where necessary.
› Fill up. The fuel consumption of the vehicle is much higher when driving off-
road than when driving on the road.
› Pay attention to possible hazards before driving on unfamiliar territory.
› Before driving, always put the seat belt on correctly. Make sure that your front
passenger and your passengers seated on the rear seats always fasten their
seat belts correctly.
› You must be seated in such a way that you have good front visibility, especially
when driving uphill or downhill. You must never be seated in such a way that
the distance between your chest and the middle of the airbag cover is less than
25 cm » page 138, Front airbags.
› Use a suitable pair of shoes which makes it safer to operate the pedals.
› Install the towing eye at the front or at the rear before driving off-road. It is not
always possible to install the towing eye if the vehicle got stuck.
› Check the car tool kit, stock up where necessary.
› Fill the engine oil up to the mark A
» page 172
, Checking the engine oil level .
› Fill up the windscreen washer fluid.
› Your vehicle has a higher centre of gravity than normal cars. This increases the
risk of vehicle rollover when driving on-road and off-road.
› Secure the items in your vehicle properly. Ð
ä
153
Driving and the Environment
Page 156 of 225

Off-road driving
First read and observe the introductory information and safety warn-
ings on page 151.
Important information
› Switch on the
OFF ROADmode » page 98 , OFF ROAD mode.
› Drive slowly through tricky route sections. Shift up when driving up on slippery
surfaces, make sure the vehicle always remains in motion. Do not drive too fast
otherwise you may lose control over the vehicle.
› Drive slowly over hilltops. Make sure that the wheels of the vehicle do not lift
off the ground, as this could severely damage the vehicle and it may become
disabled.
› If your vehicle got stuck in sand, snow or sludge, it may be more effective to re-
verse the vehicle than trying to drive forwards.
› Place stones, footmats or pieces of wood under the spinning wheels in order to
achieve traction on a sandy or slippery ground.
› Read the instructions before driving through water
» page 151.
› Keep sufficient distance from other vehicles even at low speeds. When the first
vehicle suddenly gets stuck, the following vehicle can still stop in time without
getting stuck itself.
Driving uphill
› Drive slowly and steadily straight uphill.
› Do not shift gears or press the clutch pedal while climbing.
› Only press the accelerator enough to move up the hill.
› Do not stop or turn the vehicle around on the hillside.
› Prevent the engine from cutting out.
If you can go no further on a slope
› Never attempt to make a turn with the vehicle on a hillside.
› If the engine cuts out, stop and restart the engine.
› Shift into reverse gear and carefully move backwards in your own lane.
Downhill
› Shift into first gear or select the first driving stage, while in Tiptronic mode, to
drive downhill on steep hillsides. The Downhill Drive Support is optimally utilis-
ed in this way.
› Use the foot break carefully otherwise you may lose control over the vehicle.
› If it is feasible and safe, drive straight down.
› Do not press down on the clutch or shift into Neutral.
ä
Driving over rutted roads and troughs
› Only drive over rutted roads and troughs when they do not exceed your vehi-
cle's ground clearance. Your vehicle may
“sink” and get stuck in soft ground.
› Never drive over rutted roads and troughs which are too deep. If you cannot
avoid this, it is better that you turn back.
Crossing a trench › If possible, drive through the trench at an acute angle. Make sure when driving
through the trench that the tilt angle is not too steep.
Driving in sand and mud
› You should always drive at a constant speed through sand or mud whenever
possible and at the same time do not shift gears.
› Never drive too fast, otherwise the wheels may spin and the vehicle can get
stuck. If you feel that the tyres are losing grip, turn the steering wheel quickly
back and forth. This leads to an improved grip on the front tyres for a short peri-
od of time. Ð Changing gear when driving off-road
First read and observe the introductory information and safety warn-
ings on page 151.
The gear you must shift into depends on the terrain. Choosing the correct gear
contributes to safe driving.
Important information
› When the gear or the driving stage has been properly selected, it is unnecessary
to slow down the vehicle on a downhill section using the footbrake as in most
cases the engine braking power is sufficient.
› Depress the accelerator only as much as is necessary. A too great acceleration
may lead to the wheels spinning and thus results in the loss over the control of
the vehicle. £
ä
154 Driving Tips
Page 157 of 225

Manual gearbox
› If you are driving through difficult terrain,
on no account use the clutch or
change the gear. When the clutch is depressed, the vehicle may come to a
standstill because of the increased grip of all the tyres of the vehicle (e.g. in the
mud, in deep sand or on a slope). Once the vehicle has come to a standstill, it
may be difficult or even impossible to start off under these conditions.
› When negotiating a steep downhill section or a steep uphill section, always
shift into the 1st or 2nd gear.
› On a soft or slippery ground, you must drive at the appropriate speed and you
must select the highest possible gear for this.
Automatic gearbox
› Select the selector lever position D
for normal flat stretches of ter-
rain » page 110, Selector lever positions.
› While in Tiptronic mode, select the selector lever position 3
or 2
if you are
driving through mud, sand, water or hilly sections of terrain » page 111, Manual
shifting of gears (Tiptronic) .
› When negotiating a steep downhill section or a steep uphill section, select the
selector lever position 1
while in Tiptronic mode
› On a soft or slippery ground, you must drive at the appropriate speed and you
must select the highest possible driving stage for this. ÐDriving at an angle on a hillside
Fig. 137
Steer and maintain your trajec-
tory/in direction to exit - facing
uphill
First read and observe the introductory information and safety warn-
ings on page 151.
Driving at an angle on a hillside is one of the most dangerous situations while
driving off-road.
ä If the vehicle is at a very steep angle, the wheels on the low side must not sink
deeply into the ground or into troughs and you must not drive over stones, tree
stumps or other obstructions with the alternate raised wheels.
If there is a risk your vehicle may tilt, steer immediately in direction of dip A
and
lightly depress the accelerator » Fig. 137.
A passenger, seated at the rear, should always remain seated on the seat facing
up the hill during such a journey. In an extreme case, the passenger on the rele-
vant side must exit the vehicle until you have safely crossed the hillside.
Exiting the vehicle on a hillside
If the vehicle comes to a standstill at a steep angle on a hillside and you and your
passengers must exit the vehicle, then all the occupants should exit on the side
facing up the hill B
» Fig. 137
. WARNING
■ Before driving at an angle on a hillside A
» Fig. 137
, ensure that you can
steer and maintain your trajectory. If you drive at an angle on a hillside and
there is a risk your vehicle may tilt, steer immediately downhill on your trajec-
tory and lightly depress the accelerator. ■ In case the vehicle is stationary on a hillside at a steep angle, do not exit the
vehicle when it is facing downhill. Always leave the vehicle carefully on the
side facing downhill B
» Fig. 137.
■ When driving at an angle on a hillside, the vehicle can lose its grip and slide
sideways. Always make sure that the wheels on the low side do not sink
deeply into the ground or into troughs and do not drive over stones, tree
stumps or other obstructions with the alternate raised wheels - risk of acci-
dent! Ð Stuck vehicle
First read and observe the introductory information and safety warn-
ings on page 151.
If you can no longer drive on ...
›
Carefully dig out all wheels and ensure that no other parts of the vehicle are
still stuck.
› Engage reverse gear.
› Carefully press the accelerator and try to reverse in a straight line.
› Place scrub, footmats or a sackcloth directly in front of the tyres in order to im-
prove grip and thus achieve an improved traction to drive out. £
ä
155
Driving and the Environment
Page 158 of 225
Rocking out vehicle
›
Switch off the TCS.
› Set the steering wheel straight.
› Drive back until the wheels just begin to spin.
› Shift into first gear and drive forwards until the wheels just begin to spin again.
› Drive back and forth repeatedly until the momentum is sufficient to free the ve-
hicle.
› Switch on the TCS. ÐAfter driving off-road
First read and observe the introductory information and safety warn-
ings on page 151.
Check the vehicle for damage after driving off-road - especially on the underside
of the vehicle.
Remove coarse dirt and trapped objects, such as scrub, chips, small stones and
foreign bodies from the tyre tread.
Clean the indicator lights, headlamps, indicator light and windows.
In case of thick layers of dirt, clean the radiator grille, the engine compartment
and the underbody of the vehicle.
We recommend you have any damage repaired by a
ŠKODA Service Partner.Ðä
156 Driving Tips
Page 159 of 225

Towing a trailer
Towing a trailer
Technical requirements
If your vehicle has already been factory-fitted with a towing device or is fitted
with a towing device from ŠKODA Original Accessories, then it meets all of the
technical requirements and national legal provisions for towing a trailer.
On vehicles with a towing device, the ball rod is detachable and is stowed togeth-
er with separate operating instructions in the spare wheel well or in the compart-
ment for the spare wheel within the boot » page 190, Vehicle tool kit.
Your vehicle is fitted with a 13-pin power socket for the electrical connection be-
tween the vehicle and trailer. If the trailer that is to be towed has a 7-pin connec-
tor, you can use a suitable adapter from
ŠKODA Original Accessories.
If a towing device is retrofitted, it must be completed in accordance with the
manufacturer's specifications. Note
If you have any questions, please contact a ŠKODA Service Partner. ÐLoading a trailer
Loading a trailer
The vehicle/trailer combination must be balanced, whereby the maximum permis-
sible drawbar load must be utilised. If the drawbar load is too low, it jeopardises
the performance of the vehicle/trailer combination.
Distribution of the load
Distribute the load in the trailer in such a way that heavy items are located as
close to the axle as possible. Secure the items from slipping.
The distribution of the weight is very poor if your vehicle is unladen and the trail-
er is laden. Maintain a particularly low speed if you cannot avoid driving with this
combination. Tyre pressure
Correct the tyre inflation pressure on your vehicle for a
“full load” » page 182 ,
Service life of tyres.
Trailer load
The permissible trailer load must not be exceeded under any circumstan-
ces » page 208 , Technical data .
The trailer loads specified apply only to altitudes up to 1 000 metres above mean
sea level. As the engine output drops at an increasing altitude due to the declin-
ing air pressure and therefore the climbing ability is also reduced, this means that
the maximum permissible towed weight must be reduced by 10 % for every fur-
ther increase of 1 000 m in height. The towed weight comprises the actual weight
of the (loaded) towing vehicle and the (loaded) trailer. Always drive particularly
carefully with the trailer.
The trailer and drawbar load information on the type plate of the towing device
are merely test data for the towing device The vehicle-specific values are detailed
in the vehicle documents. WARNING
■ If the maximum permissible axle and drawbar load and the maximum per-
missible total or towed weight of the vehicle and the trailer are exceeded this
can cause accidents and serious injuries.
■ Slipping loads can significantly affect the stability and safety of the vehicle/
trailer combination, causing accidents and serious injuries. Ð Towing a trailer
Exterior mirrors
You have to have additional exterior mirrors fitted if you are not able to see the
traffic behind the trailer with the standard rear-view mirrors. The national legal
requirements must be observed.
Headlights
The headlight settings must be checked before starting a journey with a coupled
trailer. If necessary, adjust the settings with the headlight beam adjust-
ment » page 44 , Headlight beam adjustment .
Driving speed
For safety reasons, do not drive faster than the maximum permissible speed indi-
cated on the trailer. £
157
Towing a trailer
Page 160 of 225

Immediately reduce your speed as soon as even the slightest swaying of the trail-
er is detected. Never attempt to stop the trailer from “swaying” by accelerating.
Brakes
Apply the brakes in good time! If the trailer is fitted with a trailer brake, apply the
brakes gently at first, then brake firmly. This will avoid brake jolts resulting from
the trailer wheels locking. On downhill sections shift down a gear in good time to
also use the engine as a brake.
Trailer stabilisation
The trailer stabilisation is an extension of the stabilisation control that works in
conjunction with the counter-steering assistance to reduce the amount the trail-
er "sways". After turning on the ignition, the ESC indicator light in the instru-
ment cluster lights up for about 2 seconds longer than the ABS indicator light.
Prerequisites for stabilising the trailer.
› The towing device is factory-fitted or a compatible towing device has been ret-
rofitted.
› The ESC is active. The indicator light
or in the instrument cluster is not illu-
minated.
› The trailer is electrically connected to the towing vehicle by means of the trailer
socket.
› The speed is higher than approx. 60 km/h.
› Trailers must have a fixed drawbar.
› The ESC works for both braked and unbraked trailers.
Trailer is connected to the anti-theft alarm system. › If the vehicle is factory-fitted with an anti-theft alarm system and a towing de-
vice.
› If the trailer is electrically connected to the towing vehicle by means of the trail-
er socket.
› If the electrical system of the vehicle and trailer is fully functional.
› If the vehicle is locked with the car key and the anti-theft alarm system is acti-
vated.
When the vehicle is locked, the alarm is activated as soon as the electrical con-
nection to the trailer is interrupted.
Always deactivate the anti-theft alarm system before a trailer is connected/dis-
connected. Otherwise, the anti-theft alarm system could accidentally be trig-
gered » page 31 , Anti-theft alarm system . Engine overheating
If the needle for the coolant temperature gauge moves into the right-hand area
or the red area of the scale, the speed must be reduced immediately. Stop and
switch off the engine if the indicator light
in the instrument cluster starts to
flash. Wait a few minutes and check the level of coolant in the coolant expansion
bottle » page 174, Checking the coolant level .
The following guidelines must be observed » page 20, Coolant temperature/cool-
ant level .
The coolant temperature can be reduced by switching on the heating. WARNING
■ The increased safety offered by the trailer stabilisation must not tempt you
to take greater risks than otherwise. ■ Adapt your speed to the conditions of the road surface and to the traffic sit-
uation.
■ Improper or incorrectly connected electric cables can energise the trailer and
cause functional faults to the vehicle's entire electrical system as well as acci-
dents and severe injuries.
■ Any work on the electrical system must be carried out only by ŠKODA spe-
cialist garages.
■ Never directly connect the trailer's electrical system with the electrical con-
nections for the tail lights or other current sources. CAUTION
■ The trailer stabilisation need not be able to correctly detect all of driving situa-
tions.
■ Trailers that sway slightly are not always detected by the trailer stabilisation
and thus are not stabilised accordingly.
■ Release the pressure on the accelerator pedal if the system is being regulated.
■ Avoid abrupt and sudden driving/braking manoeuvres.
■ When the ball rod is removed, the mounting shaft must be sealed with an ap-
propriate cover. This prevents foreign matter from penetrating into the mounting
shaft. See the fitting instructions for the towing device. £
158 Driving Tips
 1
1 2
2 3
3 4
4 5
5 6
6 7
7 8
8 9
9 10
10 11
11 12
12 13
13 14
14 15
15 16
16 17
17 18
18 19
19 20
20 21
21 22
22 23
23 24
24 25
25 26
26 27
27 28
28 29
29 30
30 31
31 32
32 33
33 34
34 35
35 36
36 37
37 38
38 39
39 40
40 41
41 42
42 43
43 44
44 45
45 46
46 47
47 48
48 49
49 50
50 51
51 52
52 53
53 54
54 55
55 56
56 57
57 58
58 59
59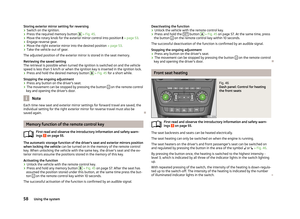 60
60 61
61 62
62 63
63 64
64 65
65 66
66 67
67 68
68 69
69 70
70 71
71 72
72 73
73 74
74 75
75 76
76 77
77 78
78 79
79 80
80 81
81 82
82 83
83 84
84 85
85 86
86 87
87 88
88 89
89 90
90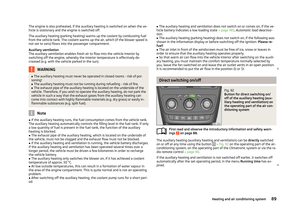 91
91 92
92 93
93 94
94 95
95 96
96 97
97 98
98 99
99 100
100 101
101 102
102 103
103 104
104 105
105 106
106 107
107 108
108 109
109 110
110 111
111 112
112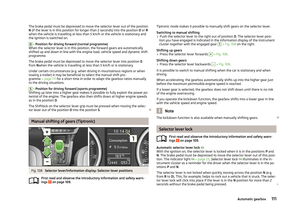 113
113 114
114 115
115 116
116 117
117 118
118 119
119 120
120 121
121 122
122 123
123 124
124 125
125 126
126 127
127 128
128 129
129 130
130 131
131 132
132 133
133 134
134 135
135 136
136 137
137 138
138 139
139 140
140 141
141 142
142 143
143 144
144 145
145 146
146 147
147 148
148 149
149 150
150 151
151 152
152 153
153 154
154 155
155 156
156 157
157 158
158 159
159 160
160 161
161 162
162 163
163 164
164 165
165 166
166 167
167 168
168 169
169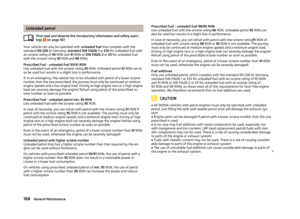 170
170 171
171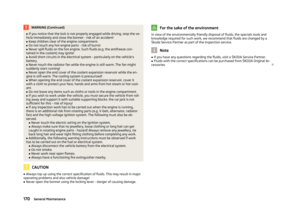 172
172 173
173 174
174 175
175 176
176 177
177 178
178 179
179 180
180 181
181 182
182 183
183 184
184 185
185 186
186 187
187 188
188 189
189 190
190 191
191 192
192 193
193 194
194 195
195 196
196 197
197 198
198 199
199 200
200 201
201 202
202 203
203 204
204 205
205 206
206 207
207 208
208 209
209 210
210 211
211 212
212 213
213 214
214 215
215 216
216 217
217 218
218 219
219 220
220 221
221 222
222 223
223 224
224