Page 89 of 180

This function")
Symbol
Importance
a phone is connected to the hands-free system.
The hands-free system is visible to other devices.
A multimedia unit is connected to the hands-free system.a)
This function is only supported by some mobile phones. ÐOperate the telephone via the information display
The following menu points can be selected in the menu Phone.
■ Phone book
■ Dial number 1)
■ Call register
■ Voice mailbox
■ Bluetooth 1)
■ Settings 2)
■ Back
Phone book
In the menu point Phone book is the list of the loaded contacts from the tele-
phone memory and the SIM card of the mobile phone.
Dial number
Any telephone number can be entered in the menu point Dial number. The re-
quired numbers must be selected one after the other using adjustment wheel
and confirmed by pressing the adjustment wheel. You can select numbers 0 - 9,
symbols , , #, and functions Cancel, Call, and Delete .
Call register
The following menu items can be selected in the menu item Call register.
■ Missed calls
■ Dialled numbers
■ Received calls
Voice mailbox
In the menu Voice mailbox , it is possible to set the number of the voice mailbox 1)
and then dial the number. Bluetooth
The following menu items can be selected in the menu
Bluetooth.
■ User – the overview of the stored users
■ New user – Search for new mobile phones that are in the reception range
■ Visibility – Switching on the visibility of the telephone unit for other devices
■ Media player
■ Active device
■ Paired devices
■ Search
■ Phone name – the possibility to change the name of the telephone unit (pre-set
SKODA UHV)
Settings
The following menu items can be selected in the menu Settings.
■ Phone book
■ Update 1)
■ List
■ Surname
■ First name
■ Ring tone
Back
Return in the Start menu of the telephone. Ð Voice control
Dialogue
The period of time during which the system is ready to receive voice commands
and to carry them out is called a dialogue. The system gives audible feedback and
guides you if necessary through the relevant functions.
Optimum understanding of the voice commands depends on several factors.
› Speak with a normal tone of voice without intonation and excessive pauses.
› Avoid a bad pronunciation.
› Close the doors, windows and sliding roof, to reduce or stop disturbing exterior
noise. £1)
On vehicles fitted with the Amundsen+ navigation system, this function can be accessed via the navi-
gation system menu; refer to the operating instructions for the Amundsen+ navigation system.
2) This function is not available in vehicles fitted with the Amundsen+ navigation system.
87
Communication
Page 90 of 180

›
It is recommended to speak louder at higher speeds, so that the tone of your
voice is louder than the increased surrounding noise.
› During the dialogue, limit additional noise in the vehicle, e.g. passengers talking
at the same time.
› Do not speak, if the system makes an announcement.
The microphone for voice control is inserted in the moulded headliner and direc-
ted to the driver and front passenger. Therefore the driver and the front passen-
ger can operate the equipment.
Entering a phone number
The telephone number can be entered as a continuous series of individually spo-
ken digits (the whole number at once) or in the form of digital blocks (separated
by short pauses). After each order of digits (separation through brief voice pause)
all of the digits detected up to now are repeated by the system.
The digits 0 – 9, symbols +, , # are permitted. The system detects no continuous
digit combinations such as twenty-three, but only individually spoken digits (two,
three).
Switching on voice control
By briefly pressing the button 2
on the multi-function steering wheel
» page 85,
Operating the phone on the multifunction steering wheel .
Switching off voice control
If the system is currently playing a message, you will need to end the message
currently being played by briefly pressing the button 2
on the multi-function
steering wheel.
If the system expects a voice command, you can end the dialogue yourself:
› with the
CANCEL voice command;
› by briefly pressing the button 2
on the multifunction steering wheel.
Note
■ The dialogue of an incoming call is immediately interrupted.
■ The voice control is only possible in vehicles fitted with a multi-function steer-
ing wheel with telephone control. Ð Voice commands
Basic voice commands Voice command Action
HELP After this command the system repeats all possible
commands.
CALL XYZ This command calls up the contact from the phone
book.
PHONE BOOK After this command, for example, the phone book
can be repeated back to you, a voice entry for the
contact can be updated or deleted, etc.
CALL HISTORY Lists of dialled numbers, missed calls, etc.
DIAL NUMBER After this command, a telephone number can be en-
tered to establish a connection with the requested
party.
REDIAL After this command the system calls the last dialled
number.
MUSIC a)
Play music from the mobile phone or another paired
device.
FURTHER OPTIONS After this command the system offers additional
context-dependent commands.
SETTINGS Selection for setting Bluetooth ®
, dialogue etc.
CANCEL The dialogue is ended. a)
On vehicles fitted with the Amundsen+ navigation system, this function can be accessed via the navi-
gation system menu; refer to the operating instructions for the Amundsen+ navigation system.
If a voice command is not detected, the system answers with
“Sorry?” and a new
entry can be completed. After the 2nd error the system repeats the aid. After the
3rd error the answer “Cancelled ” is given and the dialogue is ended.
Store voice recording of a contact
If automatic name recognition does not work reliably for some contacts, you can
choose to save your own voice entry for the contact in the menu Phone book –
Voice Tag – Record .
Your own voice entry can also be saved using the voice control in the menu FUR-
THER OPTIONS . Ð
88 Using the system
Page 91 of 180

Multimedia
Music playback via Bluetooth
®
The universal telephone preinstallation GSM II makes it possible to play back mu-
sic via Bluetooth ®
from the devices such as MP3 player, mobile phone or note-
book.
To ensure the music can be played back via Bluetooth ®
, it is necessary to connect
the terminal device with the hands-free system in the menu Phone – Bluetooth –
Media player. The music playback process is performed on the connected device.
The universal telephone preinstallation GSM
II ensures that the music played back
via the hands-free system can be controlled with the remote control » page 88,
Voice commands . Note
The device being connected must support the Bluetooth ®
A2DP profile; refer to
the operating instructions for the relevant device being connected. ÐOperating the radio and navigation system on the multifunction steering wheel
Fig. 74
Multifunction steering wheel:
control buttons
The multifunction steering wheel comprises buttons for setting the basic func-
tions for the factory-fitted radio and navigation system » Fig. 74. The radio and navigation system can of course still be operated on the devices. A
description is included in the relevant operating instructions.
If the side lights are switched on, the buttons on the multifunction steering
wheel are illuminated.
The buttons apply for the respective operating mode of the current radio or navi-
gation system.
The following functions can be completed by pressing or turning the buttons.
Button Action Radio, traffic information CD/MP3/Navigation1
Press briefly
Switch off/on tone1 Press button for a
long period of time Switch the unit on/off1
Turn upwards
Increase volume1
Turn downwards
Decrease volume2
Press briefly
Switch to the next stored radio station
Interruption of the traffic report Changing to the next title2 Press button for a
long period of time Search forwards
Fast forward£ 89
Communication
Page 92 of 180

Button
Action Radio, traffic information CD/MP3/Navigation3
Press briefly
Switch to the previous stored radio station
Interruption of the traffic report Changing to the previous title3 Press button for a
long period of time Search backwards
Fast rewindNote
■ The functions of button 1
are different for vehicles fitted with a universal tele-
phone preinstallation GSM
II » page 85.
■ The loudspeakers in the vehicle are adjusted to the power output of the radio
and navigation system of 4x20°W. ÐAUX-IN und MDI input ports
Fig. 75
AUX input/MDI input
For a description of use, refer to the operating instructions for the relevant radio
or navigation system.
AUX input
The AUX input is located in the following places:
› Between the front seats in the centre console
» Fig. 75 – ;
› Above the storage box of the front centre console
» Fig. 75 – ;
› On the front of the Amundsen+ navigation system.
The AUX input is used to connect external audio sources (e.g. iPod or mp3 player)
via the factory-fitted radio or navigation system. Multi-Device Interface (MDI) input
The MDI input is located above the storage box of the front centre con-
sole » Fig. 75 –
.
The MDI input comprises AUX and MDI inputs.
The MDI input is used to connect external audio sources (e.g. iPod or mp3 player)
and to play back audio from these devices via the factory-fitted radio or naviga-
tion system.
You need to use the correct adapter, available from
ŠKODA Original Accessories,
to connect audio sources e.g., iPod.
USB input
You can also use the USB input » Fig. 75 – to connect e.g., a USB stick contain-
ing audio files. Audio play back starts as soon as you connect the USB stick. Ð
90 Using the system
Page 93 of 180

Safety
Passive Safety
General information
ä
Introduction
This chapter contains information on the following subjects:
Safety equipment 91
Before setting off 91
What influences the driving safety? 92
In this section you will find important information, tips and notes on the subject
of passive safety in your vehicle. We have combined everything here which you
should be familiar with, for example, regarding seat belts, airbags, child seats and
safety of children. It is therefore important, in particular, to comply with the notes
and warnings in this section for your own interest and in the interest of those
travelling with you. WARNING
■ This chapter contains important information on how to use the vehicle for
the driver and his occupants. You will find further information on safety, which
concerns you and those travelling with you, in the following chapters of this
Owner's Manual.
■ The complete on-board literature should always be in the vehicle. This ap-
plies in particular, if you rent out or sell the vehicle. ÐSafety equipment
First read and observe the introductory information and safety warn-
ings on page 91.
ä The following list contains part of the safety equipment in your vehicle:
› three-point seat belts for all the seats;
› belt force limiters for the front seats;
› belt tensioners for front seats;
› seat belt height adjusters for front seats;
› Front airbag for the driver and the front seat passenger;
› side airbags;
› head airbags;
› anchoring points for child seat using the
ISOFIX system;
› anchoring points for child seat using the TOP TETHER system;
› head restraints adjustable for height 1)
;
› adjustable steering column.
The specified safety equipment works together, in order to optimally protect you
and those travelling with you in accident situations. The safety equipment does
not protect you or the people travelling with you, if you or your occupants adopt
an incorrect seated position or the equipment is not correctly adjusted or used. Ð Before setting off
First read and observe the introductory information and safety warn-
ings on page 91.
For your own safety and the safety of the people travelling with you, please pay
attention to the following points before setting off.
›
Ensure that the lighting and the turn signal system are functioning properly.
› Check the tyre inflation pressure.
› Ensure that all of the windows offer good visibility to the outside.
› Secure all items of luggage
» page 48.
› Ensure that no objects can obstruct the pedals.
› Adjust the mirrors, the front seat and head restraint to your body size.
› Advise your passengers to adjust the head restraints to their body size.
› Protect children in suitable child seats with correctly fastened seat
belts
» page 105 , Transporting children safely .
› Adopt the correct seated position
» page 92. Tell your passengers to assume
the correct seated position.
› Correctly fasten the seat belt. Also inform passengers to fasten the seat belt
correctly » page 95 . Ð
ä
1)
Not valid for sports seat.
91
Passive Safety
Page 94 of 180

What influences the driving safety?
First read and observe the introductory information and safety warn-
ings on page 91.
The driver is fully responsible for himself and his occupants. If your driving safety
is effected, you place yourself and the oncoming traffic at risk.
The following guidelines must therefore be observed. › Do not get distracted from concentrating on the traffic situation, e.g. by your
passengers or mobile phone calls.
› Never drive when your driving ability is impaired, e.g. through medication, alco-
hol, drugs.
› Keep to the traffic regulations and the permissible speed limit.
› Always adjust the driving speed to the road, traffic and weather conditions.
› Take regular breaks on long journeys – at least every two hours. ÐCorrect seated position
ä
Introduction
This chapter contains information on the following subjects:
Correct seated position for the driver 93
Correct seated position for the front passenger 93
Correct seated position for the occupants on the rear seats 93
Examples of an incorrect seated position 94
WARNING
■ The front seats and the head restraints must always be adjusted to match
the body size of the seat occupant as well as the seat belts must always be
correctly fastened in order to provide an optimal protection for you and your
occupants.
■ Always assume the correct seated position before setting off and do not
change this position while driving. Also advise your passengers to adopt the
correct seated position and not to change this position while the car is mov-
ing.
ä WARNING (Continued)
■ If the occupant adopts an incorrect seated position, he is exposed to life-
threatening injuries, in case he is hit by a deployed airbag.
■ If the occupants on the rear seats are not sitting upright, the risk of injury is
increased due to incorrect routing of the seat belt.
■ The driver must maintain a distance of at least 25 cm to the steering wheel.
The front passenger must maintain a distance of at least 25 cm to the dash
panel. Not maintaining this minimum distance will mean that the airbag sys-
tem will not be able to properly protect you – hazard!
■ When driving, hold the steering wheel with both hands firmly on the outer
edge in the 9 o'clock and 3
o'clock position. Never hold the steering wheel in
the 12 o'clock position or in any other way (e.g. in the middle or inner edge of
the steering wheel). In such cases, you could severely injure the arms, hands
and head when the driver airbag is deployed.
■ The seat backrests must not be angled too far back when driving otherwise
this will affect proper operation of the seat belts and of the airbag system –
risk of injury!
■ Ensure that there are no objects in the driver's footwell as they may get
caught behind the pedals when driving or applying the braking. You would
then no longer be able to operate the clutch, brake or accelerate.
■ Always keep your feet in the footwell when the car is being driven – never
place your feet on the instrument panel, out of the window or on the surfaces
of the seats. You will be exposed to increased risk of injury if it becomes nec-
essary to apply the brake or in the event of an accident. If an airbag is de-
ployed, you may suffer fatal injuries when adopting an incorrect seated posi-
tion! Ð
92 Safety
Page 95 of 180

Correct seated position for the driver
Fig. 76
The correct distance of the driver to the steering wheel/The correct
head restraint adjustment
First read and observe the introductory information and safety warn-
ings on page 92.
For your own safety and to reduce the risk of injury in the event of an accident,
we recommend the following setting.
› Adjust the steering wheel so that the distance A
» Fig. 76 between the steer-
ing wheel and your chest is at least 25 cm.
› Adjust the driver’s seat in the forward/back direction so that the pedals can be
fully depressed with slightly bent legs.
› Adjust the seat backrest so that the highest point of the steering wheel can be
reached with your arms at a slight angle.
› Adjust the head restraint so that the top edge B
of the head restraint is at the
same level as the upper part of your head 1)
.
› Correctly fasten the seat belt
» page 95, Seat belts.
Driver seat adjustment » page 45, Adjusting the front seats .ÐCorrect seated position for the front passenger
First read and observe the introductory information and safety warn-
ings on page 92.ä
ä For the safety of the front passenger and to reduce the risk of injury in the event
of an accident, we recommend the following setting.
› Position the front passenger seat back as far as possible. The front passenger
must maintain a distance of at least 25 cm to the dash panel so that the airbag
offers the greatest possible safety if it is deployed.
› Adjust the head restraint so that the top edge B
» Fig. 76 on
page 93 » page 93 of the head restraint is at the same level as the upper part of
your head 1)
.
› Correctly fasten the seat belt
» page 95, Seat belts.
In exceptional cases the front passenger airbag can be deactivated » page 103,
Deactivating airbags .
Front passenger adjustment » page 45, Adjusting the front seats .Ð Correct seated position for the occupants on the rear seats
First read and observe the introductory information and safety warn-
ings on page 92.
To reduce the risk of injury in the event of a sudden braking manoeuvre or an ac-
cident, the occupants on the rear seats must observe the following.
› Adjust the head restraint so that the top edge B
» Fig. 76 on
page 93 » page 93 of the head restraint is at the same level as the upper part of
your head.
› Correctly fasten the seat belt
» page 95, Seat belts.
› Use a suitable child restraint system if transporting children in the vehi-
cle » page 105, Transporting children safely .Ð
ä
1)
Not valid for sports seat.
93
Passive Safety
Page 96 of 180

Examples of an incorrect seated position
First read and observe the introductory information and safety warn-
ings on page 92.
Seat belts offer their optimum protection only if the webbing of the seat belts is
properly routed. Incorrect seated positions considerably reduce the protective
functions of the seat belts and therefore increase the risk of injury due to an in-
correct routing of the seat belt. The driver is fully responsible for himself and
passengers, especially children. Never allow a passenger to adopt an incorrect
seated position when the car is moving.
The following list contains examples of which seated positions can cause serious
injuries or death. This list is not complete, however we would like you to familiar-
ise yourself with this subject.
Therefore, while the car is moving never:
› stand up in the vehicle;
› stand up on the seats;
› kneel on the seats;
› tilt the seat backrest fully to the back;
› lean against the dash panel;
› lie on the rear seat bench;
› only sit on the front area of the seat;
› sit to the side;
› lean out of the window;
› put the feet out of the window;
› put the feet on the dash panel;
› put the feet on the seat upholstery;
› transport somebody in the footwell;
› have the seat belt not fastened when driving;
› be in the boot. Ðä
94 Safety
 1
1 2
2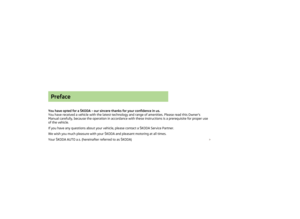 3
3 4
4 5
5 6
6 7
7 8
8 9
9 10
10 11
11 12
12 13
13 14
14 15
15 16
16 17
17 18
18 19
19 20
20 21
21 22
22 23
23 24
24 25
25 26
26 27
27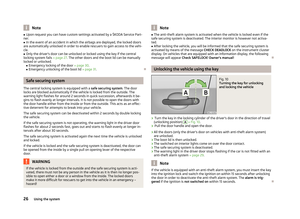 28
28 29
29 30
30 31
31 32
32 33
33 34
34 35
35 36
36 37
37 38
38 39
39 40
40 41
41 42
42 43
43 44
44 45
45 46
46 47
47 48
48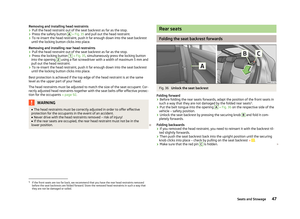 49
49 50
50 51
51 52
52 53
53 54
54 55
55 56
56 57
57 58
58 59
59 60
60 61
61 62
62 63
63 64
64 65
65 66
66 67
67 68
68 69
69 70
70 71
71 72
72 73
73 74
74 75
75 76
76 77
77 78
78 79
79 80
80 81
81 82
82 83
83 84
84 85
85 86
86 87
87 88
88 89
89 90
90 91
91 92
92 93
93 94
94 95
95 96
96 97
97 98
98 99
99 100
100 101
101 102
102 103
103 104
104 105
105 106
106 107
107 108
108 109
109 110
110 111
111 112
112 113
113 114
114 115
115 116
116 117
117 118
118 119
119 120
120 121
121 122
122 123
123 124
124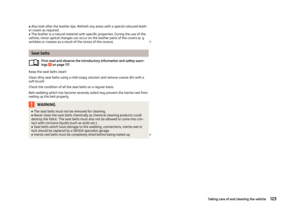 125
125 126
126 127
127 128
128 129
129 130
130 131
131 132
132 133
133 134
134 135
135 136
136 137
137 138
138 139
139 140
140 141
141 142
142 143
143 144
144 145
145 146
146 147
147 148
148 149
149 150
150 151
151 152
152 153
153 154
154 155
155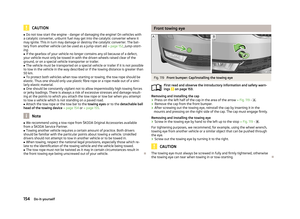 156
156 157
157 158
158 159
159 160
160 161
161 162
162 163
163 164
164 165
165 166
166 167
167 168
168 169
169 170
170 171
171 172
172 173
173 174
174 175
175 176
176 177
177 178
178 179
179