Page 73 of 180

WARNING
■ The brake booster only operates when the engine is running. Greater physi-
cal effort for braking is required when the engine is switched off – risk of acci-
dent!
■ Depress the clutch pedal when stopping or braking a vehicle with a petrol
engine and manual transmission in the low rev range. If you fail to do so, the
functionality of the brake booster can be impaired – risk of accident! ■ If a front spoiler, full wheel trim, etc. is mounted retrospectively, it must be
ensured that the air supply to the front wheel brakes is not reduced. Other-
wise, the functionality of the brake system could be impaired – risk of acci-
dent!
■ Please note that the handbrake must be fully released. A handbrake which
is only partially released can result in the rear brakes overheating, which can
have a negative effect on the operation of the brake system – risk of accident!
■ Never leave children unattended in the vehicle. The children might, for ex-
ample, release the handbrake or take the vehicle out of gear. The vehicle
might then move off – risk of accident!
■ A lack of fuel can cause irregular engine running or cause the engine to shut
down. The brake assist systems would then be without function – risk of acci-
dent!
■ Adjust the speed and driving style to the current visibility, weather, road and
traffic conditions. The increased safety offered by the brake assist systems
must not tempt you to take greater risks than otherwise – risk of an accident! CAUTION
■ Observe the recommendations on the new brake pads » page 109.
■ Never let the brakes slip with light pressure on the pedal if braking is not neces-
sary. This causes the brakes to overheat and can also result in a longer braking
distance and excessive wear. ■ All four wheels must be fitted with the same tyres approved by the manufactur-
er to ensure the brake assist systems operate correctly. Note
■ If the brakes are applied in full and the control unit for the braking system con-
siders the situation to be dangerous for the following traffic, the brake light
flashes automatically. After the speed was reduced below around 10
km/h or the
vehicle was stopped, the brake light stops flashing and the hazard warning light
system switches on. The hazard warning light system is switched off automatical-
ly after accelerating or driving off again. ■ Before negotiating a steep downhill section, reduce the speed, shift down into
the next lower gear (manual gearbox) or select a lower drive position (automatic
gearbox). As a result, the braking effect of the engine will be used, reducing the
load on the brakes. Any additional braking should be completed intermittently,
not continuously. ■ Changes to the vehicle (e.g. to the engine, brakes, chassis or another combina-
tion of tyres and wheels) can influence the functionality of the brake assist sys-
tems »
page 144 , Accessories, changes and replacement of parts .
■ If a fault occurs in the ABS system, the ESC, ASR and EDL also do not work. A
warning light » page 20 comes on if a fault occurs in the ABS system. Ð Information for braking
First read and observe the introductory information and safety warn-
ings on page 70.
Wear-and-tear
The wear of the brake pads is dependent on the operating conditions and driving
style. The brake pads wear more quickly if a lot of journeys are completed in
towns and over short distances or if a very sporty style of driving is adopted. If
operated under severe conditions, the thickness of the brake pads must be
checked by a ŠKODA specialist garage before the next service appointment.
Wet roads or road salt
The performance of the brakes can be delayed as the brake discs and brake pads
may be moist or have a coating of ice or layer of salt on them in winter. The
brakes are cleaned and dried by applying the brakes several times.
Corrosion
Corrosion on the brake discs and dirt on the bake pads occur if the vehicle has
been parked for a long period and if you do not make much use of the braking
system. If the brake system is not used much or if there is corrosion on the sur-
face, we recommend cleaning the brake discs by firmly applying the brakes from a
fairly high speed. £
ä
71
Starting-off and Driving
Page 74 of 180

Faults in the brake surface
If it is found that the braking distance has suddenly become longer and that the
brake pedal can be depressed further, the brake system may be faulty. Visit a
ŠKODA specialist garage immediately and adjust your style of driving appropriate-
ly as you will not know how great the damage is.
Low brake fluid level
An insufficient level of brake fluid may result in problems in the brake system. The
level of the brake fluid is monitored electronically
» page 17, Brake system .
Brake booster
The brake booster increases the pressure generated with the brake pedal. The
brake booster only operates when the engine is running. ÐHandbrake
Fig. 64
Centre console: Handbrake
First read and observe the introductory information and safety warn-
ings on page 70.
Apply
› Pull the handbrake lever firmly upwards.
Loosening
› Pull the handbrake lever up slightly and
at the same time push in the locking
button » Fig. 64 .
› Move the lever right down while pressing the lock button.
The handbrake warning light lights up when the handbrake is applied, provided
the ignition is on. Ð
ä Electronic Stability Control (ESC)
Fig. 65
ESC system: TCS button
First read and observe the introductory information and safety warn-
ings on page 70.
The ESC helps to maintain control of the vehicle in situations where it is being op-
erated at its dynamic limits, such as a sudden change to the direction of travel.
The risk of skidding is reduced and your car thus offers greater driving stability
depending on the conditions of the road surface.
The direction which the driver wishes to take is determined based on the steering
angle and the speed of the vehicle and is constantly compared with the actual
behaviour of the vehicle. In the event of deviations, such as if the car starts to
skid, the ESC automatically brakes the appropriate wheel.
During an intervention of the system, the warning light flashes in the instru-
ment cluster.
The following systems are integrated into the electronic stabilisation control
(ESC):
› Antilock brake system (ABS),
› Traction control (TCS),
› Electronic Differential Lock (EDL)
› Brake assistant (HBA)
› Hill hold control (HHC)
It is not possible to deactivate ESC. You can only use the button » Fig. 65
to
switch off ASR. The TCS warning light lights up in the instrument cluster when
the TCS is switched off. £
ä
72 Using the system
Page 75 of 180

The TCS should normally always be switched on. It may be advisable to switch off
the system in certain exceptional circumstances, such as:
›
when driving with snow chains;
› when driving in deep snow or on a very loose surface;
› when it is necessary to
“rock a vehicle free” when it has got stuck.
Ensure the TCS is switched on again afterwards.
Hydraulic brake assist (HBA)
The HBA is activated by the very quick operation of the brake pedal. It increases
the braking effect and helps to shorten the braking distance. To achieve the
shortest possible braking distance, the brake pedal must be applied firmly and
held in this position until the vehicle has come to a complete standstill.
The ABS is activated faster and more effectively with the intervention of the
brake assist system.
The brake assist function is automatically switched off when the brake pedal is
released.
Hill hold control (HHC)
The HHC makes it easier to start off on steep hills. The system holds the brake
pressure produced by the activation of the brake pedal for approx. 2 seconds af-
ter the brake pedal is released. The driver can therefore move his foot from the
brake pedal to the accelerator pedal and start off on the slope, without having to
actuate the handbrake. The brake pressure drops gradually the more you operate
the accelerator pedal. If the vehicle does not start off within 2 seconds, it starts
to roll back.
The HHC is active as of a 5 % slope, if the driver door is closed. It is always active
on slopes when in forward or reverse start off. When driving downhill, it is inac-
tive. ÐAntilock brake system (ABS)
First read and observe the introductory information and safety warn-
ings on page 70.
ABS prevents the wheels locking when braking. Thus helping the driver to main-
tain control of the vehicle.
ä The intervention of the ABS is noticeable from the
pulsating movements of the
brake pedal which is accompanied by noises.
Do not reduce the pressure on the brake pedal during the intervention of the
ABS. The ABS deactivates if the brake pedal is released. Never interrupt the appli-
cation of the brakes during the intervention of the ABS! Ð Traction control (ASR)
First read and observe the introductory information and safety warn-
ings on page 70.
If the wheels are slipping, the TCS adapts the engine speed to the conditions of
the road surface. The TCS makes it much easier to start off, accelerate and climb
steep hills even if the conditions of the road surface are unfavourable.
During an intervention of the system, the TCS warning light 1)
flashes in the in-
strument cluster. Ð Electronic differential lock (EDL)
First read and observe the introductory information and safety warn-
ings on page 70.
If one of the wheels starts to spin, the EDL system brakes the spinning wheel and
transfers the driving force to the other wheels. This ensures the stability of the
vehicle and a quick journey.
The EDL switches off automatically if unusually severe stresses exist in order to
avoid excessive heat generation in the disc brake on the wheel which is being
braked. The vehicle can continue to be driven and has the same characteristics as
a vehicle not fitted with EDL. The EDL switches on again automatically as soon as
the brake has cooled down. Ð
ä
ä
1)
Valid for vehicles without Electronic Stability Control (ESC).
73
Starting-off and Driving
Page 76 of 180

Shifting
Fig. 66
Gearshift pattern of 5 gear or
6 gear manual gearbox
Always depress the clutch pedal fully when changing gear, to prevent excessive
wear of the clutch.
The gearshift indicator must be observed when changing gear » page 11.
Only engage reverse gear when the vehicle is stationary. Depress the clutch pedal
and hold it fully depressed. Wait a moment before reverse gear is engaged to
avoid any shift noises.
The reversing lights will come on once reverse gear is engaged, provided the igni-
tion is on. WARNING
Never engage reverse gear when driving – risk of accident! Note
If not in the process of changing gear, do not leave your hand on the gearshift
lever while driving. The pressure from the hand can cause the gearshift mecha-
nism to wear excessively. Ðpedals
The operation of the pedals must not be hindered under any circumstances!
In the driver's footwell, only a footmat, which is attached to the two correspond-
ing attachment points, may be used. Only use footmats from the range of ŠKODA Original Accessories, which are fitted
to two attachment points. WARNING
No objects are allowed in the driver's footwell – risk of obstruction or limita-
tion in operating the pedal! Ð Parking aid
Fig. 67
Parking aid: Range of sensors
The parking aid determines the distance between the rear bumper and an obsta-
cle with the aid of ultrasound sensors. The sensors are integrated in the rear
bumper.
Range of sensors
The clearance warning begins at a distance of about 160 cm from the obstacle
(area A
» Fig. 67). The interval between the warning signals becomes shorter as
the clearance is reduced.
A continuous tone sounds from a distance of approx. 30 cm (area B
) – danger
area. You should not reverse any further after this signal sounds!
On vehicles with a factory-fitted radio or navigation system, the distance to the
obstacle is simultaneously graphically illustrated on the display, refer to the oper-
ating instructions for the radio or navigation system.
On vehicles with a factory-fitted towing device, the border of the danger area
starts (continuous tone) 5
cm further away from the vehicle. The length of the ve-
hicle can be increased with an installed detachable towing device.
On vehicles with a factory-fitted towing device, the rear sensors are deactivated
when towing a trailer. £
74 Using the system
Page 77 of 180

Activating/deactivating the parking aid
The parking aid is activated automatically when
reverse gear is engaged and the
ignition is turned on. This is confirmed by a brief audible signal.
The parking aid is deactivated by removing the reverse gear. WARNING
■ The parking aid is not a substitute for the driver paying proper attention and
it is always the driver's responsibility to take care when reversing the vehicle
or carrying out similar manoeuvres. Pay particular attention to small children
and animals as they are not recognised by the parking aid sensors.
■ Before reversing or parking, check that there is no small obstacle, such as a
rock, thin post, trailer drawbar etc., in front of or behind the vehicle. Such ob-
stacles may not be recognised by the parking aid sensors.
■ Under certain circumstances, surfaces of certain objects and types of cloth-
ing cannot reflect the signals from the parking aid. Thus, these objects or peo-
ple who wear such clothing are not recognised by the parking aid sensors.
■ External sound sources can have a detrimental effect on the parking aid.
Under unfavourable conditions, objects or people may not be recognised. Note
■ If a warning signal sounds for 3 seconds every time you activate the system,
this indicates a system fault. Have the fault rectified by a ŠKODA specialist ga-
rage. ■ The sensors must be kept clean (free of ice, etc.) to enable the parking aid to
operate properly.
■ If the parking aid is activated and the selector lever of the automatic gearbox is
in the position P , the warning signal is interrupted (the vehicle cannot move). ÐCruise control system (CCS)
ä
Introduction
This chapter contains information on the following subjects:
Storing a speed 76
Changing a stored speed 76
Switching off the cruise control system temporarily 76
Switching off the cruise control system completely 76The cruise control system (CCS) maintains a constant speed, more than 30
km/h,
once it has been set, without you having to depress the accelerator pedal. This is
only possible within the range which is permitted by the power output and brak-
ing power of the engine.
The warning light illuminates in the instrument cluster when the cruise control
system is activated. WARNING
■ For safety reasons, the cruise control system must not be used in dense
traffic or on unfavourable road surfaces (such as icy roads, slippery roads,
loose gravel) – risk of accident! ■ The saved speed may only be resumed if it is not too high for the current
traffic conditions. ■ Always switch off the cruise control system after use to prevent uninten-
tional use of the system. CAUTION
■ The cruise control system is not able to maintain a constant speed when driving
in areas with steeper gradients. The weight of the vehicle increases the speed at
which it travels. Therefore, shift to a lower gear in good time or slow the vehicle
down by applying the foot brake. Note
■ It is not possible on vehicles fitted with an automatic gearbox to switch on the
cruise control system if the selector lever is in the position P, N or R.
■ It is not possible to switch on the cruise control system on vehicles fitted with a
manual gearbox if the first gear or reverse gear is engaged. Ð
75
Starting-off and Driving
Page 78 of 180

Storing a speed
Fig. 68
Turn signal and main beam lever:
Rocker switch and switch of the
cruise control system
First read and observe the introductory information and safety warn-
ings on page 75.
Storing a speed
›
Turn the switch A
» Fig. 68
into the ON position.
› After the desired speed has been reached, press the rocker button B
into the
SET position.
After you have released the rocker button B
out of the position SET
, the speed
you have just stored is maintained at a constant speed without having to depress
the accelerator. ÐChanging a stored speed
First read and observe the introductory information and safety warn-
ings on page 75.
Increasing the speed with the accelerator
›
Depress the accelerator to increase the speed.
› Release the accelerator to reduce the speed back down to the preset speed.
However, if the saved speed is exceeded by more than 10
km/h for a period of
more than 3 minutes by depressing the accelerator, the stored speed is deleted
from the memory. You have to re-store the desired speed.
Increasing the speed with the rocker button B
›
Press the rocker button B
» Fig. 68
on page 76
into the RES position.
› The speed will increase continuously, if the rocker button is pressed and held in
the RES position. Release the rocker button once the desired speed is reached.
The set speed is then stored in the memory.
ä
ä Decreasing the speed
› The stored speed can be
reduced by pressing the rocker button B
» Fig. 68 on
page 76 into the position SET.
› The speed will decrease continuously, if the rocker button is pressed and held
in the SET position. Release the rocker button once the desired speed is
reached. The set speed is then stored in the memory.
› If the rocker button is released at a speed of less than 30 km/h, the speed is
not stored and the memory is erased. The speed must then be stored again by
pressing the rocker button B
in the position SET after increasing the speed of
the vehicle to more than 30
km/h.
The speed can also be reduced by depressing the brake pedal, which temporarily
deactivates the system. Ð Switching off the cruise control system temporarily
First read and observe the introductory information and safety warn-
ings on page 75.
The cruise control system is
temporarily switched off
by pressing the switch A
» Fig. 68
on page 76 into the spring-tensioned position CANCEL or by depress-
ing the brake or clutch pedal.
The set speed remains stored in the memory.
Briefly press the rocker button B
into the position RES
to resume the stored
speed after the clutch or brake pedal is released. Ð Switching off the cruise control system completely
First read and observe the introductory information and safety warn-
ings on page 75.
›
Turn the switch A
» Fig. 68
on page 76 into the OFF position. Ð
ä
ä
76 Using the system
Page 79 of 180

START/STOP
Fig. 69
Dash panel: Button for the
START-STOP system
The START-STOP system helps you to save fuel while at the same time reducing
harmful exhaust emissions and CO 2 emissions.
The function is automatically activated each time the ignition is switched on.
In the start-stop mode, the engine automatically switches to the vehicle's idle
phase, e.g. when stopped at traffic lights.
Information regarding the current state of the
START-STOP system is indicated in
the display of the instrument cluster.
Automatic engine shut down (stop phase)
› Stop the vehicle (where necessary, apply the handbrake).
› Take the vehicle out of gear.
› Release the clutch pedal.
Automatic renewed engine restart (start phase).
› Depress the clutch pedal.
Switching the
START-STOP system on and off
The START/STOP system can be switched on/off by pressing the button » Fig. 69
.
When start-stop mode is deactivated, the warning light in the button lights up.
If the vehicle is in the stop phase when manually switching off the system, the
engine starts immediately.
The
START-STOP system is very complex. Some of the procedures are hard to
check without servicing. The general conditions for the proper functioning of the
START-STOP system are listed in the following overview. Conditions for the automatic engine shut down (stop phase)
› The gearshift lever is in Neutral.
› The clutch pedal is not depressed.
› The driver has fastened the seat belt.
› The driver's door is closed.
› The bonnet is closed.
› The vehicle is at a standstill.
› The factory-fitted towing device is not electrically connected to a trailer.
› The engine is at operating temperature.
› The charge state of the vehicle battery is sufficient.
› The stationary vehicle is not on a steep slope or a steep downhill section.
› The engine speed is less than 1
200 rpm.
› The temperature of the vehicle battery is not too low or too high.
› There is sufficient pressure in the braking system.
› The difference between the outdoor- and the set temperature in the interior is
not too great.
› The vehicle speed since the last time the engine was switched off was greater
than 3 km/h.
› No cleaning of the diesel particle filter takes place
» page 21.
› The front wheels are not turned excessively (the steering angle is less than 3/4
of a steering wheel revolution).
Conditions for an automatic restart (start phase) › The clutch is depressed.
› The max./min. temperature is set.
› The defrost function for the windscreen is switched on.
› A high blower stage has been selected.
› The START STOP button is pressed.
Conditions for an automatic restart without driver intervention
› The vehicle moves at a speed of more than 3 km/h.
› The difference between the outdoor- and the set temperature in the interior is
too great.
› The charge state of the vehicle battery is not sufficient.
› There is insufficient pressure in the braking system.
If the driver's seat belt is removed for more than 30 seconds or the driver's door is
opened during stop mode, the engine must be started manually with the key. The
following messages in the instrument cluster display must be observed. £
77
Starting-off and Driving
Page 80 of 180

ERROR START STOP Error in the START-STOP system
START STOP NOT POSSIBLE Automatic engine shut down is not
po")
Messages in the instrument cluster display (valid for vehicles without
Information display)
ERROR START STOP Error in the START-STOP system
START STOP NOT POSSIBLE Automatic engine shut down is not
possible.
START STOP ACTIVE Automatic engine shut down (stop
phase)
SWITCH OFF IGNITION Switch off the ignition.
START MANUALLY Start the engine manually.WARNING
■ The brake servo unit and power steering only operate if the engine is run-
ning.
■ Never let the vehicle roll with the engine switched off. CAUTION
Deactivate the START-STOP system before driving through water on the
street » page 114. Note
■ Changes to the outdoor temperature can have an effect on the internal temper-
ature of the vehicle battery even after several hours. If the vehicle remains out-
doors for a long time in minus temperatures or in direct sunlight, it can take sev-
eral hours until the internal temperature of the vehicle battery reaches a suitable
temperature for proper operation of the
START STOP system.
■ If the Climatronic is running in automatic mode, under certain conditions, the
engine may not switch off automatically. Ð78
Using the system
 1
1 2
2 3
3 4
4 5
5 6
6 7
7 8
8 9
9 10
10 11
11 12
12 13
13 14
14 15
15 16
16 17
17 18
18 19
19 20
20 21
21 22
22 23
23 24
24 25
25 26
26 27
27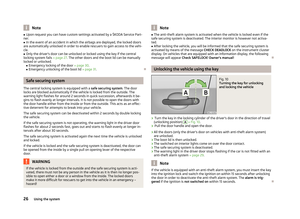 28
28 29
29 30
30 31
31 32
32 33
33 34
34 35
35 36
36 37
37 38
38 39
39 40
40 41
41 42
42 43
43 44
44 45
45 46
46 47
47 48
48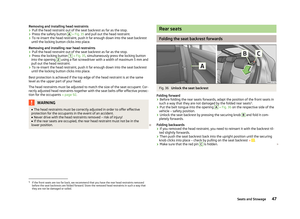 49
49 50
50 51
51 52
52 53
53 54
54 55
55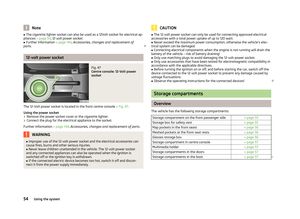 56
56 57
57 58
58 59
59 60
60 61
61 62
62 63
63 64
64 65
65 66
66 67
67 68
68 69
69 70
70 71
71 72
72 73
73 74
74 75
75 76
76 77
77 78
78 79
79 80
80 81
81 82
82 83
83 84
84 85
85 86
86 87
87 88
88 89
89 90
90 91
91 92
92 93
93 94
94 95
95 96
96 97
97 98
98 99
99 100
100 101
101 102
102 103
103 104
104 105
105 106
106 107
107 108
108 109
109 110
110 111
111 112
112 113
113 114
114 115
115 116
116 117
117 118
118 119
119 120
120 121
121 122
122 123
123 124
124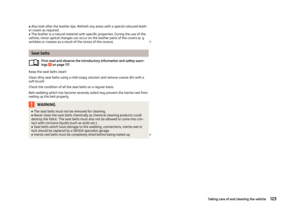 125
125 126
126 127
127 128
128 129
129 130
130 131
131 132
132 133
133 134
134 135
135 136
136 137
137 138
138 139
139 140
140 141
141 142
142 143
143 144
144 145
145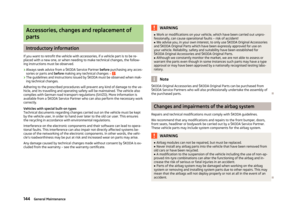 146
146 147
147 148
148 149
149 150
150 151
151 152
152 153
153 154
154 155
155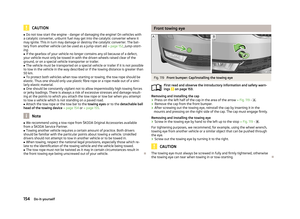 156
156 157
157 158
158 159
159 160
160 161
161 162
162 163
163 164
164 165
165 166
166 167
167 168
168 169
169 170
170 171
171 172
172 173
173 174
174 175
175 176
176 177
177 178
178 179
179