Page 257 of 308

255
Practical information
Changing a wheel
Fig. 145 Changing the
wheel: loosen wheel
bolts with the socket at
the end of the wheel
brace
Removing the wheel
● Please observe the check list ⇒ page 251.
● Loosen the wheel bolts ⇒ page 251.
● Jacking up the vehicle ⇒ page 253.
● Using the hexagonal socket in the wheel brace ⇒ Fig. 145, unscrew the
slackened wheel bolts and place them on a clean surface.
● Take off the wheel.
How to use the spare wheel or temporary spare wheel
Check the direction of rotation of the tyre ⇒ page 218, Tyre code.
● Place the spare wheel or temporary spare wheel into position.
● Replace the wheel bolts and tighten slightly using the hexagonal socket
on the end of the wheel brace.
● To tighten the anti-theft locking wheel bolts use the corresponding
adaptor.
● Lower the vehicle with the jack. ●
Tighten all of the wheel bolts clockwise ⇒
. Tighten the bolts in diago-
nal pairs (not in a circle).
● Put the caps, trim or full hubcap back on ⇒ page 248.
WARNING
If the wheel bolts are not treated suitably or not tightened to the correct
torque then this could lead to loss of vehicle control and to a serious ac-
cident.
● All the wheel bolts and hub threads should be clean and free of oil
and grease. The wheel bolts should be easily tightened to the correct tor-
que.
● The hexagonal socket in the wheel brace should be used for turning
wheel bolts only. Do not use it to loosen or tighten the wheel bolts.
After changing the wheel
● Clean the vehicle tools, if necessary and put them away in the luggage
compartment foam holder ⇒ page 246.
● Store the spare wheel, the temporary spare wheel or the changed wheel
securely in the luggage compartment.
● Have the tightening torque of the wheel bolts checked as soon as possi-
ble with a torque wrench ⇒ page 252.
● Have the flat tyre replaced as quickly as possible.
Vehicle diagramPrior to a journey...While drivingCare, cleaning and mainte-
nanceIf and whenTechnical Data
Page 258 of 308

256Practical information
Anti-puncture kit*
Introduction
The Tyre Mobility Set* will reliably seal punctures caused by the penetration
of a foreign body of up to about 4 mm in diameter. Do not remove foreign
objects, e.g. screws or nails, from the tyre.
After inserting the sealant residue in the tyre, you must again check the tyre
pressure about 10 minutes after starting the engine.
You should only use the tire mobility set if the vehicle is parked in a safe
place, you are familiar with the procedure and you have the necessary tire
mobility set! Otherwise, you should seek professional assistance.
The tyre sealant must not be used in the following cases:
● If the wheel rim has been damaged.
● In outside temperatures below -20 °C (-4 °F).
● In the event of cuts or perforations in the tyre greater than 4 mm.
● If you have been driving with very low pressure or a completely flat tyre.
● If the sealant bottle has passes its use by date.
Additional information and warnings:
● Vehicle key set ⇒ page 28
● Braking, stopping and parking ⇒ page 134
● Wheels and tyres ⇒ page 210
● In case of emergency ⇒ page 240
● Wheel trims ⇒ page 248
WARNING
Using the tire mobility set can be dangerous, especially when filling the
tyre at the roadside. Please observe the following rules to minimise the
risk of injury:
● Stop the vehicle safely as soon as possible. Park your vehicle as safe
distance from surrounding traffic to fill the tyre.
● Ensure the ground on which you park is flat and solid.
● All passengers and particularly children must keep a safe distance
from the work area.
● Turn on the hazard warning lights to warn other road users.
● Use the tire mobility set only if you are familiar with the necessary
procedure. Otherwise, you should seek professional assistance.
● The tire mobility set is intended for temporary, emergency use only.
Use only until you can reach the nearest specialised workshop.
● Replace the repaired tyre with the tire mobility set as soon as possi-
ble.
● The sealant is a health hazard and must be cleaned immediately if it
comes into contact with the skin.
● Always keep the tire mobility set out of the reach of small children.
● Never use the approved jack, even if it has been approved for your ve-
hicle.
● Always stop the engine, apply the handbrake lever firmly and engage
gear if using a manual gearbox, in order to reduce the risk of vehicle in-
voluntary movement.
WARNING
A tyre filled with sealant does not have the same performance properties
as a conventional tyre.
● Never drive faster than 80 km/h (50 mph).
Page 259 of 308

257
Practical information
WARNING (Continued)
● Avoid heavy acceleration, hard braking and fast cornering.
● Drive only during 10 minutes at a maximum speed of 80 km/h
(50 mph) and subsequently check the tyre.
For the sake of the environment
Dispose of used or expired sealant observing any legal requirements.
Note
A new bottle of sealant can be purchased at SEAT dealerships.
Note
Take into account the separate instruction manual of the tire mobility set
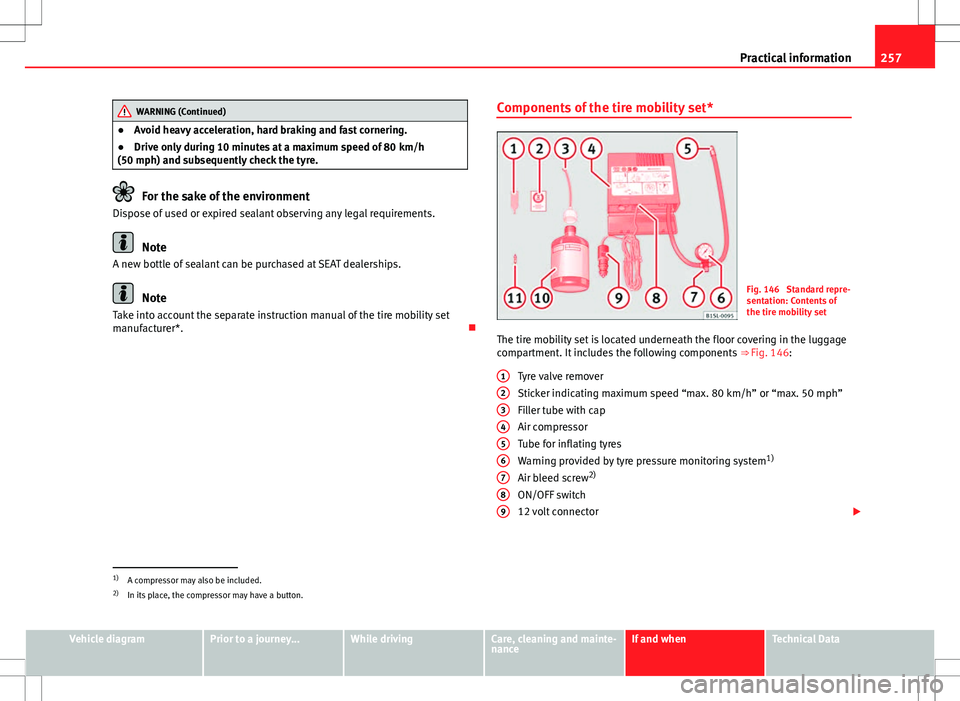
manufacturer*. Components of the tire mobility set*Fig. 146 Standard repre-
sentation: Contents of
the tire mobility set
The tire mobility set is located underneath the floor covering in the luggage
compartment. It includes the following components ⇒ Fig. 146:
Tyre valve remover
Sticker indicating maximum speed “max. 80 km/h” or “max. 50 mph”
Filler tube with cap
Air compressor
Tube for inflating tyres
Warning provided by tyre pressure monitoring system 1)
Air bleed screw 2)
ON/OFF switch
12 volt connector
1
23456789
1)
A compressor may also be included.
2) In its place, the compressor may have a button.
Vehicle diagramPrior to a journey...While drivingCare, cleaning and mainte-
nanceIf and whenTechnical Data
Page 260 of 308

258Practical information
Bottle of sealant 1)
Spare tyre valve
The valve insert remover 1
has a gap at the lower end for a valve insert.
The valve insert can only be screwed or unscrewed in this way. This also ap-
plies to its replacement part 11
.
Preparation
Checklist
Before filling a tyre, complete the following operations in the order given
⇒
:
1. In the event of a puncture, park the vehicle as far as possible from traffic and on flat, suitable ground.
2. Apply the handbrake firmly ⇒ page 134.
3. Stop the engine and remove the key from the ignition ⇒ page 119.
4. Manual gearbox: Select a gear ⇒ page 124.
5. Have all vehicle occupants get out of the vehicle and wait in a safe place (for example, behind the safety barrier).
6. Switch on the hazard warning lights and set the warning triangle in position ⇒ page 240. Observe legal requirements.
7. Check whether a repair is possible using the Tyre Mobility Set ⇒ page 256
8. If the luggage compartment is full: take the baggage out of the vehi- cle.
9. Remove the tire mobility set from the luggage compartment.
10. Apply the sticker ⇒ Fig. 146 2
from the tire mobility set to the dash
panel where it can be seen clearly.
11. Do not remove foreign objects, e.g. screws or nails, from the tyre.
1011WARNING
Failure to follow the checklist prepared for your own safety could lead to
accidents and severe injuries.
● Always complete the operations given in the checklist and observe
the general rules of safety.
Sealing and inflating a tyre
Sealing a tyre
● Unscrew the tyre valve cap.
● Use the corresponding enclosed extractor ⇒ Fig. 146 1
to unscrew the
tyre valve insert. Place the valve insert on a clean surface.
● Vigorously shake the sealant bottle ⇒ Fig. 146 10
for several seconds.
● Screw the inflator tube ⇒ Fig. 146 3 securely into the sealant bottle in
a clockwise direction. The seal on the mouth of the bottle moves automati-
cally.
● Remove the lid from the filling tube ⇒ Fig. 146 3
and screw the open
end of the tube into the tyre valve.
● Hold the tyre sealant can upside down and fill the complete contents of
the can into the tyre.
● Remove the tyre sealant bottle from the valve.
● Screw the valve insert again with the corresponding enclosed extractor
⇒ Fig. 146 1
into the tyre valve.
Inflating the tyre
● Securely screw the tyre inflator tube ⇒ Fig. 146 5
of the compressor in-
to the tyre valve.
● Check whether the air bleed screw ⇒ Fig. 146 7
is closed.
1)
A compressor may also be included.
Page 261 of 308

259
Practical information
● Start the vehicle engine and leave it running.
● Attach the connector ⇒ Fig. 146 9
to a 12 volt socket of the vehicle
⇒ page 117.
● Connect the air compressor with the ON/OFF switch ⇒ Fig. 146 8
.
● Keep the air compressor running until it reaches 2.0 to 2.5 bar
(29-36 psi / 200-250 kPa) ⇒
. Maximum operation time 8 minutes ⇒ .
● Disconnect the air compressor.
● If it is not possible to achieve an air pressure of 2.0 to 2.5 bar
(29-36 psi / 200-250 kPa), unscrew the tyre inflator tube from the tyre valve.
● Move the vehicle some 10 metres forwards or backwards so that the
sealant is evenly distributed in the tyre interior.
● Securely screw the compressor tyre inflator tube into the tyre valve and
repeat the inflation process.
● If the indicated pressure can still not be reached, the tyre is too badly
damaged. The tyre cannot be sealed with the anti-puncture kit. Do not con-
tinue driving. You should obtain professional assistance ⇒
.
● Disconnect the air compressor and unscrew the flexible inflator tube
from the tyre valve.
● When the tyre pressure is between 2.5 and 2.0 bars, immediately con-
tinue driving without exceeding 80 km/h (50 mph).
● After 10 minutes, Check the pressure again ⇒ page 259.
WARNING
When inflating the wheel, the air compressor and the inflator tube may
become hot.
● Protect hands and skin from hot parts.
● Do not place the hot flexible inflator tube or hot air compressor on
flammable material.
WARNING (Continued)
● Allow them to cool before storing the device.
● If it is not possible to inflate the tyre to at least 2.0 bars (29 psi /
200 kPa), the tyre is too badly damaged. The sealant is not in a good con-
dition to seal the tyre. Do not continue driving. You should obtain profes-
sional assistance.
CAUTION
Switch off the air compressor after a maximum of 8 operational minutes to
avoid overheating! Before switching on the air compressor again, let it cool
for several minutes.
Check after 10 minutes of driving
Screw the inflator tube ⇒ Fig. 146 5 again and check the pressure on the
gauge 6.
1.3 bar (19 psi / 130 kPa) and lower:
● Stop the vehicle! The tyre cannot be sealed sufficiently with the tyre mo-
bility set.
● You should obtain professional assistance ⇒
.
1.4 bar (20 psi / 140 kPa) and higher:
● Set the tyre pressure to the correct value again ⇒ page 210.
● Carefully resume your journey until you reach the nearest specialised
workshop without exceeding 80 km/h (50 mph).
● Have the damaged tyre replaced.
Vehicle diagramPrior to a journey...While drivingCare, cleaning and mainte-
nanceIf and whenTechnical Data
Page 262 of 308
260Practical information
WARNING
Driving with an unsealed tyre is dangerous and can cause accidents and
serious injury.
● Do not continue driving if the tyre pressure is 1.3 bar (19 psi /
130 kPa) and lower.
● You should obtain professional assistance.
Page 263 of 308

261
Practical information
Fuses
Introduction
Due to the constant update of vehicles, fuse assignments depending on
equipment and the use of the same fuse for various electrical components,
at the time of printing this manual it is not possible to provide an up-to-date
summary of the electrical components fuse positions. For detailed informa-
tion about the fuse positions, please consult a Technical Service.
In general, a fuse can be assigned to various electrical components. Like-
wise, an electrical component can be protected by several fuses.
Only replace fuses when the cause of the problem has been solved. +If a
newly inserted fuse blows after a short time, you must have the electrical
system checked by a Specialised workshop as soon as possible.
Additional information and warnings:
● Working in the engine compartment ⇒ page 180
WARNING
The high voltages in the electrical system can give serious electrical
shocks, causing burns and even death!
● Never touch the electrical wiring of the ignition system.
● Take care not to cause short circuits in the electrical system.
WARNING
Using unsuitable fuses, repairing fuses or bridging a current circuit with-
out fuses can cause a fire and serious injury.
● Never use a fuse with a higher value. Only replace fuses with a fuse of
the same amperage (same colour and markings) and size.
● Never repair a fuse.
● Never replace a fuse by a metal strip, staple or similar.
CAUTION
● To avoid damage to the vehicles electric system, before replacing a fuse
turn off the ignition, the lights and all electrical elements and remove the
keys from the ignition.
● If you replace a fuse with higher-rating fuse, you could cause damage to
another part of the electrical system.
● Protect the fuse boxes when open to avoid the entry of dust or humidity.
Dirt and humidity inside fuse boxes can cause damage to the electrical sys-
tem.
Note
One single consumer could have more than one fuse.
Note
Several consumers could run over one single fuse.
Vehicle diagramPrior to a journey...While drivingCare, cleaning and mainte-
nanceIf and whenTechnical Data
Page 264 of 308

262Practical information
Vehicle fuses
Fig. 147 Below the driv-
er side dash panel: fuse
box cover
Fig. 148 In the engine
compartment: fuse box
cover
Only replace fuses with a fuse of the same amperage (same colour and
markings) and size. Identifying fuses situated below the driver-side dash panel by colours
ColourAmp ratingPurple3Light brown5Brown7,5Red10Blue15Yellow20White or transparent25Green30Orange40
Opening and closing the fuse box situated below the dash panel
●
Opening: press the unlock button ⇒ Fig. 147 1 until it is possible to
open the cover.
● Fold the cover down.
● Closing: fold the cover up in the opposite direction to the arrow until it
clicks into the locking lever 1
.
Opening the engine compartment fuse box
● Open the bonnet ⇒ page 180.
● Press the attachment tabs in the direction indicated by the arrow (thin
arrows) to release the fuse box cover ⇒ Fig. 148.
● Then lift the cover out.
● To fit the cover, place it on the fuse box. Push the attachment tabs
down, in the opposite direction indicated by the arrow until they click audi-
bly into place.