Page 257 of 289
256Fuses and bulbs
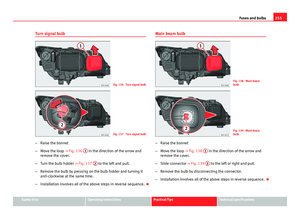
Changing bulb for front fog light
Front fog light bulb
Fig. 140 Front fog light
Fig. 141 Front fog light –
Remove the bolt ⇒ Fig. 140 A
from the fog light grille with a
screwdriver.
– Remove the bolts (3x) ⇒ Fig. 141 B
to remove the fog light.
– Remove the fog light.
Note
Due to the difficulty of accessing fog light bulbs, have them replaced at a
Technical Service or specialised workshop.
Fog light, FR version
Due to the difficulty of accessing fog light bulbs, have them replaced at a
Technical Service or specialised workshop.
Page 258 of 289
257
Fuses and bulbs
Remove the bulb holder
Fig. 142 Front fog light
– Remove connector ⇒ Fig. 142 A
from the bulb.
– Turn bulb holder ⇒ Fig. 142 B
to the left and pull.
– Remove the bulb by pressing on the bulb holder and turning it
anti-clockwise at the same time.
– Installation involves all of the above steps in reverse sequence.
– Check that the bulb works properly. Changing tail light bulbs (on side panel)
Overview of tail lights
Rear lights on the side panel
Turn signalPY21W NA LLSide light and brake lightP21W LL
Safety FirstOperating instructionsPractical TipsTechnical specifications
Page 259 of 289
258Fuses and bulbs
Removing tail light
Fig. 143 Luggage com-
partment: Location of the
bolt securing the tail
light unit
Fig. 144 Remove rear
light unit from side panel
– Check which of the bulbs is defective.
– Open the rear lid. –
Remove the cover by prying the flat side of a screwdriver into
the recess and remove the cover from the opening ⇒ Fig. 143
1
.
– Carefully loosen the screw located behind the cover with a
screwdriver, turning it anti-clockwise (arrows) ⇒ Fig. 143 2
.
– Tilt the light in the direction of the arrows until it comes out (po-
sitions 3
and 4 ⇒ Fig. 144).
– Remove the bulb holder ⇒ page 259.
CAUTION
Take care when removing the rear light unit to make sure there is no dam-
age to the paintwork or any of its components.
Note
Make sure you have a soft cloth ready to place under the glass on the rear
light unit, to avoid any scratches.
Page 260 of 289
259
Fuses and bulbs
Remove the bulb holder
When changing a bulb, you must first remove the bulb hold-
er.
Fig. 145 Retaining tabs
on reverse side of tail
light
– Remove the bulb holder ⇒ Fig. 145 unlocking the A
retaining
tabs.
– Raise the bulb holder.
– Change the defective bulb.
– To refit follow the steps in reverse order, taking special care
when fitting the bulb holder. And especially that all retaining
tabs are properly in place.
– Place the light back into place and tighten with a screwdriver.
Note
In the case of LED lights, change only the turn signal bulb.
Changing tail light bulbs (on rear lid)
Overview of tail lights
Rear lid lights 1)
Left sideSide lights2x W5W LLFog lightsH21 WRight sideSide lights2x W5W LLReverse lightP21W LL
1)
The above table corresponds to a right-hand traffic vehicle. The position of lights may vary
according to the country.
Safety FirstOperating instructionsPractical TipsTechnical specifications
Page 261 of 289
260Fuses and bulbs
Remove the bulb holder
The rear lid must be open to change the bulbs.
Fig. 146 Remove the
cover from the rear lid
Fig. 147 Remove the
bulb holder
– Remove the rear lid cover in the direction indicated ⇒ Fig. 146. –
Unlock the retaining tabs A
of the bulb holder, following the
direction of arrows 1 and 2 ⇒ Fig. 147.
– Remove the bulb holder by turning it in the direction of arrow
3
⇒ Fig. 147.
Changing bulbs
Fig. 148 Position of the
bulbs in the bulb holder
– Lightly press the defective bulb into the bulb holder ⇒ Fig. 148
1
, then turn it to the left 2 and remove it.
– Fit the new bulb, pressing it into the bulb holder and turn it to
the right as far as it will go.
– Use a cloth to remove any fingerprints from the glass part of the
bulb.
– Check that the new bulb works properly.
– Replace the bulb holder.
Page 262 of 289

261
Fuses and bulbs
Note
For LED pilots, you can only change the fog or reverse bulb, on the left or
right guide.
Fitting the bulb holder
– Install the bulb holder making sure that locking clips ⇒ Fig. 147
A are properly clipped on.
– Replace the cover of the rear lid lining ⇒ Fig. 146.
Changing number plate light bulbs 1)
Fig. 149 In the rear
bumper: number plate
light
Fig. 150 Number plate
light: remove the bulb
holder
Follow the steps indicated:
1. Press the number plate light in the direction of the arrow ⇒ Fig. 149.
2. Remove the number plate bulb slightly.
3. In the connector lock, turn ⇒ Fig. 150 towards arrow A
and pull
the connector.
4. Rotate the bulb holder in the direction of arrow B
and extract it
with the bulb.
5. Replace the defective bulb with a new bulb with the same fea- tures.
6. Insert the bulb holder in the number plate light and turn in the opposite direction of arrow B
until it stops.
1)
Depending on how equipped the vehicle is, the number plate lights may be LEDs. LEDs
have an estimated life that exceeds than that of the car. If a light with LEDs fails, go to an
authorised workshop for replacement.
Safety FirstOperating instructionsPractical TipsTechnical specifications
Page 263 of 289
262Fuses and bulbs
7. Plug the connector into the bulb holder.
Page 264 of 289

263
Technical specifications
Technical specifications Technical specifications
Important
The information in your vehicle's official documents always
take precedence over the information in the current instruc-
tion manual. All technical specifications provided in this documentation are valid for the
standard model in Spain. The vehicle data card included in the Mainte-
nance Programme or the vehicle registration documentation shows which
engine is installed in the vehicle.
The figures may be different depending whether additional equipment is fit-
ted, for different models, for special vehicles and for other countries. Abbreviations used in the Technical Specifications sectionAbbrevia-
tionMeaning
kWKilowatt, engine power measurement.
PSPferdestärke (horsepower), formerly used to denote engine
power.
rpmRevolutions per minute - engine speed.NmNewton metres, unit of engine torque.litres per100 kmFuel consumption in litres per 100 km (70 miles).
g/kmCarbon dioxide emissions in grams per km (mile) travelled.CO 2Carbon dioxideCNCetane number, indication of the diesel combustion power.
RONResearch octane number, indication of the knock resistance
of petrol.
Safety FirstOperating instructionsPractical TipsTechnical specifications