Page 9 of 20

7To view detailed instructional videos regarding these and other features, please go to www.nissanownersinfo.mobi.
01
0408
09
05
0607
0203
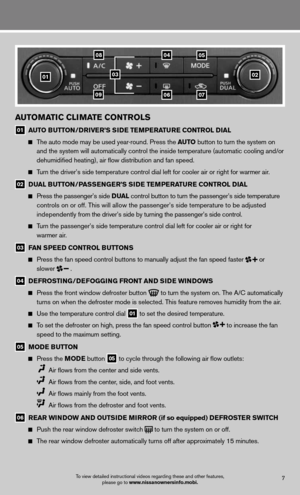
automatiC ClimatE Controls
01 auto B
utton/DrivE r’s si DE tEmPE ratur E Control D ial
The auto mode may be used year-round. Press the auto button to turn the system on
and the system will automatically control the inside temperature (autom\
atic cooling and/or
dehumidified heating), air flow distribution and fan speed.
Turn the driver’s side temperature control dial left for cooler air or\
right for warmer air.
02 D
ual B utton /Pass En GE r’s si DE tEmPE ratur E Control D ial
Press the passenger’s side D ual control button to turn the passenger’s side temperature
controls on or off. This will allow the passenger’s side temperature to be adjusted
independently from the driver’s side by turning the passenger’s side control.
Turn the passenger’s side temperature control dial left for cooler air\
or right for
warmer air.
03 fan s
PEED Control B uttons
Press the fan speed control buttons to manually adjust the fan speed fas\
ter
or
slower
.
04 DE
frostin G/DEfoGG inG front an D siDE Win Do Ws
Press the front window defroster button
to turn the system on. The A/c automatically
turns on when the defroster mode is selected. This feature removes humidity from the air.
use the temperature control dial
01 to set the desired temperature.
To set the defroster on high, press the fan speed control button to increase the fan
speed to the maximum setting.
05 moDE B
utton
Press the moDE button
05 to cycle through the following air flow outlets:
Air flows from the center and side vents.
Air flows from the center, side, and foot vents.
Air flows mainly from the foot vents.
Air flows from the defroster and foot vents.
06 r
Ear Win Do W an D outsi DE mirror (if so equipped) DE frostEr sWitCh
Push the rear window defroster switch
to turn the system on or off.
The rear window defroster automatically turns off after approximately 15 minutes.
Page 10 of 20

01 VOLUME/ON•OFF CONTROL KNOB
Press the VOL/ON•OFF control knob to turn the system on or off.
Turn the knob right or le")
fm/am /Xm®* satE llitE raD io With CD PlayE r (if so equipped)
01 VOLUME/ON•OFF CONTROL KNOB
Press the VOL/ON•OFF control knob to turn the system on or off.
Turn the knob right or left to increase or decrease the volume.
02 tun
E/folDE r/au Dio Control knoB
To manually tune the radio, turn the tunE/fol DEr/auDio knob left or right.
03 s
EE k/C at an D tra Ck Buttons
To scan quickly and stop at the previous or next broadcast station, press the sEEk /Cat
button or the tra Ck button.
f or XM® satellite radio, press the sEEk /Cat button or the tra Ck button to switch
to the first channel of the previous or next category.
To change tracks on a cd, press the sEEk /Cat button or the tra Ck button.
To fast forward or rewind a track on a cd, press and hold the sEEk /Cat button or
the tra Ck button.
02
03
05
06
01
0404
8
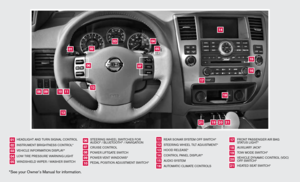
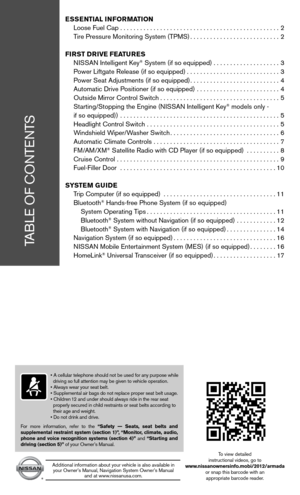
first drive features
To view detailed instructional videos regarding these and other features,
please go to www.nissanownersinfo.mobi.
07 air r
ECirCulation B utton
Press the air recirculation button
to recirculate air inside the vehicle. The indicator
light on the button will illuminate. This system is used to avoid outside odors and helps to
adjust the inside vehicle temperature more effectively.
Press the air recirculation button
again to turn air recirculation off. This allows outside
air to be drawn into the passenger compartment to prevent fogging in def\
rost, floor or
defrost/floor modes.
The air recirculation mode can only be selected if the air flow control\
mode is in the
or
position.
08 a/C B
utton
Press the a/C button to manually turn the A/c on or off.
09 off B
utton
Press the off button to turn the climate control system off.
for more information, refer to the “instruments and controls (section 2)” and the “monitor, climate, audio, phone and voice
recognition systems (section 4)” of your Owner’s Manual.
*XM® Satellite Radio is only available on vehicles equipped with optional XM® satellite subscription service.
Page 11 of 20

9To view detailed instructional videos regarding these and other features, please go to www.nissanownersinfo.mobi.
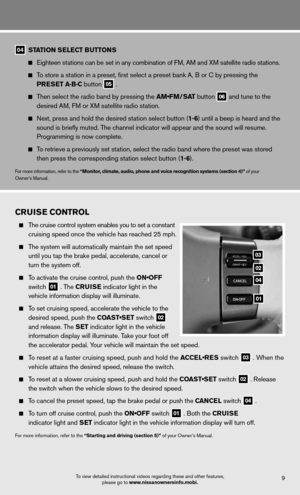
04 station s
ElEC t Buttons
eighteen stations can be set in any combination of f M, AM and XM satellite radio stations.
To store a station in a preset, first select a preset bank A, B or c by pressing the
PrEs Et a·B·C button
05 .
Then select the radio band by pressing the AM•FM/SAT button
06 and tune to the
desired AM, f M or XM satellite radio station.
Next, press and hold the desired station select button (1-6) until a beep is heard and the
sound is briefly muted. The channel indicator will appear and the sound will resume.
Programming is now complete.
To retrieve a previously set station, select the radio band where the preset was stored
then press the corresponding station select button (1-6).
for more information, refer to the “monitor, climate, audio, phone and voice recognition systems (section 4)” of your
Owner’s Manual.
Cruis E Control
The cruise control system enables you to set a constant
cruising speed once the vehicle has reached 25 mph.
The system will automatically maintain the set speed
until you tap the brake pedal, accelerate, cancel or
turn the system off.
To activate the cruise control, push the ON•OFF
switch
01 . The C
ruisE indicator light in the
vehicle information display will illuminate.
To set cruising speed, accelerate the vehicle to the
desired speed, push the COAST•SET switch
02
and release. The s
Et indicator light in the vehicle
information display will illuminate. Take your foot off
the accelerator pedal. Your vehicle will maintain the set speed.
To reset at a faster cruising speed, push and hold the ACCEL•RES switch
03 . When the
vehicle attains the desired speed, release the switch.
To reset at a slower cruising speed, push and hold the COAST•SET switch
02 . Release
the switch when the vehicle slows to the desired speed.
To cancel the preset speed, tap the brake pedal or push the C anCEl switch
04 .
To turn off cruise control, push the ON•OFF switch
01 . Both the C
ruisE
indicator light and s Et indicator light in the vehicle information display will turn off.
for more information, refer to the “starting and driving (section 5)” of your Owner’s Manual.
03
02
04
01
Page 12 of 20
To view detailed instructional videos regarding these and other features, please go to www.nissanownersinfo.mobi.10
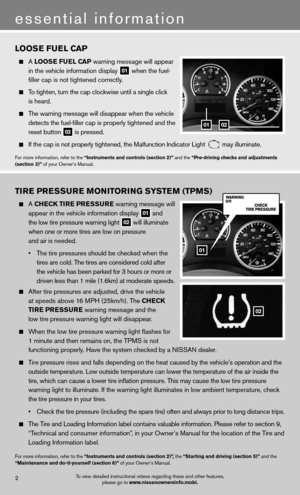
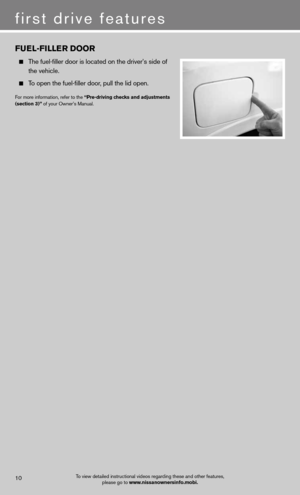
fuEl-fillE r Door
The fuel-filler door is located on the driver’s side of
the vehicle.
To open the fuel-filler door, pull the lid open.
for more information, refer to the “Pre-driving checks and adjustments
(section 3)” of your Owner’s Manual.
first drive features
Page 13 of 20

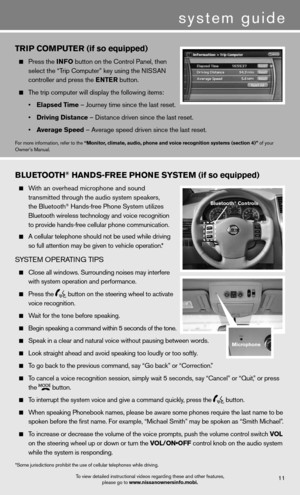
Press the info button on the control Panel, then
select the “Trip computer” key using the ni SSAn
controller and press the E ntEr button.")
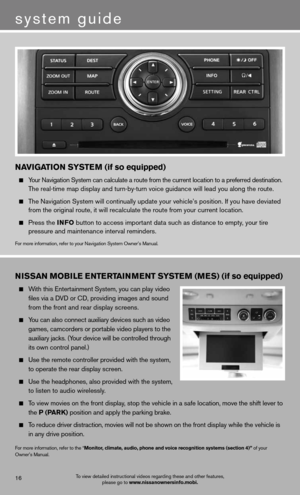
system guide
triP Com PutEr (if so equipped)
Press the info button on the control Panel, then
select the “Trip computer” key using the ni SSAn
controller and press the E ntEr button.
The trip computer will display the following items:
• Elapsed t ime – Journey time since the last reset.
• Driving Distance – distance driven since the last reset.
• average speed – Average speed driven since the last reset.
for more information, refer to the “monitor, climate, audio, phone and voice recognition systems (section 4)” of your
Owner’s Manual.
To view detailed instructional videos regarding these and other features, please go to www.nissanownersinfo.mobi.11
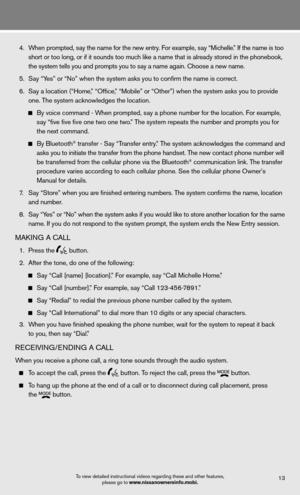
Blu Etooth® han Ds-fr EE Phon E systEm (if so equipped)
With an overhead microphone and sound
transmitted through the audio system speakers,
the Bluetooth
® Hands-free Phone System utilizes
Bluetooth wireless technology and voice recognition
to provide hands-free cellular phone communication.
A cellular telephone should not be used while driving
so full attention may be given to vehicle operation.*
SYSTe M OPeRATin G TiPS
close all windows. Surrounding noises may interfere
with system operation and performance.
Press the
button on the steering wheel to activate
voice recognition.
Wait for the tone before speaking.
Begin speaking a command within 5 seconds of the tone.
Speak in a clear and natural voice without pausing between words.
Look straight ahead and avoid speaking too loudly or too softly.
To go back to the previous command, say “Go back” or “correction.”
To cancel a voice recognition session, simply wait 5 seconds, say “cancel” or “Quit,” or press
the
button.
To interrupt the system voice and give a command quickly, press the
button.
When speaking Phonebook names, please be aware some phones require the la\
st name to be
spoken before the first name. For example, “Michael Smith” may be spoken as “Smith Michael”.
To increase or decrease the volume of the voice prompts, push the volume \
control switch vol
on the steering wheel up or down or turn the VOL/ON•OFF control knob on the audio system
while the system is responding.
*Some jurisdictions prohibit the use of cellular telephones while drivin\
g.
Bluetooth® Controls
microphone
Page 14 of 20

system guide
To view detailed instructional videos regarding these and other features, please go to www.nissanownersinfo.mobi.12
if the Voice Recognition system does not recognize your voice commands, train th\
e system
using the Speaker Adaptation Mode. See your Owner’s Manual for detailed information.
Some commands are not available while the vehicle is in motion.
The “Help” command can be used to hear a list of available commands\
at any time.
Please refer to the cellular phone manufacturer’s Owner’s Manual f\
or detailed information
regarding your Bluetooth phone.
for recommended phones and detailed instructions, please visit
www.nissanusa.com/bluetooth.
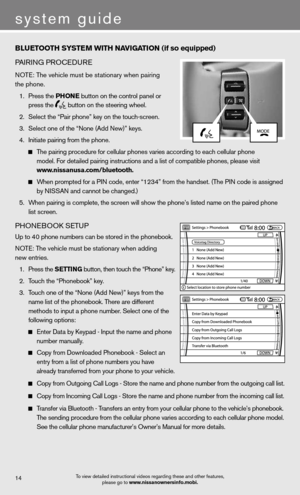
Blu Etooth systE m Without navi Gation (if so equipped)
PA iR inG PROcedu Re
n OTe: The vehicle must be stationary when pairing
the phone.
1. Press the
button on the steering wheel and wait
for the tone.
2. Say “Setup.”
3. Wait for the tone, then say “Pair phone.”
4. Wait for the tone, then say “new phone.”
5. initiate connecting from the phone.
The pairing procedure varies according to each cellular phone model. f or detailed pairing
instructions and a list of compatible phones, please visit www.nissanusa.com/bluetooth.
When prompted for a PASS keY code, enter “1234” from the handset. (The PASS keY
code is assigned by ni SSAn and cannot be changed.)
6. Say a name for the phone when the system asks you to provide one. You can give the phone
a name of your choice.
7. Say a number between 1 and 5 when the system asks you for a priority leve\
l. The priority
level determines which phone interacts with the system when two or more paired phones are
active in the vehicle at the same time. choose 1 if this is the only phone or the primary phone.
8. Say “Yes” or “no” when the system asks if you would like to select a custom ring ton\
e.
f ollow the instructions provided by the system to choose a ring tone.
PHOneBOOk SeTu P
each paired phone has its own dedicated phonebook. each phonebook can store up to 40
names. each name can have up to four locations/numbers: Home, Office, Mobile and\
Other.
n OTe: The vehicle must be stationary when adding new entries.
1. Press the
button and wait for the tone.
2. Say “Phonebook.”
3. Wait for the tone, then say “new entry.”
Page 15 of 20

4. When prompted, say the name for the new entry. For example, say “Michelle.” If the name is too
short or too long, or if it sounds too much like a name that is already stored in the phonebook,
the system tells you and prompts you to say a name again. choose a new name.
5. Say “Yes” or “no” when the system asks you to confirm the name is correct.
6. Say a location (“Home,” “Office,” “Mobile” or “Other”) when the system asks you to provi\
de
one. The system acknowledges the location.
By voice command - When prompted, say a phone number for the location. For example,
say “five five five one two one two.” The system repeats the number and prompts you for
the next command.
By Bluetooth® transfer - Say “Transfer entry.” The system acknowledges the command and
asks you to initiate the transfer from the phone handset. The new contact phone number will
be transferred from the cellular phone via the Bluetooth
® communication link. The transfer
procedure varies according to each cellular phone. See the cellular phone Owner’s
Manual for details.
7. Say “Store” when you are finished entering numbers. The system confirms the name, location
and number.
8. Say “Yes” or “no” when the system asks if you would like to store another location f\
or the same
name. if you do not respond to the system prompt, the system ends the new entry session.
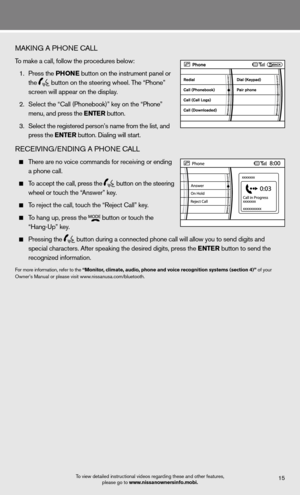
MAkinG A cALL
1. Press the
button.
2. After the tone, do one of the following:
Say “Call [name] [location].” For example, say “Call Michelle Home.”
Say “Call [number].” For example, say “Call 123-456-7891.”
Say “Redial” to redial the previous phone number called by the syst\
em.
Say “call international” to dial more than 10 digits or any special characters.
3. When you have finished speaking the phone number, wait for the system to repeat it back
to you, then say “dial.”
ReceiVin G/endin G A cALL
When you receive a phone call, a ring tone sounds through the audio syste\
m.
To accept the call, press the
button. To reject the call, press the
button.
To hang up the phone at the end of a call or to disconnect during call pl\
acement, press
the
button.
To view detailed instructional videos regarding these and other features,
please go to www.nissanownersinfo.mobi.13
Page 16 of 20

PA iR inG PROcedu Re
n OTe: The vehicle must be stationary when pairing
the phone.
1. Press the Phon E button on the control pane")
system guide
Blu Etooth systE m With naviGation (if so equipped)
PA iR inG PROcedu Re
n OTe: The vehicle must be stationary when pairing
the phone.
1. Press the Phon E button on the control panel or
press the
button on the steering wheel.
2. Select the “Pair phone” key on the touch-screen.
3. Select one of the “none (Add new)” keys.
4. initiate pairing from the phone.
The pairing procedure for cellular phones varies according to each cellular phone
model. f or detailed pairing instructions and a list of compatible phones, please visit\
www.nissanusa.com/bluetooth.
When prompted for a P in code, enter “1234” from the handset. (The P in code is assigned
by niSSAn and cannot be changed.)
5. When pairing is complete, the screen will show the phone’s listed name\
on the paired phone
list screen.
PHOne BOOk SeTu P
up to 40 phone numbers can be stored in the phonebook.
n OTe: The vehicle must be stationary when adding
new entries.
1. Press the s EttinG button, then touch the “Phone” key.
2. Touch the “Phonebook” key.
3. Touch one of the “none (Add new)” keys from the
name list of the phonebook. There are different
methods to input a phone number. Select one of the
following options:
enter data by k eypad - input the name and phone
number manually.
copy from downloaded Phonebook - Select an
entry from a list of phone numbers you have
already transferred from your phone to your vehicle.
copy from Outgoing call Logs - Store the name and phone number from the outgoing call list.
copy from incoming call Logs - Store the name and phone number from the incoming call list.
Transfer via Bluetooth - Transfers an entry from your cellular phone to the vehicle’s phonebook\
.
The sending procedure from the cellular phone varies according to each cellular phone model.
See the cellular phone manufacturer’s Owner’s Manual for more details.
To view detailed instructional videos regarding these and other features,
please go to www.nissanownersinfo.mobi.14