Page 338 of 714

Features and controls
3-223
3
4. The headlights will come on in the low beam setting for
about 30 seconds. After the headlights go off, the head-
lights can be turned on again in the low beam setting for
about 30 seconds by pulling the turn signal lever toward
you within 60 seconds of turning the ignition switch to the
“LOCK” position. To turn on the headlights again after 60
seconds of turning the ignition switch to the “LOCK”
position, repeat the process from step 1.NOTE�While the coming home light function is operating, per-
form one of the following operations to cancel the func-
tion.
• Pull the turn signal lever toward you.
• Turn the combination headlights and dimmer switch to
the “ ” or “ ” position.
• Turn the ignition switch to the “ON” position.
�It is possible to modify functions as follows:
• The time that the headlights remain on can be changed.
• The coming home light function can be deactivated.
For details, consult a Mitsubishi Motors dealer.
On vehicles equipped with Mitsubishi Multi-Communica-
tion System, screen operations can be used to make the
adjustment.
Refer to separate owner’s manual for details.
Headlight leveling switch
(if so equipped)
N00537100075
The direction of the headlight beam (the direction in which the
light shines) alters according to the number of people and the
load in the vehicle. Lower the headlight angle if it is too high
due to the number of people and/or the load in the vehicle so
that the headlights’ glare does not distract the drivers of
approaching vehicles. First set the light switch to the “ ”
position, then turn the headlight leveling switch knob to lower
the beam. The greater the number on the headlight leveling
switch knob, the lower the beam will point.
Set the switch to the appropriate position so that the headlight
beam is level with the road.
BK0138000US.book 223 ページ 2011年4月13日 水曜日 午前11時17分
Page 350 of 714

Features and controls
3-235
3
Precautions to observe when using wipers and
washers
N00523500195
NOTE�Do not use the wipers when the windshield is dry. This
could scratch the glass and wear the wiper blades prema-
turely.
�Before using the wipers in cold weather, check to be sure
that the wiper blades are not frozen to the windshield or
rear window. Using the wipers while the blades are frozen
could cause the wiper motor to burn out.
�If the wipers become blocked by ice or other deposits on
the glass, the motor may still burn out even if the wiper
switch is OFF. If deposits form on the windshield, park
your vehicle in a safe place, turn off the engine, and clean
the glass so that the wipers can operate smoothly.
�Avoid using the washer for more than 20 seconds at a
time. Do not operate the washer when the washer fluid
reservoir is empty or the pump may fail.
�During cold weather, add a recommended washer solution
that will not freeze in the washer fluid reservoir. Other-
wise the washer may not work or may be damaged.�Replace the wiper blades when they are worn. Use the
proper size replacement blades. For further information,
please contact your authorized Mitsubishi Motors dealer.
CAUTION
!�If the washer is used in cold weather, the washer
fluid sprayed onto the glass might freeze, blocking
your view. Heat the glass with the defroster before
using the washer.
BK0138000US.book 235 ページ 2011年4月13日 水曜日 午前11時17分
Page 358 of 714

Features and controls
3-243
3
Setting the passcode
Use the following procedure to turn on the security function by
setting a passcode.
1. Press the SPEECH button.
2. Say “Setup.”
3. Say “Passcode.”
4. The voice guide will say “Passcode is disabled. Would
you like to enable it?” Answer “Yes.”
Answer “No” to cancel the setting of the passcode and
return to the main menu.
5. The voice guide will say “Please say a 4-digit passcode.
Remember this passcode. It will be required to use this
system.”
Say a 4-digit number which you want to set as a passcode.
6. For confirmation purposes, the voice guide will say “Pass-
code <4-digit passcode>. Is this correct?” Answer “Yes.”
Answer “No” to return to the passcode input in Step 5.
7. When the registration of the passcode is completed, the
voice guide will say “Passcode is enabled” and the system
will return to the main menu. NOTE�Passcode will be required to access the system after the
next ignition cycle.
�Allow a short time after entering the passcode, for it to
record into the system. If the engine is started or the igni-
tion switch is turned to “ACC” or “ON” too soon, you
must re-enter the passcode.
Entering the passcode
If a passcode has been set and the security function is enabled,
the voice guide will say “Hands-free system is locked. State thepasscode to continue” when the SPEECH button is pressed to
enter voice recognition mode. Say the 4-digit passcode number
to enter the passcode.
If the entered passcode is wrong, the voice guide will say “<4-
digit passcode>, Incorrect passcode. Please try again.” Enter
the correct passcode.
NOTE�You can reenter the passcode as many times as you want.
�If you have forgotten your passcode, say “Cancel” to quit
the voice input mode and then check with an authorized
Mitsubishi Motors dealer.
Disabling the passcode
Use the following procedure to turn off the security function by
disabling the passcode. NOTE�System must be unlocked to disable the passcode.
1. Press the SPEECH button.
2. Say “Setup.”
3. Say “Passcode.”
4. The voice guide will say “Passcode is enabled. Would you
like to disable it?” Answer “Yes.”
Answer “No” to cancel the disabling of the passcode and
return to the main menu.
5. When the disabling of the passcode is completed, the
voice guide will say “Passcode is disabled” and the sys-
tem will return to the main menu.
BK0138000US.book 243 ページ 2011年4月13日 水曜日 午前11時17分
Page 379 of 714
3-264 Features and controls
3
How to connect a USB memory device
N00566800016
1. Park your vehicle in a safe place and turn the ignition
switch to the “LOCK” position.
2. Open the USB input terminal cover (A) in the floor con-
sole box.3. Connect the connector cable (C) to the USB memory
device (B).
BK0138000US.book 264 ページ 2011年4月13日 水曜日 午前11時17分
Page 380 of 714
Features and controls
3-265
3
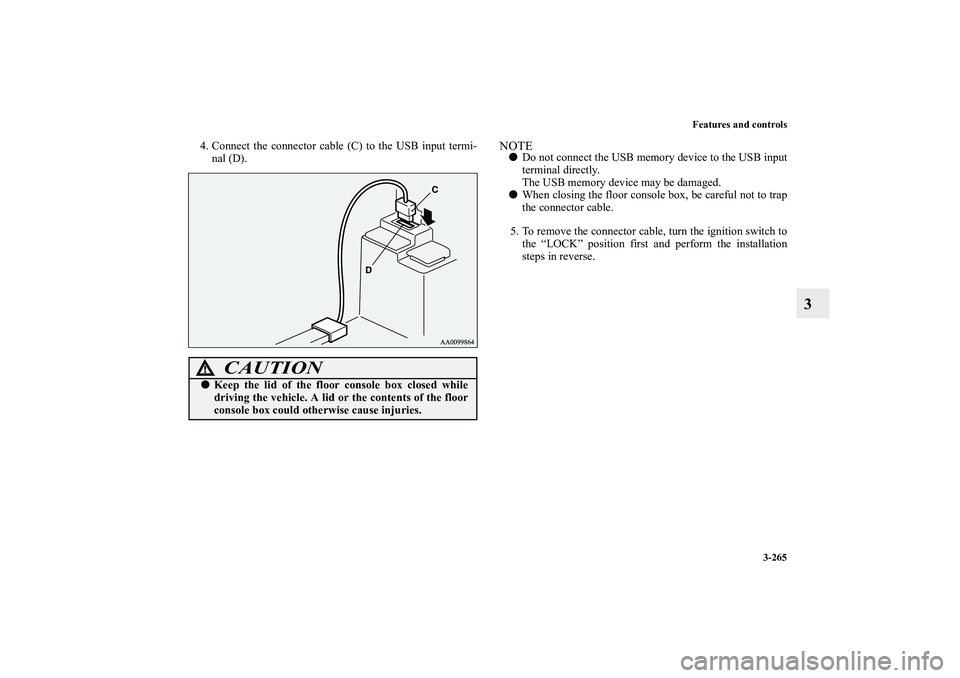
4. Connect the connector cable (C) to the USB input termi-
nal (D).
NOTE�Do not connect the USB memory device to the USB input
terminal directly.
The USB memory device may be damaged.
�When closing the floor console box, be careful not to trap
the connector cable.
5. To remove the connector cable, turn the ignition switch to
the “LOCK” position first and perform the installation
steps in reverse.
CAUTION
!�Keep the lid of the floor console box closed while
driving the vehicle. A lid or the contents of the floor
console box could otherwise cause injuries.
BK0138000US.book 265 ページ 2011年4月13日 水曜日 午前11時17分
Page 381 of 714
3-266 Features and controls
3
How to connect an iPod
N00566900017
1. Park your vehicle in a safe place and turn the ignition
switch to the “LOCK” position.
2. Open the USB input terminal cover (A) in the floor con-
sole box.3. Connect the Dock connector (C) to the iPod (B).
NOTE�Use a genuine Dock connector from Apple Inc.
BK0138000US.book 266 ページ 2011年4月13日 水曜日 午前11時17分
Page 382 of 714
 to the USB input termi-
nal (D).NOTE�When closing the floor console box, be careful not to trap
the connector cable.
5. To remove the Do")
Features and controls
3-267
3
4. Connect the Dock connector (C) to the USB input termi-
nal (D).NOTE�When closing the floor console box, be careful not to trap
the connector cable.
5. To remove the Dock connector, turn the ignition switch to
the “LOCK” position first and perform the installation
steps in reverse.
Types of connectable devices and supported file
specifications
N00567000015
Device types
N00567100058
Devices of the following types can be connected.
*: “iPod touch,” “iPod classic,” “iPod” and “iPod nano” are
registered trademarks of Apple Inc. in the United States and
other countries.
CAUTION
!�Keep the lid of the floor console box closed while
driving the vehicle. A lid or the contents of the floor
console box could otherwise cause injuries.
Model name
Condition
USB memory deviceStorage capacity of 256 Mbytes
or more
iPod touch* F/W Ver.1.1.1 or later
iPod classic* F/W Ver.1.0 or later
iPod (fifth generation)* F/W Ver.1.2.2 or later
iPod nano (fifth generation)* F/W Ver.1.2 or later
iPod nano (second generation)* F/W Ver.1.1.2 or later
Models other than USB mem-
ory devices and iPodsDigital audio player supporting
mass storage class
BK0138000US.book 267 ページ 2011年4月13日 水曜日 午前11時17分
Page 383 of 714

3-268 Features and controls
3
NOTE�Depending on the type of the USB memory device or
other device connected, the connected device may not
function properly or the available functions may be lim-
ited.
�Use the iPod whose firmware has been updated to the lat-
est version.
�You can charge your iPod by connecting it to the USB
input terminal when the ignition switch is in the “ACC” or
“ON” position.
�Do not keep your USB memory device or iPod in your
vehicle.
�It is recommended that you back up the files in case of
data damage.
�Do not connect to the USB input terminal any device
(hard disk, card reader, memory reader, etc.) other than
the connectable devices specified in the previous section.
The device and/or data may be damaged. If any of these
devices was connected by mistake, remove it after turning
the ignition switch to the “LOCK” position.
File specifications
N00567200017
You can play music files of the following specifications that
are saved in a USB memory device or other device supporting
mass storage class.Item
Condition
File format MP3, WMA, AAC, WAV
Maximum number of levels
(including the root)Level 8
Number of folders 700
Number of files 65,535
BK0138000US.book 268 ページ 2011年4月13日 水曜日 午前11時17分

")