2012 MERCEDES-BENZ SLS AMG ROADSTER window
[x] Cancel search: windowPage 111 of 288
Defrosting the windows
Windows fogged up on the insideXActivate the cooling with air
dehumidification function.XActivate automatic mode.XIf the windows continue to fog up, activate
the defrosting function.
Windows fogged up on the outside
XActivate the windshield wipers.XPress the _ button repeatedly until the
O or P symbol appears in the
display.
i You should only select this setting until
the windshield is clear again.
Rear window defroster
Activating/deactivating
GWARNING
Any accumulation of snow and ice should be
removed from the rear window before driving.
Visibility could otherwise be impaired,
endangering you and others.
The rear window defroster has a high current
draw. You should therefore switch it off as
soon as the window is clear. It otherwise
switches off automatically after several
minutes.
If the battery voltage is too low, the rear
window defroster may switch off.
XSelect SmartKey position 2 with the Start/
Stop button.XPress the ¤ button.
The indicator lamp in the ¤ button lights
up or goes out.Problems with the rear window
defroster
The rear window defroster has deactivated
prematurely or cannot be activated. The on-
board voltage is too low because too many
electrical consumers are switched on.
XSwitch off any consumers that are not
required, e.g. seat heating or interior
lighting.
When the battery is sufficiently charged,
the rear window defroster is activated
again automatically.
Activating/deactivating air-
recirculation mode
You can deactivate the flow of fresh air if
unpleasant odors are entering the vehicle
from outside. The air already inside the
vehicle will then be recirculated.
GWARNING
Fogged windows impair visibility,
endangering you and others. If the windows
begin to fog on the inside, switching off the
air recirculation mode immediately should
clear interior window fogging. If interior
window fogging persists, make sure the air
conditioning is activated, or press the ¬
button.
XSelect SmartKey position 2 with the Start/
Stop button.XTo activate: press the g button.
The indicator lamp in the g button lights
up.
i Air-recirculation mode is activated
automatically at high outside
temperatures. When air-recirculation mode
is activated automatically, the indicator
lamp in the g button is not lit.
Outside air is added after about 30
minutes.
Operating the climate control system109Climate controlZ
Page 112 of 288
XTo switch off: press the g button.
The indicator lamp in the g button goes
out.
i Air-recirculation mode deactivates
automatically:
R after approximately five minutes if
outside temperatures are less than about
41 ‡ (5 †)
R after approximately five minutes if
cooling with air dehumidification is
deactivated
R after approximately 30 minutes if outside
temperatures are over about
41 ‡ (5 †)
Setting the air vents
Important safety notes
GWARNING
When operating the climate control, the air
that enters the passenger compartment
through the air vents can be very hot or very
cold (depending on the set temperature). This
could cause burns or frostbite to unprotected
skin in the immediate area of the air vents.
Always keep sufficient distance between
unprotected parts of the body and the air
vents. If necessary, use the air distribution
adjustment to direct the air to air vents in the
vehicle interior that are not in the immediate
area of unprotected skin.
In order to ensure the direct flow of fresh air
through the air vents into the vehicle interior,
please observe the following notes:
R keep the air inlet on the right-hand side of
the hood free of blockages, such as ice,
snow or leaves.
R never cover the air vents or air intake grilles
in the vehicle interior.
i For virtually draft-free ventilation, adjust
the sliders of the air vents to the center
position.
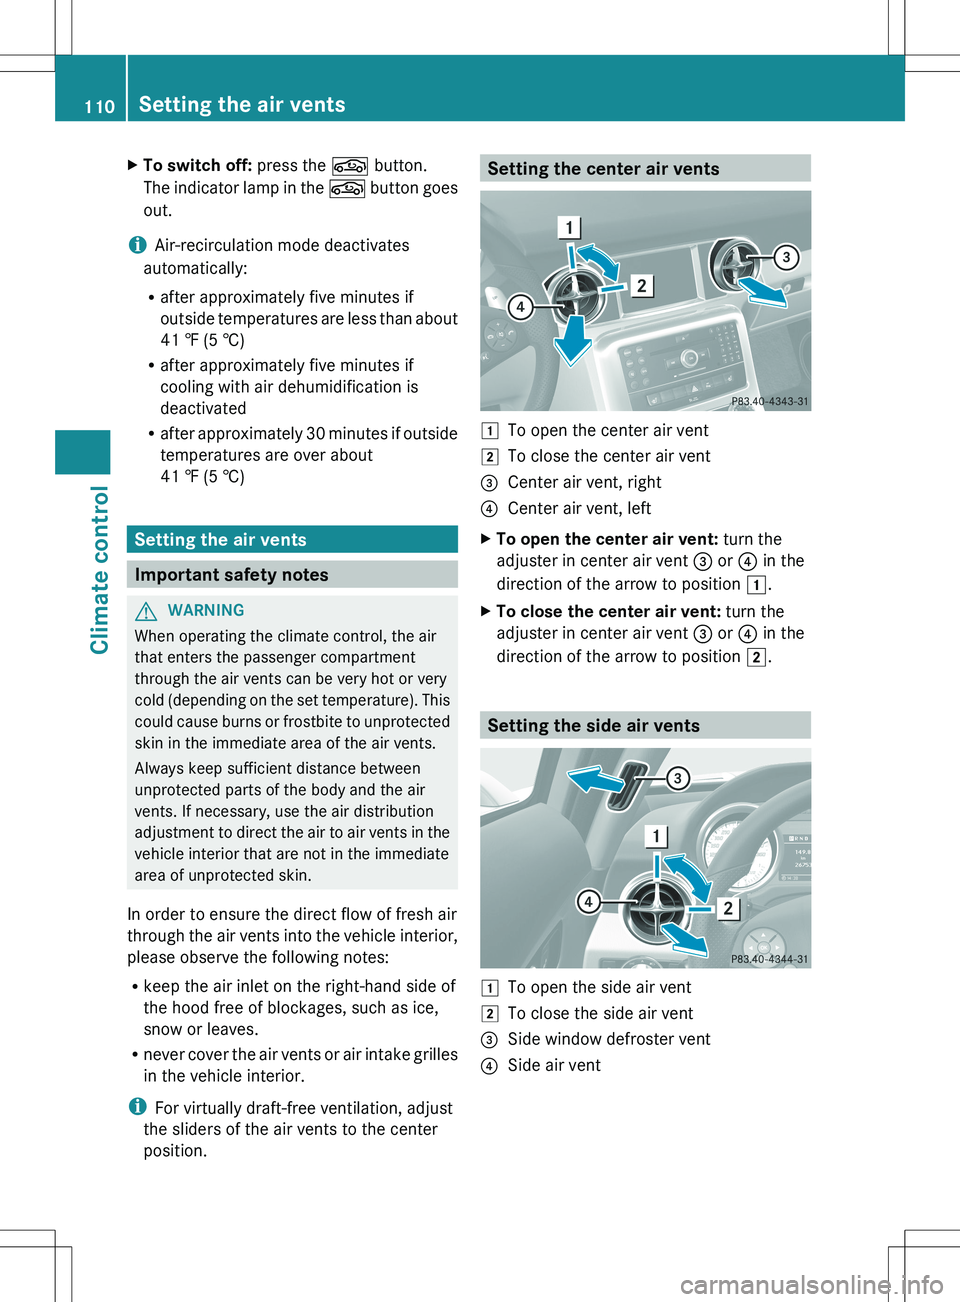
Setting the center air vents1To open the center air vent2To close the center air vent=Center air vent, right?Center air vent, leftXTo open the center air vent: turn the
adjuster in center air vent = or ? in the
direction of the arrow to position 1.XTo close the center air vent: turn the
adjuster in center air vent = or ? in the
direction of the arrow to position 2.
Setting the side air vents
1To open the side air vent2To close the side air vent=Side window defroster vent?Side air vent110Setting the air ventsClimate control
Page 118 of 288
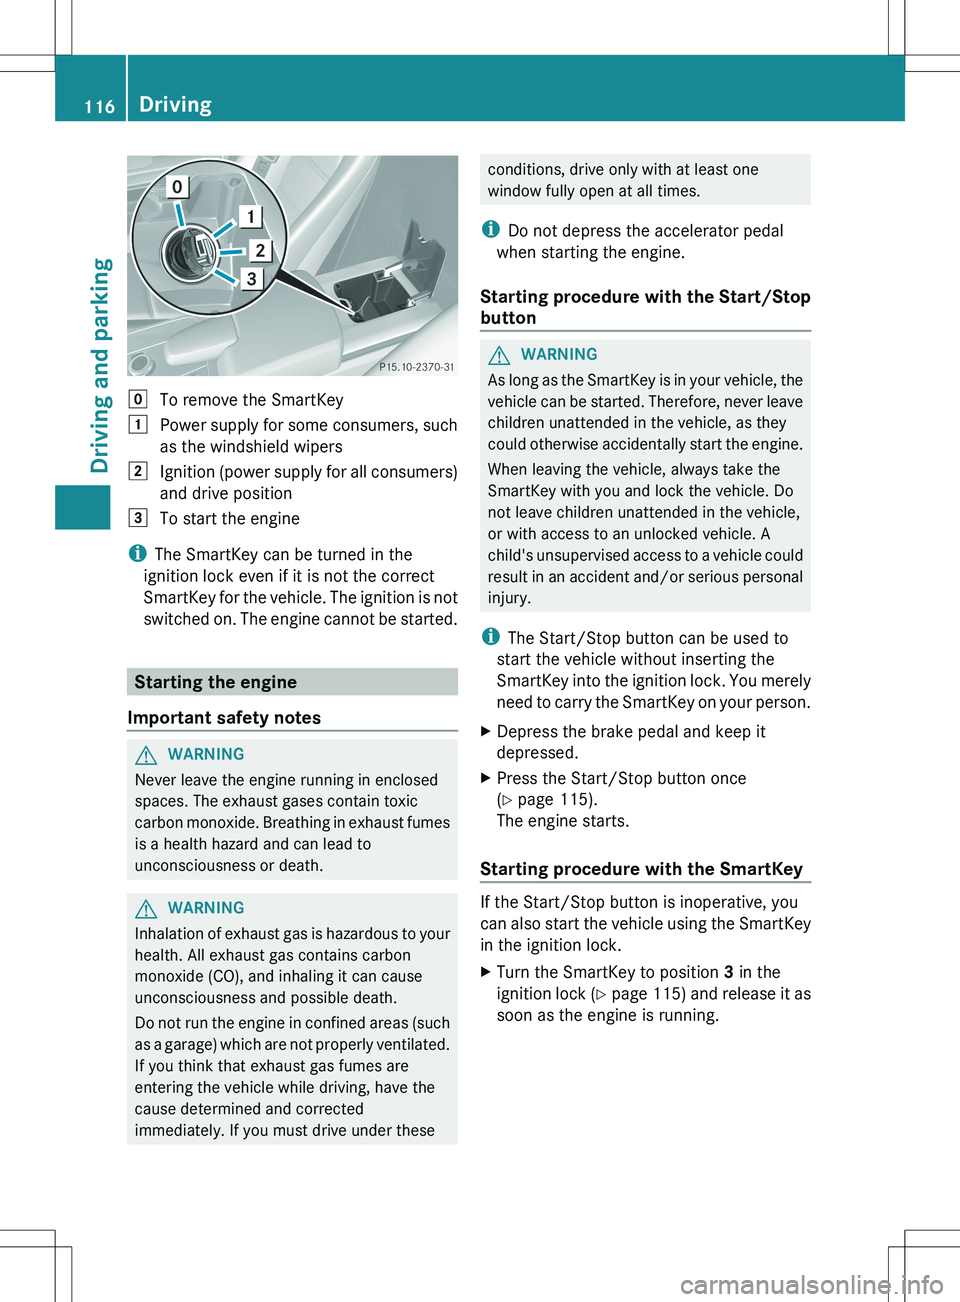
gTo remove the SmartKey1Power supply for some consumers, such
as the windshield wipers2Ignition (power supply for all consumers)
and drive position3To start the engine
i The SmartKey can be turned in the
ignition lock even if it is not the correct
SmartKey for the vehicle. The ignition is not
switched on. The engine cannot be started.
Starting the engine
Important safety notes
GWARNING
Never leave the engine running in enclosed
spaces. The exhaust gases contain toxic
carbon monoxide. Breathing in exhaust fumes
is a health hazard and can lead to
unconsciousness or death.
GWARNING
Inhalation of exhaust gas is hazardous to your
health. All exhaust gas contains carbon
monoxide (CO), and inhaling it can cause
unconsciousness and possible death.
Do not run the engine in confined areas (such
as a garage) which are not properly ventilated.
If you think that exhaust gas fumes are
entering the vehicle while driving, have the
cause determined and corrected
immediately. If you must drive under these
conditions, drive only with at least one
window fully open at all times.
i Do not depress the accelerator pedal
when starting the engine.
Starting procedure with the Start/Stop
buttonGWARNING
As long as the SmartKey is in your vehicle, the
vehicle can be started. Therefore, never leave
children unattended in the vehicle, as they
could otherwise accidentally start the engine.
When leaving the vehicle, always take the
SmartKey with you and lock the vehicle. Do
not leave children unattended in the vehicle,
or with access to an unlocked vehicle. A
child's unsupervised access to a vehicle could
result in an accident and/or serious personal
injury.
i The Start/Stop button can be used to
start the vehicle without inserting the
SmartKey into the ignition lock. You merely
need to carry the SmartKey on your person.
XDepress the brake pedal and keep it
depressed.XPress the Start/Stop button once
( Y page 115).
The engine starts.
Starting procedure with the SmartKey
If the Start/Stop button is inoperative, you
can also start the vehicle using the SmartKey
in the ignition lock.
XTurn the SmartKey to position 3 in the
ignition lock (Y page 115) and release it as
soon as the engine is running.116DrivingDriving and parking
Page 135 of 288
Do not turn off the engine while the vehicle is
in motion.
Exhaust checkGWARNING
Inhalation of exhaust gas is hazardous to your
health. All exhaust gas contains carbon
monoxide (CO), and inhaling it can cause
unconsciousness and possible death.
Do not run the engine in confined areas (such
as a garage) which are not properly ventilated.
If you think that exhaust gas fumes are
entering the vehicle while driving, have the
cause determined and corrected
immediately. If you must drive under these
conditions, drive only with at least one
window fully open at all times.
Certain engine systems are designed to keep
the level of poisonous components in exhaust
fumes within legal limits.
These systems only work at peak efficiency if
they are serviced exactly in accordance with
the manufacturer's specifications. For this
reason, all work on the engine may only be
carried out by qualified and authorized
Mercedes-Benz technicians.
The engine settings must not be changed
under any circumstances. Furthermore, all
specific service work must be carried out at
regular intervals and in accordance with the
Mercedes-Benz service requirements. Details
can be found in the Maintenance Booklet.
Brakes
Important safety notes
GWARNING
On slippery road surfaces, never downshift in
order to obtain braking action. This could
result in drive wheel slip and reduced vehicle
control. Your vehicle's ABS will not prevent
this type of loss of control.
GWARNING
Make sure that you do not endanger other
road users when you apply the brakes.
Downhill gradients
! On long and steep gradients, you must
reduce the load on the brakes by shifting
early to a lower gear. This allows you to take
advantage of the engine braking effect and
helps avoid overheating and excessive
wear of the brakes.
When you take advantage of the engine
braking effect, a drive wheel may not turn
for some time, e.g. on a slippery road
surface. This could cause damage to the
drive train. This type of damage is not
covered by the Mercedes-Benz warranty.
Heavy and light loads
GWARNING
Depressing the brake pedal constantly results
in excessive and premature wear to the brake
pads.
It may also cause the brakes to overheat,
seriously impairing their effectiveness. It may
then not be possible to stop the vehicle in
sufficient time to avoid an accident.
If the brakes have been subjected to a heavy
load, do not stop the vehicle immediately, but
drive on for a short while. This allows the
airflow to cool the brakes more quickly.
Wet roads
GWARNING
After driving in heavy rain for some time
without applying the brakes or through water
deep enough to wet brake components, the
first braking action may be somewhat
reduced. You have to depress the brake pedal
more firmly. Maintain a safe distance from
vehicles in front.
After driving on a wet road or having the
vehicle washed, brake firmly while paying
Driving tips133Driving and parkingZ
Page 137 of 288
of this and adjust your driving and braking
accordingly during this break-in period.
Excessive high-demand braking will cause
correspondingly high brake wear. Please be
attentive to the brake warning lamp in the
instrument cluster and brake condition
messages in the multifunction display.
Especially for high performance driving, it is
important to maintain and have the brake
system checked regularly.
The AMG high-performance compound brake
system and the AMG ceramic high-
performance compound brake system are
designed for high loads. This may lead to
noise when braking. This will depend on:
R speed
R braking force
R environmental conditions, such as
temperature and humidity
The wear of individual components of the
brake system, such as the brake pads/linings
or brake discs, depends on the individual
driving style and operating conditions.
For this reason, it is impossible to state a
mileage that will be valid under all
circumstances. An aggressive driving style
will lead to high wear. You can obtain further
information about this from your authorized
Mercedes-Benz Center.
Driving on wet roads
Hydroplaning
If water has accumulated to a certain depth
on the road surface, there is a danger of
hydroplaning occurring, even if:
R you drive at low speeds.
R the tires have adequate tread depth.
For this reason, in the event of heavy rain or
in conditions in which hydroplaning can
occur, you must drive in the following
manner:
R lower your speed.
R avoid ruts.
R brake carefully.
Driving on flooded roads
! Do not drive through flooded areas.
Check the depth of any water before driving
through it. Drive slowly through standing
water. Otherwise, water may enter the
vehicle interior or the engine compartment.
This can damage the electronic
components in the engine or the automatic
transmission. Water can also be drawn in
by the engine's air suction nozzles and this
can cause engine damage.
Winter driving
Please bear the following in mind
GWARNING
If the vehicle becomes trapped in snow,
ensure that snow is kept away from the
exhaust pipe and from around the vehicle as
long as the engine is running. Otherwise,
poisonous carbon monoxide (CO) may enter
the vehicle, resulting in loss of consciousness
and even death.
To assure sufficient fresh air ventilation, open
a window slightly on the side of the vehicle
not facing the wind.
At the onset of winter, have your vehicle
winterproofed at a qualified specialist
workshop, e.g. at an authorized Mercedes-
Benz Center.
Observe the notes in the "Winter operation"
section ( Y page 252).
Driving tips135Driving and parkingZ
Page 225 of 288
Have service work carried out as described
in the Maintenance Booklet. This may
otherwise lead to increased wear and
damage to the major assemblies or the
vehicle.
Driving abroad
An extensive Mercedes-Benz Service network
is also available in other countries. You can
obtain further information from any
authorized Mercedes-Benz Center.
Care
Notes on care
Regular care of your vehicle is a condition for
retaining the quality in the long term.
Use care products and cleaning agents
recommended and approved by Mercedes-
Benz.
GWARNING
Many cleaning products can be hazardous.
Some are poisonous, others are flammable.
Always follow the instructions on the
particular container. Always open your
vehicle's doors or windows when cleaning the
inside.
Never use fluids or solvents that are not
designed for cleaning your vehicle.
Always lock away cleaning products and keep
them out of reach of children.
! For cleaning your vehicle, do not use any
of the following:
R dry, rough or hard cloths
R abrasive cleaning agents
R solvents
R cleaning agents containing solvents
Do not scrub.
Do not touch the surfaces or protective
films with hard objects, e.g. a ring or ice
scraper. You could otherwise scratch or
damage the surfaces and protective film.
HEnvironmental note
Dispose of empty packaging and cleaning
cloths in an environmentally responsible
manner.
! Do not park the vehicle for an extended
period right after cleaning it, particularly
after having cleaned the wheels with wheel
cleaner. Wheel cleaners could cause
increased corrosion of the brake discs and
brake pads/linings. For this reason, you
should drive for a few minutes after
cleaning. Braking heats the brake discs and
brake pads, thus drying them. The vehicle
can then be parked.
Exterior care
Automatic car wash
GWARNING
Braking efficiency is reduced after washing
the vehicle. This could cause an accident.
After the vehicle has been washed, brake
firmly while paying attention to the traffic
conditions. This will warm up the brake discs,
thereby drying them more quickly. After
washing the vehicle, drive particularly
carefully until the brakes are dry and braking
power has been fully restored.
You can wash the vehicle in an automatic car
wash from the very start.
If the vehicle is very dirty, pre-wash it before
cleaning it in an automatic car wash.
! Never clean your vehicle in a Touchless
Automatic Car Wash as these use special
cleaning agents. These cleaning agents can
damage the paintwork or plastic parts.
! When washing your vehicle in a tow-
through car wash, use the SmartKey
instead of the Start/Stop button.
Start the engine using the SmartKey.. Move
the transmission to N with the E-SELECT
lever. Use the SmartKey to switch the
engine off again and then turn the
Care223Maintenance and careZ
Page 226 of 288
SmartKey to position 2. Make sure that you
then leave the SmartKey in position 2. You
may otherwise damage the vehicle, the
transmission or the car wash.
Check the transmission position in the
instrument cluster.
! Use the E-SELECT lever to shift the
transmission to N before switching the
engine off. If you open the driver's or front-
passenger door, the transmission remains
in this position for up to 30 minutes if the
SmartKey is in the ignition, even if the
engine is switched off. If you do not shift
the transmission to N using the E-SELECT
lever beforehand, it shifts automatically to
parking position P and locks the wheels if
the driver's or front-passenger door is
opened and the engine is switched off. This
may damage the vehicle, the transmission
or the car wash.
Observe the information on maneuvering
( Y page 129).
! Before driving into an automatic car wash,
make sure that it is suitable for the
dimensions of the vehicle. In particular,
make sure that:
R there is enough ground clearance
between the vehicle underbody and the
guide rails of the automatic car wash.
R the clearance width of the automatic car
wash is sufficient, particularly the width
of the guide rails.
R you enter the automatic car wash
straight and in the center of the guide
rails in order to avoid damaging the tires
or wheel rims.
Fold in the exterior mirrors before the
vehicle is washed. The exterior mirrors
could otherwise be damaged.
! Make sure that:R
the side windows are fully closed.
R the ventilation/heating is switched off
(the OFF button has been pressed/the
airflow control is set to position 0).
R that the windshield wiper switch is in
position 0.
Otherwise, the vehicle might be damaged.
! In portal car washes, the windshield
wipers may be moved up the windshield by
the cleaning brushes when the ignition is
switched off.
Set the Start/Stop button to key position
2 to reset the windshield wipers to their
original position.
! Vehicles with a matte finish:
Do not use wash programs with a hot wax
treatment under any circumstances.
After using an automatic car wash, wipe off
wax and drying agents from the windshield
and the wiper blades. This will prevent smears
and reduce wiping noises caused by residue
on the windshield.
Power washersGWARNING
Using power washers with circular-jet nozzles
(dirt grinders) may cause damage to the
vehicle, in particular to the tires.
Using damaged tires results in an increased
risk of accident. A sudden loss of tire pressure
while you are driving may cause you to lose
control of your vehicle, cause an accident and
injure yourself and others.
! Maintain a minimum distance of
11.8 in (30 cm) between the vehicle and the
power washer nozzle. Information about
the correct distance is available from the
equipment manufacturer.
Move the power washer nozzle around
when cleaning your vehicle.
224CareMaintenance and care
Page 228 of 288
! The following may cause the paint to
become shiny and thus reduce the matte
effect:
R Vigorous rubbing with unsuitable
materials.
R Frequent use of car washes.
R Washing the vehicle in direct sunlight.
! Never use paint cleaner, buffing or
polishing products such as gloss preserver
(wax). These products are only suitable for
high-gloss surfaces. Their use on vehicles
with matte finish leads to considerable
surface damage (shiny, spotted areas).
If wax comes into contact with the painted
surface by accident, remove it immediately
with commercially available petroleum
ether. Do so carefully and do not apply too
much pressure to the painted surface.
Ensure that no resinous, greasy or oily
substances come into contact with the
paint, as these can leave a residue. If such
substances do come into contact with the
painted surface accidentally, remove these
immediately with commercially available
petroleum ether. Do so carefully and do not
apply too much pressure to the painted
surface.
Tar stains or marks on the painted surface
can be removed with a commercially
available tar remover. Do so carefully and
do not apply too much pressure to the
painted surface.
Always have paintwork repairs carried out
at a qualified specialist workshop, e.g. an
authorized Mercedes-Benz Center.
! Do not use wash programs with a hot wax
treatment under any circumstances.
i The vehicle should preferably be washed
by hand using a soft sponge, car shampoo
and plenty of water.
i Use only insect remover and car shampoo
from the range of recommended and
approved Mercedes-Benz care products.Cleaning the Roadster soft topXLight soiling: you can clean the soft top
while it is dry or rinse it with clear water.XNormal to heavy soiling: clean the soft
top with a brush and clear water. Clean
stains and other dirt with a brush and soft
top cleaning agents that have been
recommended and approved by Mercedes-
Benz. Always brush from front to back,
following the grain of the fabric.
! Never use any of the following to clean the
soft top:
R gasoline
R thinner
R tar or stain remover
R other organic solvents
! Remove bird droppings immediately as
they are corrosive and, therefore, can make
the soft-top fabric leak. Do not use high-
pressure cleaning equipment to clean the
vehicle. Do not use sharp-edged equipment
to remove ice and snow.
Frequent cleaning reduces the soft top's
resistance to dirt.
To restore this resistance to dirt, clean the
soft top using soft top cleaning agents that
have been recommended and approved by
Mercedes-Benz.
Incorrect cleaning and care, as well as aging,
can cause the soft-top seams to leak. Have
the soft-top seams sealed at a qualified
specialist workshop, e.g. at an authorized
Mercedes-Benz Center.
i Cover the soft top appropriately if you
plan to leave the vehicle outside for a long
period of time.
Cleaning the windows
GWARNING
Switch the windshield wipers off before
cleaning the windshield or wiper blades. Press
the Start/Stop button repeatedly until all
226CareMaintenance and care