2012 MERCEDES-BENZ SLS AMG ROADSTER window
[x] Cancel search: windowPage 40 of 288
followed. These instructions are available
from any authorized Mercedes-Benz
Center.
R Given the considerable deployment speed,
required inflation volume, and the material
of the air bags, there is the possibility of
abrasions or other, potentially more serious
injuries resulting from air bag deployment.
If you sell your vehicle, Mercedes-Benz
strongly recommends that you inform the
subsequent owner that the vehicle is
equipped with SRS. Also, refer them to the
applicable section in the Operator's Manual.
Air bags
Important safety notes
GWARNING
Air bags are designed to reduce the potential
of injury and fatality rates in certain
situations:
R frontal impacts (driver's and front-
passenger front air bags and knee bags)
R side impacts (head bags and side impact air
bags)
However, no system available today can
completely eliminate injuries and fatalities.
When the air bags are deployed, a small
amount of powder temporarily comes out of
the air bags. This powder generally does not
constitute a health hazard and does not
indicate that there is a fire in the vehicle. In
order to prevent potential breathing
difficulties, you should leave the vehicle as
soon as it is safe to do so. If you have any
breathing difficulty but cannot get out of the
vehicle, then get fresh air by opening a side
window or door.
GWARNING
In order to reduce the potential danger of
injuries caused during the deployment of the
front air bags, the driver and front passenger
must always be correctly seated and wear
their seat belts.
For maximum protection in the event of a
collision, you must always be in the normal
seat position with your back against the
backrest. Fasten your seat belt and make sure
that it is correctly positioned on your body.
As the air bag inflates with considerable
speed and force, a proper seating position
and correct positioning of the hands on the
steering wheel will help to keep you at a safe
distance from the air bag. Occupants who are
not wearing their seat belt, are not seated
properly or are too close to the air bag can be
seriously injured or killed by an air bag as it
inflates with great force instantaneously:
R sit with the seat belt fastened correctly and
in a position that is as upright as possible
with your back against the backrest.
R move the driver's seat as far back as
possible, still permitting proper operation
of vehicle controls. The distance from the
center of the driver's chest to the center of
the air bag cover on the steering wheel
must be at least 10 inches (25 cm) or more.
You should be able to accomplish this by
adjusting the seat and steering wheel. If
you have any difficulties, please contact an
authorized Mercedes-Benz Center.
R do not lean your head or chest close to the
steering wheel or dashboard.
R only hold the steering wheel on the outside.
Placing hands and arms inside the rim can
increase the risk and potential severity of
hand/arm injury when the driver front air
bag inflates.
R adjust the front-passenger seat as far back
as possible from the dashboard when the
seat is occupied.
R Occupants, especially children, should
never place their bodies or lean their heads
in the area of the door or the seat where the
head bag or side impact air bag inflates.
This could result in serious injuries or death
should the head bag or side impact air bag
be deployed. Always sit as upright as38Occupant safetySafety
Page 44 of 288
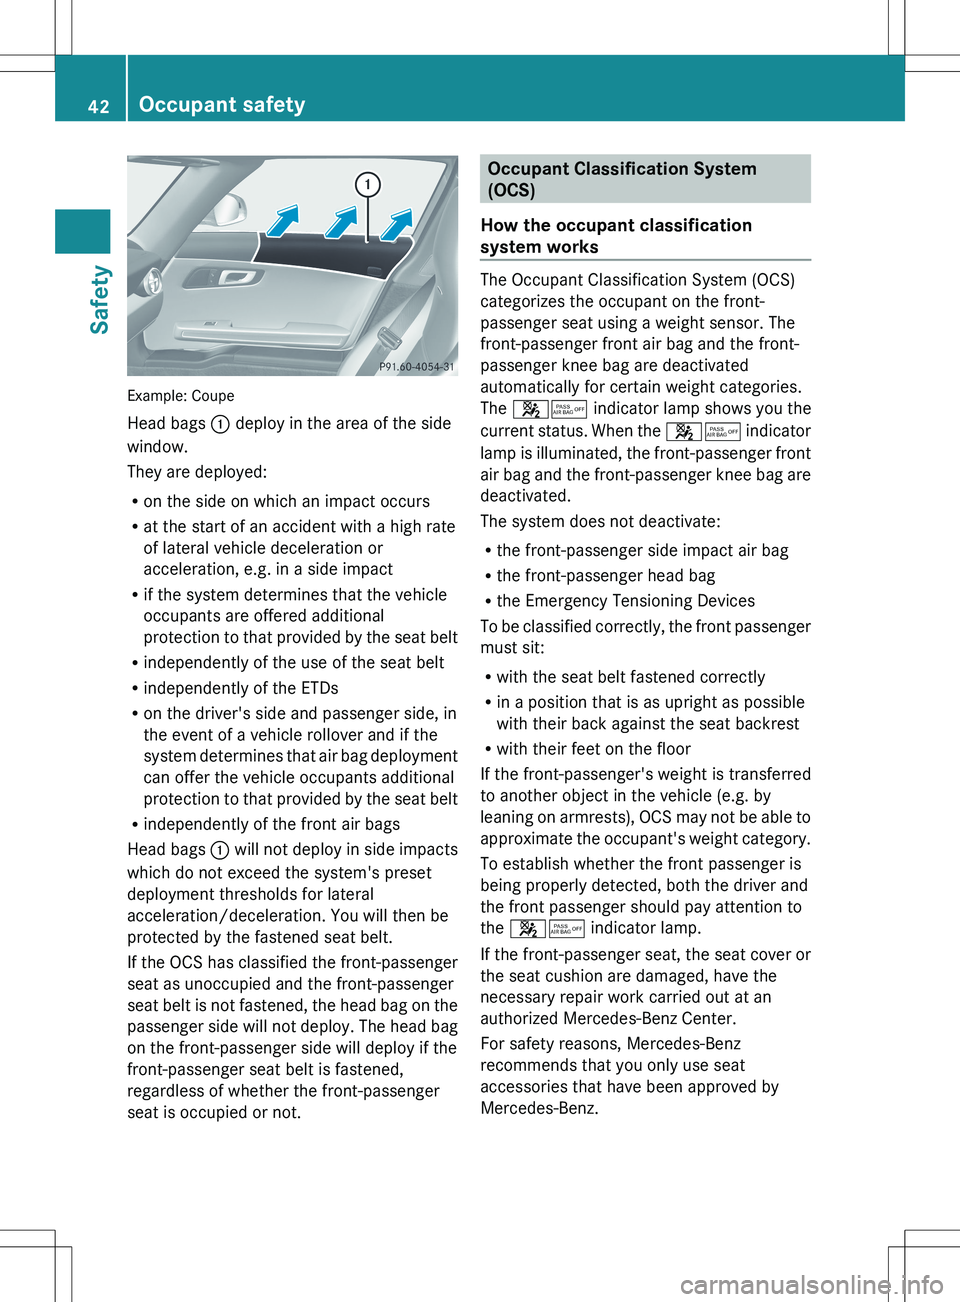
Example: Coupe
Head bags : deploy in the area of the side
window.
They are deployed:
R on the side on which an impact occurs
R at the start of an accident with a high rate
of lateral vehicle deceleration or
acceleration, e.g. in a side impact
R if the system determines that the vehicle
occupants are offered additional
protection to that provided by the seat belt
R independently of the use of the seat belt
R independently of the ETDs
R on the driver's side and passenger side, in
the event of a vehicle rollover and if the
system determines that air bag deployment
can offer the vehicle occupants additional
protection to that provided by the seat belt
R independently of the front air bags
Head bags : will not deploy in side impacts
which do not exceed the system's preset
deployment thresholds for lateral
acceleration/deceleration. You will then be
protected by the fastened seat belt.
If the OCS has classified the front-passenger
seat as unoccupied and the front-passenger
seat belt is not fastened, the head bag on the
passenger side will not deploy. The head bag
on the front-passenger side will deploy if the
front-passenger seat belt is fastened,
regardless of whether the front-passenger
seat is occupied or not.
Occupant Classification System
(OCS)
How the occupant classification
system works
The Occupant Classification System (OCS)
categorizes the occupant on the front-
passenger seat using a weight sensor. The
front-passenger front air bag and the front-
passenger knee bag are deactivated
automatically for certain weight categories.
The 45 indicator lamp shows you the
current status. When the 45 indicator
lamp is illuminated, the front-passenger front
air bag and the front-passenger knee bag are
deactivated.
The system does not deactivate:
R the front-passenger side impact air bag
R the front-passenger head bag
R the Emergency Tensioning Devices
To be classified correctly, the front passenger
must sit:
R with the seat belt fastened correctly
R in a position that is as upright as possible
with their back against the seat backrest
R with their feet on the floor
If the front-passenger's weight is transferred
to another object in the vehicle (e.g. by
leaning on armrests), OCS may not be able to
approximate the occupant's weight category.
To establish whether the front passenger is
being properly detected, both the driver and
the front passenger should pay attention to
the 45 indicator lamp.
If the front-passenger seat, the seat cover or
the seat cushion are damaged, have the
necessary repair work carried out at an
authorized Mercedes-Benz Center.
For safety reasons, Mercedes-Benz
recommends that you only use seat
accessories that have been approved by
Mercedes-Benz.
42Occupant safetySafety
Page 65 of 288
Useful information ..............................64
SmartKey ............................................. 64
Doors .................................................... 69
Trunk .................................................... 73
Side windows ...................................... 75
Soft top (Roadster) .............................7863Opening/closing
Page 72 of 288
Unlocking and opening doors from
inside
Coupe
You can only open a door from the inside if it
is unlocked.
The vehicle locks the doors automatically,
when you drive faster than 9 mph
(15 km/h).
The doors are automatically unlocked after a
journey if you switch off the engine.
! The doors swing upwards and out when
opened. Therefore, make sure that there is
sufficient clearance above the vehicle.
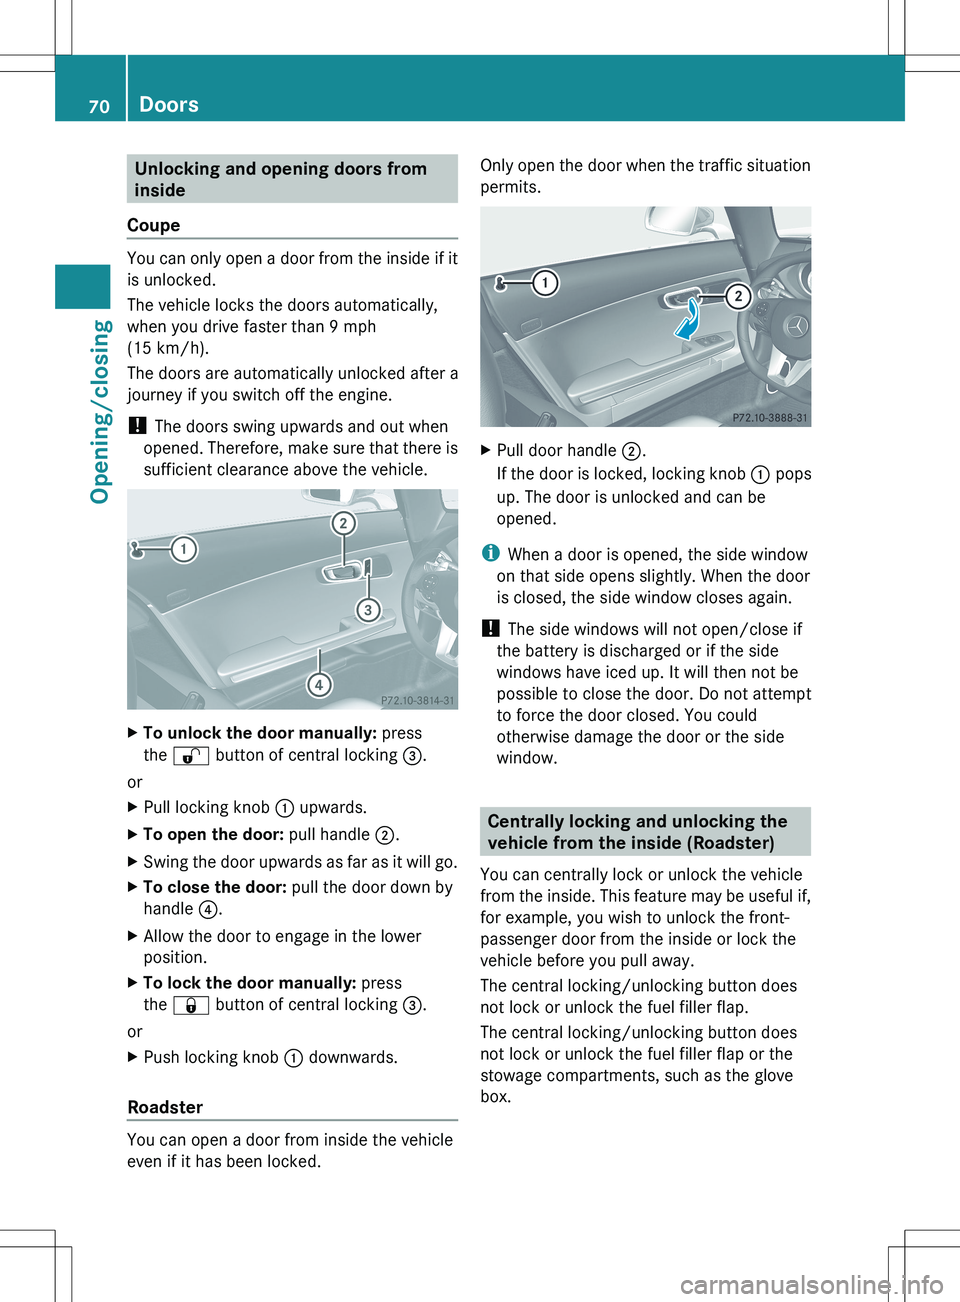
XTo unlock the door manually: press
the % button of central locking =.
or
XPull locking knob : upwards.XTo open the door: pull handle ;.XSwing the door upwards as far as it will go.XTo close the door: pull the door down by
handle ?.XAllow the door to engage in the lower
position.XTo lock the door manually: press
the & button of central locking =.
or
XPush locking knob : downwards.
Roadster
You can open a door from inside the vehicle
even if it has been locked.
Only open the door when the traffic situation
permits.XPull door handle ;.
If the door is locked, locking knob : pops
up. The door is unlocked and can be
opened.
i When a door is opened, the side window
on that side opens slightly. When the door
is closed, the side window closes again.
! The side windows will not open/close if
the battery is discharged or if the side
windows have iced up. It will then not be
possible to close the door. Do not attempt
to force the door closed. You could
otherwise damage the door or the side
window.
Centrally locking and unlocking the
vehicle from the inside (Roadster)
You can centrally lock or unlock the vehicle
from the inside. This feature may be useful if,
for example, you wish to unlock the front-
passenger door from the inside or lock the
vehicle before you pull away.
The central locking/unlocking button does
not lock or unlock the fuel filler flap.
The central locking/unlocking button does
not lock or unlock the fuel filler flap or the
stowage compartments, such as the glove
box.
70DoorsOpening/closing
Page 77 of 288
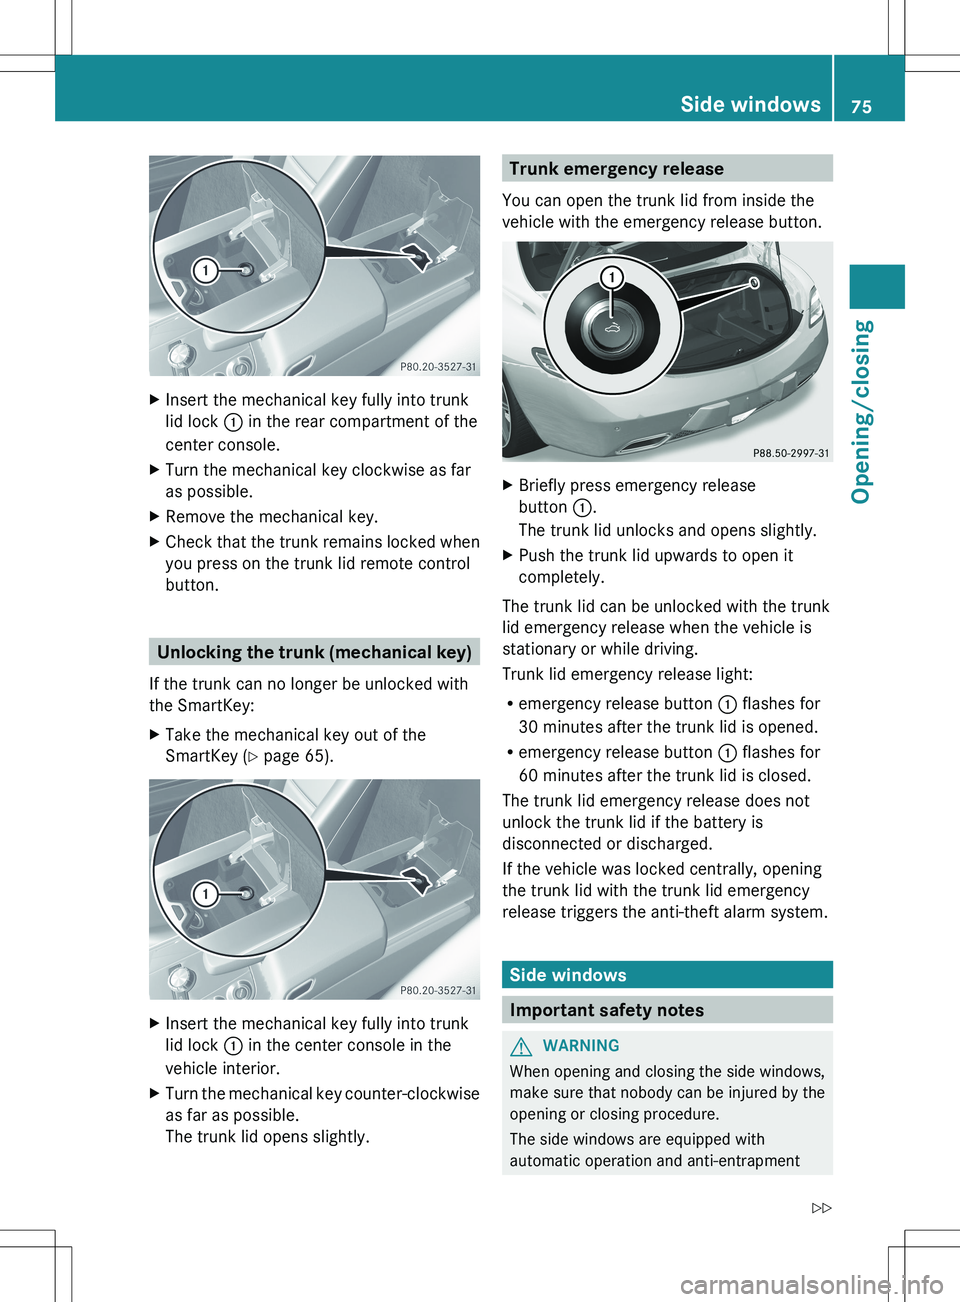
XInsert the mechanical key fully into trunk
lid lock : in the rear compartment of the
center console.XTurn the mechanical key clockwise as far
as possible.XRemove the mechanical key.XCheck that the trunk remains locked when
you press on the trunk lid remote control
button.
Unlocking the trunk (mechanical key)
If the trunk can no longer be unlocked with
the SmartKey:
XTake the mechanical key out of the
SmartKey ( Y page 65).XInsert the mechanical key fully into trunk
lid lock : in the center console in the
vehicle interior.XTurn the mechanical key counter-clockwise
as far as possible.
The trunk lid opens slightly.Trunk emergency release
You can open the trunk lid from inside the
vehicle with the emergency release button.XBriefly press emergency release
button :.
The trunk lid unlocks and opens slightly.XPush the trunk lid upwards to open it
completely.
The trunk lid can be unlocked with the trunk
lid emergency release when the vehicle is
stationary or while driving.
Trunk lid emergency release light:
R emergency release button : flashes for
30 minutes after the trunk lid is opened.
R emergency release button : flashes for
60 minutes after the trunk lid is closed.
The trunk lid emergency release does not
unlock the trunk lid if the battery is
disconnected or discharged.
If the vehicle was locked centrally, opening
the trunk lid with the trunk lid emergency
release triggers the anti-theft alarm system.
Side windows
Important safety notes
GWARNING
When opening and closing the side windows,
make sure that nobody can be injured by the
opening or closing procedure.
The side windows are equipped with
automatic operation and anti-entrapment
Side windows75Opening/closingZ
Page 78 of 288
features. If, in automatic operation mode, a
side window encounters an obstruction that
blocks its path, the anti-entrapment feature
will stop the side window and open it slightly.
The side windows operate differently when
the switch is pulled and held. These details
can be found in the "Closing a blocked side
window" section in this chapter.
The closing of the side windows can be
immediately halted by releasing the switch or,
if the switch was pulled past the resistance
point and released, by pressing or pulling the
respective switch.
If a side window encounters an obstruction
that blocks its path when you are closing the
side windows by pressing and holding the
& button on the SmartKey, the anti-
entrapment feature will not operate.GWARNING
Do not keep any part of your body up against
the window pane when opening a window. The
downward motion of the pane may pull that
part of your body down between the window
pane and the door frame and trap it there. If
there is a risk of entrapment, release the
switch and pull it to close the window.
Observe the important safety notes in the
"Children in the vehicle" section (Y page 51).
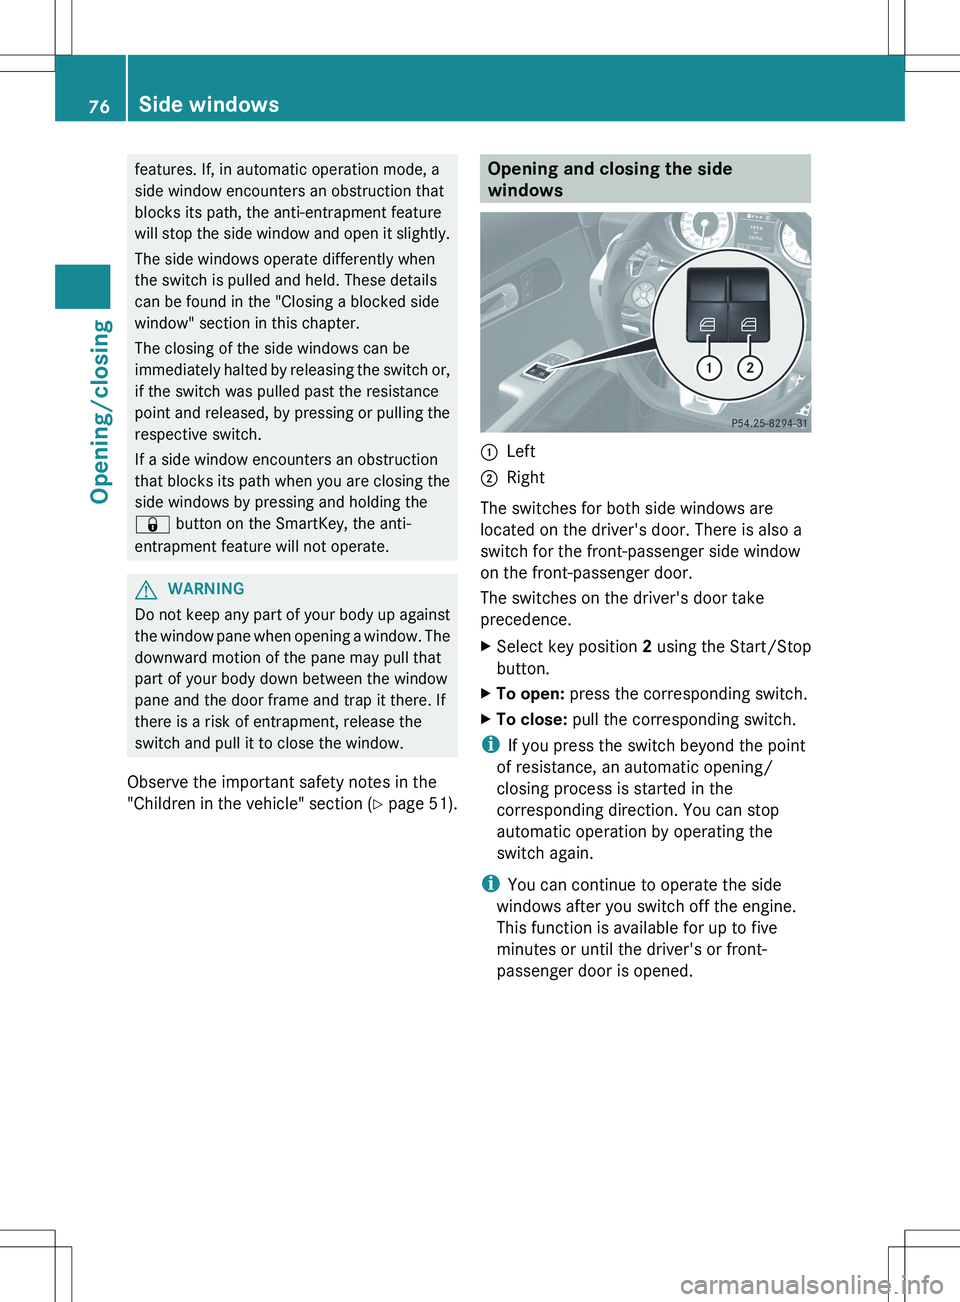
Opening and closing the side
windows:Left;Right
The switches for both side windows are
located on the driver's door. There is also a
switch for the front-passenger side window
on the front-passenger door.
The switches on the driver's door take
precedence.
XSelect key position 2 using the Start/Stop
button.XTo open: press the corresponding switch.XTo close: pull the corresponding switch.
i
If you press the switch beyond the point
of resistance, an automatic opening/
closing process is started in the
corresponding direction. You can stop
automatic operation by operating the
switch again.
i You can continue to operate the side
windows after you switch off the engine.
This function is available for up to five
minutes or until the driver's or front-
passenger door is opened.
76Side windowsOpening/closing
Page 79 of 288
Opening and closing all side windows
(Roadster)
With the SmartKeyGWARNING
Make sure that nobody can become trapped
as you close the side windows.
Proceed as follows if there is a risk of
entrapment:
R release the & button.
R press and hold the % button until the
side windows open again.
If the soft top is closed, you can use the
SmartKey to simultaneously open or close all
of the side windows:
XMake sure that the soft top is closed
( Y page 78).XPoint the tip of the SmartKey at the driver's
door handle.XTo open all side windows: press and hold
the % button on the SmartKey until the
side windows are fully open.XTo interrupt the opening procedure:
release the % button.XTo close all side windows: press and hold
the & button on the SmartKey until the
side windows are fully closed.XTo interrupt the closing procedure:
release the & button.
Convenience opening (Coupe)
GWARNING
When closing the side windows, make sure
there is no danger of anyone being harmed by
the closing procedure.
Proceed as follows in a potentially dangerous
situation:
R Release the & button to interrupt the
closing procedure.
R Press and hold the & button to open. To
continue the closing procedure after
ensuring that nobody can be injured by the
closing procedure, press and hold the
& button.
When you lock the vehicle, you can
simultaneously close both side windows from
outside.
i The SmartKey must be close to the
driver's door handle.XPoint the tip of the SmartKey at the driver's
door handle.XLock the vehicle with the & button.XPress and hold the & button until the
side windows are fully closed.XMake sure that all the side windows are
closed.
Convenience closing (Coupe)
You can ventilate the vehicle before you start
driving. To do so, open the side windows using
the SmartKey.
i The SmartKey must be close to the
driver's door handle.
XPoint the tip of the SmartKey at the driver's
door handle.XUnlock the vehicle by pressing the %
button.XPress and hold the % button until the
side windows are in the desired position.XTo interrupt convenience opening:
release the % button.
Problems with the side windows
Problem: a side window cannot be closed
because objects are preventing it from
closing.
XRemove the objects.XClose the side window.
Problem: a side window cannot be closed
and you cannot see the cause.
Side windows77Opening/closingZ
Page 80 of 288
GWARNING
Closing the side windows with increased force
or without the anti-entrapment feature could
lead to serious or even fatal injury. Make sure
that nobody can become trapped when
closing the side windows.
If a side window is obstructed during closing
and reopens again slightly:
XImmediately after the window blocks, pull
the corresponding switch again until the
side window has closed.
The side window is closed with increased
force.
If a side window is obstructed again during
closing and reopens again slightly:
XImmediately after the window blocks, pull
the corresponding switch again until the
side window has closed.
The side window is closed without the anti-
entrapment feature.GWARNING
Pulling and holding the switch to close the
door window immediately after it had been
blocked two times will cause the door window
to close without the anti-entrapment feature
for as long as you hold the switch.
Soft top (Roadster)
Important safety notes
GWARNING
Only drive with the soft top fully open or
closed.
If the soft top does not open or close fully, the
soft-top hydraulics are depressurized and the
soft top is lowered:
R after about seven minutes if the ignition is
switched on
R immediately if the ignition is switched off
A warning tone sounds shortly beforehand.
The Top lowering message appears in the
multifunction display..
Lock the soft top again before driving on.
Otherwise the unlocked soft top could open
during the journey and cause you to lose
control of your vehicle. You and/or other
persons could be injured as a result.
You can open or close the soft top:
R if the vehicle is stationary or
R if the speed does not exceed 30 mph
(50 km/h)
If there is a strong head wind, it may not be
possible to close the soft top fully. In this
case, reduce speed or stop in order to close
the soft top fully.
For safety reasons, Mercedes-Benz
recommends that you only open or close the
soft top when the vehicle is stationary.
! Never sit on the soft top when it is closed
or store heavy objects on it. You will
otherwise damage the soft top of the
vehicle.
! When opening and closing the soft top,
make sure that:
R there is sufficient clearance above it, as
the soft top swings upwards.
R there are no objects on the soft top or
the soft-top covers to the side.
R the fabric is not dirty, wet or frozen
R the outside temperature is above -10 †.
You could otherwise damage the soft top
as well as other parts of the vehicle.
i Make sure that the soft top is dry and
clean before closing it. Otherwise, water or
dirt could enter the vehicle interior or trunk.
Opening and closing with the soft top
switch
Important safety notes
GWARNING
Make sure nobody can be trapped or injured
by moving parts, such as the soft-top linkage
78Soft top (Roadster)Opening/closing