2012 MERCEDES-BENZ SLS AMG COUPE start stop button
[x] Cancel search: start stop buttonPage 81 of 288
or soft-top compartment cover, when opening
or closing the soft top.
Release the soft-top switch in the event of
danger. The soft-top mechanism stops
immediately.GWARNING
The soft top stops moving during the opening
or closing procedure if you drive faster than
30 mph (50 km/h). This could impair your rear
view. At high speeds the soft top may be
damaged.
Reduce your speed to below 30 mph
(50 km/h) or stop in accordance with traffic
conditions. Press the soft-top switch again in
order to open or close the soft top fully.
Opening and closing
XWhen the vehicle is stationary, depress the
brake pedal.XSelect key position 1 using the Start/Stop
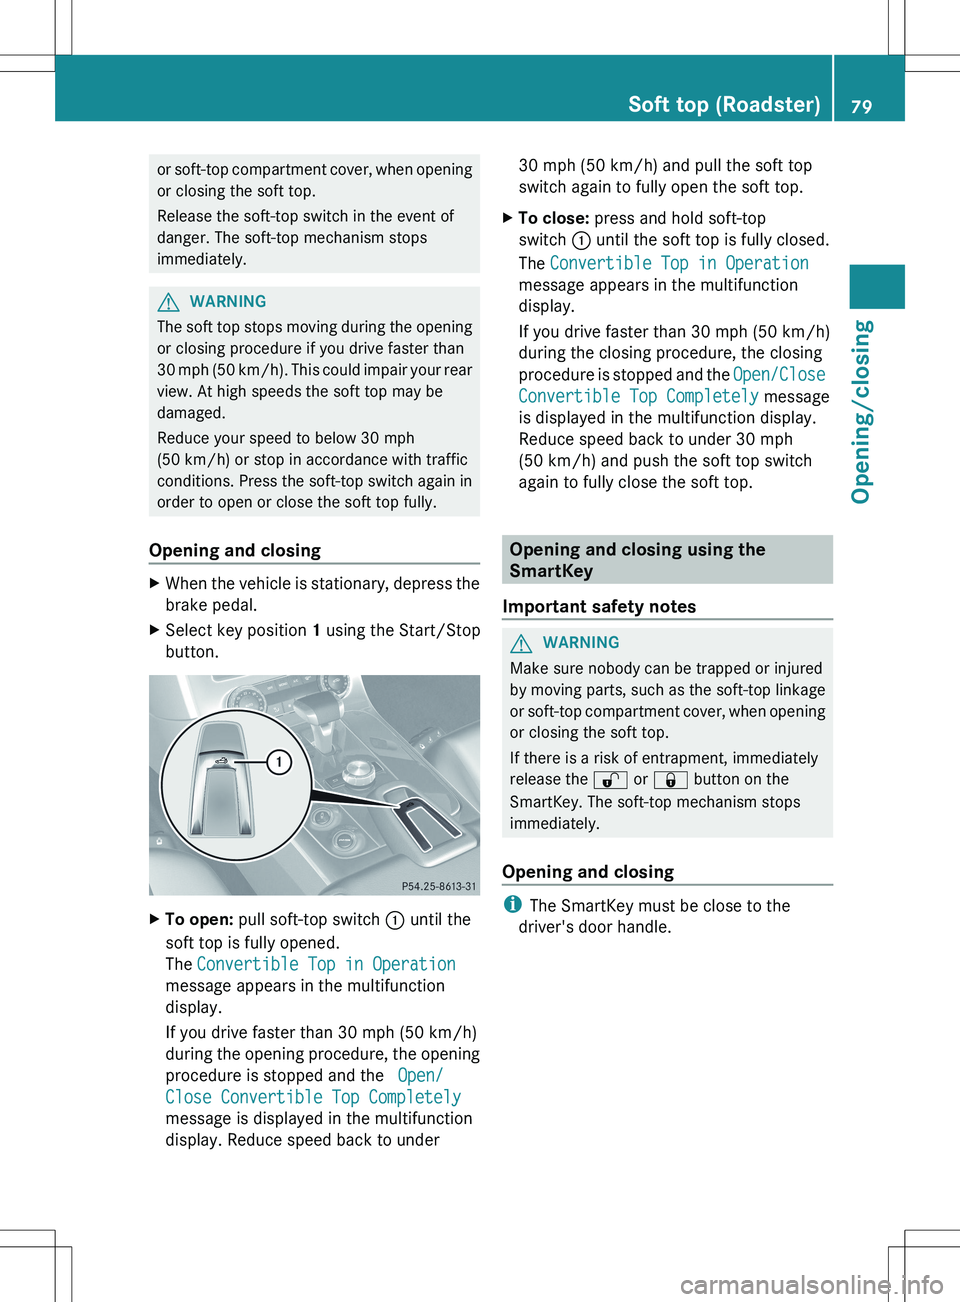
button.XTo open: pull soft-top switch : until the
soft top is fully opened.
The Convertible Top in Operation
message appears in the multifunction
display.
If you drive faster than 30 mph (50 km/h)
during the opening procedure, the opening
procedure is stopped and the Open/
Close Convertible Top Completely
message is displayed in the multifunction
display. Reduce speed back to under30 mph (50 km/h) and pull the soft top
switch again to fully open the soft top.XTo close: press and hold soft-top
switch : until the soft top is fully closed.
The Convertible Top in Operation
message appears in the multifunction
display.
If you drive faster than 30 mph (50 km/h)
during the closing procedure, the closing
procedure is stopped and the Open/Close
Convertible Top Completely message
is displayed in the multifunction display.
Reduce speed back to under 30 mph
(50 km/h) and push the soft top switch
again to fully close the soft top.
Opening and closing using the
SmartKey
Important safety notes
GWARNING
Make sure nobody can be trapped or injured
by moving parts, such as the soft-top linkage
or soft-top compartment cover, when opening
or closing the soft top.
If there is a risk of entrapment, immediately
release the % or & button on the
SmartKey. The soft-top mechanism stops
immediately.
Opening and closing
i The SmartKey must be close to the
driver's door handle.
Soft top (Roadster)79Opening/closingZ
Page 82 of 288
XPoint the tip of the SmartKey at the driver's
door handle.XTo open: press and hold the % button
on the SmartKey until the soft top is fully
opened.
The Convertible Top in Operation
message appears in the multifunction
display.XTo close: press and hold the & button
on the SmartKey until the soft top is fully
closed.
The Convertible Top in Operation
message appears in the multifunction
display. The soft top and the side windows
close.
Re-locking the soft top
GWARNING
Stop the vehicle at a suitable location as soon
as it is possible to do so safely and lock the
soft top before driving on. You could
otherwise endanger yourself and others.
The soft top is not locked if:
R the Convertible Top in Operation
message appears in the multifunction
display.
R you hear a warning tone for up to ten
seconds when pulling away or while driving.
You can lock the soft top again if it is not
locked fully.
XStop the vehicle immediately, paying
attention to road and traffic conditions.XSelect key position 2 using the Start/Stop
button.XPress the soft-top switch.
Installing/removing the wind screen
GWARNING
You could lose control of the vehicle and
injure yourself or others if you operate the
wind screen while driving.
Install or remove the wind screen only when
the vehicle is stationary.GWARNING
If the wind screen is not properly engaged and
the fastening levers are not folded outwards,
it could become detached while driving. There
is a risk of accident and injury.
Make sure that you push in the wind screen
up to the locking point and then fold the
fastening levers outwards.
! Install or remove the wind screen only
when the soft top is open. You could
otherwise damage the wind screen or the
vehicle interior.
! Mercedes-Benz recommends that you
only use wind screens which have been
tested and approved for Mercedes-Benz
vehicles. This helps to prevent damage to
the vehicle.
The wind screen protects against wind when
driving with the soft top open. It is secured
between the roll bars.
The wind screen is located in a bag on the
tank partition wall in the trunk.
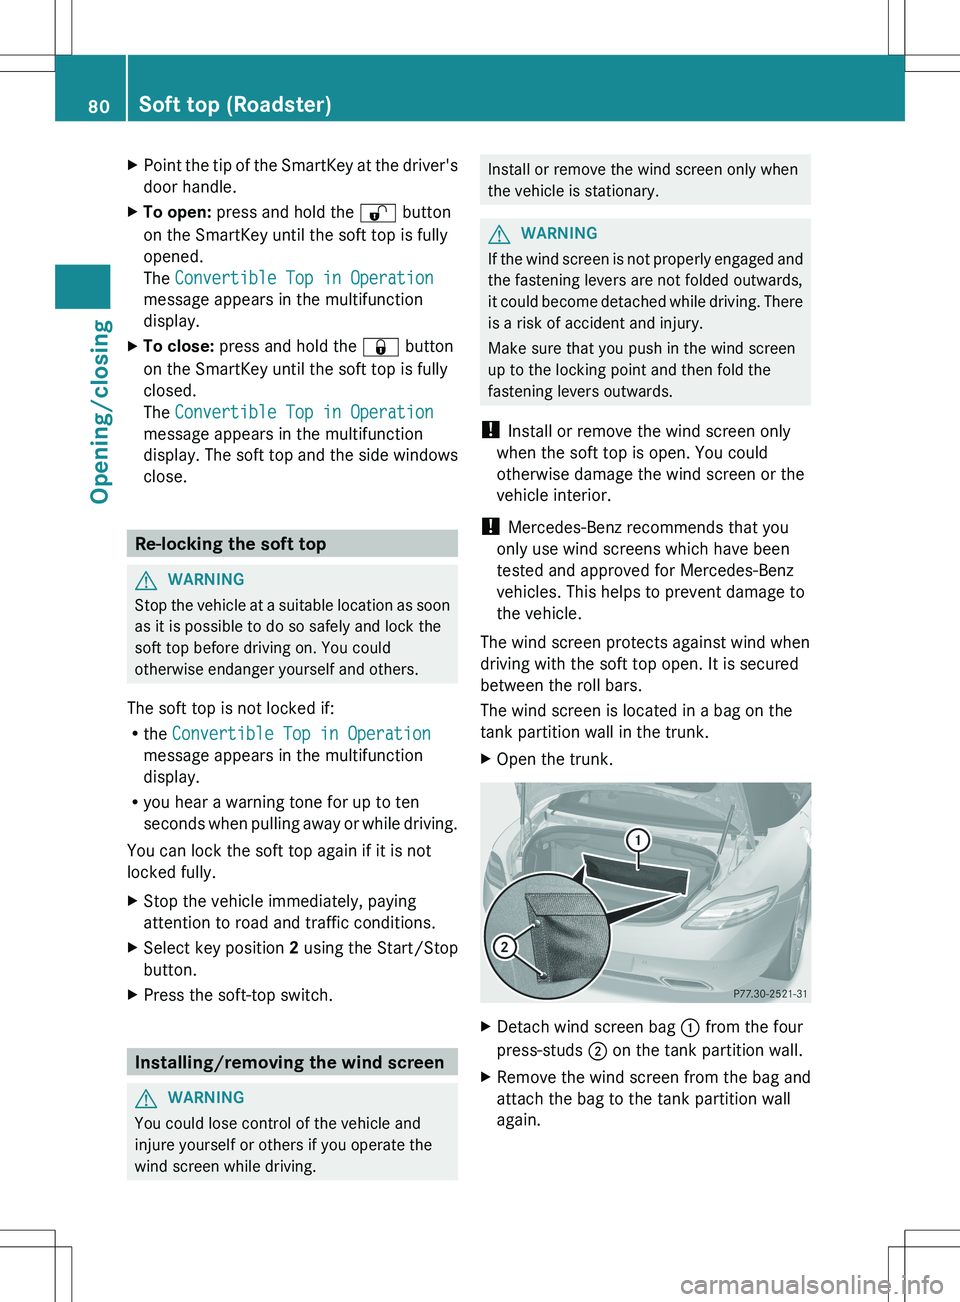
XOpen the trunk.XDetach wind screen bag : from the four
press-studs ; on the tank partition wall.XRemove the wind screen from the bag and
attach the bag to the tank partition wall
again.80Soft top (Roadster)Opening/closing
Page 84 of 288
Problems with the soft topProblemPossible causes/consequences and M SolutionsThe soft top will not
open or close.Key position 1 is not selected.XSelect key position 1 using the Start/Stop button.The brake pedal has not been depressed with the vehicle
stationary.XDepress the brake pedal.The soft-top mechanism or control system is defective.XVisit a qualified specialist workshop.The soft top was opened and closed several times in succession.
The soft-top drive has been deactivated automatically for safety
reasons.
You can open or close the soft top again after approximately ten
minutes.XSwitch the ignition off and then on again.XRepeat the opening or closing procedure.82Soft top (Roadster)Opening/closing
Page 88 of 288
Rclean the seat covers as recommended;
see the "Interior care" section.
R do not transport heavy loads on the
seats. Do not place sharp objects on the
seat cushions, e.g. knives, nails or tools.
The seats should only be occupied by
passengers, if possible.
R when the seat heating is in operation, do
not cover the seats with insulating
materials, e.g. blankets, coats, bags,
seat covers, child seats or booster seats.
! When you move the seats, make sure that
there are no objects in the footwell or
behind the seats. Otherwise, you could
damage the seats and the objects.
Adjusting the seats
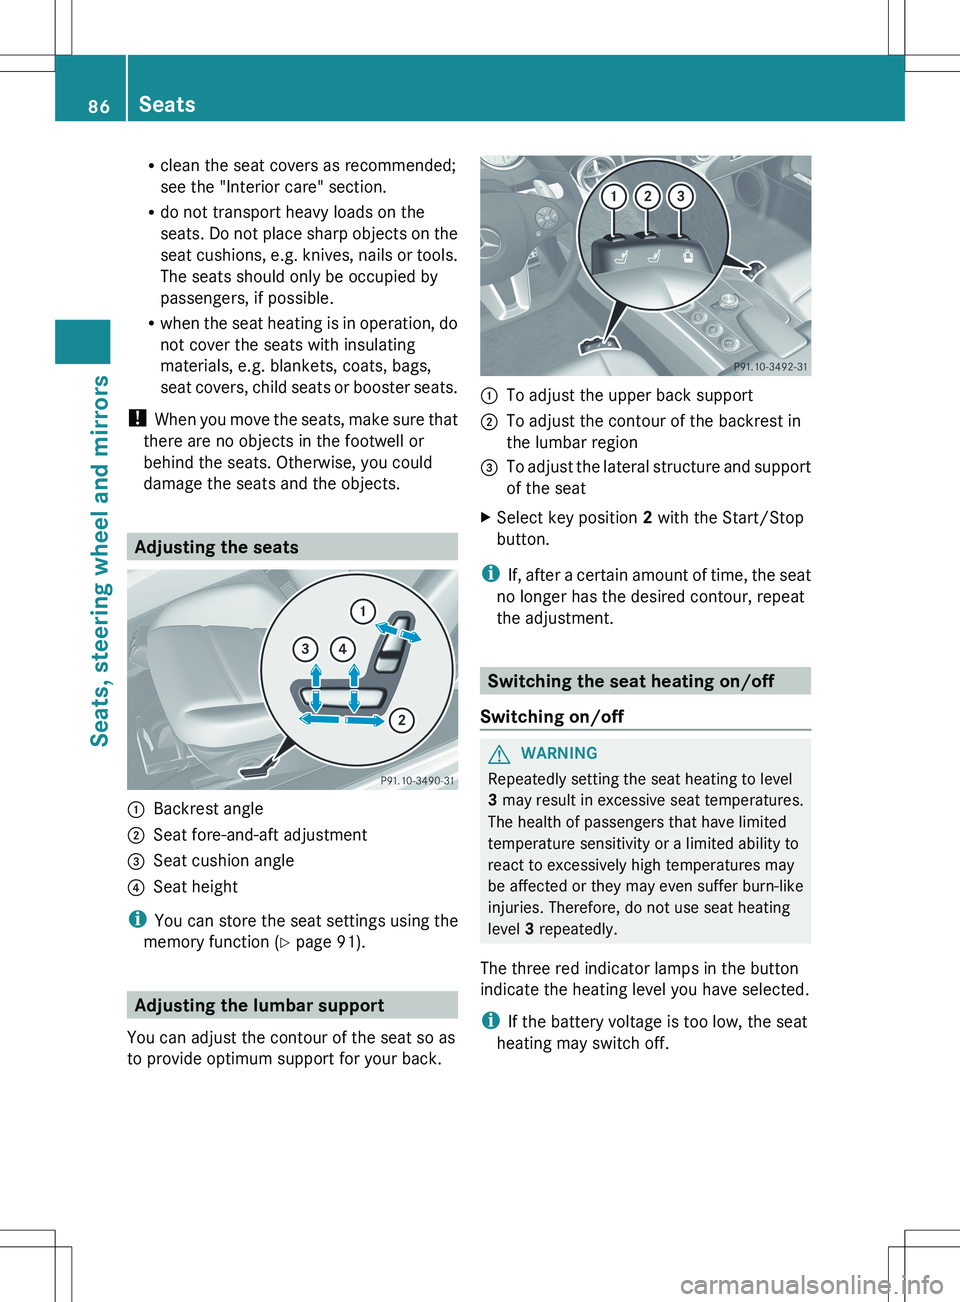
:Backrest angle;Seat fore-and-aft adjustment=Seat cushion angle?Seat height
i You can store the seat settings using the
memory function ( Y page 91).
Adjusting the lumbar support
You can adjust the contour of the seat so as
to provide optimum support for your back.
:To adjust the upper back support;To adjust the contour of the backrest in
the lumbar region=To adjust the lateral structure and support
of the seatXSelect key position 2 with the Start/Stop
button.
i If, after a certain amount of time, the seat
no longer has the desired contour, repeat
the adjustment.
Switching the seat heating on/off
Switching on/off
GWARNING
Repeatedly setting the seat heating to level
3 may result in excessive seat temperatures.
The health of passengers that have limited
temperature sensitivity or a limited ability to
react to excessively high temperatures may
be affected or they may even suffer burn-like
injuries. Therefore, do not use seat heating
level 3 repeatedly.
The three red indicator lamps in the button
indicate the heating level you have selected.
i If the battery voltage is too low, the seat
heating may switch off.
86SeatsSeats, steering wheel and mirrors
Page 89 of 288
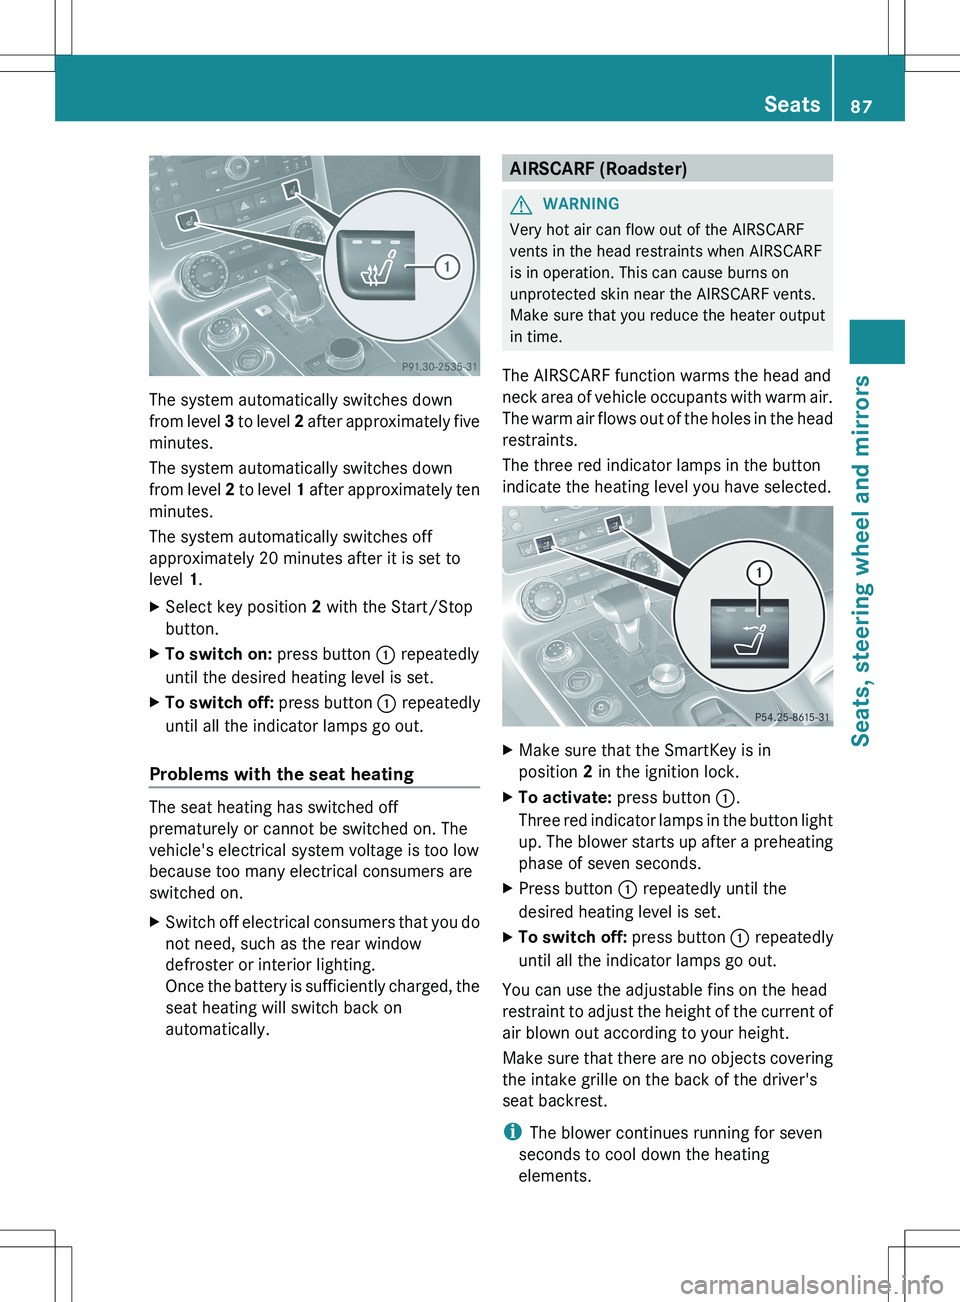
The system automatically switches down
from level 3 to level 2 after approximately five
minutes.
The system automatically switches down
from level 2 to level 1 after approximately ten
minutes.
The system automatically switches off
approximately 20 minutes after it is set to
level 1.
XSelect key position 2 with the Start/Stop
button.XTo switch on: press button : repeatedly
until the desired heating level is set.XTo switch off: press button : repeatedly
until all the indicator lamps go out.
Problems with the seat heating
The seat heating has switched off
prematurely or cannot be switched on. The
vehicle's electrical system voltage is too low
because too many electrical consumers are
switched on.
XSwitch off electrical consumers that you do
not need, such as the rear window
defroster or interior lighting.
Once the battery is sufficiently charged, the
seat heating will switch back on
automatically.AIRSCARF (Roadster)GWARNING
Very hot air can flow out of the AIRSCARF
vents in the head restraints when AIRSCARF
is in operation. This can cause burns on
unprotected skin near the AIRSCARF vents.
Make sure that you reduce the heater output
in time.
The AIRSCARF function warms the head and
neck area of vehicle occupants with warm air.
The warm air flows out of the holes in the head
restraints.
The three red indicator lamps in the button
indicate the heating level you have selected.
XMake sure that the SmartKey is in
position 2 in the ignition lock.XTo activate: press button :.
Three red indicator lamps in the button light
up. The blower starts up after a preheating
phase of seven seconds.XPress button : repeatedly until the
desired heating level is set.XTo switch off: press button : repeatedly
until all the indicator lamps go out.
You can use the adjustable fins on the head
restraint to adjust the height of the current of
air blown out according to your height.
Make sure that there are no objects covering
the intake grille on the back of the driver's
seat backrest.
i The blower continues running for seven
seconds to cool down the heating
elements.
Seats87Seats, steering wheel and mirrorsZ
Page 91 of 288
Position of the steering wheel for
driving
The steering wheel is moved to the last
selected position when:
R the driver's door is closed.
R you press the Start/Stop button once.
When you close the driver's door with the
ignition switched on, the steering wheel is
also automatically moved to the previously
set position.
The last position of the steering wheel is
stored after each manual setting or when you
store the setting with the memory function
( Y page 91).
Crash-responsive EASY-EXIT feature
If the crash-responsive EASY-EXIT feature is
triggered in an accident, the steering column
will move upwards when the driver's door is
opened. This occurs irrespective of the
position of the SmartKey in the ignition lock.
This makes it easier to exit the vehicle and
rescue the occupants.
The crash-responsive EASY-EXIT feature is
only operational if the EASY-EXIT/ENTRY
feature is activated in the on-board computer.
Mirrors
Rear-view mirror
XAnti-glare mode: flick anti-glare
switch : forwards or back.Exterior mirrors
Adjusting the exterior mirrorsGWARNING
Exercise care when using the passenger-side
exterior rear view mirror. The mirror surface
is convex (outwardly curved surface for a
wider field of view). Objects in mirror are
closer than they appear. Check your interior
rear view mirror and glance over your
shoulder before changing lanes.
The convex exterior mirrors provide a larger
field of vision.
The exterior mirrors are automatically heated
if the rear window defroster is switched on
and the outside temperature is low.
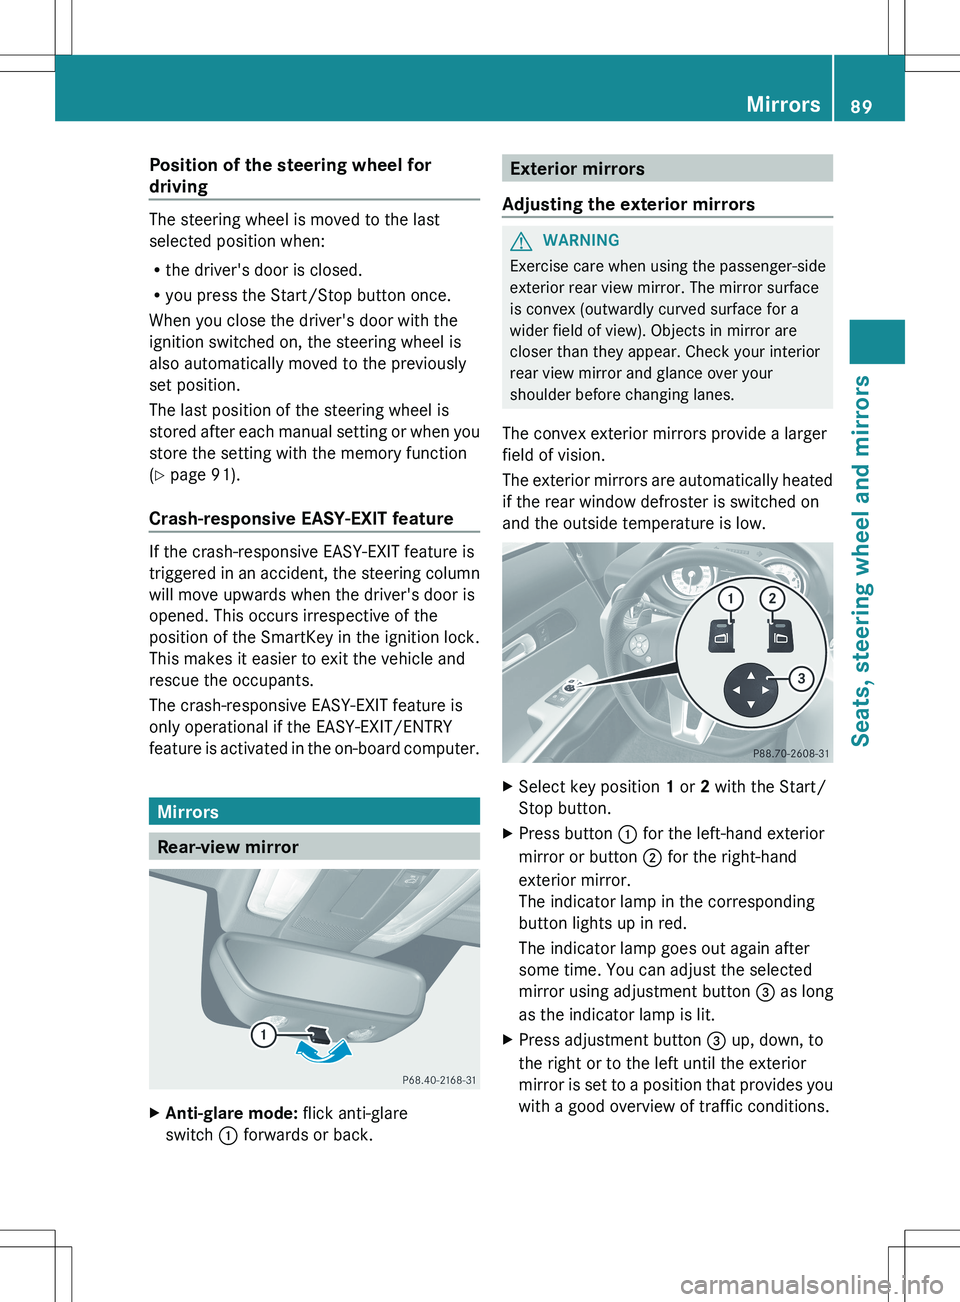
XSelect key position 1 or 2 with the Start/
Stop button.XPress button : for the left-hand exterior
mirror or button ; for the right-hand
exterior mirror.
The indicator lamp in the corresponding
button lights up in red.
The indicator lamp goes out again after
some time. You can adjust the selected
mirror using adjustment button = as long
as the indicator lamp is lit.XPress adjustment button = up, down, to
the right or to the left until the exterior
mirror is set to a position that provides you
with a good overview of traffic conditions.Mirrors89Seats, steering wheel and mirrorsZ
Page 92 of 288
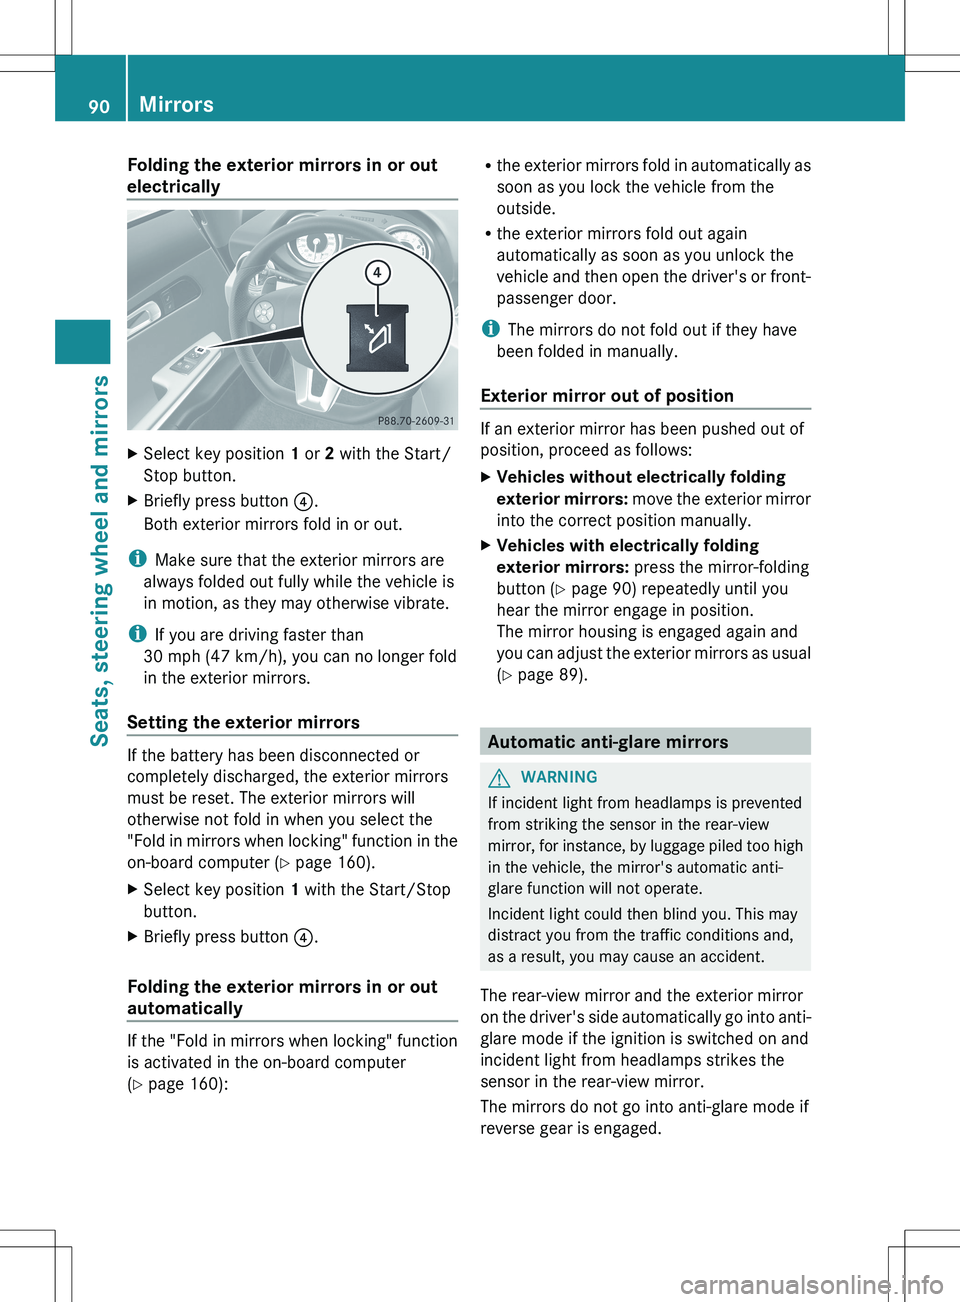
Folding the exterior mirrors in or out
electricallyXSelect key position 1 or 2 with the Start/
Stop button.XBriefly press button ?.
Both exterior mirrors fold in or out.
i Make sure that the exterior mirrors are
always folded out fully while the vehicle is
in motion, as they may otherwise vibrate.
i If you are driving faster than
30 mph (47 km/h), you can no longer fold
in the exterior mirrors.
Setting the exterior mirrors
If the battery has been disconnected or
completely discharged, the exterior mirrors
must be reset. The exterior mirrors will
otherwise not fold in when you select the
"Fold in mirrors when locking" function in the
on-board computer ( Y page 160).
XSelect key position 1 with the Start/Stop
button.XBriefly press button ?.
Folding the exterior mirrors in or out
automatically
If the "Fold in mirrors when locking" function
is activated in the on-board computer
( Y page 160):
R
the exterior mirrors fold in automatically as
soon as you lock the vehicle from the
outside.
R the exterior mirrors fold out again
automatically as soon as you unlock the
vehicle and then open the driver's or front-
passenger door.
i The mirrors do not fold out if they have
been folded in manually.
Exterior mirror out of position
If an exterior mirror has been pushed out of
position, proceed as follows:
XVehicles without electrically folding
exterior mirrors: move the exterior mirror
into the correct position manually.XVehicles with electrically folding
exterior mirrors: press the mirror-folding
button ( Y page 90) repeatedly until you
hear the mirror engage in position.
The mirror housing is engaged again and
you can adjust the exterior mirrors as usual
( Y page 89).
Automatic anti-glare mirrors
GWARNING
If incident light from headlamps is prevented
from striking the sensor in the rear-view
mirror, for instance, by luggage piled too high
in the vehicle, the mirror's automatic anti-
glare function will not operate.
Incident light could then blind you. This may
distract you from the traffic conditions and,
as a result, you may cause an accident.
The rear-view mirror and the exterior mirror
on the driver's side automatically go into anti-
glare mode if the ignition is switched on and
incident light from headlamps strikes the
sensor in the rear-view mirror.
The mirrors do not go into anti-glare mode if
reverse gear is engaged.
90MirrorsSeats, steering wheel and mirrors
Page 93 of 288
Parking position for the exterior
mirror on the front-passenger side
Setting and storing the parking position
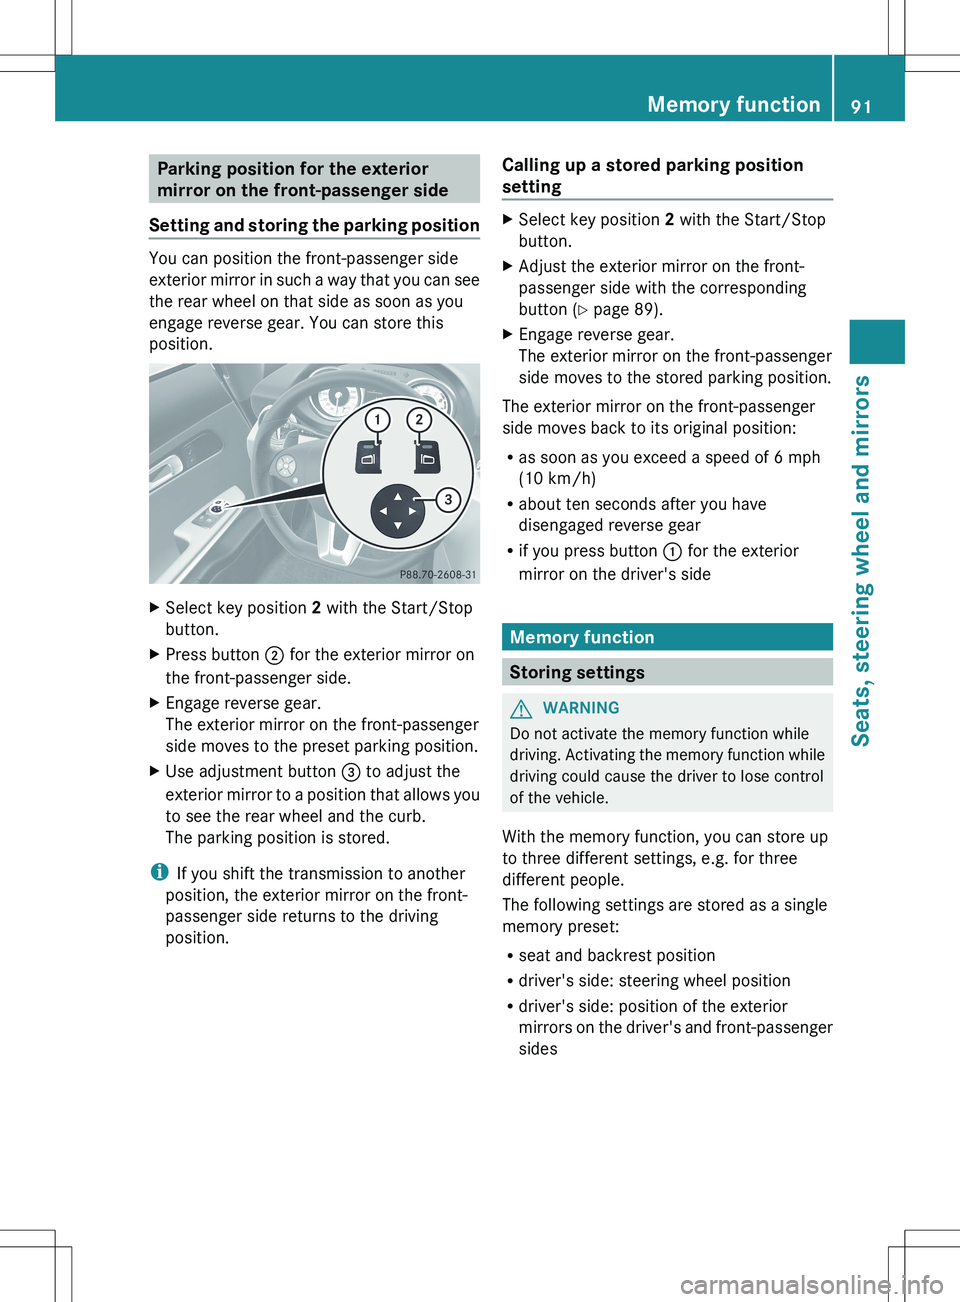
You can position the front-passenger side
exterior mirror in such a way that you can see
the rear wheel on that side as soon as you
engage reverse gear. You can store this
position.
XSelect key position 2 with the Start/Stop
button.XPress button ; for the exterior mirror on
the front-passenger side.XEngage reverse gear.
The exterior mirror on the front-passenger
side moves to the preset parking position.XUse adjustment button = to adjust the
exterior mirror to a position that allows you
to see the rear wheel and the curb.
The parking position is stored.
i If you shift the transmission to another
position, the exterior mirror on the front-
passenger side returns to the driving
position.
Calling up a stored parking position
settingXSelect key position 2 with the Start/Stop
button.XAdjust the exterior mirror on the front-
passenger side with the corresponding
button ( Y page 89).XEngage reverse gear.
The exterior mirror on the front-passenger
side moves to the stored parking position.
The exterior mirror on the front-passenger
side moves back to its original position:
R as soon as you exceed a speed of 6 mph
(10 km/h)
R about ten seconds after you have
disengaged reverse gear
R if you press button : for the exterior
mirror on the driver's side
Memory function
Storing settings
GWARNING
Do not activate the memory function while
driving. Activating the memory function while
driving could cause the driver to lose control
of the vehicle.
With the memory function, you can store up
to three different settings, e.g. for three
different people.
The following settings are stored as a single
memory preset:
R seat and backrest position
R driver's side: steering wheel position
R driver's side: position of the exterior
mirrors on the driver's and front-passenger
sides
Memory function91Seats, steering wheel and mirrorsZ